01 | <?xml version="1.0" encoding="UTF-8"?> |
02 | <beans xmlns="http://www.springframework.org/schema/beans" |
03 | xmlns:xsi="http://www.w3.org/2001/XMLSchema-instance" |
04 | xmlns:p="http://www.springframework.org/schema/p" |
06 | http://www.springframework.org/schema/beans |
07 | http://www.springframework.org/schema/beans/spring-beans-2.5.xsd"> |
09 | <bean id="propertyConfigurer" class="org.springframework.beans.factory.config.PropertyPlaceholderConfigurer"> |
10 | <property name="locations"> |
16 | <value>classpath:resource/config/jdbc.properties</value> |
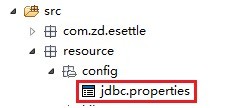
此时的数据库配置文件项目路径是这样的
用法2:
读取数据库的配置文件还可以使用下面的方式
01 | <strong><?xml version="1.0" encoding="UTF-8"?> |
02 | <beans xmlns="http://www.springframework.org/schema/beans" |
03 | xmlns:xsi="http://www.w3.org/2001/XMLSchema-instance" |
05 | http://www.springframework.org/schema/beans |
06 | http://www.springframework.org/schema/beans/spring-beans-2.0.xsd"> |
08 | <bean id="propertyConfigurer" class="org.springframework.beans.factory.config.PropertyPlaceholderConfigurer"> |
09 | <property name="locations"> |
11 | <value>/WEB-INF/config_test/jdbc.properties</value> |
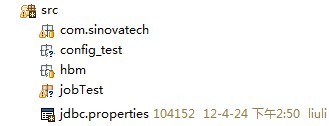
此时jdbc.properties文件的位置如下图所示

.properties配置文件还可以有多个,这里在<list></list>标签中指定了2个数据的配置文件
01 | <?xml version="1.0" encoding="UTF-8"?> |
02 | <beans xmlns="http://www.springframework.org/schema/beans" |
03 | xmlns:xsi="http://www.w3.org/2001/XMLSchema-instance" |
05 | http://www.springframework.org/schema/beans |
06 | http://www.springframework.org/schema/beans/spring-beans-2.0.xsd"> |
07 | <bean id="propertyConfigurer" class="org.springframework.beans.factory.config.PropertyPlaceholderConfigurer"> |
08 | <property name="locations"> |
10 | <value>classpath:jdbc.properties</value> |
11 | <value>/WEB-INF/config_test/jdbc.properties</value> |
classpath:jdbc.properties对应的文件位置是:
文件内容是:配置的是sqlserver的连接信息
2 | sqlserver.password=sqlserver |
3 | sqlserver.url=jdbc\:jtds\:sqlserver\://localhost\:1433/J2EE |
4 | sqlserver.driver=net.sourceforge.jtds.jdbc.Driver |
/WEB-INF/config_test/jdbc.properties对应的文件位置是

文件内容是:配置的是oracle的连接信息
1 | jdbc.driverClassName=oracle.jdbc.driver.OracleDriver |
2 | jdbc.url=jdbc:oracle:thin:@127.0.0.1 :1521:orcl |
这样数据库的配置信息被读取之后,在创建datasource的时候就可以使用了
下面连接oracle 使用apache的dbcp 数据源
01 | <bean id="dataSource" class="org.apache.commons.dbcp.BasicDataSource" destroy-method="close"> |
02 | <property name="driverClassName"> |
03 | <value>${jdbc.driverClassName}</value> |
06 | <value>${jdbc.url}</value> |
08 | <property name="username"> |
09 | <value>${jdbc.username}</value> |
11 | <property name="password"> |
12 | <value>${jdbc.password}</value> |
14 | <property name="maxActive"> |
17 | <property name="maxIdle"> |
20 | <property name="maxWait"> |
23 | <property name="defaultAutoCommit"> |
下面连接sqlserver数据库使用的是c3p0数据源
1 | <bean id="dataSource_oracle" class="com.mchange.v2.c3p0.ComboPooledDataSource" destroy-method="close" > |
2 | <property name="driverClass" value="${jdbc.driverClassName}" /> |
3 | <property name="jdbcUrl" value="${jdbc.url}" /> |
4 | <property name="user" value="${jdbc.username}" /> |
5 | <property name="password" value="${jdbc.password}" /> |
使用dbcp数据源令人郁闷的事,使用dbcp和spring提供的JdbcTemplate操作数据库是查询是可以的
但是执行update、delete、insert into 操作时,数据库中的数据没有变化
从网上查询了很多的资料,都无果。最后偶然看到网上有人说,dbcp数据源的事务不会自动提交,
当改成c3p0数据源后好了
随后认为这下终于可以松口气了,谁知道天不遂人愿。当更换一张表进行测试,数据库中的数据还是没有变化,难道c3p0数据源也不好使,
当再次经过代码的折磨之后,
最终发现改动测试java文件,不在一个项目中,把其他的项目关闭就好了
当文档写到这里时,突然发现oracle使用的dbcp数据源有这一项配置
1 | <property name="defaultAutoCommit"> |
原来dbcp数据源事务的自动提交功能被关闭了
马上把事务自动提交改成true 进行测试,一切ok,(^ _ ^)


 873
873


 被折叠的 条评论
为什么被折叠?
被折叠的 条评论
为什么被折叠?
 到【灌水乐园】发言


