


PhoneGap 是一个允许开发者使用熟悉的网页开发技术,例如HTML,CSS 和 JavaScript 去开发跨平台应用的手机开发框架。
也就是说你可以使用 PhoneGap 架构开发一款应用,不需要重写额外一行代码就可以将它部署到多个移动应用平台。
在这个教程中,你将学习使用 PhoneGap 去创建一款简单的 to-do 应用。在这个过程中你会学习到很多 PhoneGap 的知识,例如安装 PhoneGap,编写 Javascript 代码,使用本地存储等等~
这个教程假设你已经有基本的 HTML ,CSS 和 Javascript 基础。如果你是对这方面是一无所知的话,你同样可以跟随教程一起学习,但是你会错过很多相关的背景知识,所以还是建议你去阅读一下这方面的书籍先。
开始
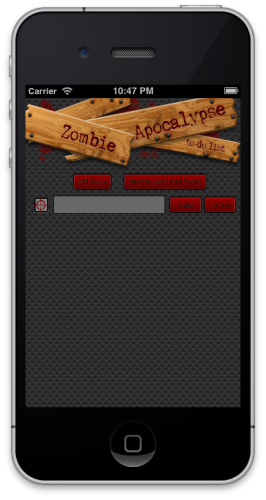
和其他任何新建的项目一样,去构想一下你要创建的app的外观总是不错的。
下面是你将要构建的app的外观:
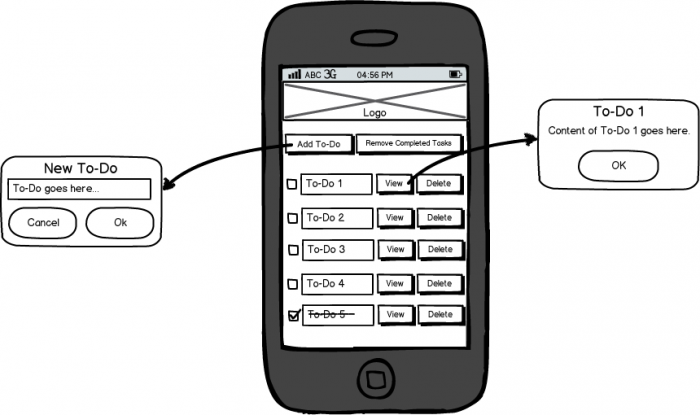
简单地,这只是让你了解到你接下来所有做的事而已。屏幕的上方是一个app Logo,Logo 下面有两个按钮;一个是增加新任务,一个是移除已完成的项目。当用户新增一条待做项到待做列表的时候,表格就会创建一个包含四个元素的行。
首先,你有一个 checkbox 表示待做项的状态,接下来是一个填写待做内容的输入框,最后还有两个按钮,一个是以弹出框的形式展示待做内容,另一个是删除待做项。
该 app 使用本地存储 API 保存待做项。
还有一点,谢谢这位大哥 Vicki Wenderlich ,是他帮我设计的图片,所以app就长这样了。

是时候看一下app有啥功能了:
- 增加待做项:当按下 Add To-Do 按钮的时候,用户可以立刻输入待做的内容到待做列表项中。
- 标记待做项为已完成状态:用户可以点击待做项左边的checkbox标记待做项已完成。
- 移除已完成的待做项:点击 Remove Completed Tasks 按钮移除所有已完成的任务。
- 查看待做项:当点击View按钮的时候可以查看完整的待做项内容。
- 删除待做项:点击Delete按钮会删除相应的待做项。
安装 PhoneGap
sudo npm install -g cordovacordova create Zombie com.aaron.zombie ZombieApocalypseToDoList
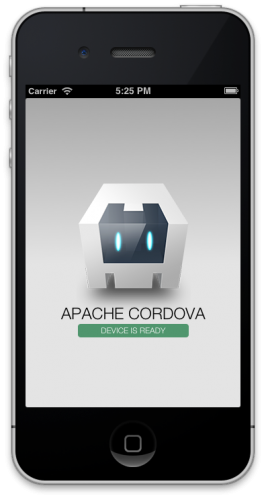
cordova platform add ios

构建你的应用程序
<!DOCTYPE html>
<html>
    <head>
        <title>Zombie Apocalypse To-Do List</title>
        <link rel="stylesheet" type="text/css" href="css/index.css"/>
        <script type="text/javascript" language="JavaScript">

        </script>
    </head>
    <body>

    </body>
</html>
在 index.html 界面的body标签中增加以下代码:
<input type="button" value="Add To-Do"/>
<input type="button" value="Remove Completed Tasks"/>
<br/><br/>
<table id="dataTable" width="100%" border="1">

</table>
用Javascript编写:总预览
createNewToDo()addTableRow(todoDictionary, appIsLoading)checkBoxClicked()viewSelectedRow(todoTextField)deleteSelectedRow(deleteButton)removeCompletedTasks()saveToDoList()loadToDoList()deleteAllRows()Javascript:实现
Note:下面的代码段,除非特别指明,否则它们都一律放在index.html的script标签中。
增加以下代码:
// create a new to-do
function createNewToDo()
{
    var todoDictionary = {};

    // prompt the user to enter to-do
    var todo = prompt("To-Do","");
    if (todo != null)
    {
        if (todo == "")
        {
            alert("To-Do can't be empty!");
        }
        else
        {
            // append the new to-do with the table
            todoDictionary = { check : 0 , text : todo};
            addTableRow(todoDictionary, false);
        }
    }

}
createNewToDo() 非常的简单易懂,它只是简单的弹出一个输入框让用户输入待做项。如果待做项内容是空的话就提醒用户待做内容不能为空,否则就调用 addTableRow() 函数。
增加以下代码:
// add a row to the table
var rowID = 0;
function addTableRow(todoDictionary, appIsLoading)
{
    rowID +=1;
    var table = document.getElementById("dataTable");
    var rowCount = table.rows.length;
    var row = table.insertRow(rowCount);

    // create the checkbox
    var cell1 = row.insertCell(0);
    var element1 = document.createElement("input");
    element1.type = "checkbox";
    element1.name = "chkbox[]";
    element1.checked = todoDictionary["check"];
    element1.setAttribute("onclick", "checkboxClicked()");
    cell1.appendChild(element1);

    // create the textbox
    var cell2 = row.insertCell(1);
    var element2 = document.createElement("input");
    element2.type = "text";
    element2.name = "txtbox[]";
    element2.size = 16;
    element2.id = "text" + rowID;
    element2.value = todoDictionary["text"];
    element2.setAttribute("onchange", "saveToDoList()");
    cell2.appendChild(element2);

    // create the view button
    var cell3 = row.insertCell(2);
    var element3 = document.createElement("input");
    element3.type = "button";
    element3.id = rowID;
    element3.value = "View";
    element3.setAttribute("onclick", "viewSelectedRow(document.getElementById('text' + this.id))");
    cell3.appendChild(element3);

    // create the delete button
    var cell4 = row.insertCell(3);
    var element4 = document.createElement("input");
    element4.type = "button";
    element4.value = "Delete";
    element4.setAttribute("onclick", "deleteSelectedRow(this)");
    cell4.appendChild(element4);

    // update the UI and save the to-do list
    checkboxClicked();
    saveToDoList();

    if (!appIsLoading) alert("Task Added Successfully.");
}
增加如下代码:
标记待做项的完成情况。 |
增加如下代码:
// view the content of the selected row
function viewSelectedRow(todoTextField)
{
    alert(todoTextField.value);
}
增加如下代码:
// delete the selected row
function deleteSelectedRow(deleteButton)
{
    var p = deleteButton.parentNode.parentNode;
    p.parentNode.removeChild(p);
    saveToDoList();
}
增加如下代码:
// remove completed tasks
function removeCompletedTasks()
{
    var table = document.getElementById("dataTable");
    var rowCount = table.rows.length;

    // loop through all rows of the table
    for(var i = 0; i < rowCount; i++)
    {
        // if the checkbox is checked, delete the row
        var row = table.rows[i];
        var chkbox = row.cells[0].childNodes[0];
        if(null != chkbox && true == chkbox.checked)
        {
            table.deleteRow(i);
            rowCount--;
            i--;
        }
    }

    // save the to-do list
    saveToDoList();

    alert("Completed Tasks Were Removed Successfully.");
}
增加如下代码:
// save the to-do list
function saveToDoList()
{
    var todoArray = {};
    var checkBoxState = 0;
    var textValue = "";

    var table = document.getElementById("dataTable");
    var rowCount = table.rows.length;

    if (rowCount != 0)
    {
        // loop through all rows of the table
        for(var i=0; i<rowCount; i++)
        {
            var row = table.rows[i];

            // determine the state of the checkbox
            var chkbox = row.cells[0].childNodes[0];
            if(null != chkbox && true == chkbox.checked)
            {
                checkBoxState = 1;
            }
            else
            {
                checkBoxState= 0;
            }

            // retrieve the content of the to-do
            var textbox = row.cells[1].childNodes[0];
            textValue = textbox.value;

            // populate the array
            todoArray["row" + i] =
            {
                check : checkBoxState,
                text : textValue
            };
        }
    }
    else
    {
        todoArray = null;
    }

    // use the local storage API to persist the data as JSON
    window.localStorage.setItem("todoList", JSON.stringify(todoArray));
}
既然已经将数据保存到本地了,你就得在app再次启动的时候将它加载回来,是吧?
那么,增加如下代码:
// load the to-do list
function loadToDoList()
{
    // use the local storage API load the JSON formatted to-do list, and decode it
    var theList = JSON.parse(window.localStorage.getItem("todoList"));

    if (null == theList || theList == "null")
    {
        deleteAllRows();
    }
    else
    {
        var count = 0;
        for (var obj in theList)
        {
            count++;
        }

        // remove any existing rows from the table
        deleteAllRows();

        // loop through the to-dos
        for(var i = 0; i < count; i++)
        {
            // adding a row to the table for each one
            addTableRow(theList["row" + i], true);
        }
    }
}
增加如下代码:
删除所有行。 |
将所有函数归到一起
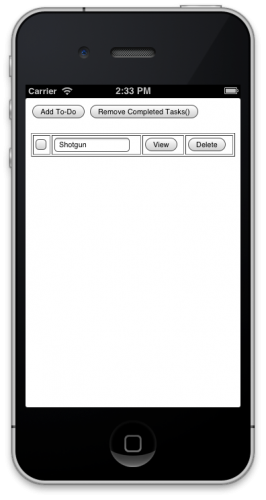
写了那么多,终于写完所有接口的实现了,现在来看一下它跑起来是什么样子。
调用上面的方法很简单,只需要为按钮增加一个onClick 事件就行了。
在 index.html 的 body 标签中增加如下代码:
<body οnlοad="loadToDoList()">
    <input type="button" value="Add To-Do" οnclick="createNewToDo()"/>
    <input type="button" value="Remove Completed Tasks()" οnclick="removeCompletedTasks()"/>
    <br/><br/>
    <table id="dataTable" width="100%" border="1">

    </table>
</body>
上面的代码中,当app第一次加载的时候就会被调用。 createNewToDo()函数和 removeCompletedTasks() 函数在点击相应的按钮的时候就会被调用。
编译并运行一下,就可以看到如下效果了:
javascript 的一个弊端之一就是它一个解释型语言,不想 Object-C等其他编译类型的语言,在代码不小心写错的时候不会即时的报错,只有在运行时执行到某一句错误的代码时才Crash掉,所以在调试的时候也是挺麻烦的。
tips:当运行时出错的时候,你可以用你熟悉的浏览器所提供的开发者工具进行调试。
一切看起来都还不错,只是界面有点单调。好吧,我们再为它加一些其他的内容。
美化你的APP
<img src="img/header.png" width="100%" />既然你是用HTML技术实现你的app,就避免不了使用CSS去设计app的样式和布局。
每一个你想要展示的样式都需要一个 class 元素,下面你将开始用 CSS 布局你app中的button样式。
<button type="button" class="addToDo" οnclick="createNewToDo()"><img src="img/button_addtodo.png" /></button>
<button type="button" class="removeTasks" οnclick="removeCompletedTasks()"><img src="img/button_removetasks.png" /></button>
你现在已经为button添加了一个class属性,接下来你就可以使用CSS布局button的样式了。
同样,你需要为app中的checkboxes,textboxes和其他button添加 class 属性,以便使用CSS样式。
更新 index.html 的代码,增加如下代码:
...
element1.setAttribute("onclick","checkboxClicked()");
element1.className = "checkbox"; // ADD ME - Add the class name 'checkbox' to element1
cell1.appendChild(element1);
...
element2.setAttribute("onchange", "saveToDoList()");
element2.className = "textbox"; // ADD ME - Add the class name 'textbox' to element2
cell2.appendChild(element2);
...
element3.setAttribute("onclick", "viewSelectedRow(document.getElementById('text' + this.id))");
element3.className = "viewButton"; // ADD ME - Add the class name 'viewButton' to element3
cell3.appendChild(element3);
...
element4.setAttribute("onclick", "deleteSelectedRow(this)");
element4.className = "deleteButton"; // ADD ME - Add the class name 'deleteButton' to element4
cell4.appendChild(element4);
现在是时候编写HTML中所引用到的CSS样式代码了。
打开 index.css (在Zombie/www/css/目录下),找到如下代码:
background-color:#E4E4E4;
background-image:linear-gradient(top, #A7A7A7 0%, #E4E4E4 51%);
background-image:-webkit-linear-gradient(top, #A7A7A7 0%, #E4E4E4 51%);
background-image:-ms-linear-gradient(top, #A7A7A7 0%, #E4E4E4 51%);
background-image:-webkit-gradient(
    linear,
    left top,
    left bottom,
    color-stop(0, #A7A7A7),
    color-stop(0.51, #E4E4E4)
);
background-attachment:fixed;
这段代码提供了一个梯度效果的背景,但在该app中我们不会使用它,等下我们会使用更合适的背景替换该背景效果。
用下面的代码替换上面的代码段:
background-image: url('../img/bg_pattern.png');恩,背景现在已经换成bg_pattern.png这张图片。
滚动到 index.css 最后,增加如下代码:
.addToDo {
background-color: Transparent;
border-color: Transparent;
float: left;
margin-left: 0;
position: absolute;
left: 0px
}

.removeTasks {
background-color: Transparent;
border-color: Transparent;
float: right;
margin-right: 0;
position: absolute;
right: 0px;
}

.checkbox {
background-color: Transparent;
background-image: url('../img/check_box.png');
width: 34px;
height: 32px;
}

.textbox {
background-color: grey;
}

.viewButton {
background-color: Transparent;
background-image: url('../img/button_view.png');
width: 64px;
height: 32px;
}

.deleteButton {
background-color: Transparent;
background-image: url('../img/button_delete.png');
width: 64px;
height: 32px;
}
代码中的每一个类样式—— .deleteButton, .viewButton等等定义了UI元素的背景颜色,背景图片,宽,高等等~
再运行一下,就可以看到下面的效果了。
哇,是不是看起来很不一样了。至此,app就算完成了。
使用 PhoneGap 的一个好处就是你可以不用修改一行代码就可以发布到任意多个平台,下面简单看一下如何做吧:
发布你的 App
在上传到 Adobe Build 的时候你首先得压缩一下你的项目。
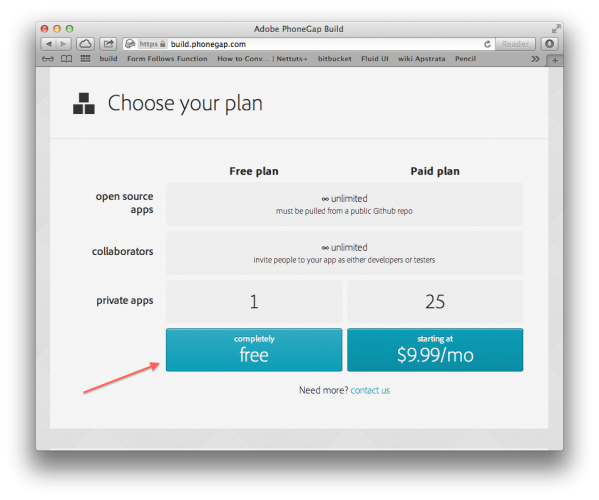
压缩完 Zombie 项目之后,打开 https://build.phonegap.com/ 这个网站,点击 Get started! 开始发布你的app 流程。
这里面有一个 Paid plan,当你有更多的私人app要发布的时候你可以调查一下该支付计划,但 PhoneGap 这个教程的目的并不是这个,所有还是选择 completely free 吧
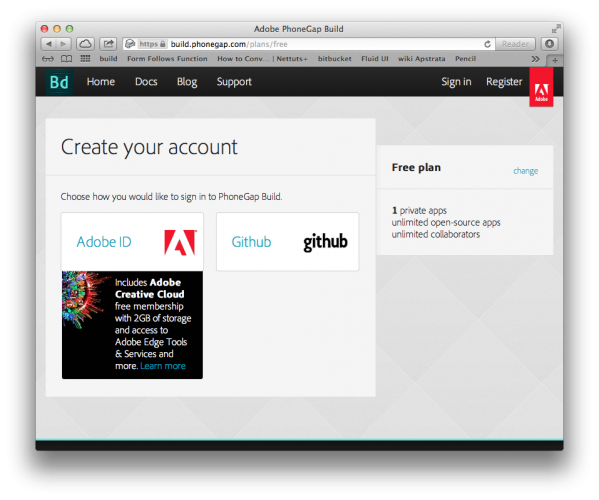
使用 Adobe ID 或者 Github 账号登陆
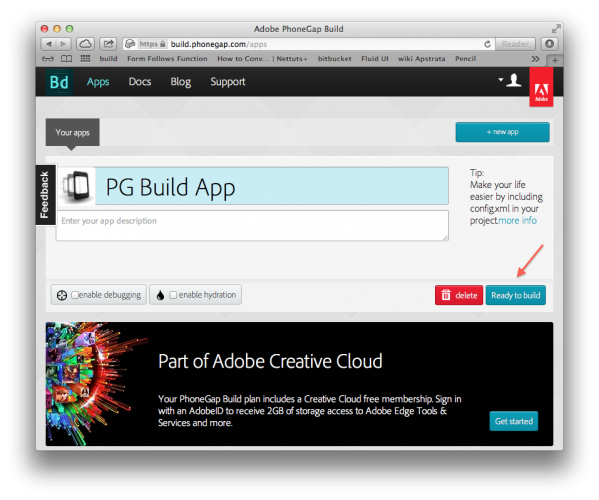
登陆完成之后 点击 Upload a .zip file ,选择打包好的 Zombie.zip 文件,开始上传。上传完成后,点击 Ready to build 按钮,如下:
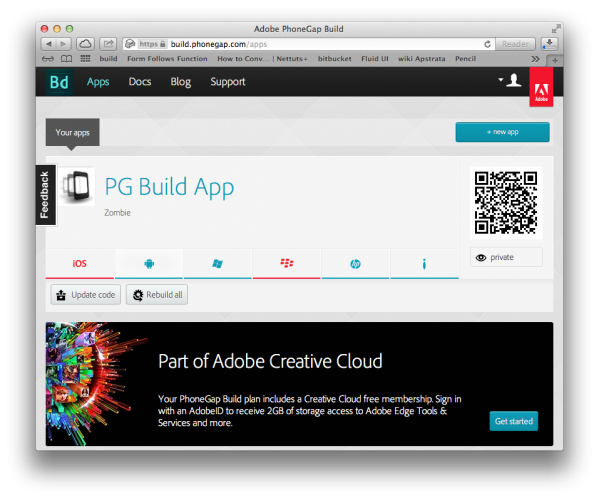
当 build 完成之后,你就可以看到PhonGap支持的多个移动平台的编译状态。如下,其他平台的都是蓝色,只有 IOS 和 黑莓的显示为红色,说明这两个平台的编译出了问题。
点击红色的 ios ,然后再点击下拉框,你会看到要求你上传 certificate 和 provisioning profile 这两个文件。

作为一个ios开发者,证书肯定是有的,从 keychain 导出来就可以了;如果你还没有证书的话,可以看一下苹果官方的教程:App Store Submission Turorial
使用 Spotlight 查找 KeyChain Access. 如果你之前已经安装过开发者证书,你就能在这里找到它,现在我们来导出它。
选择 My Certificates 分类,右击 iPhone Distribution... ,在弹出框中选择 Export ”iPhone Distribution..."。如下图:

导出过程中确认你使用的是 Personal Information Export(.p12)格式导出,即导出的格式后缀是 .p12 的。为你导出的证书填入一个密码,下面会用到。最后点击 OK 就可以将证书成功导出了。
现在你已经有一个证书了,你还需要再创建一个配置文件。打开苹果开发者中心 developer.apple.com 并登陆你的开发者账号。
在开是创建配置文件之前,你需要为你的 Zombie App 创建一个 App ID。
在左边的选项中选择 APP IDs,在下一页中,点击 New App ID。填写表格的一些必要字段,确认你在 Bundle Identifier 字段中输入 com.raywenderlich.zombie(这里的内容你跟你创建项目是填在Bundle Identifier 中的一样的。)如下:
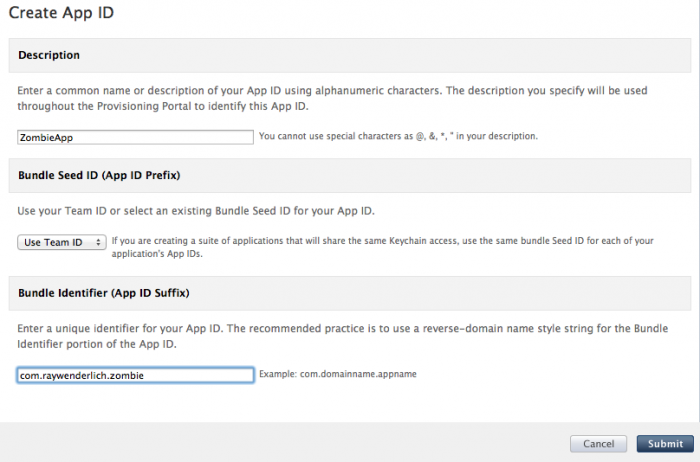
最后,点击 Submit.
当你完成App ID 的创建的时候,选择左边的 options 选项的 Provsioning ,在下一页中,选择 Distribution 选项卡,点击 New Profile ,填写一些必要的信息,选择你刚刚创建的App ID,选择你要安装的设备,最后,点击 Submit,配置文件就创建好了。
完成以上操作后,下载创建好的配置文件。将配置文件和证书都导入进入,如下:

点击黄色的锁头按钮,输入你刚刚创建的证书的密码,如下:
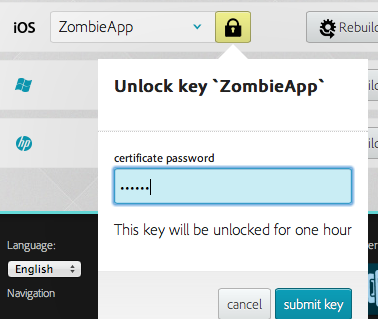
最后,点击 Submit key。稍等一会儿你就可以看到它已经帮你创建好了一个可以下载的 .ipa 文件了。

完整地项目代码放在这里,稍微修改了一下,有需要的来这里拿吧,source code 这是没有修改过的。
参考链接:
另外可以看一下使用 PhoneGap 编写的一些优秀软件:check out the full list
原文链接:http://www.raywenderlich.com/30734/phonegap-tutorial-a-cross-platform-zombie-app


 138
138


 被折叠的 条评论
为什么被折叠?
被折叠的 条评论
为什么被折叠?
 到【灌水乐园】发言


