


[翻译]在APIlevel 17以下时正确显示adjustViewBounds的ImageView
Correct the ImageView’s adjustViewBounds behaviour on API Level 17 and below with AdjustableImageView
原文地址:
http://inthecheesefactory.com/blog/correct-imageview-adjustviewbounds-with-adjustable-imageview/en
几乎每一个应用都会有这么一个需求:我想要很好的缩放一个ImageView让它适应它的父容器,我该怎么办?就像下面这样
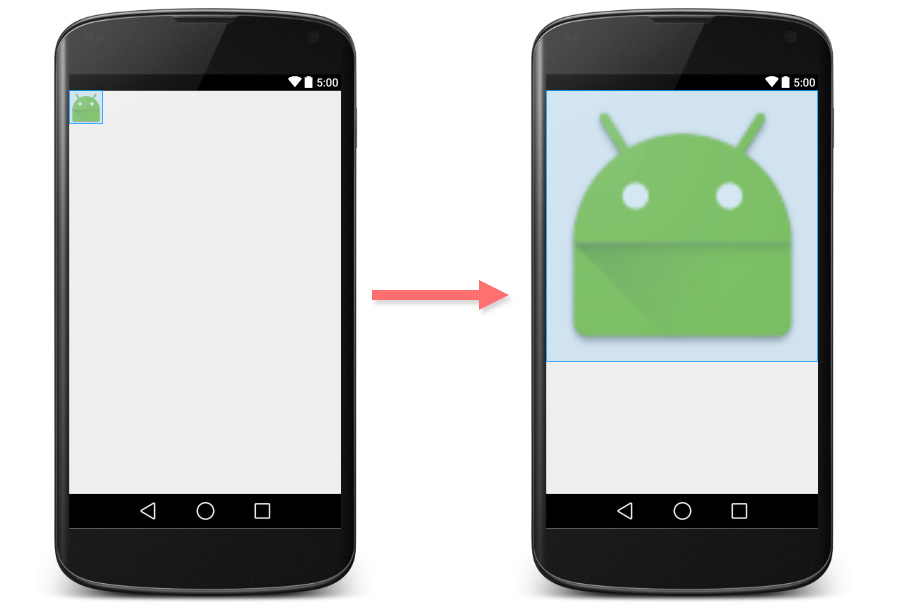
实际上ImageView已经提供了这种能力,你可以简单的设定android:adjustViewBounds 为 true即可。
<ImageView
    android:layout_width="match_parent"
    android:layout_height="wrap_content"
    android:adjustViewBounds="true"
    android:src="@mipmap/ic_launcher" />
下面是显示效果:
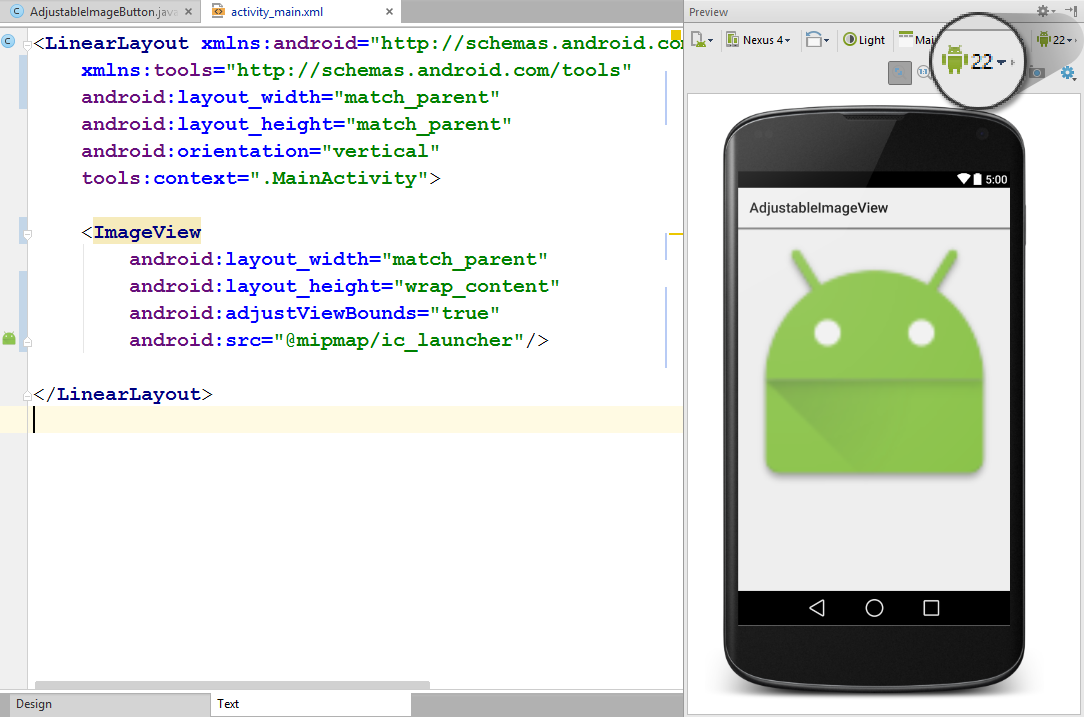
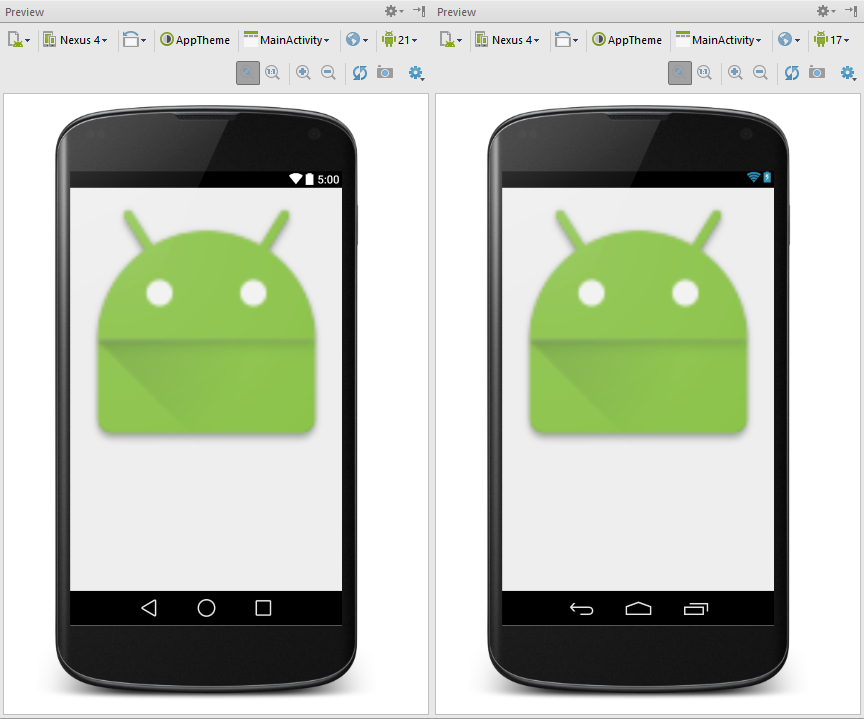
一切看起来很完美? 实际上不是,如果你切换你的预览版本为API level17 或者更低,你会看到ImageView根本没缩放。
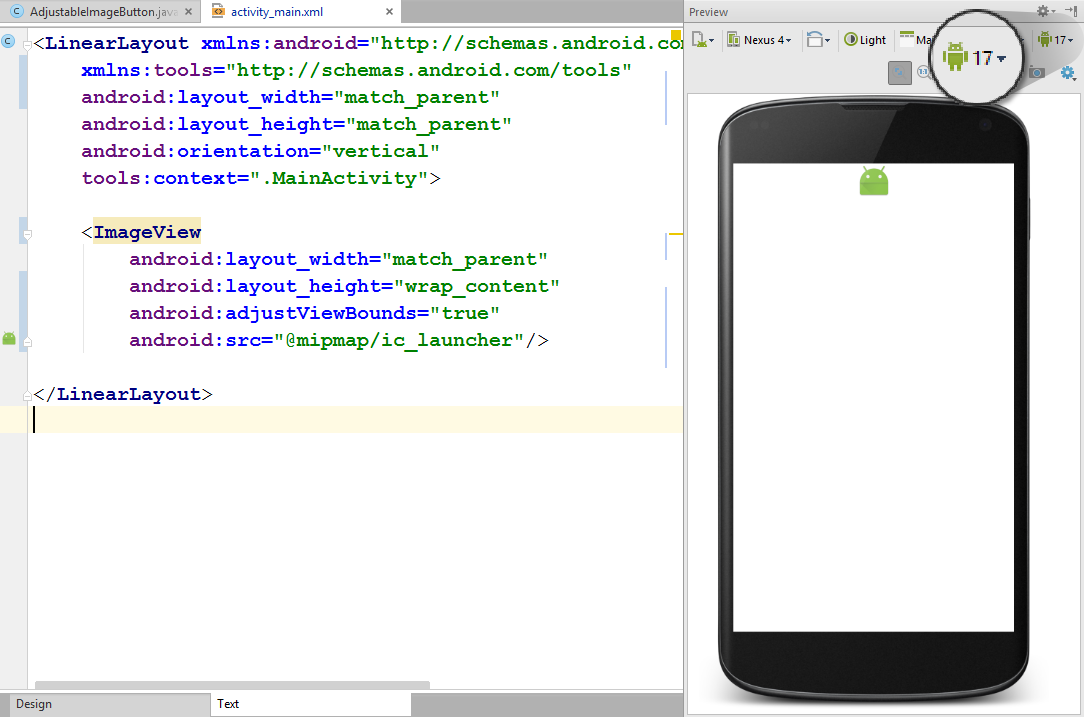
这不是bug。官方文档里有如下说明
注意:如果应用Target API level 小于等于17,adjustViewBounds会让drawable收缩到图片的边界,而不会拉伸到填充可用的测量空间。这是为了和过去的MeasureSpec 和 RelativeLayout行为保持兼容这就意味着,小于等于API Level 17, 最大宽度和最大高度会和android:src定义的图片源一致,于是,图片就会像上面展示的一样。
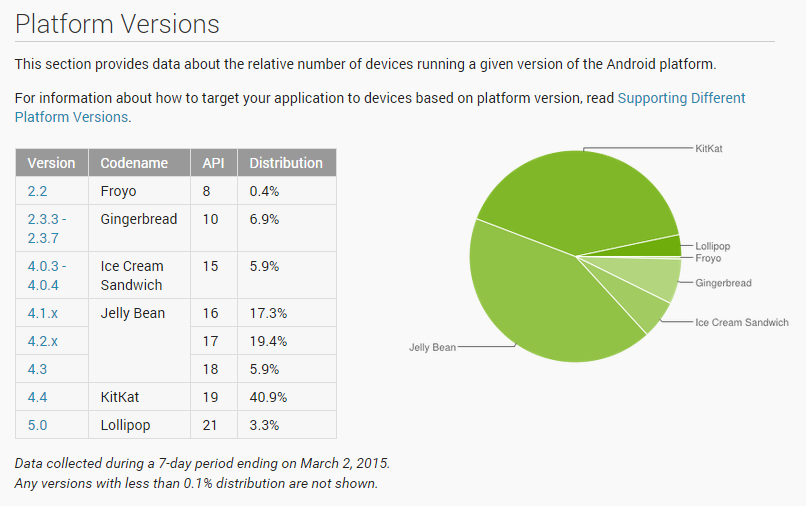
看一下Android平台版本统计就会发现,Android手机几乎有一半是小于等于API level 17的。
把minSdkVersion设定为18显然不是一个解决问题的好主意。
修改ImageView的源码来让它表现和API level 18+ 一致的行为显然更好,使用一个自定义的ImageView来替代普通的ImageView。代码如下:
import android.content.Context;
import android.graphics.drawable.Drawable;
import android.util.AttributeSet;
import android.view.ViewGroup;
import android.view.ViewParent;
import android.widget.ImageView;

/**
 * Created by nuuneoi on 2/17/15 AD.
 */
public class AdjustableImageView extends ImageView {

    boolean mAdjustViewBounds;

    public AdjustableImageView(Context context) {
        super(context);
    }

    public AdjustableImageView(Context context, AttributeSet attrs) {
        super(context, attrs);
    }

    public AdjustableImageView(Context context, AttributeSet attrs, int defStyleAttr) {
        super(context, attrs, defStyleAttr);
    }

    @Override
    public void setAdjustViewBounds(boolean adjustViewBounds) {
        mAdjustViewBounds = adjustViewBounds;
        super.setAdjustViewBounds(adjustViewBounds);
    }

    @Override
    protected void onMeasure(int widthMeasureSpec, int heightMeasureSpec) {
        Drawable mDrawable = getDrawable();
        if (mDrawable == null) {
            super.onMeasure(widthMeasureSpec, heightMeasureSpec);
            return;
        }

        if (mAdjustViewBounds) {
            int mDrawableWidth = mDrawable.getIntrinsicWidth();
            int mDrawableHeight = mDrawable.getIntrinsicHeight();
            int heightSize = MeasureSpec.getSize(heightMeasureSpec);
            int widthSize = MeasureSpec.getSize(widthMeasureSpec);
            int heightMode = MeasureSpec.getMode(heightMeasureSpec);
            int widthMode = MeasureSpec.getMode(widthMeasureSpec);

            if (heightMode == MeasureSpec.EXACTLY && widthMode != MeasureSpec.EXACTLY) {
                // Fixed Height & Adjustable Width
                int height = heightSize;
                int width = height * mDrawableWidth / mDrawableHeight;
                if (isInScrollingContainer())
                    setMeasuredDimension(width, height);
                else
                    setMeasuredDimension(Math.min(width, widthSize), Math.min(height, heightSize));
            } else if (widthMode == MeasureSpec.EXACTLY && heightMode != MeasureSpec.EXACTLY) {
                // Fixed Width & Adjustable Height
                int width = widthSize;
                int height = width * mDrawableHeight / mDrawableWidth;
                if (isInScrollingContainer())
                    setMeasuredDimension(width, height);
                else
                    setMeasuredDimension(Math.min(width, widthSize), Math.min(height, heightSize));
            } else {
                super.onMeasure(widthMeasureSpec, heightMeasureSpec);
            }
        } else {
            super.onMeasure(widthMeasureSpec, heightMeasureSpec);
        }
    }

    private boolean isInScrollingContainer() {
        ViewParent p = getParent();
        while (p != null && p instanceof ViewGroup) {
            if (((ViewGroup) p).shouldDelayChildPressedState()) {
                return true;
            }
            p = p.getParent();
        }
        return false;
    }
}
这些代码的工作原理很直接,在onMeasure方法中,如果宽度固定了(拉伸到父控件允许的最大),则计算等比例下的高度是多少,反之亦然。如果这个AdjustableImageView对象被放置在了一个非滚动的容器中,宽高将会被限定到父控件剩下的空间,否则,它将会无限制的放大。
在layout的xml文件中使用com.inthecheesefactory.thecheeselibrary.widget.AdjustableImageView 代替ImageView即可使用。
<com.inthecheesefactory.thecheeselibrary.widget.AdjustableImageView
    android:layout_width="match_parent"
    android:layout_height="wrap_content"
    android:adjustViewBounds="true"
    android:src="@mipmap/ic_launcher" />
使用AdjustableImageView库来简化操作
(译者窃以为如果你使用Eclipse或者网络条件一般,还是直接拷贝代码到工程中吧)
我们知道创建一个文件,拷贝代码,粘贴,reformat。检查是不是正确… 这些很烦人的。
使用我给你准备的依赖库让生活更简单,依赖库目前在Jcentor可以找到,一旦你添加依赖到工程,AdjustableImageView和AdjustableImageButton可以直接使用,源码上传到了GitHub.
下面是gradle依赖,只需要在build.gradle文件中添加如下:
dependencies {
    compile 'com.inthecheesefactory.thecheeselibrary:adjustable-imageview:1.0.0'
}
AdjustableImageView 和AdjustableImageButton 可以在AdjustableImageView and AdjustableImageButton包中找到。
只需要使用AdjustableImageView 和AdjustableImageButton替代项目中的ImageView 和 ImageButton。
<LinearLayout xmlns:android="http://schemas.android.com/apk/res/android"
    xmlns:tools="http://schemas.android.com/tools" android:layout_width="match_parent"
    android:layout_height="match_parent"
    android:orientation="vertical"
    tools:context=".MainActivity">

    <ScrollView
        android:layout_width="match_parent"
        android:layout_height="match_parent"
        android:fillViewport="true">

        <LinearLayout android:layout_width="match_parent"
            android:layout_height="match_parent"
            android:orientation="vertical">

            <com.inthecheesefactory.thecheeselibrary.widget.AdjustableImageView
                android:layout_width="match_parent"
                android:layout_height="wrap_content"
                android:adjustViewBounds="true"
                android:src="@mipmap/ic_launcher"/>

            <com.inthecheesefactory.thecheeselibrary.widget.AdjustableImageView
                android:layout_width="match_parent"
                android:layout_height="wrap_content"
                android:adjustViewBounds="true"
                android:src="@mipmap/ic_launcher"/>
        </LinearLayout>

    </ScrollView>

</LinearLayout>
这样,ImageView现在可以完美的放大,无论你使用什么Android版本。
这也是为什么我们应该在电脑里安装多版本的SDK,而不是只安装最近的一个。一旦你想要让你的Android Studio在不同版本下预览你的layout。你就得安装那个版本的SDK Platform,否则它不会作为一个选择出现在你的预览面板上。我建议你应该安装从API level 14开始的每一个SDK Platform。 虽然损失一点硬盘空间,但是回报是值得的。


 被折叠的 条评论
为什么被折叠?
被折叠的 条评论
为什么被折叠?
 到【灌水乐园】发言


