


springMVC系列之与spring的整合——07
摘要:本文是实现springMVC与spring的整合、springMVC作为spring的一部分、与spring整合是很容易实现、同时附带一些关于wem.xml中配置加载的顺序、和获取springMVC上下文、spring上下文、并验证他们之间的关系。
一:本文内容
1、web.xml中配置的加载顺序
2、springMVC与spring的整合
3、spring与springMVC整合相比于struts2与spring整合的不同之处
4、ServletContext、spring上下文、springMVC上下文关系
5、获取ServletContext、spring上下文、springMVC上下文关系以及验证他们之间的关系。
二:具体实现
1、web.xml中配置的加载顺序:
a) <context-param></context-param>标签
b) <listener></listener>标签
c) <filter></filter>标签
d) <servlet></servlet>标签
2、springMVC与spring的整合
a) jar包——无需引入、使用springMVC框架的jar就行!
b) web.xml中加载spring的配置文件:使用<context-param></context-param>指明spring配置文件的名称、位置。补充一点:在一个项目中会有各个不同的模块、如果都用同一个spring的配置文件、则很可能有冲突、乱套、所以指定一个总的spring配置文件、各个模块使用自己的spring配置文件、然后将这些配置文件在总的spring配置文件中使用<import>引入、这样容易管理、并且看着也清晰。
c) web.xml中配置spring的Listener
d) 在spring的配置文件:applicationContext.xml(我项目中是用的springAnnotation-core.xml)配置文件中配置bean、如同使用struts2时为其一个action注入属性一样、这里是用于注入一个或者多个Controller中。值得注意的是:这里不再需要对Controller配置bean、因为他在服务器启动的时候就已经生成了、而不像struts2还要配置action的bean。
e) 在需要使用spring生成的bean实体类的Controller中使用注解的形式获取实例、相对于struts2的action、不再需要此注入属性生成get、set方法。、
f) 最后:Just use it!
3、 与struts2相比:
a) 不用spring在为我们生成action实例、对应的springMVC中的Controller已经在服务器启动的时候实例化好了。
b) 注入属性的时候不再像struts2那样为bean配置的action使用<property>标签来注入
c) 调用某个接口中的方法的时候、相对于struts2的为调用接口的引用生成get、set方法、springMVC的注解显的高大上。
4、ServletContext、spring上下文、springMVC上下文关系:
springMVC上下文继承spring上下文继承ServletContext
5、获取ServletContext、spring上下文、springMVC上下文关系以及验证他们之间的关系
/**
* 获取各个上下文、验证springMVC上下文继承与spring上下文
* 为避免影响、将上面的private SpringManager springManager 注释掉
*/
@RequestMapping("/getAndValidateContext")
public String getAndValidateContext(HttpServletRequest request){
//根环境上下文ServletContext——服务器上下文
ServletContext sc = request.getSession().getServletContext();
//根据ServletContext获取spring上下文、继承与ServletContext
WebApplicationContext ac1 = WebApplicationContextUtils.getWebApplicationContext(sc);
//获取springMVC上下文、继承与spring上下文
WebApplicationContext ac2 = RequestContextUtils.getWebApplicationContext(request);
//验证springMVC上下文继承与spring上下文
/*
* 我们知道通过spring配置文件的bean标签、在服务器启动的时候就已经将 SpringManager为我们注入好了
* 所以我们可以通过spring的上下文来获取springManager的实例来调用get()方法、看能不能输出东西就ok
*/
SpringManager springManager1 = (SpringManager) ac1.getBean("springManager");
springManager1.get();
System.out.println("===========================================");
//通过springMVC获取StringManager实例
SpringManager springManager2 = (SpringManager) ac2.getBean("springManager");
springManager2.get();
/*
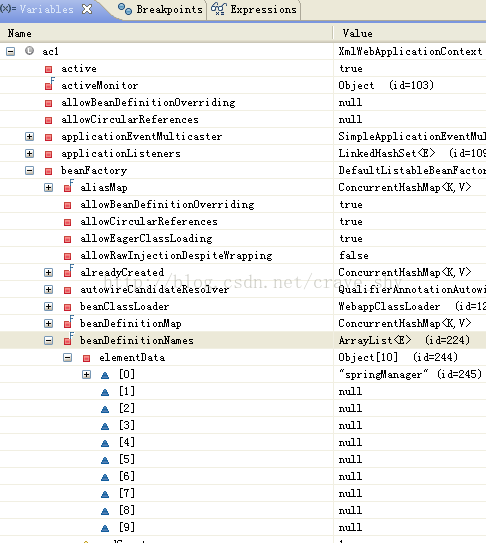
* 有兴趣的可以通过debug5的形式看看ac1、ac2中都有哪些东西、我们可以通过getBean方法获取想要的
*/
return "success";
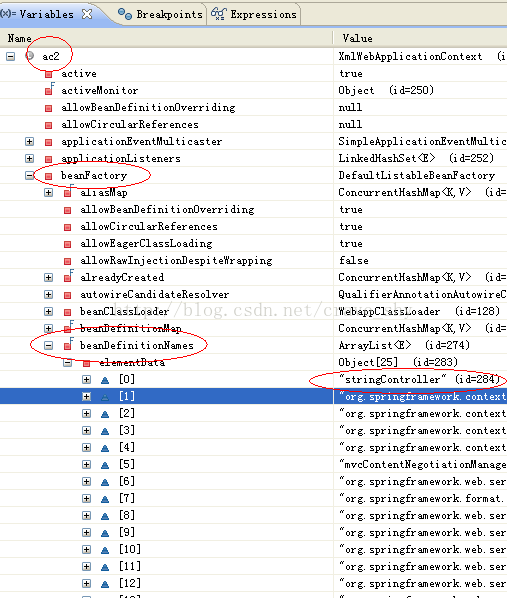
}代码中ac1、ac2中beanFactory中部分内容(debug形式观察):
ac2中beanFactory中部分内容(debug形式观察):
补充:
2、web.xml
<?xml version="1.0" encoding="UTF-8"?>
<web-app xmlns:xsi="http://www.w3.org/2001/XMLSchema-instance"
	xmlns="http://java.sun.com/xml/ns/javaee" xmlns:web="http://java.sun.com/xml/ns/javaee/web-app_2_5.xsd"
	xsi:schemaLocation="http://java.sun.com/xml/ns/javaee http://java.sun.com/xml/ns/javaee/web-app_2_5.xsd"
	id="WebApp_ID" version="2.5">

	<context-param>
		<param-name>contextConfigLocation</param-name>
		<param-value>classpath*:config/springAnnotation-core.xml</param-value>
	</context-param>

	<listener>
		<listener-class>org.springframework.web.context.ContextLoaderListener</listener-class>
	</listener>

	<servlet>
		<servlet-name>springMVC</servlet-name>
		<servlet-class>org.springframework.web.servlet.DispatcherServlet</servlet-class>
		<init-param>
			<param-name>contextConfigLocation</param-name>
			<param-value>classpath*:config/springAnnotation-servlet.xml</param-value>
		</init-param>
		<load-on-startup>1</load-on-startup>
	</servlet>

	<filter>
		<filter-name>encodingFilter</filter-name>
		<filter-class>org.springframework.web.filter.CharacterEncodingFilter</filter-class>
		<init-param>
			<param-name>encoding</param-name>
			<param-value>UTF-8</param-value>
		</init-param>
		<init-param>
			<param-name>forceEncoding</param-name>
			<param-value>true</param-value>
		</init-param>
	</filter>

	<!-- encoding filter for jsp page -->
	<filter-mapping>
		<filter-name>encodingFilter</filter-name>
		<url-pattern>/*</url-pattern>
	</filter-mapping>

	<servlet-mapping>
		<servlet-name>springMVC</servlet-name>
		<url-pattern>/</url-pattern>
	</servlet-mapping>
</web-app>
3、springAnnotation-servlet.xml与前面一样
4、springAnnotation-core.xml
<?xml version="1.0" encoding="UTF-8"?>
<!DOCTYPE beans PUBLIC "-//SPRING//DTD BEAN 2.0//EN" "http://www.springframework.org/dtd/spring-beans-2.0.dtd" [
<!ENTITY contextInclude SYSTEM "org/springframework/web/context/WEB-INF/contextInclude.xml">
]>

<beans>
	<import resource="classpath*:com/chy/web/controller/annotation/springAnnotation-import.xml"/>
</beans>
5、springAnnotation-import.xml
<?xml version="1.0" encoding="UTF-8"?>
<!DOCTYPE beans PUBLIC "-//SPRING//DTD BEAN 2.0//EN" "http://www.springframework.org/dtd/spring-beans-2.0.dtd" [
<!ENTITY contextInclude SYSTEM "org/springframework/web/context/WEB-INF/contextInclude.xml">
]>

<beans>
	<bean id="springManager" class="com.chy.web.controller.annotation.SpringManagerImpl"></bean>
</beans>
6、StringController.java
package com.chy.web.controller.annotation;

import javax.servlet.ServletContext;
import javax.servlet.http.HttpServletRequest;

import org.springframework.stereotype.Controller;
import org.springframework.web.bind.annotation.RequestMapping;
import org.springframework.web.context.WebApplicationContext;
import org.springframework.web.context.support.WebApplicationContextUtils;
import org.springframework.web.servlet.support.RequestContextUtils;

@Controller
@RequestMapping("/spring")
public class StringController {

	/*
	//代替struts2中的get、set方法
	@Resource(name="springManager")
	private SpringManager springManager;

	@RequestMapping("/springManager")
	public String springManager(){
		System.out.println("this is spring controller");
		springManager.get();
		return "success";
	}
	*/

	/**
	 * 获取各个上下文、验证springMVC上下文继承与spring上下文
	 * 为避免影响、将上面的private SpringManager springManager 注释掉
	 */
	@RequestMapping("/getAndValidateContext")
	public String getAndValidateContext(HttpServletRequest request){
		//根环境上下文ServletContext——服务器上下文
		ServletContext sc = request.getSession().getServletContext();

		//根据ServletContext获取spring上下文、继承与ServletContext
		WebApplicationContext ac1 = WebApplicationContextUtils.getWebApplicationContext(sc);

		//获取springMVC上下文、继承与spring上下文
		WebApplicationContext ac2 = RequestContextUtils.getWebApplicationContext(request);


		//验证springMVC上下文继承与spring上下文
		/*
		 * 我们知道通过spring配置文件的bean标签、在服务器启动的时候就已经将 SpringManager为我们注入好了
		 * 所以我们可以通过spring的上下文来获取springManager的实例来调用get()方法、看能不能输出东西就ok
		 */
		SpringManager springManager1 = (SpringManager) ac1.getBean("springManager");
		springManager1.get();
		System.out.println("===========================================");

		//通过springMVC获取StringManager实例
		SpringManager springManager2 = (SpringManager) ac2.getBean("springManager");
		springManager2.get();

		/*
		 * 有兴趣的可以通过debug5的形式看看ac1、ac2中都有哪些东西、我们可以通过getBean方法获取想要的
		 */
		return "success";
	}
}
7、SpringManager.java
package com.chy.web.controller.annotation;

public interface SpringManager {
	public void get();
}
8、SpringManagerImpl.java
package com.chy.web.controller.annotation;

public class SpringManagerImpl implements SpringManager{

	public void get() {
		System.out.println("this is get() method");
	}
}
更多内容: springMVC系列之目录——00


 1515
1515


 被折叠的 条评论
为什么被折叠?
被折叠的 条评论
为什么被折叠?
 到【灌水乐园】发言


