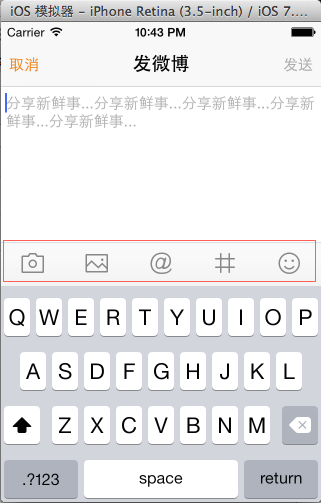
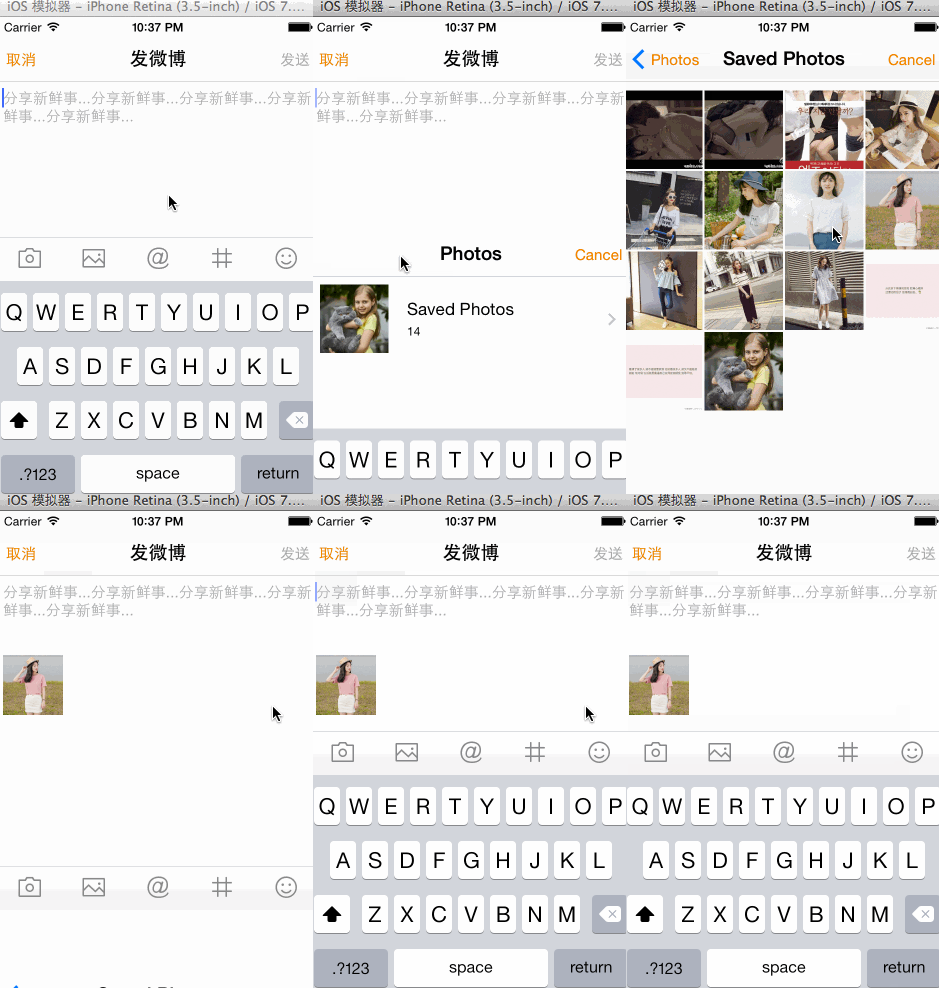
在上一篇,我们创建了发微博界面的Toolbar,并且可以根据键盘的弹出移动,下面我们给Toolbar上添加按钮,相机、相册、@、#、表情五个按钮,然后添加点击事件,如我们需要获取本地的图片发布在微博上,可以给相册添加点击事件,并通过代理(控制器),打开相册库,然后将选中的图片显示到发微博的界面。
###1、需要添加的按钮

定义toolbar工具条上的按钮类型,可以用枚举。
IWComposeToolbar.h
//
//  IWComposeToolbar.h
//  ItcastWeibo
//
//  Created by kaiyi on 16-5-15.
//  Copyright (c) 2016年 itcast. All rights reserved.
//

#import <UIKit/UIKit.h>
@class IWComposeToolbar;

// 定义toolbar工具条上的按钮类型,五个按钮===*===
typedef enum {

    IWComposeToolbarButtonTypeCamera,
    IWComposeToolbarButtonTypePicture,
    IWComposeToolbarButtonTypeMention,
    IWComposeToolbarButtonTypeTrend,
    IWComposeToolbarButtonTypeEmotion,
} IWComposeToolbarButtonType;

@protocol IWComposeToolbarDelegate <NSObject>

@optional
-(void)composeToolbar:(IWComposeToolbar *)toolbar didClickedButton:(IWComposeToolbarButtonType)buttonType;

@end
@interface IWComposeToolbar : UIView
@property(weak, nonatomic) id<IWComposeToolbarDelegate> delegate;
@end
###2、在初始化工具条的时候,并添加上边的五个按钮
IWComposeToolbar.m
//
//  IWComposeToolbar.m
//  ItcastWeibo
//
//  Created by kaiyi on 16-5-15.
//  Copyright (c) 2016年 itcast. All rights reserved.
//

#import "IWComposeToolbar.h"

@implementation IWComposeToolbar

- (id)initWithFrame:(CGRect)frame
{
    self = [super initWithFrame:frame];
    if (self) {

        // 1.设置工具条背景图片,平铺
      self.backgroundColor = [UIColor colorWithPatternImage:[UIImage imageWithName:@"compose_toolbar_background"]];
       // self.backgroundColor = [UIColor redColor];

        // 2.添加按钮

         [self addButtonWithIcon:@"compose_camerabutton_background" highIcon:@"compose_camerabutton_background_highlighted" tag:IWComposeToolbarButtonTypeCamera];
        [self addButtonWithIcon:@"compose_toolbar_picture" highIcon:@"compose_toolbar_picture_highlighted" tag:IWComposeToolbarButtonTypePicture];
         [self addButtonWithIcon:@"compose_mentionbutton_background" highIcon:@"compose_mentionbutton_background_highlighted" tag:IWComposeToolbarButtonTypeMention];

         [self addButtonWithIcon:@"compose_trendbutton_background" highIcon:@"compose_trendbutton_background_highlighted" tag:IWComposeToolbarButtonTypeTrend];
         [self addButtonWithIcon:@"compose_emoticonbutton_background" highIcon:@"compose_emoticonbutton_background_highlighted" tag:IWComposeToolbarButtonTypeEmotion];

    }
    return self;
    //
}

/**
 *
 * 添加按钮
 */
-(void)addButtonWithIcon:(NSString *)icon highIcon:(NSString *)highIcon tag:(int)tag
{
    UIButton *button = [[UIButton alloc] init];
    button.tag = tag;
    [button addTarget:self action:@selector(buttonClick:) forControlEvents:UIControlEventTouchUpInside];
    [button setImage:[UIImage imageWithName:icon] forState:UIControlStateNormal];
    [button setImage:[UIImage imageWithName:highIcon] forState:UIControlStateHighlighted];
    [self addSubview:button];
}

/**
 *
 * 监听按钮点击
 */
-(void)buttonClick:(UIButton *)button{

    // NSLog(@"%d", button.tag);

    if([self.delegate respondsToSelector:@selector(composeToolbar:didClickedButton:)])
    {
        [self.delegate composeToolbar:self didClickedButton:button.tag];

    }

}

/**
 *布局
 */
-(void)layoutSubviews{
    [super layoutSubviews];

    CGFloat buttonW = self.frame.size.width / self.subviews.count;
    CGFloat buttonH = self.frame.size.height;
    for(int i = 0; i < self.subviews.count; i++){
        UIButton *button = self.subviews[i];
        CGFloat buttonX = buttonW * i;
        button.frame = CGRectMake(buttonX, 0, buttonW, buttonH);

    }
}

@end
###3、具体的打开相册的方法,并写将图片显示在imageView ** IWComposeViewController.m**
#import "IWComposeViewController.h"
#import "IWTextView.h"
#import "AFNetworking.h"
#import "IWAccount.h"
#import "IWWeiboTool.h"
#import "IWAccountTool.h"
#import "MBProgressHUD+MJ.h"
#import "IWComposeToolbar.h"

@interface IWComposeViewController ()<UITextViewDelegate,IWComposeToolbarDelegate,UINavigationControllerDelegate,UIImagePickerControllerDelegate>
@property (nonatomic, weak) IWTextView *textView;
@property (nonatomic, weak)IWComposeToolbar *toolbar;
@property (nonatomic, weak)UIImageView *imageView; // [new Add 2016-05-27]
@end

@implementation IWComposeViewController

- (void)viewDidLoad
{
    [super viewDidLoad];

    // 设置导航栏属性
    [self setupNavBar];

    // 添加textView
    [self setupTextView];

    // 添加toolbar ****===***
    [self setupToolbar];

    // 添加imageView (初始化) [new Add 2016-05-27]
    [self setupImageView];
}

/**
 *  添加imageView
 */
-(void)setupImageView
{
    UIImageView *imageView = [[UIImageView alloc] init];

    // 设置frame
    imageView.frame = CGRectMake(5, 80, 60, 60);
    [self.textView addSubview:imageView];

    // 赋值属性
    self.imageView = imageView;

}

#pragma mark - toolbar的代理方法
- (void)composeToolbar:(IWComposeToolbar *)toolbar didClickedButton:(IWComposeToolbarButtonType)buttonType
{
    switch (buttonType) {
        case IWComposeToolbarButtonTypeCamera: // 相机
            [self openCamera];
            break;

        case IWComposeToolbarButtonTypePicture: // 相册
            NSLog(@"jinqule");
            [self openPhotoLibarary];
            break;

        default:
            break;
    }
}

/**
 *  打开相机
 */
- (void)openCamera
{
    UIImagePickerController *ipc = [[UIImagePickerController alloc] init];
    ipc.sourceType = UIImagePickerControllerSourceTypeCamera;
    ipc.delegate = self;
    [self presentViewController:ipc animated:YES completion:nil];
}

/**
 *  打开相册
 */
-(void)openPhotoLibarary{
    NSLog(@"打开相册");
    UIImagePickerController *ipc = [[UIImagePickerController alloc] init];
    ipc.sourceType = UIImagePickerControllerSourceTypePhotoLibrary;
    ipc.delegate = self;
    [self presentViewController:ipc animated:YES completion:nil];
}

/**
 * 图片选择控制器的代理
 */
-(void)imagePickerController:(UIImagePickerController *)picker didFinishPickingMediaWithInfo:(NSDictionary *)info
{
    // 1.销毁picker控制器
    [picker dismissViewControllerAnimated:YES completion:nil];

    // 2.获取到的图片
    UIImage *image = info[UIImagePickerControllerOriginalImage];

    // 3.把用户选择的图片显示在发微博编辑框内
    self.imageView.image = image;
    NSLog(@"%@", info);
}

/**
 *  添加Toolbar
 */
-(void)setupToolbar
{
    IWComposeToolbar *toolbar = [[IWComposeToolbar alloc] init];
    toolbar.delegate = self;  // 点击打开图片库的按钮[2016-05-26 00:45 ADD]

    // 设置frame
    CGFloat toolbarH = 44;
    CGFloat toolbarW = self.view.frame.size.width;  // 宽度为view的宽度
    CGFloat toolbarX = 0;   // 位置,在最左边
    CGFloat toolbarY = self.view.frame.size.height - toolbarH; // 无键盘时的toolbar高度
    toolbar.frame = CGRectMake(toolbarX, toolbarY, toolbarW, toolbarH);

    // toolbar的父控件是textview还是控制器?经过分析新浪微博的toolbar,当键盘消失时,toolbar永远在view的最底部
    // 所以,我们确定其父控件为控制器
    [self.view addSubview:toolbar];

    // 赋值属性
    self.toolbar = toolbar;

}
效果: 
注:本博客项目完整源码可以访问我的个人博客获取Corwien博客digtime.cn


 5万+
5万+

 被折叠的 条评论
为什么被折叠?


