


当属性为match_parent时:weight属性可以理解为优先级;
<LinearLayout xmlns:android="http://schemas.android.com/apk/res/android"
    android:layout_width="match_parent"
    android:layout_height="match_parent"
    android:orientation="horizontal">
        <Button
            android:layout_width="match_parent"
            android:layout_height="wrap_content"
            android:layout_weight="1"
            android:text="按钮一"/>
        <Button
            android:layout_width="match_parent"
            android:layout_height="wrap_content"
            android:layout_weight="1"
            android:text="按钮二"/>
</LinearLayout>
其效果图为:左图,如果将第一个button改为3,将变为右图所示
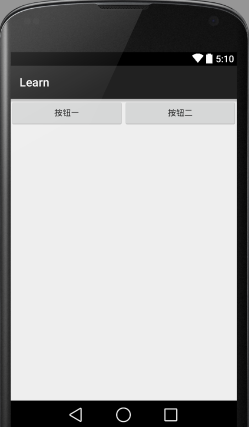
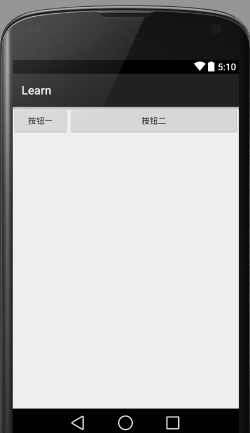
由上面的代码分析,可以得出,如果属性定为mathch_parent时,它的weight越小,所占的空间也就越大,而且是成比例的增大。
2.当属性为warp_content时:
我们首先写出代码,看一下它的结果,我们再做分析:
<LinearLayout xmlns:android="http://schemas.android.com/apk/res/android"
    android:layout_width="match_parent"
    android:layout_height="match_parent"
    android:orientation="horizontal">
        <Button
            android:layout_width="wrap_content"
            android:layout_height="wrap_content"
            android:layout_weight="3000"
            android:text="按钮一"/>
        <Button
            android:layout_width="wrap_content"
            android:layout_height="wrap_content"
            android:layout_weight="1"
            android:text="按钮二"/>
</LinearLayout>
而且你会发现,一旦达到第二个按钮可以包括里面的text的时候,再增加button1的weight也无济于事,所以,对于这种情况,我们可以理解为,前提是最起码满足warp_content的条件,也就是要包含这个组件,然后才是按照比例分配空间。
3.看了上面两种情况,是不是感觉很麻烦,感觉都傻傻分不清楚,官方已经给了weight的正确使用方式:
In order to improve the layout efficiency when you specify the weight, you should change the width of theEditText to be zero (0dp). Setting the width to zero improves layout performance because using "wrap_content"as the width requires the system to calculate a width that is ultimately irrelevant because the weight value requires another width calculation to fill the remaining space.
也就是说,在使用时,要把对应的方向上的layout_width或者layout_height设置为0dp,这样的话呢,weight就成为了权重的意思,就可以完全根据比例来调整你的布局了。是不是瞬间就变的很简单而且使用了一个布局工具了。
下面我们简单的展示一下:
<LinearLayout xmlns:android="http://schemas.android.com/apk/res/android"
    android:layout_width="match_parent"
    android:layout_height="match_parent"
    android:orientation="horizontal">
        <Button
            android:layout_width="0dp"
            android:layout_height="wrap_content"
            android:layout_weight="4"
            android:text="按钮一"/>
        <Button
            android:layout_width="0dp"
            android:layout_height="wrap_content"
            android:layout_weight="1"
            android:text="按钮二"/>
</LinearLayout>
效果为:


 2415
2415

 被折叠的 条评论
为什么被折叠?
被折叠的 条评论
为什么被折叠?
 到【灌水乐园】发言


