


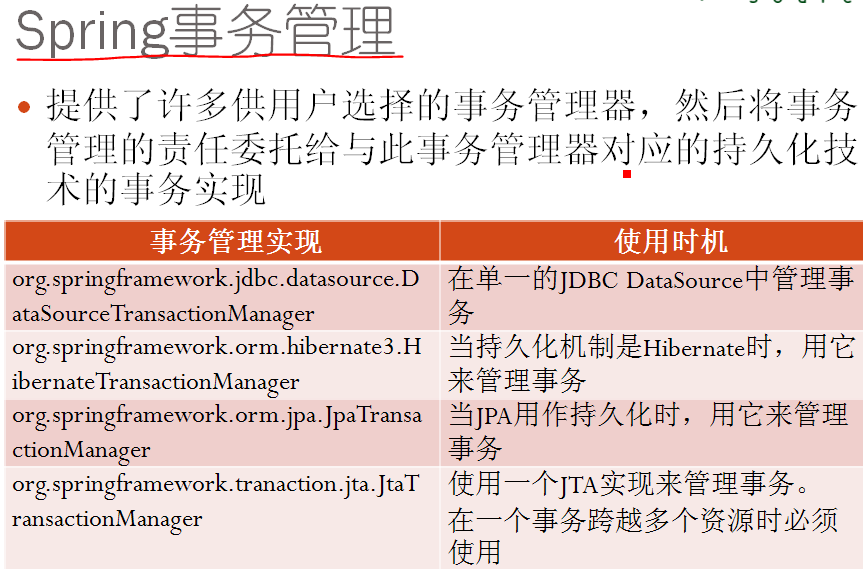
Spring框架并没有直接管理用户的应用系统中的事务,它只是提供许多供用户选择的事务管理器,然后将事务管理的责任委托给与此事务管理器对应的持久化技术的事务实现。
每种事务管理器在使用时,都要在Spring的Bean配置文件中进行定义,如下配置:
声明式事务管理
<?xml version="1.0" encoding="UTF-8"?>

<beans xmlns="http://www.springframework.org/schema/beans"
        xmlns:xsi="http://www.w3.org/2001/XMLSchema-instance"
        xmlns:aop="http://www.springframework.org/schema/aop"
        xmlns:tx="http://www.springframework.org/schema/tx"
        xsi:schemaLocation="
            http://www.springframework.org/schema/beans http://www.springframework.org/schema/beans/spring-beans-2.5.xsd
            http://www.springframework.org/schema/aop http://www.springframework.org/schema/aop/spring-aop-2.5.xsd
            http://www.springframework.org/schema/tx http://www.springframework.org/schema/tx/spring-tx-2.5.xsd">

    <!-- 配置不带连接池的数据源 -->
    <bean id="dataSource"
          class="org.springframework.jdbc.datasource.DriverManagerDataSource">
        <property name="driverClassName" value="com.mysql.jdbc.Driver" />
        <property name="url" value="jdbc:mysql:///spring_04" />
        <property name="username" value="root" />
        <property name="password" value="root" />
    </bean>

    <!-- JDBC事务管理器 -->
    <bean id="transactionManager"
        class="org.springframework.jdbc.datasource.DataSourceTransactionManager">
        <!-- DataSource事务管理器需要数据源实例 -->
        <property name="dataSource" ref="dataSource"/>
    </bean>

    <!-- 定义事务通知(主要是针对指定事务管理器对应的事务实现配置事务参数) -->
    <tx:advice id="txAdvice" transaction-manager="transactionManager">
        <tx:attributes>
            <!-- 对选定的方法配置详细的事务属性 -->
            <tx:method name="find*" read-only="true" />
            <tx:method name="*"/>
        </tx:attributes>
    </tx:advice>

    <!-- AOP配置 -->
    <aop:config>
        <!--  声明事务切入点(配置哪些类的哪些方法参与事务) -->
        <aop:pointcut id="AllServiceMethod"
                expression="execution(* com.qiujy.service.*.*(..))" />
        <!-- 通知器(把事务通知绑定到切入点) -->
        <aop:advisor pointcut-ref="AllServiceMethod" advice-ref="txAdvice" />
    </aop:config>


    <!-- 以下是Spring容器管理的Bean -->
    <bean id="accountDao" class="com.qiujy.dao.AccountDaoJDBCImpl">
        <property name="dataSource" ref="dataSource" />
    </bean>
    <bean id="accountService" class="com.qiujy.service.AccountService">
        <property name="accountDao" ref="accountDao"/>
    </bean>

    <!-- Hibernate事务管理器
    <bean id="txManager2"
         class="org.springframework.orm.hibernate3.HibernateTransactionManager">
        <property name="sessionFactory" ref ="sessionFactory"/>
    </bean>
    -->
    <!-- JPA事务管理器
    <bean id="txManager3"
         class="org.springframework.orm.jpa.JpaTransactionManager">
        <property name="entityManagerFactory" ref ="entityManagerFactory"/>
    </bean>
    -->
</beans>
基于注解的方式
<!-- 配置不带连接池的数据源 -->
    <bean id="dataSource"
          class="org.springframework.jdbc.datasource.DriverManagerDataSource">
        <property name="driverClassName" value="com.mysql.jdbc.Driver" />
        <property name="url" value="jdbc:mysql:///spring_04" />
        <property name="username" value="root" />
        <property name="password" value="root" />
    </bean>

    <!-- JDBC事务管理器 -->
    <bean id="transactionManager"
        class="org.springframework.jdbc.datasource.DataSourceTransactionManager">
        <!-- DataSource事务管理器需要数据源实例 -->
        <property name="dataSource" ref="dataSource"/>
    </bean>
    <!-- 启用对事务注解的支持  -->
    <tx:annotation-driven transaction-manager="transactionManager"/>
第二步:用@Transactional 注解指定接口、类或方法的事务属性
package com.qiujy.service;

import java.util.List;

import org.springframework.transaction.annotation.Transactional;

import com.qiujy.dao.AccountDao;
import com.qiujy.domain.Account;

/** Account业务逻辑类--基于注解方式的声明式事务管理配置 */
@Transactional //指定需要声明式事务,事务属性使用默认值
public class AccountServiceByTxAnnotation {
    private AccountDao accountDao;
    public void setAccountDao(AccountDao accountDao){
        this.accountDao = accountDao;
    }

    public void create(Account acc) {
        accountDao.create(acc);
        //throw new RuntimeException("故意抛出一个RuntimeException....");
    }

    public void delete(Account acc) {
        accountDao.delete(acc);
    }

    public void update(Account acc) {
        accountDao.update(acc);
    }

    @Transactional(readOnly=true)  //把这个方法的事务设置为只读
    public Account findById(Long id) {
        return accountDao.findById(id);
    }

    @Transactional(readOnly=true)  //把这个方法的事务设置为只读
    public List<Account> findAll() {
        return accountDao.findAll();
    }
}
Spring整合Hibernate
虽然Hibernate大大简化了数据持久层的代码量,但在使用时还存在一些问题,如访问的步骤重复较多,基于Hibernate的DAO组件编写较复杂,事务也难以控制等。
下面三个方面来提升Hibernate应用的开发效率
1:SessionFactory注入
2:Hibernate Template
3:Hibernate 声明式事务管理
SessionFactory注入
    <!-- 配置Hibernate的SessionFactory -->
    <bean id="sessionFactory"
          class="org.springframework.orm.hibernate3.LocalSessionFactoryBean">
        <!-- 指定要加载的Hibernate配置文件是类路径下的hibernate.cfg.xml文件 -->
        <property name="configLocation" value="classpath:hibernate.cfg.xml" />
    </bean>
        <!-- 以下是Spring容器管理的Bean -->
    <bean id="accountDao" class="com.qiujy.dao.AccountDaoHibernateImpl">
        <!-- 为Dao实现类注入SessionFactory -->
        <property name="sessionFactory" ref="sessionFactory" />
    </bean>
    <bean id="accountService" class="com.qiujy.service.AccountService">
        <property name="accountDao" ref="accountDao"/>
    </bean>

    <bean id="accountDao2" class="com.qiujy.dao.AccountDaoHibernateTemplateImpl">
        <!-- 为Dao实现类注入SessionFactory -->
        <property name="sessionFactory" ref="sessionFactory" />
    </bean>
    <bean id="accountService2" class="com.qiujy.service.AccountService">
        <property name="accountDao" ref="accountDao2"/>
    </bean>
通过注入的方式!解耦合。
2:Hibernate Template
/**
 *  ClassName: AccountDaoImpl.java
 *  created on 2008-12-11
 *  Copyrights 2008 qjyong All rights reserved.
 *  EMail: qjyong@gmail.com
 */
package com.qiujy.dao;

import java.sql.SQLException;
import java.util.List;

import org.hibernate.HibernateException;
import org.hibernate.SessionFactory;
import org.springframework.orm.hibernate3.HibernateCallback;
import org.springframework.orm.hibernate3.HibernateTemplate;

import com.qiujy.domain.Account;

/**
 * AccountDao的HibernateTemplate实现类
 */
public class AccountDaoHibernateTemplateImpl implements AccountDao {
    private HibernateTemplate hibernateTemplate;

    //在SessionFactory的set方法中创建出HibernateTemplate的实例
    public void setSessionFactory(SessionFactory sessionFactory){
        hibernateTemplate = new HibernateTemplate(sessionFactory);
    }

    public void create(Account acc) {
        this.hibernateTemplate.save(acc);
    }


    public void delete(Account acc) {
        this.hibernateTemplate.delete(acc);
    }

    public void update(Account acc) {
        acc = (Account)this.hibernateTemplate.merge(acc);
    }

    @SuppressWarnings("unchecked")
    public List<Account> findAll() {
        //使用回调
        return (List<Account>) this.hibernateTemplate
                .execute(new HibernateCallback(){
                    public Object doInHibernate(org.hibernate.Session session)
                            throws HibernateException, SQLException {
                        return session.createQuery("from Account").list();
                    }
                });
    }

    public Account findById(Long id) {
        return (Account)this.hibernateTemplate.get(Account.class, id);
    }
}
这种方式不好,因为还是与Spring紧紧耦合了。
3:Hibernate声明式事务管理
也是有两种方式,一种xml,一种注解的方式
<!-- Hibernate事务管理器 -->
    <bean id="transactionManager"
         class="org.springframework.orm.hibernate3.HibernateTransactionManager">
        <property name="sessionFactory" ref ="sessionFactory"/>
    </bean>

    <!-- 定义事务通知(主要是针对指定事务管理器对应的事务实现配置事务参数) -->
    <tx:advice id="txAdvice" transaction-manager="transactionManager">
        <tx:attributes>
            <!-- 对选定的方法配置详细的事务属性 -->
            <tx:method name="find*" read-only="true" />
            <tx:method name="*"/>
        </tx:attributes>
    </tx:advice>

    <!-- AOP配置 -->
    <aop:config>
        <!--  声明事务切入点(配置哪些类的哪些方法参与事务) -->
        <aop:pointcut id="AllServiceMethod"
                expression="execution(* com.qiujy.service.*.*(..))" />
        <!-- 通知器(把事务通知绑定到切入点) -->
        <aop:advisor pointcut-ref="AllServiceMethod" advice-ref="txAdvice" />
    </aop:config>
详细的可以见代码
spring_07_hibernate
Spring整合Strtus和Hibernate
首先从整体的框架流程走.
tomcat找web.xml,从而初始化各种东西,在里面配置一个监听,一开始就启动。
<!-- 用WEB应用上下文参数来指定Spring的配置文件名 -->
    <context-param>
        <param-name>contextConfigLocation</param-name>
        <!-- 文件名
        文件名可以以classpath开头:表示在类路径下搜索;文件名可以带有通配符*
         -->
        <param-value>classpath:applicationContext-*.xml</param-value>
    </context-param>

    <!-- 使用listener来创建WebApplicationContext实例 -->
    <listener>
        <listener-class>
        org.springframework.web.context.ContextLoaderListener
        </listener-class>
    </listener>


    <servlet>
        <servlet-name>actionServlet</servlet-name>
        <servlet-class>org.apache.struts.action.ActionServlet</servlet-class>
        <load-on-startup>1</load-on-startup>
    </servlet>

    <servlet-mapping>
        <servlet-name>actionServlet</servlet-name>
        <url-pattern>*.do</url-pattern>
    </servlet-mapping>

  <welcome-file-list>
    <welcome-file>index.jsp</welcome-file>
  </welcome-file-list>
从而,把spring的applicationContext-*.xml全部加载。
struts配置不变,在上面增加东西:
<!-- 把struts默认的请求处理器换成Spring提供的代理请求处理器 -->
    <controller processorClass="org.springframework.web.struts.DelegatingRequestProcessor"/>
在Struts分发请求时,需要一个中间代理机制,在请求要分发给指定的Action之前,先分发给代理对象,由代理对象通知Spring所管理的对应的Action实例来处理请求,并将处理结果返回给代理对象,再由代理对象返回给Struts。
再来看Spring怎么管理那些Action的。
<?xml version="1.0" encoding="UTF-8"?>

<beans xmlns="http://www.springframework.org/schema/beans"
        xmlns:xsi="http://www.w3.org/2001/XMLSchema-instance"
        xmlns:aop="http://www.springframework.org/schema/aop"
        xmlns:tx="http://www.springframework.org/schema/tx"
        xsi:schemaLocation="
            http://www.springframework.org/schema/beans http://www.springframework.org/schema/beans/spring-beans-2.5.xsd
            http://www.springframework.org/schema/aop http://www.springframework.org/schema/aop/spring-aop-2.5.xsd
            http://www.springframework.org/schema/tx http://www.springframework.org/schema/tx/spring-tx-2.5.xsd">

    <!-- 配置Struts需要的Action Bean -->
    <!--
        这里通过name给Bean指定别名为/dept,
        还把它指定为每次对bean请求时都会创建一个新的bean实例
     -->
    <bean name="/dept"
          class="com.qiujy.web.dept.DeptAction"
          scope="prototype">
        <property name="serviceFacade" ref="serviceFacade"/>
    </bean>

</beans>
配置Struts需要的Action Bean 这里通过name给Bean指定别名为/dept, 还把它指定为每次对bean请求时都会创建一个新的bean实例。
到这里就把全部的工作原理解释清楚了。
在web应用中使用Spring 提供的两个过滤器
1:OpenSessionInView,使得Hibernate的Session生命周期变长。
2:字节编码过滤器
需要在web.xml中进行配置。
<!-- OSIV -->
    <filter>
        <filter-name>osiv</filter-name>
        <filter-class>org.springframework.orm.hibernate3.support.OpenSessionInViewFilter</filter-class>
    </filter>
    <filter-mapping>
        <filter-name>osiv</filter-name>
        <url-pattern>*.do</url-pattern>
    </filter-mapping>

<!-- 请求数据编码过滤器 -->
<filter>
    <filter-name>encodingFilter</filter-name>
    <filter-class>org.springframework.web.filter.CharacterEncodingFilter</filter-class>
    <!-- 指定要使用的编码类型 -->
    <init-param>
        <param-name>encoding</param-name>
        <param-value>utf-8</param-value>
    </init-param>
</filter>
<filter-mapping>
    <filter-name>encodingFilter</filter-name>
    <url-pattern>/*</url-pattern>
</filter-mapping>
详细的见代码


 1万+
1万+

 被折叠的 条评论
为什么被折叠?
被折叠的 条评论
为什么被折叠?
 到【灌水乐园】发言


