


Displacement Mapping(移位贴图)
Normal maps的另一个应用是displacement mapping,在这个应用中,细节的增加不再是通过虚拟光照得到的,而是真正的改变模型的vertices。使用displacement mapping时,vertex沿着它的法线向量平移,该法线的值由一个displacement map指定。一个displacement map就是一个高度纹理图,只有一个通道值,并且存储了高度的大小。图9.4就是本章一直使用的stone wall texture,对应的一种displacement map。
因此displacement只一个8位的数据通道,因此显示为一块灰色区域。
因此displacement只一个8位的数据通道,因此显示为一块灰色区域。
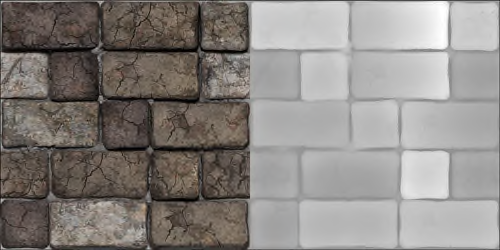
图9.4 A color map (left) and displacement map (right) for a stone wall. (Textures by Nick Zuccarello, Florida Interactive Entertainment Academy.)
根据从displacement map中采样的结果,对一个vertex移位时,要么沿着法线向内,要么向外。使用如下的公式执行向外移位:
Position = Position0 + (Normal * Scale * DisplacementMagnitude)
其中,Scale是一个shader constant,用于调整存储在displacement map中的magnitudes。对于向内移位,使用下面的公式:
其中,Scale是一个shader constant,用于调整存储在displacement map中的magnitudes。对于向内移位,使用下面的公式:
Position = Position0 + (Normal * Scale * DisplacementMagnitude − 1)
A Displacement Mapping Effect
列表9.2列出了displacement map effect的部分代码,主要是vertex shader部分的代码。列表9.2 An Abbreviated Displacement Mapping Effect(注:这里提供了完整的displacement map effect代码,也是练习第2题的要求)
#include "include\\Common.fxh"

cbuffer CBufferPerFrame
{
	float4 AmbientColor : AMBIENT <
		string UIName =  "Ambient Light";
		string UIWidget = "Color";
	> = {1.0f, 1.0f, 1.0f, 1.0f};

	float4 LightColor : COLOR <
		string Object = "LightColor0";
		string UIName =  "Light Color";
		string UIWidget = "Color";
	> = {1.0f, 1.0f, 1.0f, 1.0f};

	float3 LightPosition : POSITION <
		string Object = "PointLight0";
		string UIName = "Light Position";
		string Space = "World";
	> = { 0.0f, 0.0f, 0.0f };

	float LightRadius <
		string UIName = "Light Radius";
		string UIWidget = "slider";
		float UIMin = 0.0;
		float UIMax = 100.0;
		float UIStep = 1.0;
	> = { 10.0f };

	float3 CameraPosition : CAMERAPOSITION < string UIWidget="None"; >;
}

cbuffer CBufferPerObject
{
	float4x4 WorldViewProjection : WORLDVIEWPROJECTION < string UIWidget="None"; >;
	float4x4 World : WORLD < string UIWidget="None"; >;

	float4 SpecularColor : SPECULAR <
		string UIName =  "Specular Color";
		string UIWidget = "Color";
	> = {1.0f, 1.0f, 1.0f, 1.0f};

	float SpecularPower : SPECULARPOWER <
		string UIName =  "Specular Power";
		string UIWidget = "slider";
		float UIMin = 1.0;
		float UIMax = 255.0;
		float UIStep = 1.0;
	> = {25.0f};

	float DisplacementScale <
		string UIName = "Displacement Scale";
		string UIWidget = "slider";
		float UIMin = 0.0;
		float UIMax = 2.0;
		float UIStep = 0.01;
	> = { 0.0f };
}

Texture2D ColorTexture <
	string ResourceName = "default_color.dds";
	string UIName =  "Color Texture";
	string ResourceType = "2D";
>;

Texture2D DisplacementMap <
	string UIName = "Displacement Map";
	string ResourceType = "2D";
>;

SamplerState TrilinearSampler
{
	Filter = MIN_MAG_MIP_LINEAR;
	AddressU = WRAP;
	AddressV = WRAP;
};

RasterizerState DisableCulling
{
	CullMode = NONE;
};

/************* Data Structures *************/

struct VS_INPUT
{
	float4 ObjectPosition : POSITION;
	float2 TextureCoordinate : TEXCOORD;
	float3 Normal : NORMAL;
	float3 Tangent : TANGENT;
};

struct VS_OUTPUT
{
	float4 Position : SV_Position;
	float3 Normal : NORMAL;
	float3 Tangent : TANGENT;
	float3 Binormal : BINORMAL;
	float2 TextureCoordinate : TEXCOORD0;
	float3 LightDirection : TEXCOORD1;
	float3 ViewDirection : TEXCOORD2;
};

/************* Vertex Shader *************/

VS_OUTPUT vertex_shader(VS_INPUT IN)
{
	VS_OUTPUT OUT = (VS_OUTPUT)0;
	float2 textureCoordinate = get_corrected_texture_coordinate(IN.
		TextureCoordinate);
	if (DisplacementScale > 0.0f)
	{
		float displacement = DisplacementMap.
			SampleLevel(TrilinearSampler, textureCoordinate, 0);
		IN.ObjectPosition.xyz += IN.Normal * DisplacementScale *
			(displacement - 1);
	}
	OUT.Position = mul(IN.ObjectPosition, WorldViewProjection);
	OUT.TextureCoordinate = textureCoordinate;
	OUT.Normal = normalize(mul(float4(IN.Normal, 0), World).xyz);
	float3 worldPosition = normalize(mul(IN.ObjectPosition, World)).
		xyz;
	OUT.ViewDirection = normalize(CameraPosition - worldPosition);
	OUT.LightDirection = get_light_data(LightPosition, worldPosition,
		LightRadius);
	return OUT;
}

/************* Pixel Shader *************/

float4 pixel_shader(VS_OUTPUT IN) : SV_Target
{
	float4 OUT = (float4)0;

	float3 normal = normalize(IN.Normal);

	float3 viewDirection = normalize(IN.ViewDirection);
	float4 color = ColorTexture.Sample(TrilinearSampler, IN.TextureCoordinate);
	float3 ambient = get_vector_color_contribution(AmbientColor, color.rgb);

	LIGHT_CONTRIBUTION_DATA lightContributionData;
	lightContributionData.Color = color;
	lightContributionData.Normal = normal;
	lightContributionData.ViewDirection = viewDirection;
	lightContributionData.LightDirection = float4(IN.LightDirection, 1);
	lightContributionData.SpecularColor = SpecularColor;
	lightContributionData.SpecularPower = SpecularPower;
	lightContributionData.LightColor = LightColor;
	float3 light_contribution = get_light_contribution(lightContributionData);

	OUT.rgb = ambient + light_contribution;
	OUT.a = 1.0f;

	return OUT;
}

/************* Techniques *************/

technique10 main10
{
	pass p0
	{
		SetVertexShader(CompileShader(vs_4_0, vertex_shader()));
		SetGeometryShader(NULL);
		SetPixelShader(CompileShader(ps_4_0, pixel_shader()));

		SetRasterizerState(DisableCulling);
	}
}
Displacement Mapping Preamble
CBufferPerObject模块中新增了一个成员用于表示displacement scale。另外增加了一个Texture2D类型的对象用于表示displacement map。可以把这两个新增的变量与之前使用过的任何lighting effect结合使用。
Displacement Mapping Vertex Shader
在该vertex shader代码中,首先采样得到displacement magnitude值,然后把vertex沿着法线向内移位。采样时使用了SampleLevel()函数,该函数的第二个参数是mip-level。在displacement mapping effect的代码中,已经移除了normal mapping,因此normal不再是从一个独立的texture中获取。这种effect的一种更好的改进方法是,使用tessellation增加verteices数量,并从一个normal map采样得到normal。第四部分,“Intermediate-Level Rendering Topics”将会讨论这种技术。
Displacement Mapping Output
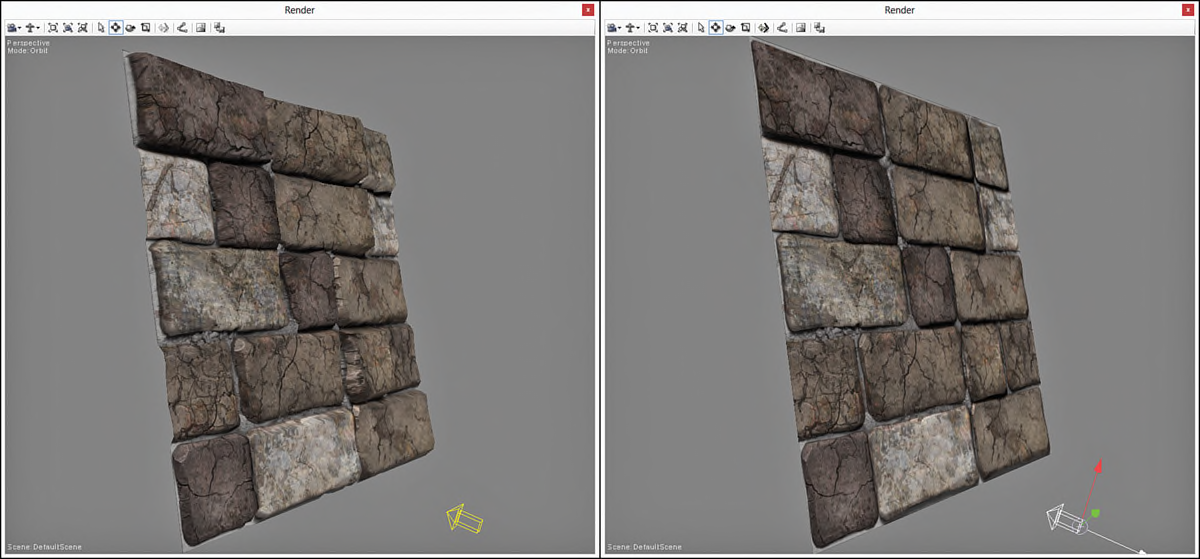
图9.5中显示了在一个plane上使用displacement mapping effect的输出结果,其中plane上使用了stone wall texture。左图中,displacement map的DisplacementScale值设为0.2。而在右图中,该值被设为0.0,displacement map effect无效。
图9.5 DisplacementMapping.fx applied to a plane with a stone wall texture using a
displacement map (left) and without a displacement map (right). (Textures by Nick Zuccarello,
Florida Interactive Entertainment Academy.)
注意
图9.5中使用的plane object是由Autodesk的Maya建模工具创建的,在水平和垂直方向分别进行了50个细分。该plane object比NVIDIA FX Composer的内置plane具有更多的vertex数量。
总结
本章主要讲解了normal mapping和displacement mapping,这两种techniques可以在不增加object的geometry数量的情况下,实现object更多的细节。而且本章是第二部分的最后一章。在后面的章节中,开始使用DirectX API并使用C++编程,把之前编写的shaders与C++渲染引擎结合起来。
Exercises
1. Find or create a color texture with an associated normal map (resource links are available on
the book’s companion website). Use these textures to experiment with the normal mapping
effect. Modify the lighting, manipulate the camera, and observe the output.
2. Implement a complete displacement mapping effect that incorporates a single point light.
3. Find or create a color texture with an associated displacement map. Use these textures to
experiment with the displacement mapping effect. Modify the displacement scale, and observe
the results.
1.查找或者创建一个color texture,以及对应的normal map(本书的配套网站上提供了texture资源的链接)。使用这些textures测试normal mapping effect。修改光照,调整camera并观察输出结果。
2.实现一个完整的displacement mapping effect,并与一个poing light结合。
3.查找或者创建一个color texture,以及对应的displacement map。使用这些textures测试displacement mapping effect。修改displacement scale值,并观察输出结果。
2.实现一个完整的displacement mapping effect,并与一个poing light结合。
3.查找或者创建一个color texture,以及对应的displacement map。使用这些textures测试displacement mapping effect。修改displacement scale值,并观察输出结果。
本章配套学习代码:


 1670
1670


 被折叠的 条评论
为什么被折叠?
被折叠的 条评论
为什么被折叠?
 到【灌水乐园】发言


