


MyBatis相信大家都很熟悉了,Spring Boot也对mybatis有很好的支持,在spring boot中使用mybatis比较简单,配置也比较少,非常的简洁明了,一起来看下吧
一 依赖的引入
       <dependency>
	   <groupId>mysql</groupId>
	   <artifactId>mysql-connector-java</artifactId>
	</dependency>

	<dependency>
	     <groupId>org.mybatis.spring.boot</groupId>
	     <artifactId>mybatis-spring-boot-starter</artifactId>
	     <version>1.3.1</version>
       </dependency>
       <dependency>
	    <groupId>com.github.pagehelper</groupId>
	    <artifactId>pagehelper</artifactId>
	    <version>4.1.0</version>
       </dependency>
要注意的是分页插件的版本,版本不同使用起来也会有差异
#DataBase DataSources
spring.datasource.url = jdbc:mysql://localhost:3306/springboot
spring.datasource.username = root
spring.datasource.password = 123456
spring.datasource.driverClassName = com.mysql.jdbc.Driver
spring.datasource.max-active=20
spring.datasource.max-idle=8
spring.datasource.min-idle=8
spring.datasource.initial-size=10


logging.level.com.debug=debug
配置文件主要是数据库的连接配置,就不过多解释了
三 在App.java里加入映射器扫描注解@MapperScan
package com.debug;

import org.mybatis.spring.annotation.MapperScan;
import org.springframework.boot.SpringApplication;
import org.springframework.boot.autoconfigure.SpringBootApplication;

/**
 * Hello world!
 *
 */
@SpringBootApplication
@MapperScan("com.debug.dao") //dao包下面是接口也就是mybatis的Mapper
public class App
{
    public static void main( String[] args )
    {
        System.out.println( "Hello World!" );
        SpringApplication.run(App.class, args);
    }
}
四 pojo和映射器
package com.debug.pojo;


public class UserInfo {

	private int id;
	private String name;
	private String address;


	public int getId() {
		return id;
	}

	public void setId(int id) {
		this.id = id;
	}

	public String getName() {
		return name;
	}

	public void setName(String name) {
		this.name = name;
	}

	public String getAddress() {
		return address;
	}

	public void setAddress(String address) {
		this.address = address;
	}

}
这里大家都懂的就不多说了
package com.debug.dao;

import org.apache.ibatis.annotations.Result;
import org.apache.ibatis.annotations.Results;
import org.apache.ibatis.annotations.Select;

import com.debug.pojo.UserInfo;

public interface UserMapper {

   @Select("select * from user where id=#{id}")
   @Results({
	   @Result(column="id",property="id"),
	   @Result(column="name",property="name"),
	   @Result(column="address",property="address")
   })
   public UserInfo getUserById(int id);

   @Select("select * from user where name like #{name}")
   @Results({
	   @Result(column="id",property="id"),
	   @Result(column="name",property="name"),
	   @Result(column="address",property="address")
   })
   public List<UserInfo> getUserByName(String name);

}
五 service类和分页工具类
针对数据分页的这个常用功能。github上也提供了用于mybatis分页的插件,我们只需要把它配置成bean然后交给spring boot进行管理就可以在代码里引用了
package com.debug.config;

import java.util.Properties;

import org.springframework.context.annotation.Bean;
import org.springframework.context.annotation.Configuration;

import com.github.pagehelper.PageHelper;

@Configuration
public class MyBatisConfiguration {

	@Bean
	public PageHelper pageHelper() {
		System.out.println("MyBatisConfiguration.pageHelper()");
		PageHelper pageHelper = new PageHelper();
		Properties p = new Properties();
		p.setProperty("offsetAsPageNum", "true");
		p.setProperty("rowBoundsWithCount", "true");
		p.setProperty("reasonable", "true");
		pageHelper.setProperties(p);
		return pageHelper;
	}
}
下面就是比较主要的service类了
package com.debug.service;

import javax.annotation.Resource;

import org.springframework.stereotype.Service;

import com.debug.dao.UserMapper;
import com.debug.pojo.UserInfo;


@Service
public class UserService {

	@Resource
	private UserMapper userMapper;

	 public UserInfo getUserById(int id) {
		 return userMapper.getUserById(id);
	 }

	 public List<UserInfo> getUserByName(String name) {

		return userMapper.getUserByName(name);
	 }
}
这里只简单的写了2个方法,后面再controller将会使用到
package com.debug.controller;
import java.util.List;
import javax.annotation.Resource;
import org.springframework.web.bind.annotation.RequestMapping;
import org.springframework.web.bind.annotation.RestController;
import com.debug.dao.UserMapper;
import com.debug.pojo.UserInfo;
import com.debug.service.UserService;
import com.github.pagehelper.PageHelper;
@RestController
@RequestMapping("/user")
public class UserController {
@Resource
private UserService userService;
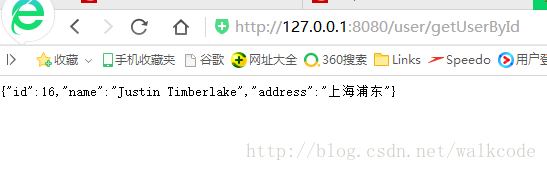
@RequestMapping("/getUserById")
public UserInfo getUserById() {
return userService.getUserById(16);
}
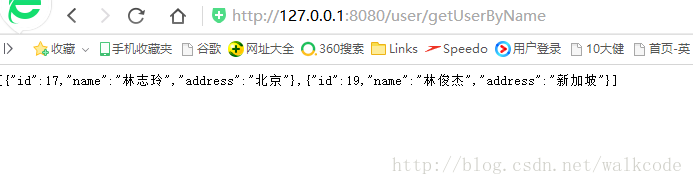
@RequestMapping("/getUserByName")
public List<UserInfo> getUserByName() {
PageHelper.startPage(1,2);
return userService.getUserByName("%林%");
}
}
最后看下运行效果:
分页的运行效果如下:
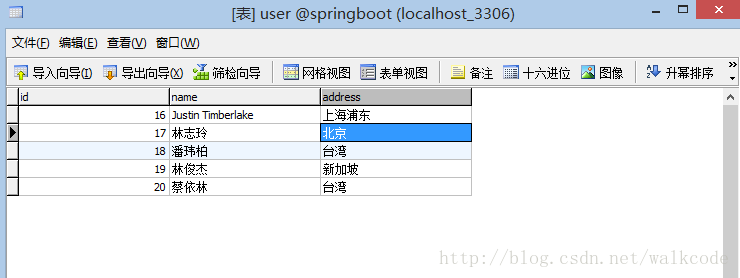
数据库里的数据是这样的


 1万+
1万+


 被折叠的 条评论
为什么被折叠?
被折叠的 条评论
为什么被折叠?
 到【灌水乐园】发言


