


上周买了本书叫《趣学Python编程》(英文名:Python for kids),昨天看完后把书后面的题都做了下。由于第1、2章没有习题,第13章及之后都是描写实例的章节,因此这个总结性的文章中只包含了第3-12章的习题答案。
1.我的调试环境
我分别在我的Win7上和RedHat上调试过Python:
1)Win7的IDE可以从Python的官网上下载:
https://www.python.org/downloads/windows/
点击链接Python 3.4.2→Download Windows x86 MSI installer,可以下载到文件Python-3.4.2.msi
2)在RedHat上可以用yum命令直接安装python,需要用到turtle的地方,还需要用yum安装tkinter
另外,在RedHat上,turtle弹出的窗口会在运行后立即消失,因此我用time.sleep()函数来拖延一些时间方便观察结果
2.关于python脚本的运行
1)win7中下载后的IDLE(Python 3.4 GUI - 32 bit),通过File→New打开一个编辑器,输入代码后按F5可以运行
2)RedHat中直接输入命令“python xxx.py”就可以运行脚本xxx.py了
3.第三章:字符串、列表、元组和字典
1)用列表games列出爱好,用列表foods列出你喜欢的食物,把这两个列表连在一起并把结果命名为favorites并打印之
games = ['game0', 'game1', 'game2', 'game3']
foods = ['food0', 'food1', 'food2', 'food3']
favorites = games + foods
print(favorites)
2)有三座建筑,每座藏了25个忍者,有两个地道,每个藏了40个武士,问一共有多少人可以投入战斗?
building = 3
ninja_per_building = 25
tunnel = 2
samurai_per_tunnel = 40
total = building * ninja_per_building + tunnel * samurai_per_tunnel
print(total)
3)创建两个变量:一个姓和一个名,创建一个字符串,用占位符使用这两个变量打印你名字的信息
namemap = {
        'Tsybius' : 'A',
        'Galatea' : 'B',
        'Gaius' : 'C',
        'Flavia' : 'D' }

text = "Name %s %s"
print(text % ('Tsybius', namemap['Tsybius']))
print(text % ('Galatea', namemap['Galatea']))
print(text % ('Gaius', namemap['Gaius']))
print(text % ('Flavia', namemap['Flavia']))
4.第四章:用海龟画图
1)用turtle的Pen函数创建一个画布,然后画一个长方形
import time
import turtle

width = 40
height = 30

t = turtle.Pen()

t.forward(width)
t.left(90)
t.forward(height)
t.left(90)
t.forward(width)
t.left(90)
t.forward(height)

time.sleep(5)
2)用turtle的Pen函数创建一个画布,然后画一个三角形
import math
import time
import turtle

t = turtle.Pen()

#画一个等边三角形
t.forward(50)
t.left(120)
t.forward(50)
t.left(120)
t.forward(50)
t.left(120)

#把坐标换到另一个位置
t.up()
t.right(90)
t.forward(200)
t.left(90)
t.down()

#画一个内角分别为30°、30°、120°的三角形
t.forward(80 * math.sqrt(3))
t.left(150)
t.forward(80)
t.left(60)
t.forward(80)
t.left(150)

time.sleep(5)
3)画一个没有角的方格
import time
import turtle

t = turtle.Pen()

#下
t.forward(100)

t.up()
t.forward(50)
t.left(90)
t.forward(50)
t.down()

#右
t.forward(100)

t.up()
t.forward(50)
t.left(90)
t.forward(50)
t.down()

#上
t.forward(100)

t.up()
t.forward(50)
t.left(90)
t.forward(50)
t.down()

#左
t.forward(100)

time.sleep(5)
5.用if和else来提问
1)输入代码验证答案
原代码
money = 2000
if money > 1000:
    print("I'm rich!!")
else:
    print("I'm not rich")
      print("But I might be later...")
这个代码是错误的,第五行和第六行的开头应该处于同一列,如下:
money = 2000
if money > 1000:
    print("I'm rich!!")
else:
    print("I'm not rich")
    print("But I might be later...")
2)用if语句判断一个数是否少于100或大于500,如果这个条件为真则打印“不是太少就是太多”
#twinkies = 50
#twinkies = 300
twinkies = 550

if twinkies < 100 or twinkies > 500:
    print("Too less or too more")
3)用一个if语句检查变量money是否在100到500之间,或是1000到5000之间
#money = 250
#money = 2500
money = 9999

if (money >= 100 and money <= 500) or (money >= 1000 and money <= 5000):
    print("money in [100, 500] or in [1000, 5000]")
else:
    print("Neither in [100, 500] nor in [1000, 5000]")
4)创建一组if语句,在变量ninja小于10时打印“我能打过”、小于30时打印“有点难”、小于50时打印“太多了”
ninjas = 5
#ninjas = 10
#ninjas = 30

if ninjas < 10:
    print("I can beat them")
elif ninjas < 30:
    print("It's a little difficult but I can deal with it")
elif ninjas < 50:
    print("Too more ninjas there!")
6.循环
1)解释下面的代码会发生什么
for x in range(0, 20):
    print('hello %s' % x)
    if x < 9:
        break
第一次循环时就因x<9触发了break,因此只能打印一次 hello 0
2)如果你的年龄是偶数,从2开始打印知道你的年龄为止,如果是你的年龄是奇数,从1开始
age = 23

start = 2
if age % 2 != 0:
    start = 1

for x in range(start, age + 2, 2):
    print(x)
3)创建一个列表,包含5种不同的三明治制作材料,创建一个循环,按顺序打印这个列表并写出顺序号
ingredients = ['snails', 'leeches', 'gorilla belly-button lint',
               'caterpillar eyebrows', 'centipede toes']

for x in range(0, 5):
    print("%d %s" % (x + 1, ingredients[x]))
4)月球上你的体重是在地球上的16.5%,假设你每年增长1公斤,打印未来15年你的体重状况
weight = 9999       #体重
increment = 1       #体重年增量
coefficient = 0.165 #体重转换系数

for x in range(1, 16):
    print("%d years later: %f" % (x, (weight + increment * x) * coefficient))
7.第七章:使用函数和模块来重用你的代码
1)用函数计算题目6.4中你的体重(参数为当前体重和体重的年增量)
def func_MoonWeight(weight, increment):
    coefficient = 0.165 #体重转换系数
    for x in range(1, 16):
        print("%d years later: %f" % (x, (weight + increment * x) * coefficient))

func_MoonWeight(30, 0.25)
2)用函数计算题目6.4中你的体重(参数为当前体重、体重的年增量和统计的年数)
def func_MoonWeight(weight, increment, deadline):
    coefficient = 0.165 #体重转换系数
    for x in range(1, deadline + 1):
        print("%d years later: %f" % (x, (weight + increment * x) * coefficient))

func_MoonWeight(90, 0.25, 5)
3)用函数计算6.4中你的体重,当前体重、体重的年增量和统计年数都由输入给出
import sys

def func_MoonWeight(weight, increment, deadline):
    coefficient = 0.165 #体重转换系数
    for x in range(1, deadline + 1):
        print("%d years later: %f" % (x, (weight + increment * x) * coefficient))

#读取信息并调用函数
print("Please enter your current Earth weight")
para1 = int(sys.stdin.readline())
print("Please enter the amount your weight might increase each year")
para2 = float(sys.stdin.readline())
print("Please enter the number of years")
para3 = int(sys.stdin.readline())

func_MoonWeight(para1, para2, para3)
8.第八章:如何使用类和对象
1)给Giraffes类增加函数让长颈鹿左、右、前、后四只脚移动,通过dance函数打印一整套舞步
class Giraffes():
    #函数:左脚向前
    def funcLeftFootForward(self):
        print('left foot forward')
    #函数:右脚向前
    def funcRightFootForward(self):
        print('right foot forward')
    #函数:左脚向后
    def funcLeftFootBack(self):
        print('left foot back')
    #函数:右脚向后
    def funcRightFootBack(self):
        print('right foot back')
    #函数:原地不动
    def funcStand(self):
        print()
    #函数:跳舞
    def funcDance(self):
        self.funcLeftFootForward()
        self.funcLeftFootBack()
        self.funcRightFootForward()
        self.funcRightFootBack()
        self.funcLeftFootBack()
        self.funcStand()
        self.funcRightFootBack()
        self.funcRightFootForward()
        self.funcLeftFootForward()

reginald = Giraffes()
reginald.funcDance()
2)使用4只Pen对象的turtle画出一个叉子
import time
import turtle

#线1
t1 = turtle.Pen()
t1.forward(100)
t1.left(90)
t1.forward(50)
t1.right(90)
t1.forward(50)

#线2
t2 = turtle.Pen()
t2.forward(100)
t2.right(90)
t2.forward(50)
t2.left(90)
t2.forward(50)

#线3
t3 = turtle.Pen()
t3.forward(120)
t3.left(90)
t3.forward(25)
t3.right(90)
t3.forward(20)

#线4
t4 = turtle.Pen()
t4.forward(120)
t4.right(90)
t4.forward(25)
t4.left(90)
t4.forward(20)

time.sleep(5)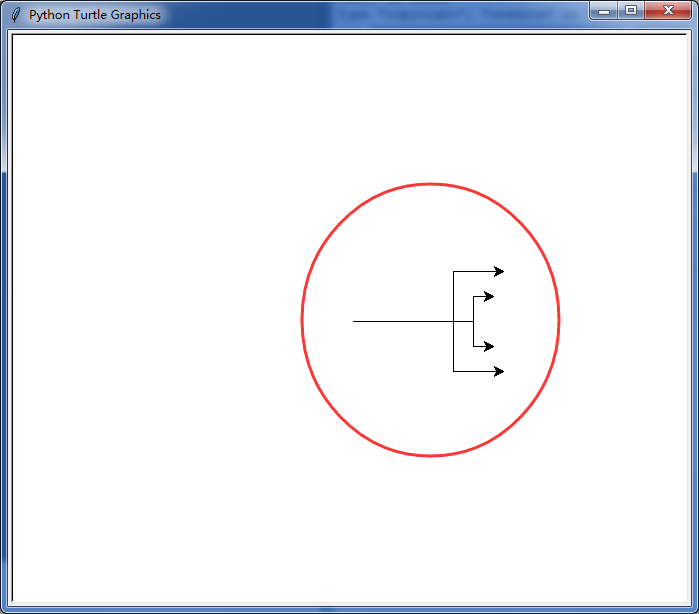
9.第九章:Python的内建函数
1)运行代码,解释结果
a = abs(10) + abs(-10)
print(a)
b = abs(-10) + -10
print(b)
a是数学算式“10+|-10|=10+10”,结果为20
b是数学算式“|-10|+(-10)=10-10”,结果为0
2)尝试用dir和help找出如何把字符串拆成单词
dir函数可以返回关于任何值的相关信息
help函数可以返回关于其参数中描述函数的帮助信息

经过dir和help函数最后确定的代码为:
string = '''this if is you not are a reading very this good then way
to you to have hide done a it message wrong'''

for x in string.split():
    print(x)
3)拷贝文件,这里采用先读取信息再写入到新文件的方式
#读取文件内容
test_file1 = open("d:\\input.txt")
text = test_file1.read()
test_file1.close()

#将读取到的内容写入到一个新文件
test_file2 = open("d:\\output.txt", 'w')
test_file2.write(text)
test_file2.close()
10.第十章,常用的Python模块
1)解释下面代码会打印出什么
import copy

class Car:
    pass

car1 = Car()
car1.wheels = 4

car2 = car1
car2.wheels = 3
print(car1.wheels) #这里打印什么? (3)

car3 = copy.copy(car1)
car3.wheels = 6
print(car1.wheels) #这里打印什么? (3)
第一个print打印3,因为car1和car2是同一个对象,改一个另一个也会改
第二个print打印3,因为car3是从car1通过copy得到的,和car1不是一个对象,修改car3不会同时改变car1
2)将一个信息用pickle序列化并保存到一个*.dat文件中,再从该文件中读取信息反序列化并打印
import pickle

info = {
    'Name' : 'Tsybius',
    'Age' : 23,
    'hobby' : ['hobby1', 'hobby2', 'hobby3']
}

#序列化写入文件
outputfile = open('d:\\save.dat', 'wb')
pickle.dump(info, outputfile)
outputfile.close()

#反序列化读取文件
inputfile = open('d:\\save.dat', 'rb')
info2 = pickle.load(inputfile)
inputfile.close
print(info2)
11.第十一章:高级海龟作图
1)画八边形
import time
import turtle

t = turtle.Pen()
for x in range(1, 9):
    t.forward(100)
    t.left(45)

time.sleep(5)
2)画一个填好色的带轮廓的八边形
import time
import turtle

t = turtle.Pen()

#绘制实心八边形(红色)
t.color(1, 0, 0)
t.begin_fill()
for x in range(1, 9):
    t.forward(100)
    t.left(45)
t.end_fill()

#为八边形描边(黑色)
t.color(0, 0, 0)
for x in range(1, 9):
    t.forward(100)
    t.left(45)

time.sleep(5)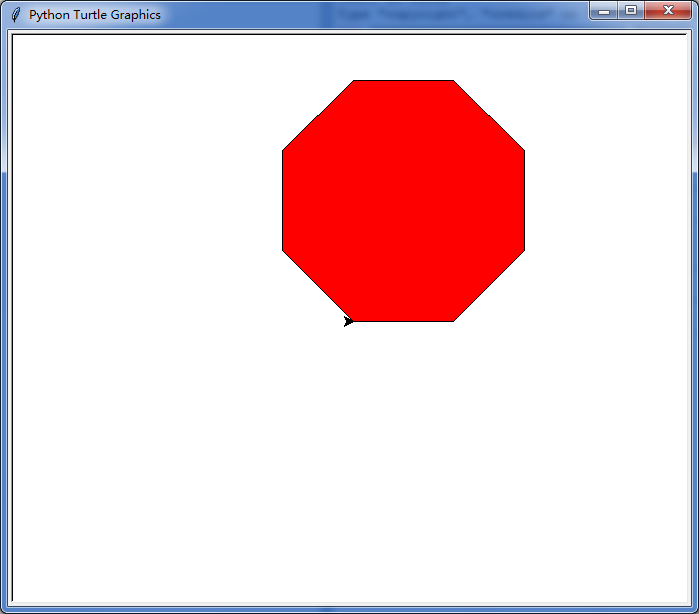
3)给出大小size和星星的角数,绘制一个星星
import time
import turtle

#x边形内角和180*(x-3)

#函数:给出大小和顶点数绘制星星
#size:星星的核心是个等边多边形,这是该多边形的顶点到其中心的距离
#point:顶点数
def funcDrawStar(size, point):
    t = turtle.Pen()
    #调校坐标位置
    t.up()
    t.backward(200)
    t.right(90)
    t.forward(100)
    t.left(90)
    t.down()
    #开始画图
    t.color(1, 0, 0)
    t.begin_fill()
    for x in range(1, point * 2 + 1):
        t.forward(size)
        if x % 2 == 0:
            t.left(120)
        else:
            t.right(180 * (point - 2) / point - 60)
    t.end_fill()

#funcDrawStar(100, 6)
funcDrawStar(100, 9)

time.sleep(5)
12.第十二章:用tkinter画高级图形
1)在屏幕上画满三角形,位置随机、颜色随机
from tkinter import *
import random

color = ["green", "red", "blue", "orange", "yellow",
         "pink", "purple", "violet", "magenta", "cyan"]

tk = Tk()
canvas = Canvas(tk, width = 400, height = 400)
canvas.pack()

#函数:创建随机位置、随机颜色的三角形
def funcRandomTriangle():
    x1 = random.randrange(400)
    y1 = random.randrange(400)
    x2 = random.randrange(400)
    y2 = random.randrange(400)
    x3 = random.randrange(400)
    y3 = random.randrange(400)
    fillcolor = random.randrange(10)
    canvas.create_polygon(x1, y1, x2, y2, x3, y3,
        fill = color[fillcolor], outline = "black")

for x in range(0, 15):
    funcRandomTriangle()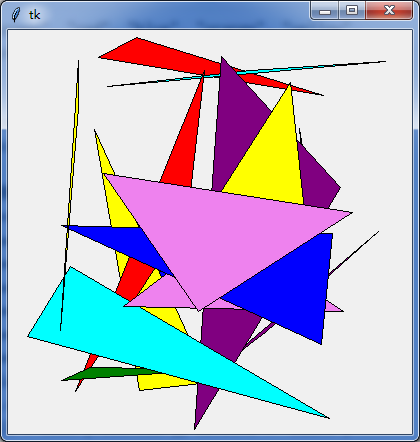
2)移动三角形,先向右,再向下,再向左,再向上回到原来位置
import time
from tkinter import *

tk = Tk()
canvas = Canvas(tk, width = 400, height = 400)
canvas.pack()

#创建一个三角形
canvas.create_polygon(10, 10, 10, 60, 50, 35)

#向右移动
for x in range(0, 60):
    canvas.move(1, 5, 0)
    tk.update()
    time.sleep(0.05)

#向下移动
for x in range(0, 60):
    canvas.move(1, 0, 5)
    tk.update()
    time.sleep(0.05)

#向左移动
for x in range(0, 60):
    canvas.move(1, -5, 0)
    tk.update()
    time.sleep(0.05)

#向上移动
for x in range(0, 60):
    canvas.move(1, 0, -5)
    tk.update()
    time.sleep(0.05)
3)移动照片(gif格式)
import time
from tkinter import *

tk = Tk()
canvas = Canvas(tk, width = 400, height = 400)
canvas.pack()

myimg = PhotoImage(file = "d:\\temp.gif")
canvas.create_image(0, 0, anchor = NW, image = myimg)

#向右移动
for x in range(0, 25):
    canvas.move(1, 5, 0)
    tk.update()
    time.sleep(0.05)
END


 被折叠的 条评论
为什么被折叠?
被折叠的 条评论
为什么被折叠?
 到【灌水乐园】发言


