


在Win32环境下编写多线程应用程序,也会常用到信号量Semaphore来进行线程同步。与其相关的一组API包括:CreateSemaphore,ReleaseSemaphore,WaitForSingleObject,和CloseHandle。关于这些API的功能以及参数意义等这里就不多说了。下边,我封装了一个信号量类,以及测试代码。已由本人在VS2005环境下编译,测试通过。
MySemaphore.h
#ifndef Semaphore_Header
#define Semaphore_Header

#include <iostream>
#include <Windows.h>
#include <assert.h>

using namespace std;

//------------------------------------------------------------------------

class CSemaphoreImpl
{
protected:
	CSemaphoreImpl(int n, int max);
	~CSemaphoreImpl();
	void SetImpl();
	void WaitImpl();
	bool WaitImpl(long lMilliseconds);

private:
	HANDLE m_hSema;
};

inline void CSemaphoreImpl::SetImpl()
{
	if (!ReleaseSemaphore(m_hSema, 1, NULL))
	{
		cout<<"cannot signal semaphore"<<endl;
	}
}

//------------------------------------------------------------------------

/*

 信号量同步机制
 信号量提供一个计数值,可以进行原子操作。V 将计数值加1,使得
 等待该信号量的线程可以被调用(调用Set()),P 将计数值减1,使
 当前线程被挂起,进行睡眠(调用Wait())。
 当信号量的计数值被初始化为0时,调用P操作,将挂起当前线程。
 当信号量被激活,即调用V操作后,被挂起的线程就有机会被重新调度了。

*/

class CMySemaphore: private CSemaphoreImpl
{
public:

	/*
	 创建一个信号量,信号量计数值当前值为参数n,最大值为max。
	 如果只有n,则n必须大于0;如果同时有n和max,则n必须不小
	 于0,且不大于max
	*/
	CMySemaphore(int n);
	CMySemaphore(int n, int max);

	/*
	 销毁一个信号量
	*/
	~CMySemaphore();

	/*
	 对信号量计数值做加1动作,信号量变为有信号状态,使得
	 另一个等待该信号量的线程可以被调度
	*/
	void Set();

	/*
	 对信号量计数值做减1动作,信号量变为无信号状态。若
	 计数值变得大于0时,信号量才会变为有信号状态。
	*/
	void Wait();

	/*
	 在给定的时间间隔里等待信号量变为有信号状态,若成功,
	 则将计数值减1,否则将发生超时。
	*/
	void Wait(long lMilliseconds);

	/*
	 在给定的时间间隔里等待信号量变为有信号状态,若成功,
	 则将计数值减1,返回true;否则返回false。
	*/
	bool TryWait(long lMilliseconds);

private:
	CMySemaphore();
	CMySemaphore(const CMySemaphore&);
	CMySemaphore& operator = (const CMySemaphore&);
};

inline void CMySemaphore::Set()
{
	SetImpl();
}


inline void CMySemaphore::Wait()
{
	WaitImpl();
}


inline void CMySemaphore::Wait(long lMilliseconds)
{
	if (!WaitImpl(lMilliseconds))
		cout<<"time out"<<endl;
}

inline bool CMySemaphore::TryWait(long lMilliseconds)
{
	return WaitImpl(lMilliseconds);
}

#endif
MySemaphore.cpp
#include "MySemaphore.h"

CSemaphoreImpl::CSemaphoreImpl(int n, int max)
{
	assert (n >= 0 && max > 0 && n <= max);

	m_hSema = CreateSemaphore(NULL, n, max, NULL);
	if (!m_hSema)
	{
		cout<<"cannot create semaphore"<<endl;
	}
}

CSemaphoreImpl::~CSemaphoreImpl()
{
	CloseHandle(m_hSema);
}

void CSemaphoreImpl::WaitImpl()
{
	switch (WaitForSingleObject(m_hSema, INFINITE))
	{
	case WAIT_OBJECT_0:
		return;
	default:
		cout<<"wait for semaphore failed"<<endl;
	}
}

bool CSemaphoreImpl::WaitImpl(long lMilliseconds)
{
	switch (WaitForSingleObject(m_hSema, lMilliseconds + 1))
	{
	case WAIT_TIMEOUT:
		return false;
	case WAIT_OBJECT_0:
		return true;
	default:
		cout<<"wait for semaphore failed"<<endl;
	}
	return false;
}

CMySemaphore::CMySemaphore(int n): CSemaphoreImpl(n, n)
{
}

CMySemaphore::CMySemaphore(int n, int max): CSemaphoreImpl(n, max)
{
}


CMySemaphore::~CMySemaphore()
{
}
下边是测试代码
// MySem.cpp : 定义控制台应用程序的入口点。
//

#include "MySemaphore.h"
#include <process.h>

//创建一个信号量,其计数值当前值为0,最大值为3
CMySemaphore g_MySem(0, 3);

//线程函数
unsigned int __stdcall StartThread(void *pParam)
{
	//休眠100毫秒,确保主线程函数main中
	//创建工作线程下一句g_MySem.Set();先执行
	Sleep(100);

	g_MySem.Wait(); //信号量计数值减1

	cout<<"Do print StartThread"<<endl;

	return (unsigned int)0;
}

int main(int argc, char* argv[])
{
	HANDLE hThread;
	unsigned int uiThreadId;

	assert ( !g_MySem.TryWait(10) );

	g_MySem.Set(); //信号量计数值加1

	g_MySem.Wait(); //信号量计数值减1

	try
	{
		g_MySem.Wait(100);
		cout<<"must timeout"<<endl; //此处发生超时
	}
	catch (...)
	{
		cout<<"wrong exception"<<endl;
	}

	g_MySem.Set();
	g_MySem.Set();
	assert ( g_MySem.TryWait(0) );
	g_MySem.Wait();
	assert ( !g_MySem.TryWait(10) );

	//创建工作线程
	hThread = (HANDLE)_beginthreadex(NULL, 0, &StartThread, NULL, 0, &uiThreadId);

	g_MySem.Set();

	//等待线程结束
	DWORD dwRet = WaitForSingleObject(hThread,INFINITE);
	if ( dwRet == WAIT_TIMEOUT )
	{
		TerminateThread(hThread,0);
	}

	assert ( !g_MySem.TryWait(10) ); //若将断言中的 ! 去掉,则会发生断言错误

	//关闭线程句柄,释放资源
	CloseHandle(hThread);

	system("pause");
	return 0;
}
编译,运行
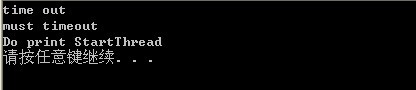
可见,在不同的线程,这里是主线程函数main和工作线程函数StartThread都可以对信号量对象g_MySem做 P操作。
欢迎转载,麻烦带上连接http://blog.csdn.net/chexlong/article/details/7089287 谢谢合作!


 1550
1550


 被折叠的 条评论
为什么被折叠?
被折叠的 条评论
为什么被折叠?
 到【灌水乐园】发言


