Spring4 整合 Hibernate4
Spring4 接管 Hibernate4 所有 Bean 实例,以及 SessionFactory,事务管理器; 泛型注入;
Spring4 整合 Struts2
Spring4 接管 Struts2 所有 Bean 实例;
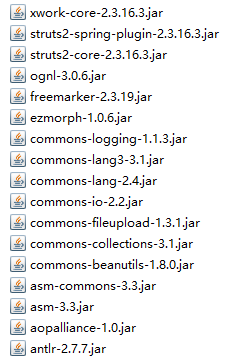
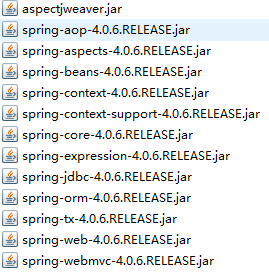
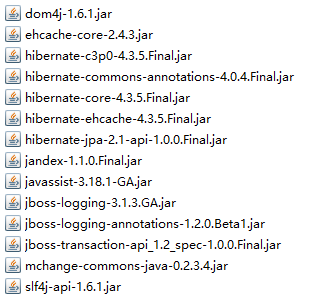
需要整合的jar包
数据库驱动包
![]()
Struts2.3.16
Spring4.0.6
Hibernate4.3.5
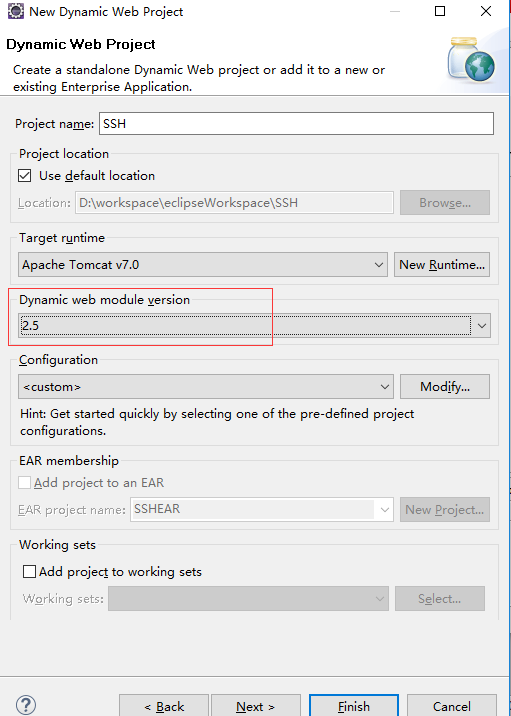
一、创建web项目,选择2.5,因为3.0没有web.xml文件
然后将以上那些jar复制到lib下
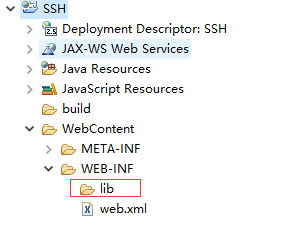
二、然后配置web.xml
<?xml version="1.0" encoding="UTF-8"?>
<web-app xmlns:xsi="http://www.w3.org/2001/XMLSchema-instance" xmlns="http://java.sun.com/xml/ns/javaee" xsi:schemaLocation="http://java.sun.com/xml/ns/javaee http://java.sun.com/xml/ns/javaee/web-app_2_5.xsd" id="WebApp_ID" version="2.5">
  <display-name>SSH</display-name>
  <welcome-file-list>
    <welcome-file>index.jsp</welcome-file>
  </welcome-file-list>

  <!-- 添加对spring的支持 -->
  <context-param>
    <param-name>contextConfigLocation</param-name>
    <param-value>classpath:applicationContext.xml</param-value>
  </context-param>

    <!-- 定义Spring监听器,加载Spring  -->
    <listener>
        <listener-class>org.springframework.web.context.ContextLoaderListener</listener-class>
    </listener>

  <!-- 添加对struts2的支持 -->
  <filter>
    <filter-name>struts2</filter-name>
    <filter-class>org.apache.struts2.dispatcher.ng.filter.StrutsPrepareAndExecuteFilter</filter-class>
  </filter>

  <filter-mapping>
    <filter-name>struts2</filter-name>
    <url-pattern>/*</url-pattern>
  </filter-mapping>

  <!-- Session延迟加载到页面  -->
  <!-- 没有这个的话,Hibernate后台取数据的时候,Hibernate对象关联了,
       Session被关闭了,页面是取不到数据的加了openSessionInViewFilter
       Session就能延迟到页面
   -->
   <filter>
    <filter-name>openSessionInViewFilter</filter-name>
    <filter-class>org.springframework.orm.hibernate4.support.OpenSessionInViewFilter</filter-class>
    <init-param>
      <param-name>singleSession</param-name>
      <param-value>true</param-value>
    </init-param>
  </filter>

   <filter-mapping>
    <filter-name>openSessionInViewFilter</filter-name>
    <url-pattern>*.action</url-pattern>
  </filter-mapping>

</web-app>
三、配置Struts2(在src文件夹下)
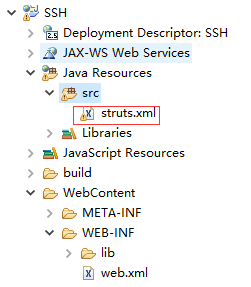
<?xml version="1.0" encoding="UTF-8"?>
<!DOCTYPE struts PUBLIC
    "-//Apache Software Foundation//DTD Struts Configuration 2.3//EN"
    "http://struts.apache.org/dtds/struts-2.3.dtd">

<struts>
    <!-- 后缀,用action -->
    <constant name="struts.action.extension" value="action" />


</struts>
四、配置hibernate.cfg.xml(在src文件夹下)
<?xml version='1.0' encoding='UTF-8'?>
<!DOCTYPE hibernate-configuration PUBLIC
         "-//Hibernate/Hibernate Configuration DTD 3.0//EN"
    "http://www.hibernate.org/dtd/hibernate-configuration-3.0.dtd">

<hibernate-configuration>
    <session-factory>

		<!--方言-->
        <property name="dialect">org.hibernate.dialect.MySQL5Dialect</property>

        <!-- 显示sql语句 -->
        <property name="show_sql">true</property>

		<!-- 自动更新 -->
        <property name="hbm2ddl.auto">update</property>


    </session-factory>
</hibernate-configuration>
五、配置applicationContext.xml(在src文件夹下)
<?xml version="1.0" encoding="UTF-8"?>
<beans xmlns="http://www.springframework.org/schema/beans"
    xmlns:xsi="http://www.w3.org/2001/XMLSchema-instance"
    xmlns:p="http://www.springframework.org/schema/p"
    xmlns:aop="http://www.springframework.org/schema/aop"
    xmlns:context="http://www.springframework.org/schema/context"
    xmlns:jee="http://www.springframework.org/schema/jee"
    xmlns:tx="http://www.springframework.org/schema/tx"
    xsi:schemaLocation="
        http://www.springframework.org/schema/aop http://www.springframework.org/schema/aop/spring-aop-4.0.xsd
        http://www.springframework.org/schema/beans http://www.springframework.org/schema/beans/spring-beans-4.0.xsd
        http://www.springframework.org/schema/context http://www.springframework.org/schema/context/spring-context-4.0.xsd
        http://www.springframework.org/schema/jee http://www.springframework.org/schema/jee/spring-jee-4.0.xsd
        http://www.springframework.org/schema/tx http://www.springframework.org/schema/tx/spring-tx-4.0.xsd">

    <!-- 定义数据源,使用hibeinate时是由hibernate.cfg.xml定义,现在是由Spring定义 -->
    <!-- 要创建数据库test -->
    <bean id="dataSource"
		class="org.springframework.jdbc.datasource.DriverManagerDataSource">
		<property name="driverClassName"
			value="com.mysql.jdbc.Driver">
		</property>
		<property name="url"
			value="jdbc:mysql://localhost:3306/test">
		</property>
		<property name="username" value="root"></property>
		<property name="password" value="123456"></property>
	</bean>


    <!-- session工厂,注入数据源和hibernate.cfg.xml文件 -->
    <bean id="sessionFactory"
        class="org.springframework.orm.hibernate4.LocalSessionFactoryBean">
        <property name="dataSource">
            <ref bean="dataSource" />
        </property>
        <property name="configLocation" value="classpath:hibernate.cfg.xml"/>
        <!-- 自动扫描注解方式配置的hibernate类文件 -->
        <property name="packagesToScan">
            <list>
                <value>com.java.entity</value>
            </list>
        </property>
    </bean>

    <!-- 配置事务管理器 -->
    <bean id="transactionManager"
        class="org.springframework.orm.hibernate4.HibernateTransactionManager">
        <property name="sessionFactory" ref="sessionFactory" />
    </bean>

    <!-- 配置事务通知属性 -->
    <tx:advice id="txAdvice" transaction-manager="transactionManager">
        <!-- 定义事务传播属性 -->
        <tx:attributes>
            <tx:method name="insert*" propagation="REQUIRED" />
            <tx:method name="update*" propagation="REQUIRED" />
            <tx:method name="edit*" propagation="REQUIRED" />
            <tx:method name="save*" propagation="REQUIRED" />
            <tx:method name="add*" propagation="REQUIRED" />
            <tx:method name="new*" propagation="REQUIRED" />
            <tx:method name="set*" propagation="REQUIRED" />
            <tx:method name="remove*" propagation="REQUIRED" />
            <tx:method name="delete*" propagation="REQUIRED" />
            <tx:method name="change*" propagation="REQUIRED" />
            <tx:method name="get*" propagation="REQUIRED" read-only="true" />
            <tx:method name="find*" propagation="REQUIRED" read-only="true" />
            <tx:method name="load*" propagation="REQUIRED" read-only="true" />
            <tx:method name="*" propagation="REQUIRED" read-only="true" />
        </tx:attributes>
    </tx:advice>


    <!-- 配置事务切面 -->
    <aop:config>
        <aop:pointcut id="serviceOperation"
            expression="execution(* com.java.service..*.*(..))" />
        <aop:advisor advice-ref="txAdvice" pointcut-ref="serviceOperation" />
    </aop:config>

    <!-- 自动加载构建bean
    	后面我们配置的类用注解的方式实现,不用手工配置
    -->
    <context:component-scan base-package="com.java" />

</beans>
六、创建数据库test
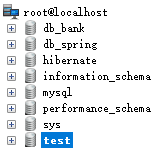
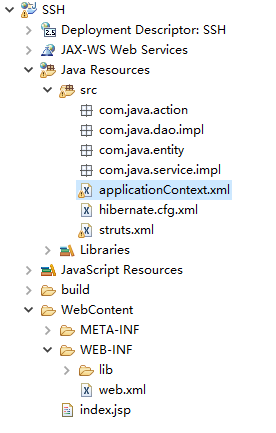
七、包层次
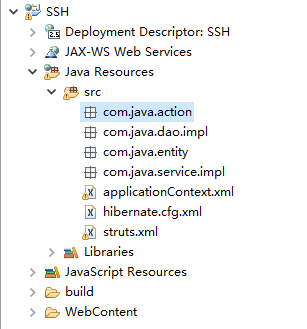
com.java.entity(实体)在sessionFactory配置好了
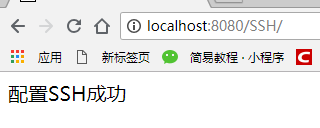
八、创建一个jsp文件看看ssh是否配置成功


 1598
1598

 被折叠的 条评论
为什么被折叠?


