


传统的Spring做法是使用.xml文件来对bean进行注入或者是配置aop、事物,这么做有两个缺点:
1、如果所有的内容都配置在.xml文件中,那么.xml文件将会十分庞大;如果按需求分开.xml文件,那么.xml文件又会非常多。总之这将导致配置文件的可读性与可维护性变得很低。
2、在开发中在.java文件和.xml文件之间不断切换,是一件麻烦的事,同时这种思维上的不连贯也会降低开发的效率。
为了解决这两个问题,Spring引入了注解,通过"@XXX"的方式,让注解与Java Bean紧密结合,既大大减少了配置文件的体积,又增加了Java Bean的可读性与内聚性。
1、@Autowired
不使用注解例子:
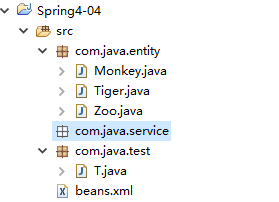
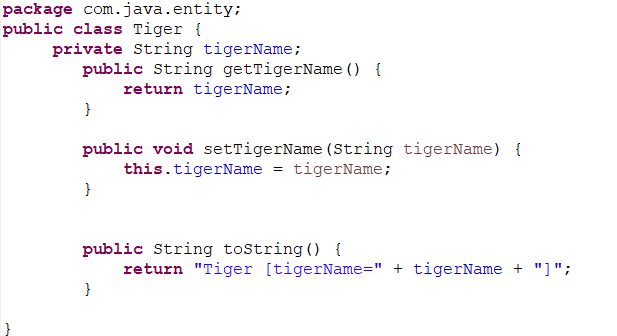
定义一个老虎
package com.java.entity;

public class Tiger {
	 private String tigerName;

	public String getTigerName() {
		return tigerName;
	}

	public void setTigerName(String tigerName) {
		this.tigerName = tigerName;
	}


	public String toString() {
		return "Tiger [tigerName=" + tigerName + "]";
	}


}
定义一个猴子
package com.java.entity;

public class Monkey {
	  private String monkeyName;


	public String toString() {
		return "Monkey [monkeyName=" + monkeyName + "]";
	}

	public String getMonkeyName() {
		return monkeyName;
	}

	public void setMonkeyName(String monkeyName) {
		this.monkeyName = monkeyName;
	}


}
定义一个动物园
package com.java.entity;

public class Zoo {
	 private Monkey monkey;
	 private Tiger tiger;
	public Monkey getMonkey() {
		return monkey;
	}
	public void setMonkey(Monkey monkey) {
		this.monkey = monkey;
	}
	public Tiger getTiger() {
		return tiger;
	}
	public void setTiger(Tiger tiger) {
		this.tiger = tiger;
	}

	public String toString() {
		return "Zoo [monkey=" + monkey + ", tiger=" + tiger + "]";
	}


}
在beans.xml(名字可以自定义)中实例化
<?xml version="1.0" encoding="UTF-8"?>
<beans xmlns="http://www.springframework.org/schema/beans"
    xmlns:xsi="http://www.w3.org/2001/XMLSchema-instance"
    xmlns:aop="http://www.springframework.org/schema/aop"
    xmlns:context="http://www.springframework.org/schema/context"
    xsi:schemaLocation="http://www.springframework.org/schema/beans
        http://www.springframework.org/schema/beans/spring-beans.xsd
        http://www.springframework.org/schema/aop
        http://www.springframework.org/schema/aop/spring-aop.xsd
        http://www.springframework.org/schema/context
        http://www.springframework.org/schema/context/spring-context.xsd">


	<bean id="monkey" class="com.java.entity.Monkey" >
		<property name="monkeyName" value="猴子"></property>
	</bean>

	<bean id="tiger" class="com.java.entity.Tiger" >
		<property name="tigerName" value="老虎"></property>
	</bean>

	<!-- 把老虎、猴子注入到动物园Bean -->
	<bean id="zoo" class="com.java.entity.Zoo" >
		<property name="tiger" ref="tiger" />
		<property name="monkey" ref="monkey" />
	</bean>

</beans>
测试类
package com.java.test;
import org.junit.Before;
import org.junit.Test;
import org.springframework.context.ApplicationContext;
import org.springframework.context.support.ClassPathXmlApplicationContext;
import com.java.entity.Zoo;
public class T {
private ApplicationContext ac;
@Before
public void setUp() throws Exception {
ac=new ClassPathXmlApplicationContext("beans.xml");
}
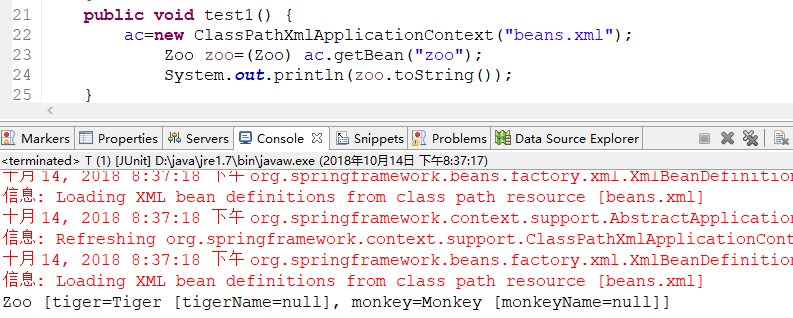
@Test
public void test1() {
ac=new ClassPathXmlApplicationContext("beans.xml");
Zoo zoo=(Zoo) ac.getBean("zoo");
System.out.println(zoo.toString());
}
}
结果
![]()
@Autowired顾名思义,就是自动装配,其作用是为了消除代码Java代码里面的gettertter与bean属性中的property。当然,getter看个人需求,如果私有属性需要对外提供的话,应当予以保留。@Autowired默认按类型匹配的方式,在容器查找匹配的Bean,当有且仅有一个匹配的Bean时,Spring将其注入@Autowired标注的变量中。因此,引入@Autowired注解,先看一下spring配置文件怎么写:
<?xml version="1.0" encoding="UTF-8"?>
<beans xmlns="http://www.springframework.org/schema/beans"
    xmlns:xsi="http://www.w3.org/2001/XMLSchema-instance"
    xmlns:aop="http://www.springframework.org/schema/aop"
    xmlns:context="http://www.springframework.org/schema/context"
    xsi:schemaLocation="http://www.springframework.org/schema/beans
        http://www.springframework.org/schema/beans/spring-beans.xsd
        http://www.springframework.org/schema/aop
        http://www.springframework.org/schema/aop/spring-aop.xsd
        http://www.springframework.org/schema/context
        http://www.springframework.org/schema/context/spring-context.xsd">

		<!-- 自动找com.spring包下面的注解 -->
   <context:component-scan base-package="com.spring" />

	<bean id="monkey" class="com.java.entity.Monkey" >
		<property name="monkeyName" value="猴子"></property>
	</bean>

	<bean id="tiger" class="com.java.entity.Tiger" >
		<property name="tigerName" value="老虎"></property>
	</bean>

	<!-- 本来把老虎、猴子注入到动物园Bean,现在不用了 -->
	<bean id="zoo" class="com.java.entity.Zoo" >
	</bean>

</beans>
再看Zoo,也不用写老虎和猴子的get,set方法了
package com.java.entity;

import org.springframework.beans.factory.annotation.Autowired;

public class Zoo {
	 @Autowired
	 private Monkey monkey;
         @Autowired
	 private Tiger tiger;


	public String toString() {
		return "Zoo [monkey=" + monkey + ", tiger=" + tiger + "]";
	}

}
结果
![]()
当我们把定义的猴子老虎bean去掉
<?xml version="1.0" encoding="UTF-8"?>
<beans xmlns="http://www.springframework.org/schema/beans"
    xmlns:xsi="http://www.w3.org/2001/XMLSchema-instance"
    xmlns:aop="http://www.springframework.org/schema/aop"
    xmlns:context="http://www.springframework.org/schema/context"
    xsi:schemaLocation="http://www.springframework.org/schema/beans
        http://www.springframework.org/schema/beans/spring-beans.xsd
        http://www.springframework.org/schema/aop
        http://www.springframework.org/schema/aop/spring-aop.xsd
        http://www.springframework.org/schema/context
        http://www.springframework.org/schema/context/spring-context.xsd">

		<!-- 自动找com.spring包下面的注解 -->
   <context:component-scan base-package="com.spring" />


	<!-- 本来把老虎、猴子注入到动物园Bean,现在不用了 -->
	<bean id="zoo" class="com.java.entity.Zoo" >
	</bean>

</beans>
就会报错

这里@Autowired注解的意思就是,当Spring发现@Autowired注解时,
将自动在代码上下文中找到和其匹配(默认是类型匹配)的Bean,并自动注入到相应的地方去。
报错是因为beans.xml的的猴子老虎bean找不到了,所以注入报错。
因为,@Autowired注解要去寻找的是一个Bean,Tiger和Monkey的Bean定义都给去掉了,自然就不是一个Bean了,Spring容器找不到也很好理解。那么,如果属性找不到我不想让Spring容器抛出异常,而就是显示null,可以吗?可以的。
就是将@Autowired注解的required属性设置为false即可。
package com.java.entity;

import org.springframework.beans.factory.annotation.Autowired;

public class Zoo {

	 @Autowired(required=false)
	 private Monkey monkey;

	 @Autowired(required=false)
	 private Tiger tiger;


	public String toString() {
		return "Zoo [monkey=" + monkey + ", tiger=" + tiger + "]";
	}


}
![]()
2、@Qualifier注解
Autowired注解配合Qualifier注解使用
但我们自动装配接口时,接口有两个实现类,应该选择哪个实现类
实例
比如,我们先写一个动物接口,然后老虎、猴子继承这个动物接口,然后在动物园实体类使用这个接口Animal
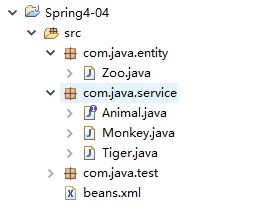
Animal.java
package com.java.service;

public interface Animal {

	public String getName();
}
Monkey.java
package com.java.service;

public class Monkey implements Animal {


	public String getName() {

		return "猴子";
	}

}
Tiger.java
package com.java.service;

public class Tiger implements Animal {


	public String getName() {

		return "老虎";
	}

}
动物园实体类使用这个接口Animal
package com.java.entity;

import org.springframework.beans.factory.annotation.Autowired;
import org.springframework.beans.factory.annotation.Qualifier;

import com.java.service.Animal;

public class Zoo {

	 @Autowired(required=false)
	 private Animal animal;


	public String toString() {
		return animal.getName();

	}

}
然后再beans.xml配置这几个文件
<?xml version="1.0" encoding="UTF-8"?>
<beans xmlns="http://www.springframework.org/schema/beans"
    xmlns:xsi="http://www.w3.org/2001/XMLSchema-instance"
    xmlns:aop="http://www.springframework.org/schema/aop"
    xmlns:context="http://www.springframework.org/schema/context"
    xsi:schemaLocation="http://www.springframework.org/schema/beans
        http://www.springframework.org/schema/beans/spring-beans.xsd
        http://www.springframework.org/schema/aop
        http://www.springframework.org/schema/aop/spring-aop.xsd
        http://www.springframework.org/schema/context
        http://www.springframework.org/schema/context/spring-context.xsd">

		<!-- 自动找com.spring包下面的注解 -->
   <context:component-scan base-package="com.spring" />

	<bean id="monkey" class="com.java.service.Monkey" ></bean>

	<bean id="tiger" class="com.java.service.Tiger" ></bean>

	<!-- 本来把老虎、猴子注入到动物园Bean,现在不用了,使用了Autowired注解 -->
	<bean id="zoo" class="com.java.entity.Zoo" >
	</bean>

</beans>
测试类
package com.java.test;

import org.junit.Before;
import org.junit.Test;
import org.springframework.context.ApplicationContext;
import org.springframework.context.support.ClassPathXmlApplicationContext;

import com.java.entity.Zoo;


public class T {

	private ApplicationContext ac;

	@Before
	public void setUp() throws Exception {
		ac=new ClassPathXmlApplicationContext("beans.xml");
	}

	@Test
	public void test1() {
		ac=new ClassPathXmlApplicationContext("beans.xml");
	        Zoo zoo=(Zoo) ac.getBean("zoo");
	        System.out.println(zoo.toString());
	}

}
结果:报错,因为Animal接口有两个实现类,Spring并不知道应当引用哪个实现类
出现这种情况通常有两种解决办法:
(1)、在配置文件中删除其中一个实现类,Spring会自动去base-package下寻找Car接口的实现类,发现接口只有一个实现类,便会直接引用这个实现类。
(2)、实现类就是有多个该怎么办?此时可以使用@Qualifier注解来指定Bean的名称:
package com.java.entity;

import org.springframework.beans.factory.annotation.Autowired;
import org.springframework.beans.factory.annotation.Qualifier;

import com.java.service.Animal;

public class Zoo {
	//Animal接口有两个实现类,让他注入monkey的实现类
        //在beans.xml定义的bean的名称monkey
	 @Autowired(required=false)
	 @Qualifier("monkey")
	 private Animal animal;


	public String toString() {
		return animal.getName();

	}

}
结果![]()
2、Resource
@Resource的作用相当于@Autowired,只不过@Autowired按byType自动注入,而@Resource默认按 byName自动注入罢了。
@Resource有两个属性是比较重要的,分是name和type
Spring将@Resource注解的name属性解析为bean的名字,而type属性则解析为bean的类型。所以如果使用name属性,则使用byName的自动注入策略,而使用type属性时则使用byType自动注入策略。如果既不指定name也不指定type属性,这时将通过反射机制使用byName自动注入策略。
@Resource装配顺序
1. 如果同时指定了name和type,则从Spring上下文中找到唯一匹配的bean进行装配,找不到则抛出异常
2. 如果指定了name,则从上下文中查找名称(id)匹配的bean进行装配,找不到则抛出异常
3. 如果指定了type,则从上下文中找到类型匹配的唯一bean进行装配,找不到或者找到多个,都会抛出异常
4. 如果既没有指定name,又没有指定type,则自动按照byName方式进行装配;如果没有匹配,则回退为一个原始类型进行匹配,如果匹配则自动装配;
区分一下@Autowired和@Resource两个注解的区别:
(1)@Autowired默认按照byType方式进行bean匹配,@Resource默认按照byName方式进行bean匹配
(2)@Autowired是Spring的注解,@Resource是J2EE的注解,这个看一下导入注解的时候这两个注解的包名就一清二楚了
刚刚那个猴子老虎例子
猴子实体类
老虎实体类
动物园
package com.java.entity;

import javax.annotation.Resource;

import org.springframework.beans.factory.annotation.Autowired;
import org.springframework.beans.factory.annotation.Qualifier;

import com.java.service.Animal;

public class Zoo {

	@Resource(name="tiger")
	    private Tiger tiger;

	    @Resource(type=Monkey.class)
	    private Monkey monkey;

		@Override
		public String toString() {
			return "Zoo [tiger=" + tiger + ", monkey=" + monkey + "]";
		}

}
beans.xml
<?xml version="1.0" encoding="UTF-8"?>
<beans xmlns="http://www.springframework.org/schema/beans"
    xmlns:xsi="http://www.w3.org/2001/XMLSchema-instance"
    xmlns:aop="http://www.springframework.org/schema/aop"
    xmlns:context="http://www.springframework.org/schema/context"
    xsi:schemaLocation="http://www.springframework.org/schema/beans
        http://www.springframework.org/schema/beans/spring-beans.xsd
        http://www.springframework.org/schema/aop
        http://www.springframework.org/schema/aop/spring-aop.xsd
        http://www.springframework.org/schema/context
        http://www.springframework.org/schema/context/spring-context.xsd">

		<!-- 自动找com.spring包下面的注解 -->
   <context:component-scan base-package="com.spring" />

	<bean id="monkey" class="com.java.entity.Monkey" ></bean>

	<bean id="tiger" class="com.java.entity.Tiger" ></bean>

	<!-- 本来把老虎、猴子注入到动物园Bean,现在不用了 -->
	<bean id="zoo" class="com.java.entity.Zoo" >
	</bean>

</beans>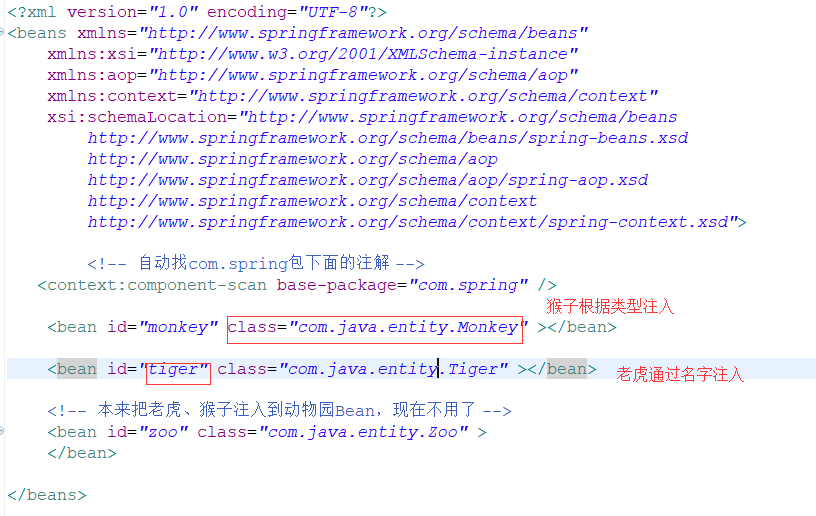
结果


 212
212

 被折叠的 条评论
为什么被折叠?
被折叠的 条评论
为什么被折叠?
 到【灌水乐园】发言


