


本篇主要描述Struts2处理请求的工作流程,不涉及Struts2的其他介绍及使用。
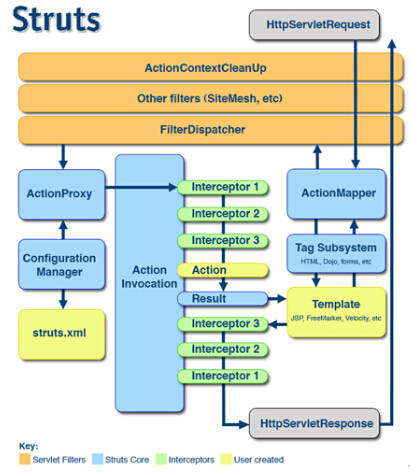
官方工作流程图
ActionMapper
该类是HttpServletRequest请求和Action调用的一个映射,通过它可以得到ActionMapping,mapping对应于配置文件中<action/>的配置,可得到namespace、name、method等相关信息。
ActionProxy和ActionInvocation
Action的一个代理,由ActionProxyFactory创建,它本身不包括Action实例,默认实现DefaultActionProxy是由ActionInvocation持有Action实例。ActionProxy作用是如何取得Action,无论是本地还是远程。而ActionInvocation的作用是如何执行Action,拦截器的功能就是在ActionInvocation中实现的
ConfigurationProvider和Configuration
ConfigurationProvider就是struts2中配置文件的解析器,struts2中的配置文件主要是由其实现类XmlConfigurationProvider及其子类StrutsXmlConfigurationProvider来解析。ConfigurationManager用于管理struts2各配置文件的配置,用来加载这些配置参数信息也可以用于在cleanup时销毁配置。
1.初始的请求通过一条标准的过滤器链,到达 servlet 容器 ( 比如 tomcat 容器,WebSphere 容器 )。
2.过滤器链包括可选的 ActionContextCleanUp 过滤器,用于系统整合技术,如 SiteMesh 插件。
3.接着调用 FilterDispatcher,FilterDispatcher 查找 ActionMapper,以确定这个请求是否需要调用某个 Action。
4.如果 ActionMapper 确定需要调用某个 Action,FilterDispatcher 将控制权交给 ActionProxy。
5.ActionProxy 依照框架的配置文件(struts.xml),找到需要调用的 Action 类。
6.ActionProxy 创建一个 ActionInvocation 的实例。ActionInvocation 先调用相关的拦截器 (Action 调用之前的部分),最后调用 Action。
7.一旦 Action 调用返回结果,ActionInvocation 根据 struts.xml 配置文件,查找对应的转发路径。返回结果通常是(但不总是,也可能是另外的一个 Action 链)JSP 技术或者 FreeMarker 的模版技术的网页呈现。Struts2 的标签和其他视图层组件,帮助呈现我们所需要的显示结果。在此,我想说清楚一些,最终的显示结果一定是 HTML 标签。标签库技术和其他视图层技术只是为了动态生成 HTML 标签。
8.接着按照相反次序执行拦截器链 ( 执行 Action 调用之后的部分 )。最后,响应通过滤器链返回(过滤器技术执行流程与拦截器一样,都是先执行前面部分,后执行后面部)。如果过滤器链中存在 ActionContextCleanUp,FilterDispatcher 不会清理线程局部的 ActionContext。如果不存在 ActionContextCleanUp 过滤器,FilterDispatcher 会清除所有线程局部变量。
核心控制器org.apache.struts2.dispatcher.FilterDispatcher
init:初始化过滤器,创建默认的dispatcher对象并且加载静态资源
destory:核心业务是调用dispatcher.cleanup()方法:释放所有绑定到dispatcher实例的资源,包括销毁所有拦截器实例
doFilter的工作流程:
首先作处理前的准备,包括创建值栈(通过静态注入的ValueStackFactory创建)、创建ActionContext(线程局部对象ThreadLocal保证数据的安全性)。
使用ActionMapper根据request尝试匹配一个ActionMapping,若有匹配则调用dispatcher.servieAction()处理action请求,否则处理静态资源或是直接通过过滤器,访问过滤器链的下个资源。
createActionContext主要干了这么几件事情:
* 创建ActionContext
* 根据静态注入的值栈工厂实例得到ValueStack
* 给ValueStack的Context赋值
* 把ValueStack的值赋值给ActionContext中的Map<String,Object>
* 把整个actionContext对象存放到threadlocal中
ActionContext
Struts2 框架,把 ActionContext 设置为 OGNL 上下文。ActionContext 持有application,session,request,parameters 的引用。ActionContext 也持有 value stack 对象的引用 ( 注意这个时候 value stack 特指 Object stack)。
上述对象的引用,ActionContext 不直接持有,而是通过自己的属性 Map<String, Object> context 持有引用。处理 OGNL 表达式最顶层的对象是 Map<String, Object> context。Struts2框架将其存放在ThreadLocal中以保持数据的安全性。
看下源代码就很明了
 public static final String ACTION_NAME = "com.opensymphony.xwork2.ActionContext.name";
    /**
     * 值栈在 map 的 key,map 肯定是 key-value 对结构了,别说你不知道。map 指本类最后一个属性 context。
     */
    public static final String VALUE_STACK = ValueStack.VALUE_STACK;

    /**
     * session 的 key,以下省略
     */
    public static final String SESSION =
    "com.opensymphony.xwork2.ActionContext.session";
    public static final String APPLICATION =
    "com.opensymphony.xwork2.ActionContext.application";
	 public static final String PARAMETERS =
     "com.opensymphony.xwork2.ActionContext.parameters";
    public static final String ACTION_INVOCATION =
    "com.opensymphony.xwork2.ActionContext.actionInvocation";

 //map 的定义
    Map<String, Object> context;

    public ActionInvocation getActionInvocation() {
        return (ActionInvocation) get(ACTION_INVOCATION);
    }

	 // 对作用域对象的引用
    public Map<String, Object> getApplication() {
        return (Map<String, Object>) get(APPLICATION);
    }
    public void setSession(Map<String, Object> session) {
        put(SESSION, session);
    }
    public Map<String, Object> getSession() {
        return (Map<String, Object>) get(SESSION);
    }
	 // 对 valueStack 的引用
    public void setValueStack(ValueStack stack) {
        put(VALUE_STACK, stack);
    }
    public ValueStack getValueStack() {
        return (ValueStack) get(VALUE_STACK);
    }
   	 // 最关键的代码
    public Object get(String key) {
        return context.get(key);
    }
    public void put(String key, Object value) {
        context.put(key, value);
    }
 }
下面来看下核心控制器的三个方法:
init方法
 public void init(FilterConfig filterConfig) throws ServletException {
	 try {
		 this.filterConfig = filterConfig;
			 // 初始化日志器
		 initLogging();

		 dispatcher = createDispatcher(filterConfig);
		 dispatcher.init();
		 dispatcher.getContainer().inject(this);

		 staticResourceLoader.setHostConfig(new FilterHostConfig(filterConfig));
	 } finally {
		 ActionContext.setContext(null);
	 }
 }
distory方法
 public void destroy() {
	 if (dispatcher == null) {
    log.warn("something is seriously wrong, Dispatcher is not initialized (null) ");
	 } else {
		 try {
			 dispatcher.cleanup();
		 } finally {
			 ActionContext.setContext(null);
		 }
	 }
 }
doFilter方法
 public void doFilter(ServletRequest req, ServletResponse res, FilterChain chain)
				 throws IOException, ServletException {
	 HttpServletRequest request = (HttpServletRequest) req;
	 HttpServletResponse response = (HttpServletResponse) res;
	 ServletContext servletContext = getServletContext();

	 String timerKey = "FilterDispatcher_doFilter: ";
	 try {
		 //1 处理前的准备
		 //1.1 创建值栈对象,值栈包含 object stack 和 context map 两个部分。
ValueStack stack =
dispatcher.getContainer().getInstance(ValueStackFactory.class).createValueStack();
        //1.2 创建 actionContext。
	  ActionContext ctx = new ActionContext(stack.getContext());
		 ActionContext.setContext(ctx);
		 UtilTimerStack.push(timerKey);

		 //1.3 准备和包装 request
		 request = prepareDispatcherAndWrapRequest(request, response);
		 ActionMapping mapping;

		 //2 根据请求路径查找 actionMapping
		 try {
   mapping = actionMapper.getMapping(request, dispatcher.getConfigurationManager());
		 } catch (Exception ex) {
			 log.error("error getting ActionMapping", ex);
			 dispatcher.sendError(request, response, servletContext,
                HttpServletResponse.SC_INTERNAL_SERVER_ERROR, ex);
			 return;
		 }
		 //3 当请求路径没有对应的 actionMapping,走第 2 和第 3 个出口
		 if (mapping == null) {
			 String resourcePath = RequestUtils.getServletPath(request);

			 if ("".equals(resourcePath) && null != request.getPathInfo()) {
				 resourcePath = request.getPathInfo();
			 }

			 if (staticResourceLoader.canHandle(resourcePath)) {
      staticResourceLoader.findStaticResource(resourcePath, request, response);
			 } else {
				 chain.doFilter(request, response);
			 }
			 // 如果是第 2 和第 3 个出口 ,action 的处理到此结束。
			 return;
		 }
		 //3.1 路径 1,委托 dispatcher 的 serviceAction 进行处理
		 dispatcher.serviceAction(request, response, servletContext, mapping);

	 } finally {
		 try {
		   //4 清除 ActionContext
			 ActionContextCleanUp.cleanUp(req);
		 } finally {
			 UtilTimerStack.pop(timerKey);
		 }
	 }
 }
org.apache.struts2.dispatcher.Dispatcher
根据上面所说,接下来分析的是dispatcher.serviceAction()都做了些什么。
Dispatcher作为实际派发的工具类,委派大部分的处理任务,核心控制器持有一个本类实例。两个重要方法:
serviceAction():加载Action类,调用Action类的方法,转向响应结果即Result。
cleanup():即filter.destory所调用的方法,释放资源,包括销毁ObjectFactory、销毁dispatcher实例、调用每个拦截器的distory方法、销毁每个拦截器、销毁ActionContext、销毁Configuration。
serviceAction方法:
创建ValueStack副本,代理对象在调用的时候使用的是值栈的副本。
根据mapping对象获取的namespace、name、method,动态创建ActionProxy(通过静态注入的ActionProxyFactory创建)。
调用代理proxy.execute(),控制权便交给了ActionProxy。
proxy.execute()
创建ActionInvocation实例,actionInvovation.init()创建action并压入栈顶,创建拦截器链。
actionInvocation.invoke()先是调用相关拦截器,然后执行action,最后执行结果集。
serviceAction方法
public void serviceAction(HttpServletRequest request, HttpServletResponse response,
          ServletContext context,  ActionMapping mapping) throws ServletException {
         Map<String, Object> extraContext = createContextMap
					 (request, response, mapping, context);

        //1 以下代码目的为获取 ValueStack,代理在调用的时候使用的是本值栈的副本
        ValueStack stack = (ValueStack) request.getAttribute
					 (ServletActionContext.STRUTS_VALUESTACK_KEY);
        boolean nullStack = stack == null;
        if (nullStack) {
            ActionContext ctx = ActionContext.getContext();
            if (ctx != null) {
                stack = ctx.getValueStack();
            }
        }
       //2 创建 ValueStack 的副本
        if (stack != null) {
            extraContext.put(ActionContext.VALUE_STACK,
					 valueStackFactory.createValueStack(stack));
        }
        String timerKey = "Handling request from Dispatcher";
        try {
            UtilTimerStack.push(timerKey);
        //3 这个是获取配置文件中 <action/> 配置的字符串,action 对象已经在核心控制器中创建
            String namespace = mapping.getNamespace();
            String name = mapping.getName();
            String method = mapping.getMethod();
            // xwork 的配置信息
            Configuration config = configurationManager.getConfiguration();

            //4 动态创建 ActionProxy
ActionProxy proxy =
config.getContainer().getInstance(ActionProxyFactory.class).
createActionProxy(namespace, name, method, extraContext, true, false);

            request.setAttribute(ServletActionContext.STRUTS_VALUESTACK_KEY,
					 proxy.getInvocation().getStack());


            //5 调用代理
            if (mapping.getResult() != null) {
                Result result = mapping.getResult();
                result.execute(proxy.getInvocation());
            } else {
                proxy.execute();
            }

            //6 处理结束后,恢复值栈的代理调用前状态
            if (!nullStack) {
                request.setAttribute(ServletActionContext.STRUTS_VALUESTACK_KEY, stack);
            }
        } catch (ConfigurationException e) {
        	 //7 如果 action 或者 result 没有找到,调用 sendError 报 404 错误
        	 if(devMode) {
        		 LOG.error("Could not find action or result", e);
        	 }
        	 else {
        		 LOG.warn("Could not find action or result", e);
        	 }
            sendError(request, response, context, HttpServletResponse.SC_NOT_FOUND, e);
        } catch (Exception e) {
            sendError(request, response, context,
              HttpServletResponse.SC_INTERNAL_SERVER_ERROR, e);
              } finally {
            UtilTimerStack.pop(timerKey);
        }
 }
cleanup方法
public void cleanup() {
	 //1 销毁 ObjectFactory
	 ObjectFactory objectFactory = getContainer().getInstance(ObjectFactory.class);
	 if (objectFactory == null) {
		 LOG.warn("Object Factory is null, something is seriously wrong,
					 no clean up will be performed");
	 }
	 if (objectFactory instanceof ObjectFactoryDestroyable) {
		 try {
			 ((ObjectFactoryDestroyable)objectFactory).destroy();
		 }
		 catch(Exception e) {
      LOG.error("
          exception occurred while destroying ObjectFactory ["+objectFactory+"]", e);
          }
	 }

	 //2 为本线程销毁 Dispatcher 实例
	 instance.set(null);

	 //3 销毁 DispatcherListeners(Dispatcher 监听器 )。
	 if (!dispatcherListeners.isEmpty()) {
		 for (DispatcherListener l : dispatcherListeners) {
			 l.dispatcherDestroyed(this);
		 }
	 }

	 //4 调用每个拦截器的 destroy() 方法,销毁每个拦截器
	 Set<Interceptor> interceptors = new HashSet<Interceptor>();
	 Collection<Interceptor> packageConfigs = configurationManager.
					 getConfiguration().getPackageConfigs().values();
	 for (PackageConfig packageConfig : packageConfigs) {
		 for (Object config : packageConfig.getAllInterceptorConfigs().values()) {
          if (config instanceof InterceptorStackConfig) {
                for (InterceptorMapping interceptorMapping :
                   ((InterceptorStackConfig) config).getInterceptors()) {
                     interceptors.add(interceptorMapping.getInterceptor());
				 }
			 }
		 }
	 }
	 for (Interceptor interceptor : interceptors) {
		 interceptor.destroy();
	 }

	 //5 销毁 action context
	 ActionContext.setContext(null);

	 //6 销毁 configuration
	 configurationManager.destroyConfiguration();
	 configurationManager = null;
 }
总结
FilterDispatcher 接到请求,查找对应的 Action Mapping,调用 Dispatcher 类的 serviceAction() 方法。
Dispatcher 类的 serviceAction() 方法中创建并且调用 ActionProxy。
ActionProxy,持有 ActionInvocation 的实例引用。ActionInvocation 持有着拦截器和 Action 实例的引用。ActionInvocation 通过反复调用 invoke() 方法,调用沿着拦截器链向下走。
走完拦截器链后运行 Action 实例,最后运行 Result。
大家注意到拦截器链了吗?它才是 Struts2 的核心所在,实现Struts2的大多数核心功能。


 394
394

 被折叠的 条评论
为什么被折叠?
被折叠的 条评论
为什么被折叠?
 到【灌水乐园】发言


