


MongoDB的同步原理,官方文档介绍的比较少,网上资料也不是太多,下面是结合官方文档、网上资料和测试时候的日志,整理出来的一点东西。
因为MongoDB的每个分片也是副本集,所以只需要搞副本集的同步原理即可。
一、Initial Sync
大体来说,MongoDB副本集同步主要包含两个步骤:
1. Initial Sync,全量同步
2. Replication,即sync oplog
先通过init sync同步全量数据,再通过replication不断重放Primary上的oplog同步增量数据。全量同步完成后,成员从转换 STARTUP2为SECONDARY
1.1 初始化同步过程
1) 全量同步开始,获取同步源上的最新时间戳t1
2) 全量同步集合数据,建立索引(比较耗时)
3) 获取同步源上最新的时间戳t2
4) 重放t1到t2之间所有的oplog
5) 全量同步结束
简单来说,就是遍历Primary上的所有DB的所有集合,将数据拷贝到自身节点,然后读取全量同步开始到结束时间段内的oplog并重放。
initial sync结束后,Secondary会建立到Primary上local.oplog.rs的tailable cursor,不断从Primary上获取新写入的oplog,并应用到自身。
1.2 初始化同步场景
Secondary节点当出现如下状况时,需要先进⾏全量同步
1) oplog为空
2) local.replset.minvalid集合⾥_initialSyncFlag字段设置为true(用于init sync失败处理)
3) 内存标记initialSyncRequested设置为true(用于resync命令,resync命令只用于master/slave架构,副本集无法使用)
这3个场景分别对应(场景2和场景3没看到官网文档有写,参考张友东大神博客)
1) 新节点加⼊,⽆任何oplog,此时需先进性initial sync
2) initial sync开始时,会主动将_initialSyncFlag字段设置为true,正常结束后再设置为false;如果节点重启时,发现_initialSyncFlag为true,说明上次全量同步中途失败了,此时应该重新进⾏initial sync
3)当⽤户发送resync命令时,initialSyncRequested会设置为true,此时会强制重新开始⼀次initial sync
1.3 疑问点解释
1.3.1 全量同步数据的时候,会不会源数据的oplog被覆盖了导致全量同步失败?
在3.4版本及以后,不会。
下面这张图说明了3.4对全量同步的改进(图来自张友东博客):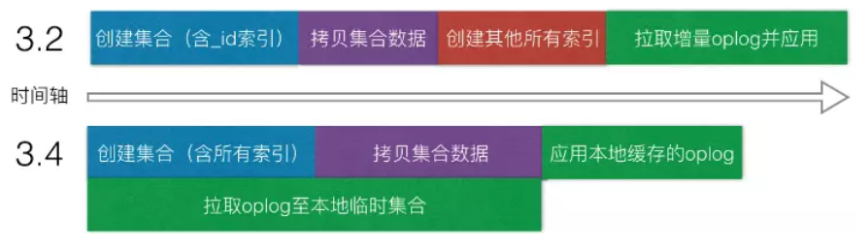
官方文档是:
initial sync会在为每个集合复制文档时构所有集合索引。在早期版本(3.4之前)的MongoDB中,仅_id在此阶段构建索引。
Initial sync复制数据的时候会将新增的oplog记录存到本地(3.4新增)。
二、Replication
2.1 sync oplog的过程
全量同步结束后,Secondary就开始从结束时间点建立tailable cursor,不断的从同步源拉取oplog并重放应用到自身,这个过程并不是由一个线程来完成的,mongodb为了提升同步效率,将拉取oplog以及重放oplog分到了不同的线程来执行。
具体线程和作用如下(这部分暂时没有在官方文档找到,来自张友东大神博客):
- producer thread:这个线程不断的从同步源上拉取oplog,并加入到一个BlockQueue的队列里保存着,BlockQueue最大存储240MB的oplog数据,当超过这个阈值时,就必须等到oplog被replBatcher消费掉才能继续拉取。
- replBatcher thread:这个线程负责逐个从producer thread的队列里取出oplog,并放到自己维护的队列里,这个队列最多允许5000个元素,并且元素总大小不超过512MB,当队列满了时,就需要等待oplogApplication消费掉
- oplogApplication会取出replBatch thread当前队列的所有元素,并将元素根据docId(如果存储引擎不支持文档锁,则根据集合名称)分散到不同的replWriter线程,replWriter线程将所有的oplog应用到自身;等待所有oplog都应用完毕,oplogApplication线程将所有的oplog顺序写入到local.oplog.rs集合。
针对上面的叙述,画了一个图方便理解:

producer的buffer和apply线程的统计信息都可以通过db.serverStatus().metrics.repl来查询到。
2.2 对过程疑问点的解释
2.2.1 为什么oplog的回放要弄这么多的线程?
和mysql一样,一个线程做一个事情,拉取oplog是单线程,其他线程进行回放;多个回放线程加快速度。
2.2.2 为什么需要replBatcher线程来中转?
oplog重放时,要保持顺序性,⽽且遇到create、drop等DDL命令时,这些命令与其他的增删改查命令是不能并⾏执⾏的,⽽这些控制就是由replBatcher来完成的。
2.2.3 如何解决secondary节点oplog重放追不上primary问题?
方法一:设置更大的回放线程数
  * mongod命令行指定:mongod --setParameter replWriterThreadCount=32
  * 配置文件中指定
setParameter:
replWriterThreadCount: 32方法二:增大oplog的大小
方法三:将writeOpsToOplog步骤分散到多个replWriter线程来并发执行,看官方开发者日志已经实现了这个(在3.4.0-rc2版本)
2.3 注意事项
- initial sync单线程复制数据,效率比较低,生产环境应该尽量避免initial sync出现,需合理配置oplog。
- 新加⼊节点时,可以通过物理复制的⽅式来避免initial sync,将Primary上的dbpath拷⻉到新的节点,然后直接启动。
- 当Secondary同步滞后是因为主上并发写入太高导致,db.serverStatus().metrics.repl.buffer的 sizeBytes值持续接近maxSizeBytes的时候,可通过调整Secondary上replWriter并发线程数来提升。
三、日志分析
3.1 初始化同步日志
将日志级别 verbosity设置为 1,然后过滤日志
cat mg36000.log |egrep "clone|index|oplog" >b.log
最后拿出过滤后的部分日志。
3.4.21新加入节点日志
因为日志太多,贴太多出来也没什么意义,下面贴出了对db01库的某个
集合的日志。
可以发现是先创建collection索引,然后clone集合数据和索引数据,这样就完成了该集合的clone。最后将配置改为下一个集合。
2019-08-21T16:50:10.880+0800 D STORAGE  [InitialSyncInserters-db01.test20] create uri: table:db01/index-27-154229953453504826 config: type=file,internal_page_max=16k,leaf_page_max=16k,checksum=on,prefix_compression=true,block_compressor=,,,,key_format=u,value_format=u,app_metadata=(formatVersion=8,infoObj={ "v" : 2, "key" : { "num" : 1 }, "name" : "num_1", "ns" : "db01.test2" }),
2019-08-21T16:50:10.882+0800 I INDEX    [InitialSyncInserters-db01.test20] build index on: db01.test2 properties: { v: 2, key: { num: 1.0 }, name: "num_1", ns: "db01.test2" }
2019-08-21T16:50:10.882+0800 I INDEX    [InitialSyncInserters-db01.test20]      building index using bulk method; build may temporarily use up to 500 megabytes of RAM
2019-08-21T16:50:10.882+0800 D STORAGE  [InitialSyncInserters-db01.test20] create uri: table:db01/index-28-154229953453504826 config: type=file,internal_page_max=16k,leaf_page_max=16k,checksum=on,prefix_compression=true,block_compressor=,,,,key_format=u,value_format=u,app_metadata=(formatVersion=8,infoObj={ "v" : 2, "key" : { "_id" : 1 }, "name" : "_id_", "ns" : "db01.test2" }),
2019-08-21T16:50:10.886+0800 I INDEX    [InitialSyncInserters-db01.test20] build index on: db01.test2 properties: { v: 2, key: { _id: 1 }, name: "_id_", ns: "db01.test2" }
2019-08-21T16:50:10.886+0800 I INDEX    [InitialSyncInserters-db01.test20]      building index using bulk method; build may temporarily use up to 500 megabytes of RAM
2019-08-21T16:50:10.901+0800 D INDEX    [InitialSyncInserters-db01.test20]      bulk commit starting for index: num_1
2019-08-21T16:50:10.906+0800 D INDEX    [InitialSyncInserters-db01.test20]      bulk commit starting for index: _id_
2019-08-21T16:50:10.913+0800 D REPL     [repl writer worker 11] collection clone finished: db01.test2
2019-08-21T16:50:10.913+0800 D REPL     [repl writer worker 11]     collection: db01.test2, stats: { ns: "db01.test2", documentsToCopy: 2000, documentsCopied: 2000, indexes: 2, fetchedBatches: 1, start: new Date(1566377410875), end: new Date(1566377410913), elapsedMillis: 38 }
2019-08-21T16:50:10.920+0800 D STORAGE  [InitialSyncInserters-db01.collection10] create uri: table:db01/index-30-154229953453504826 config: type=file,internal_page_max=16k,leaf_page_max=16k,checksum=on,prefix_compression=true,block_compressor=,,,,key_format=u,value_format=u,app_metadata=(formatVersion=8,infoObj={ "v" : 2, "key" : { "_id" : 1 }, "name" : "_id_", "ns" : "db01.collection1" }),
3.6.12加入新节点日志
3.6较3.4的区别是,复制数据库的线程明确了是:repl writer worker 进行重放(看文档其实3.4已经是如此了)
还有就是明确是用cursors来进行。
其他和3.4没有区别,也是创建索引,然后clone数据。
2019-08-22T13:59:39.444+0800 D STORAGE [repl writer worker 9] create uri: table:db01/index-32-3334250984770678501 config: type=file,internal_page_max=16k,leaf_page_max=16k,checksum=on,prefix_compression=true,block_compressor=,,,,key_format=u,value_format=u,app_metadata=(formatVersion=8,infoObj={ "v" : 2, "key" : { "_id" : 1 }, "name" : "_id_", "ns" : "db01.collection1" }),log=(enabled=true)
2019-08-22T13:59:39.446+0800 I INDEX [repl writer worker 9] build index on: db01.collection1 properties: { v: 2, key: { _id: 1 }, name: "_id_", ns: "db01.collection1" }
2019-08-22T13:59:39.446+0800 I INDEX [repl writer worker 9] building index using bulk method; build may temporarily use up to 500 megabytes of RAM
2019-08-22T13:59:39.447+0800 D REPL [replication-1] Collection cloner running with 1 cursors established.
2019-08-22T13:59:39.681+0800 D INDEX [repl writer worker 7] bulk commit starting for index: _id_
2019-08-22T13:59:39.725+0800 D REPL [repl writer worker 7] collection clone finished: db01.collection1
2019-08-22T13:59:39.725+0800 D REPL [repl writer worker 7] database: db01, stats: { dbname: "db01", collections: 1, clonedCollections: 1, start: new Date(1566453579439), end: new Date(1566453579725), elapsedMillis: 286 }
2019-08-22T13:59:39.725+0800 D REPL [repl writer worker 7] collection: db01.collection1, stats: { ns: "db01.collection1", documentsToCopy: 50000, documentsCopied: 50000, indexes: 1, fetchedBatches: 1, start: new Date(1566453579440), end: new Date(1566453579725), elapsedMillis: 285 }
2019-08-22T13:59:39.731+0800 D STORAGE [repl writer worker 8] create uri: table:test/index-34-3334250984770678501 config: type=file,internal_page_max=16k,leaf_page_max=16k,checksum=on,prefix_compression=true,block_compressor=,,,,key_format=u,value_format=u,app_metadata=(formatVersion=8,infoObj={ "v" : 2, "key" : { "_id" : 1 }, "name" : "_id_", "ns" : "test.user1" }),log=(enabled=true)4.0.11加入新节点日志
使用cursors,和3.6基本一致2019-08-22T15:02:13.806+0800 D STORAGE [repl writer worker 15] create uri: table:db01/index-30--463691904336459055 config: type=file,internal_page_max=16k,leaf_page_max=16k,checksum=on,prefix_compression=true,block_compressor=,,,,key_format=u,value_format=u,app_metadata=(formatVersion=8,infoObj={ "v" : 2, "key" : { "num" : 1 }, "name" : "num_1", "ns" : "db01.collection1" }),log=(enabled=false)
2019-08-22T15:02:13.816+0800 I INDEX [repl writer worker 15] build index on: db01.collection1 properties: { v: 2, key: { num: 1.0 }, name: "num_1", ns: "db01.collection1" }
2019-08-22T15:02:13.816+0800 I INDEX [repl writer worker 15] building index using bulk method; build may temporarily use up to 500 megabytes of RAM
2019-08-22T15:02:13.816+0800 D STORAGE [repl writer worker 15] create uri: table:db01/index-31--463691904336459055 config: type=file,internal_page_max=16k,leaf_page_max=16k,checksum=on,prefix_compression=true,block_compressor=,,,,key_format=u,value_format=u,app_metadata=(formatVersion=8,infoObj={ "v" : 2, "key" : { "_id" : 1 }, "name" : "_id_", "ns" : "db01.collection1" }),log=(enabled=false)
2019-08-22T15:02:13.819+0800 I INDEX [repl writer worker 15] build index on: db01.collection1 properties: { v: 2, key: { _id: 1 }, name: "_id_", ns: "db01.collection1" }
2019-08-22T15:02:13.819+0800 I INDEX [repl writer worker 15] building index using bulk method; build may temporarily use up to 500 megabytes of RAM
2019-08-22T15:02:13.820+0800 D REPL [replication-0] Collection cloner running with 1 cursors established.3.2 复制日志
2019-08-22T15:15:17.566+0800 D STORAGE  [repl writer worker 2] create collection db01.collection2 { uuid: UUID("8e61a14e-280c-4da7-ad8c-f6fd086d9481") }
2019-08-22T15:15:17.567+0800 I STORAGE  [repl writer worker 2] createCollection: db01.collection2 with provided UUID: 8e61a14e-280c-4da7-ad8c-f6fd086d9481
2019-08-22T15:15:17.567+0800 D STORAGE  [repl writer worker 2] stored meta data for db01.collection2 @ RecordId(22)
2019-08-22T15:15:17.580+0800 D STORAGE  [repl writer worker 2] db01.collection2: clearing plan cache - collection info cache reset
2019-08-22T15:15:17.580+0800 D STORAGE  [repl writer worker 2] create uri: table:db01/index-43--463691904336459055 config: type=file,internal_page_max=16k,leaf_page_max=16k,checksum=on,prefix_compression=true,block_compressor=,,,,key_format=u,value_format=u,app_metadata=(formatVersion=8,infoObj={ "v" : 2, "key" : { "_id" : 1 }, "name" : "_id_", "ns" : "db01.collection2" }),log=(enabled=false)
原文链接
本文为云栖社区原创内容,未经允许不得转载。


 530
530

 被折叠的 条评论
为什么被折叠?
被折叠的 条评论
为什么被折叠?
 到【灌水乐园】发言


