


文章一:
1. 安装MinGW
www.mingw.org下载mingw-get-setup.exe工具,运行,选择安装目录(如D:\MinGW)。
工具运行后会下载并运行MinGW Installation Manager,根据需要选择安装的包。
然后执行Installation->Apply changes,等待安装完成。
2,启动MinGW
为方便启动MinGW工具,新建到D:\MinGW\msys\1.0\msys.bat的快捷方式。
拷贝D:\MinGW\msys\1.0\etc目录下的fstab.sample文件为fstab,修改fstab的内容:
#Win32_Path Mount_Point
d:/mingw /mingw
点击快捷方式运行MinGW,执行命令ls /mingw:
$ ls /mingw
bin include lib libexec mingw32 msys share var
3,安装python
编译QEMU需要python工具,并且版本不能太高(3.0以下的版本)。
本文安装python-2.7.6.msi到D:\Python27\。
同时修改fstab文件增加如下内容:
d:/Python27 /python
修改etc目录下的profile文件,增加python命令的路径:
if [ $MSYSTEM == MINGW32 ]; then
export PATH=".:/usr/local/bin:/mingw/bin:/bin:/python:$PATH"
else
export PATH=".:/usr/local/bin:/bin:/mingw/bin:/python:$PATH"
fi
4,安装gtk库
编译QEMU还需要用到glib2.0的库,pkg-config与libz的库,这些东西在gtk的开发包里面都有。gtk的开发包可以在如下网址下载到:
http://www.gtk.org/download/index.php
可以单独安装需要的开发工具,本文直接下载了整个gtk开发工具包
http://www.gtk.org/download/win32.php
下载GTK+ 2.x的http://ftp.gnome.org/pub/gnome/binaries/win32/gtk+/2.24/gtk+-bundle_2.24.10-20120208_win32.zip。
解压gtk -bundle_2.24.10-20120208_win32.zip到D:\MinGW\gtk目录,配置环境变量
if [ $MSYSTEM == MINGW32 ]; then
export PATH=".:/usr/local/bin:/mingw/bin:/bin:/python:/mingw/gtk/bin:$PATH"
else
export PATH=".:/usr/local/bin:/bin:/mingw/bin:/python:/mingw/gtk/bin:$PATH"
fi
export PKG_CONFIG_PATH="$PKG_CONFIG_PATH:/mingw/gtk/lib/pkgconfig"
重新启动MinGW运行:
$ pkg-config.exe --cflags --libs gtk+-2.0
-mms-bitfields -Id:/mingw/gtk/include/gtk-2.0 -Id:/mingw/gtk/lib/gtk-2.0/include
-Id:/mingw/gtk/include/atk-1.0 -Id:/mingw/gtk/include/cairo -Id:/mingw/gtk/incl
ude/gdk-pixbuf-2.0 -Id:/mingw/gtk/include/pango-1.0 -Id:/mingw/gtk/include/glib-
2.0 -Id:/mingw/gtk/lib/glib-2.0/include -Id:/mingw/gtk/include -Id:/mingw/gtk/in
clude/freetype2 -Id:/mingw/gtk/include/libpng14 -Ld:/mingw/gtk/lib -lgtk-win32-
2.0 -lgdk-win32-2.0 -latk-1.0 -lgio-2.0 -lpangowin32-1.0 -lgdi32 -lpangocairo-1.
0 -lgdk_pixbuf-2.0 -lpango-1.0 -lcairo -lgobject-2.0 -lgmodule-2.0 -lgthread-2.0
-lglib-2.0 -lintl
5,安装SDL
下载SDL-1.2.15源代码,使用MinGW对SDL进行编译安装:
$ ./configure
$ make
$ make install
执行sdl-config命令,检查sdl是否编译正确:
$ sdl-config
Usage: sdl-config [--prefix[=DIR]] [--exec-prefix[=DIR]] [--version] [--cflags]
[--libs] [--static-libs]
6,编译qemu
$ ./configure --prefix="d:/qemu" --target-list=arm-softmmu --disable-coroutine-pool
指定安装目录为d:\qemu,只要编译arm平台相关的工具,coroutine-pool在windows平台的qemu上有问题,禁止该选项。从./configure --help可以看到,禁止只是降低性能。因为使用qemu调试跟踪内核,性能无关紧要。
--disable-coroutine-pool disable coroutine freelist (worse performance)
--enable-coroutine-pool enable coroutine freelist (better performance)
如果出现如下错误:
ERROR: zlib check failed
Make sure to have the zlib libs and headers installed.
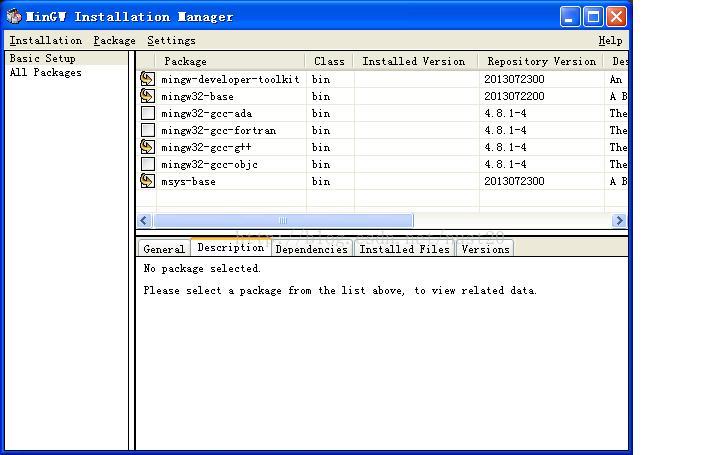
重新运行MinGW Installer,从All Packages里面选择msys-zlib的dev软件包安装:

然后继续执行上述的configure命令,成功之后执行:
$ make
$ make install
7,测试qemu工具
D:\qemu>qemu-system-armw.exe执行qemu,会提示缺少库文件。根据提示从MinGW的目录下搜索缺少的文件。最后需要拷贝如下的库文件到qemu的安装目录:
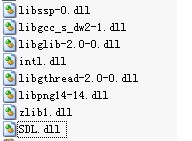
库文件准备好之后就可以用qemu启动内核与文件系统来测试功能了,当然也要测试qemu的调试功能。
文章二:
《MinGW找不到Gcc的解决方法》
MinGw安装换成了GUI的MinGW Installation Manager进行安装,选择好安装包后,居然提示:
mxio@mxio-PC ~
$ gcc
sh: gcc: command not found

解决方法:
假设MinGW+MSYS安装在c:\mingw下,那么修改对应 MinGw\msys\1.0\etc文件夹中的fstab.sample文件为 fstab
确认下面的路径正确:

#Win32_Path
c:/mingw
重启MSYS窗口,输入 gcc-v 看到搞定了!
文章三:http://ingar.satgnu.net/devenv/mingw32/base.html
《MinGW/MSYS development environment》
Introduction
This guide describes how to build a custom MSYS/MinGW development environment on windows. The goal is to create a set of matching libraries that can be used to build your own programs, with SDL, Qt 4 or GTK 2.
The guide was inspired by the Linux from Scratch way of working. If you have experience with building packages on Linux, building an MSYS/MinGW environment should feel familiar.
The directory structure emulates a traditional UNIX system with msys installation and the mingw compiler as base system in /usr, additional binaries in /opt and our own packages in/local32 and/or /local64.
This is a work in progress.
Last updated: 2014-01-20
Special thanks go to maci, for the nice examples in his Quake2World mingw scripts.
Part 1: Setting up the base system
Part 2: Building local packages
Part 3: Building GTK+
Part 4: Buildling Qt
Part 5: Building extra tools
Part 6: Building projects
MinGW home page
MSYS wiki
MinGW downloads on SourceForge
TDM's Experimental GCC/MinGW32 Builds
MinGW Distro - nuwen.net
Wget for win32
MinGW/MSYS for Tux Paint
Gtk for win32
Compiling Gtk 2 for windows
Part 1: Setting up the base system
The base system consist of the GCC compiler, the MinGW-w64 runtime, and MSYS utilities.
The compiler abd the runtime are provided by packages from the MinGW-builds project. MSYS provides a UNIX-like shell environment.
Content
We begin by installing the MinGW Installation Manager. This program will allows us to install MinGW and MSYS packages. The MSYS packages provide the shell and the necessary command line tools, but we will not use the Installation Manager to install the MinGW compiler suite.
Download the MingGW Installation Manager setup:

Run the installer. Click the Install button to accept the license and continue.

Specify the installation directory, the default C:\MinGW is usually approriate. Review the other options and click the Continue button to begin the installation.

Wait until the installation has finished and click the Continue button.

We use the MinGW Installation Manager to install MSYS packages:
Select Basic Setup on the left side of the screen. Mark the following packages to install:
- mingw-developer-toolkit
- msys-base

Open the Installation menu and click Apply Changes.

Click the Apply button.

Patiently wait for the installation to complete.

Click the Close button upon completion.

Install a number of additional packages, select All Packages on the left of the screen and mark the following packages for installation:
- msys-rxvt
- msys-unzip
- msys-wget
- msys-zip
Install the packages with the same procedure: open the Installation menu and click Apply Changes, click the Apply button, press the Close button upon completion.

Next, we create a new shortcut to launch the MSYS shell. CLick on the desktop with the right mouse button, select New -> Shortcut.
Set the location to C:\MinGW\msys\1.0\msys.bat, and call it MSYS Shell.

- Target: C:\MinGW\msys\1.0\msys.bat --rxvt
- Start in: C:\MinGW\msys\1.0\bin

Launch the MSYS Shell by double-clicking the shortcut.
You can paste clipboard text to the RXVT terminal with the shift+insert key combination, hence can copy the commands from this guide and paste them into the terminal window. If you use the mouse to select text in the RXVT window, it will be automatically copied to the clipboard as well.
MinGW is a port of the GCC compiler to the win32 platform. MinGW-W64 adds 64-bit support and an improved windows runtime.
Before installing the compiler, a little bit of cleanup has to be done: the MinGW Installation Manager has put a number of packages into C:\MinGW\mingw32, rename it toC:\MinGW\mingw.dist.
mv /c/MinGW/mingw32 /c/MinGW/mingw.dist
Download the i686 package:
- Sourceforge: i686-4.8.2-release-win32-sjlj-rt_v3-rev1.7z
- Local mirror: i686-4.8.2-release-win32-sjlj-rt_v3-rev1.7z
If you want to build 64-bit applications, you'll also need the x86_64 package:
- Sourceforge: x86_64-4.8.2-release-win32-seh-rt_v3-rev1.7z
- Local mirror: x86_64-4.8.2-release-win32-seh-rt_v3-rev1.7z
Unzip the compiler packages into the C:\MinGW directory, you can use the 7-zip utility, or any archiver that understands the 7z format. You should and up with two new subdirectories:C:\MinGW\mingw32 and C:\MinGW\mingw64.
These packages support the win32 threading model and do not support C11 threading. Building GTK fails using the POSIX threading packages.
References:
MSYS emulates a UNIX file system hierarchy. By default, the MSYS directory C:\MinGW\msys\1.0 will be mounted as root directory / and as /usr. Traditional windows drives like D: and E:can be accessed as /d or /e. Use the mount command to get an overview:
$ mount
C:\Users\Ingar\AppData\Local\Temp on /tmp type user (binmode,noumount)
C:\MinGW\msys\1.0 on /usr type user (binmode,noumount)
C:\MinGW\msys\1.0 on / type user (binmode,noumount)
c: on /c type user (binmode,noumount)
d: on /d type user (binmode,noumount)
Mount the installation directory of the custom compiler package in a convenient location:
mount 'C:\MinGW\mingw32\' /mingw32
mount 'C:\MinGW\mingw64\' /mingw64
We will add a number of extra directories to /etc/fstab, to be mounted whenever a new shell is started: /opt, where we will install a few extra packages, /sources, where downloads will be saved, /build32 where we will download the sourcode and compile packages, and /local32, where we will install our own compiled packages. These directories can be anywhere, but to keep the setup simple and consistent we will create C:\MinGW\opt, C:\MinGW\build32 and C:\MinGW\local32 and mount them as /opt, /build32 and /local32.
Additionally, we create a 64-bit variant for each of the 32-bit directories. Note that the /sources directory is the same for both environments, this prevents having to download source packages twice.
Create the necessary directories:
mkdir /c/mingw/{opt,build32,local32,build64,local64,sources}
Mount the directories, this will automaticly add them to /etc/fstab:
umount /mingw
mount 'C:\MinGW' /mingw
mount 'C:\MinGW\opt\' /opt
mount 'C:\MinGW\local32\' /local32
mount 'C:\MinGW\build32\' /build32
mount 'C:\MinGW\local64\' /local64
mount 'C:\MinGW\build64\' /build64
mount 'C:\MinGW\sources\' /sources
Create necessary subdirectories in /local32, /local64 and /opt:
mkdir /opt/bin /local{32,64}/{bin,etc,include,lib,share}
mkdir /local{32,64}/lib/pkgconfig
Create /local32/etc/profile.local:
cat > /local32/etc/profile.local << "EOF"
#
# /local32/etc/profile.local
#

alias dir='ls -la --color=auto'
alias ls='ls --color=auto'

PKG_CONFIG_PATH="/local32/lib/pkgconfig"
CPPFLAGS="-I/local32/include"
CFLAGS="-I/local32/include -mms-bitfields -mthreads -mtune=pentium3"
CXXFLAGS="-I/local32/include -mms-bitfields -mthreads -mtune=pentium3"
LDFLAGS="-L/local32/lib -mthreads"
export PKG_CONFIG_PATH CPPFLAGS CFLAGS CXXFLAGS LDFLAGS

PATH=".:/local32/bin:/mingw32/bin:/mingw/bin:/bin:/opt/bin"
PS1='\[\033[32m\]\u@\h \[\033[33m\w\033[0m\]$ '
export PATH PS1

# directory where sources will be downloaded
LOCALSOURCEDIR=/sources
# package build directory
LOCALBUILDDIR=/build32
# package installation prefix
LOCALDESTDIR=/local32
export LOCALBUILDDIR LOCALDESTDIR

EOF
Create /local64/etc/profile.local:
cat > /local64/etc/profile.local << "EOF"
#
# /local64/etc/profile.local
#

alias dir='ls -la --color=auto'
alias ls='ls --color=auto'

PKG_CONFIG_PATH="/local64/lib/pkgconfig"
CPPFLAGS="-I/local64/include"
CFLAGS="-I/local64/include -mms-bitfields -mthreads"
CXXFLAGS="-I/local64/include -mms-bitfields -mthreads"
LDFLAGS="-L/local64/lib"
export PKG_CONFIG_PATH CPPFLAGS CFLAGS CXXFLAGS LDFLAGS

PATH=".:/local64/bin:/mingw64/bin:/mingw/bin:/bin:/opt/bin"
PS1='\[\033[32m\]\u@\h \[\033[33m\w\033[0m\]$ '
export PATH PS1

# directory where sources will be downloaded
LOCALSOURCEDIR=/sources
# package build directory
LOCALBUILDDIR=/build64
# package installation prefix
LOCALDESTDIR=/local64
export LOCALBUILDDIR LOCALDESTDIR

EOF
Make sure it is executed on login:
cat >> /etc/profile << "EOF"
if [ -f /local32/etc/profile.local ]; then
        source /local32/etc/profile.local
fi

EOF
Apply the new settings:
source /local32/etc/profile.local
Note that the default environment is 32-bit. You can switch to the 64-bit environment with the following command:
source /local64/etc/profile.local
(Skip this section if you don't want to use the VIM editor)
Create a configuration file for VIM:
cat > ~/.vimrc << "EOF"
" Configuration file for VIM
set nocompatible
set bs=2                " allow backspacing over everything in insert mode
set ai                  " set autoindenting on
" set backup            " keep a backup file
set nobackup            " do not keep a backup file
set history=256	        " keep 256 lines of command line history
set ruler               " show the cursor position all the time
set tabstop=8           " tab at 4 characters
set shiftwidth=8        " 4 characters indentation
set nowrap              " do not wrap long lines
set visualbell          " no bell
set background=light    " msys rxvt has a light background
"set background=dark    " mingw shell uses a black background
syntax on               " syntax highlighting on

EOF
Set vim as default editor in the 32-bit environment:
cat >> /local32/etc/profile.local << "EOF"
EDITOR=vim
export EDITOR
EOF
In the 64-bit environment:
cat >> /local64/etc/profile.local << "EOF"
EDITOR=vim
export EDITOR
EOF
We install a few third-party tools in /opt to prevent them from interfering with the default packages.
Download and install the 7zip command line package:
cd ${LOCALSOURCEDIR} && \
wget -c "http://downloads.sourceforge.net/sevenzip/7za920.zip" && \
cd /opt/bin && \
unzip ${LOCALSOURCEDIR}/7za920.zip && \
mkdir -p ../doc/7za920 && \
mv license.txt readme.txt 7-zip.chm ../doc/7za920
Download and install the Portable Git package from msysgit:
cd ${LOCALSOURCEDIR} && \
wget -c "http://msysgit.googlecode.com/files/PortableGit-1.8.4-preview20130916.7z" && \
cd /opt && \
7za x ${LOCALSOURCEDIR}/PortableGit-1.8.4-preview20130916.7z && \
rm git-bash.bat git-cmd.bat 'Git Bash.vbs' && \
mv ReleaseNotes.rtf README.portable doc/git
Download and install the win32 subversion client using the following commands:
cd ${LOCALSOURCEDIR} && \
wget -c "http://downloads.sourceforge.net/project/win32svn/1.8.5/apache22/svn-win32-1.8.5.zip" && \
cd ${LOCALBUILDDIR} && \
unzip ${LOCALSOURCEDIR}/svn-win32-1.8.5.zip && \
cp -va svn-win32-1.8.5/* /opt && \
mkdir -p /opt/doc/svn-win32-1.8.5 && \
mv /opt/README.txt /opt/doc/svn-win32-1.8.5
Download and install the win32 cmake client using the following commands:
cd ${LOCALSOURCEDIR} && \
wget -c "http://www.cmake.org/files/v2.8/cmake-2.8.12.1-win32-x86.zip" && \
cd ${LOCALBUILDDIR} && \
unzip ${LOCALSOURCEDIR}/cmake-2.8.12.1-win32-x86.zip && \
cp -va cmake-2.8.12.1-win32-x86/* /opt
The following sections of this guide describe how to build various local packages. If you do not want to build them yourself, you can download my build:
-
32-bit local packages with GTK+
- msys-2013-12-14-local32-gtk.7z 64-bit local packages with GTK+
- msys-2013-12-14-local64-gtk.7z
These packages should be extracted into the main installation directory C:\MinGW, you should end up with C:\MinGW\mingw32 and/or C:\MinGW\mingw64.
Remember you can always switch between environments by reading the apporiate profile:
To switch to the 32-bit build environment:
source /local32/etc/profile.local
To switch to the 64-bit build environment:
source /local64/etc/profile.local
Part 2: Building local packages
This section describes how to compile the necessary additional packages and install them in ${LOCALDESTDIR}. This variable is set to /local32 or /local64, depending on your build environment.
Content
- Installing a static pkg-config binary
- Building zlib
- Building nasm
- Building SDL
- Building SDL2
- Building libpng
- Building libjpeg
- Building libtiff
- Building libwebp
- Building SDL_image
- Building SDL2_image
- Building OpenAL Soft
- Building smpeg
- Building smpeg2
- Building libogg
- Building libvorbis
- Building FLAC
- Building SDL_mixer
- Building SDL2_mixer
- Building curl
- Building pdcurses
- Building freeglut
- Building the Bullet Physics library
- Building the PhysicsFS library
The pkg-config tool is necessary to build a number of local packages. To resolve of a circular dependency between pkg-config and glib I've provided a staticly linked version we install in ${LOCALDESTDIR}. Later on we'll replace it with our own build.
- Download: msys-pkg-config-0.26-static.zip
Unpack the archive and install pkg-config into ${LOCALDESTDIR}.
cd ${LOCALSOURCEDIR} && \
wget -c http://ingar.satgnu.net/devenv/mingw32/files/msys-pkg-config-0.26-static.zip  && \
cd ${LOCALBUILDDIR}  && \
unzip ${LOCALSOURCEDIR}/msys-pkg-config-0.26-static.zip && \
install pkg-config.exe ${LOCALDESTDIR}/bin
There is a bug that affects the next part of this guide, as a workaround we install a pkg-config.sh wrapper script:
cat >  ${LOCALDESTDIR}/bin/pkg-config.sh << "EOF"
#!/bin/sh
if pkg-config "$@" > /dev/null 2>&1 ; then
res=true
else
res=false
fi
pkg-config "$@" | tr -d \\r && $res

EOF
Make the script executable and point the PKG_CONFIG environment variable to the script:
chmod ugo+x ${LOCALDESTDIR}/bin/pkg-config.sh && \
echo "PKG_CONFIG=${LOCALDESTDIR}/bin/pkg-config.sh" >> ${LOCALDESTDIR}/etc/profile.local && \
echo "export PKG_CONFIG" >> ${LOCALDESTDIR}/etc/profile.local
Load the altered profile.local:
source ${LOCALDESTDIR}/etc/profile.local
References:
zlib is a compression library.
- Homepage: http://www.zlib.net/
- Download: zlib-1.2.8.tar.gz
Build and install the zlib dll by executing the following commands:
cd ${LOCALSOURCEDIR} && \
wget -c http://www.zlib.net/zlib-1.2.8.tar.gz && \
cd ${LOCALBUILDDIR} && \
tar xzf ${LOCALSOURCEDIR}/zlib-1.2.8.tar.gz && \
cd zlib-1.2.8 && \
sed 's/-O3/-O3 -mms-bitfields -mthreads/' win32/Makefile.gcc >Makefile.gcc && \
make IMPLIB='libz.dll.a' -fMakefile.gcc && \
install zlib1.dll ${LOCALDESTDIR}/bin && \
install libz.dll.a ${LOCALDESTDIR}/lib && \
install libz.a ${LOCALDESTDIR}/lib && \
install zlib.h ${LOCALDESTDIR}/include && \
install zconf.h ${LOCALDESTDIR}/include
Note: zlib.pc must be created manually and installed into ${LOCALDESTDIR}/lib/pkgconfig/
The Netwide Assembler.
- Homepage: http://www.nasm.us/
- Download: nasm-2.10.09.tar.gz
Build and install nasm by executing the following commands:
cd ${LOCALSOURCEDIR} && \
wget -c http://www.nasm.us/pub/nasm/releasebuilds/2.10.09/nasm-2.10.09.tar.gz && \
cd ${LOCALBUILDDIR} && \
tar xzf ${LOCALSOURCEDIR}/nasm-2.10.09.tar.gz && \
cd nasm-2.10.09 && \
./configure --prefix=${LOCALDESTDIR} && \
make && \
make install
The Simple Direct Media Layer is a cross-platform application framework. Version 1.2 has been superseded by version 2, but you can have both versions installed for applications that need it.
- Homepage: http://www.libsdl.org/
- Download: SDL-1.2.15.tar.gz
Build and install SDL by executing the following commands:
cd ${LOCALSOURCEDIR} && \
wget -c http://www.libsdl.org/release/SDL-1.2.15.tar.gz && \
cd ${LOCALBUILDDIR} && \
tar xzf ${LOCALSOURCEDIR}/SDL-1.2.15.tar.gz && \
cd SDL-1.2.15 && \
./configure --prefix=${LOCALDESTDIR} && \
make && \
make install
Build the SDL test programs by executing the following commands:
cd test && \
./configure && \
make
Run the SDL test programs:
SDL_VIDEODRIVER=windib testvidinfo
cat stdout.txt
SDL_VIDEODRIVER=directx testvidinfo
cat stdout.txt
testplatform
cat stdout.txt
testdyngl
The Simple Direct Media Layer is a cross-platform application framework.
- Homepage: http://www.libsdl.org/
- Download: SDL2-2.0.1.tar.gz
Build and install SDL2 by executing the following commands:
cd ${LOCALSOURCEDIR} && \
wget -c http://www.libsdl.org/release/SDL2-2.0.1.tar.gz && \
cd ${LOCALBUILDDIR} && \
tar xzf ${LOCALSOURCEDIR}/SDL2-2.0.1.tar.gz && \
cd SDL2-2.0.1 && \
./configure --prefix=${LOCALDESTDIR} && \
make && \
make install
Build the SDL2 test programs by executing the following commands:
cd test && \
./autogen.sh && \
./configure && \
make
Run the SDL2 test programs:
./testplatform
./testgl2
The following test takes some time to complete, it won't show any output until it's done.
./testthread
libng is PNG image file format library.
- Homepage: http://www.libpng.org/pub/png/libpng.html
- Download: libpng-1.6.7.tar.gz
Build and install libpng by executing the following commands:
cd ${LOCALSOURCEDIR} && \
wget -c "http://downloads.sourceforge.net/libpng/libpng-1.6.7.tar.gz" && \
cd ${LOCALBUILDDIR} && \
tar xzf ${LOCALSOURCEDIR}/libpng-1.6.7.tar.gz && \
cd libpng-1.6.7 && \
./configure --prefix=${LOCALDESTDIR} && \
make && \
make install
libjpeg is a JPEG image file format library.
- Homepage: http://www.ijg.org/
- Download: jpegsrc.v9.tar.gz
Build and install libjpeg by executing the following commands:
cd ${LOCALSOURCEDIR} && \
wget -c http://www.ijg.org/files/jpegsrc.v9.tar.gz && \
cd ${LOCALBUILDDIR} && \
tar xzf ${LOCALSOURCEDIR}/jpegsrc.v9.tar.gz && \
cd jpeg-9 && \
./configure --prefix=${LOCALDESTDIR} --enable-shared --enable-static && \
make && \
make install
libtiff is a TIFF image file format library.
- Homepage: http://www.remotesensing.org/libtiff/
- Download: tiff-4.0.3.tar.gz
Build and install libtiff by executing the following commands:
cd ${LOCALSOURCEDIR} && \
wget -c ftp://ftp.remotesensing.org/pub/libtiff/tiff-4.0.3.tar.gz && \
cd ${LOCALBUILDDIR} && \
tar xzf ${LOCALSOURCEDIR}/tiff-4.0.3.tar.gz && \
cd tiff-4.0.3 && \
./configure --prefix=${LOCALDESTDIR} && \
make && \
make install
libwebp is a WebP image file format library.
- Homepage: https://developers.google.com/speed/webp/
- Download: libwebp-0.3.1.tar.gz
Build and install libwebp by executing the following commands:
cd ${LOCALSOURCEDIR} && \
wget --no-check-certificate -c https://webp.googlecode.com/files/libwebp-0.3.1.tar.gz && \
cd ${LOCALBUILDDIR} && \
tar xzf ${LOCALSOURCEDIR}/libwebp-0.3.1.tar.gz && \
cd libwebp-0.3.1 && \
./configure --prefix=${LOCALDESTDIR} && \
make && \
make install
SDL_image is an image support library for the Simple Direct Media Layer
- Homepage: http://www.libsdl.org/projects/SDL_image/release-1.2.html
- Download: SDL_image-1.2.12.tar.gz
Build and install SDL_image by executing the following commands:
cd ${LOCALSOURCEDIR} && \
wget -c http://www.libsdl.org/projects/SDL_image/release/SDL_image-1.2.12.tar.gz && \
cd ${LOCALBUILDDIR} && \
tar xzf ${LOCALSOURCEDIR}/SDL_image-1.2.12.tar.gz && \
cd SDL_image-1.2.12 && \
./configure --prefix=${LOCALDESTDIR} && \
make && \
make install
SDL2_image is an image support library for SDL2
- Homepage: http://www.libsdl.org/projects/SDL_image
- Download: SDL2_image-2.0.0.tar.gz
Build and install SDL_image by executing the following commands:
cd ${LOCALSOURCEDIR} && \
wget -c http://www.libsdl.org/projects/SDL_image/release/SDL2_image-2.0.0.tar.gz && \
cd ${LOCALBUILDDIR} && \
tar xzf ${LOCALSOURCEDIR}/SDL2_image-2.0.0.tar.gz && \
cd SDL2_image-2.0.0 && \
./configure --prefix=${LOCALDESTDIR} && \
make && \
make install
OpenAL Soft is an implementation of the OpenAL 3D audio API.
- Homepage: http://kcat.strangesoft.net/openal.htm
- Download: openal-soft-1.15.1.tar.bz2
Build and install OpenAL Soft by executing the following commands:
cd ${LOCALSOURCEDIR} && \
wget -c http://kcat.strangesoft.net/openal-releases/openal-soft-1.15.1.tar.bz2 && \
cd ${LOCALBUILDDIR} && \
tar xjf ${LOCALSOURCEDIR}/openal-soft-1.15.1.tar.bz2 && \
cd openal-soft-1.15.1 && \
cd build && \
cmake -DCMAKE_INSTALL_PREFIX:PATH=${LOCALDESTDIR} -G "MSYS Makefiles" .. && \
make && \
make install
Test the OpenAL Soft installation:
openal-info
smpeg is an mpeg file format library
- Homepage: https://icculus.org/smpeg
- Download: svn://svn.icculus.org/smpeg/tags/release_0_4_5
Build and install smpeg by executing the following commands:
cd ${LOCALBUILDDIR} && \
svn export svn://svn.icculus.org/smpeg/tags/release_0_4_5 smpeg-0.4.5 && \
cd smpeg-0.4.5 && \
./autogen.sh && \
./configure --prefix=${LOCALDESTDIR} --enable-mmx --disable-gtk-player \
            --disable-opengl-player --disable-gtktest  && \
make && \
make install
smpeg is an mpeg file format library
- Homepage: https://icculus.org/smpeg
- Download: svn://svn.icculus.org/smpeg/tags/release_2_0_0
Build and install smpeg by executing the following commands:
cd ${LOCALBUILDDIR} && \
svn export svn://svn.icculus.org/smpeg/tags/release_2_0_0 smpeg-2.0.0 && \
cd smpeg-2.0.0 && \
./autogen.sh && \
./configure --prefix=${LOCALDESTDIR} --enable-mmx  && \
make && \
make install
libogg is an ogg bitstream format library
- Homepage: http://www.vorbis.com/
- Download: libogg-1.3.1.tar.gz
Build and install libogg by executing the following commands:
cd ${LOCALSOURCEDIR} && \
wget -c http://downloads.xiph.org/releases/ogg/libogg-1.3.1.tar.gz && \
cd ${LOCALBUILDDIR} && \
tar xzf ${LOCALSOURCEDIR}/libogg-1.3.1.tar.gz && \
cd libogg-1.3.1 && \
LDFLAGS='-mwindows' ./configure --prefix=${LOCALDESTDIR} && \
make  && \
make install
libvorbis is a vorbis audio format library
- Homepage: http://www.vorbis.com/
- Download: libvorbis-1.3.3.tar.gz
Build and install libvorbis by executing the following commands:
cd ${LOCALSOURCEDIR} && \
wget -c http://downloads.xiph.org/releases/vorbis/libvorbis-1.3.3.tar.gz && \
cd ${LOCALBUILDDIR} && \
tar xzf ${LOCALSOURCEDIR}/libvorbis-1.3.3.tar.gz && \
cd libvorbis-1.3.3 && \
LDFLAGS='-mwindows' ./configure --prefix=${LOCALDESTDIR} && \
make && \
make install
FLAC is a Free Lossless Audio Codec.
- Homepage: http://xiph.org/flac/
- Download: flac-1.3.0.tar.gz
Build and install FLAC by executing the following commands:
cd ${LOCALSOURCEDIR} && \
wget -c http://downloads.xiph.org/releases/flac/flac-1.3.0.tar.xz && \
cd ${LOCALBUILDDIR} && \
tar xJf ${LOCALSOURCEDIR}/flac-1.3.0.tar.xz && \
cd flac-1.3.0 && \
./configure --disable-xmms-plugin --prefix=${LOCALDESTDIR} && \
make && \
make install
SDL_mixer is an audio support library for the Simple Direct Media Layer
- Homepage: http://www.libsdl.org/projects/SDL_image/release-1.2.html
- Download: SDL_mixer-1.2.12.tar.gz
The following patch is required before running ./configure:
--- Makefile.in.org     2013-06-29 17:23:02 +0200
+++ Makefile.in 2013-06-29 17:23:51 +0200
@@ -66,10 +66,10 @@
        $(LIBTOOL) --mode=link $(CC) -o $@ $(OBJECTS) $(VERSION_OBJECTS) $(LDFLAGS) $(EXTRA_LDFLAGS) $(LT_LDFLAGS)

 $(objects)/playwave$(EXE): $(objects)/playwave.lo $(objects)/$(TARGET)
-       $(LIBTOOL) --mode=link $(CC) -o $@ $(objects)/playwave.lo $(SDL_CFLAGS) $(SDL_LIBS) $(objects)/$(TARGET)
+       $(LIBTOOL) --mode=link $(CC) -o $@ $(objects)/playwave.lo $(SDL_CFLAGS) -lSDLmain $(SDL_LIBS) $(objects)/$(TARGET)

 $(objects)/playmus$(EXE): $(objects)/playmus.lo $(objects)/$(TARGET)
-       $(LIBTOOL) --mode=link $(CC) -o $@ $(objects)/playmus.lo $(SDL_CFLAGS) $(SDL_LIBS) $(objects)/$(TARGET)
+       $(LIBTOOL) --mode=link $(CC) -o $@ $(objects)/playmus.lo $(SDL_CFLAGS) -lSDLmain $(SDL_LIBS) $(objects)/$(TARGET)

 install: all install-hdrs install-lib #install-bin
 install-hdrs:
Build and install SDL_mixer by executing the following commands:
cd ${LOCALSOURCEDIR} && \
wget -c http://www.libsdl.org/projects/SDL_mixer/release/SDL_mixer-1.2.12.tar.gz && \
cd ${LOCALBUILDDIR} && \
tar xzf ${LOCALSOURCEDIR}/SDL_mixer-1.2.12.tar.gz --exclude=Xcode && \
cd SDL_mixer-1.2.12 && \
./configure --prefix=${LOCALDESTDIR} && \
make && \
make install
SDL2_mixer is an audio support library for SDL2.
- Homepage: http://www.libsdl.org/projects/SDL_mixer/
- Download: SDL2_mixer-2.0.0.tar.gz
Build and install SDL_mixer by executing the following commands:
cd ${LOCALSOURCEDIR} && \
wget -c http://www.libsdl.org/projects/SDL_mixer/release/SDL2_mixer-2.0.0.tar.gz && \
cd ${LOCALBUILDDIR} && \
tar xzf ${LOCALSOURCEDIR}/SDL2_mixer-2.0.0.tar.gz --exclude=Xcode && \
cd SDL2_mixer-2.0.0 && \
./configure --prefix=${LOCALDESTDIR} && \
make && \
make install
curl is a command line tool for transferring data with URL syntax
- Homepage: http://curl.haxx.se/
- Download: curl-7.33.0.tar.gz
Build and install curl by executing the following commands:
cd ${LOCALSOURCEDIR} && \
wget -c http://curl.haxx.se/download/curl-7.33.0.tar.gz && \
cd ${LOCALBUILDDIR} && \
tar xzf ${LOCALSOURCEDIR}/curl-7.33.0.tar.gz && \
cd curl-7.33.0 && \
CFLAGS="-mms-bitfields -mthreads" ./configure  --prefix=${LOCALDESTDIR} --without-ssl  && \
make && \
make install
Public Domain Curses is an implementation of the curses library
- Homepage: http://pdcurses.sourceforge.net/
- Download: PDCurses-3.4.tar.gz
Build and install pdcurses by executing the following commands:
cd ${LOCALSOURCEDIR} && \
wget -c http://downloads.sourceforge.net/project/pdcurses/pdcurses/3.4/PDCurses-3.4.tar.gz  && \
cd ${LOCALBUILDDIR} && \
tar xzf ${LOCALSOURCEDIR}/PDCurses-3.4.tar.gz  && \
cd PDCurses-3.4  && \
cd win32  && \
cat mingwin32.mak | sed 's|\\exp\-|\/exp\-|g' > mingwin32.new  && \
mv mingwin32.new mingwin32.mak  && \
cat mingwin32.mak | sed 's|type|cat|g' > mingwin32.new  && \
mv mingwin32.new mingwin32.mak  && \
cat mingwin32.mak | sed 's|copy|cp|g' > mingwin32.new  && \
mv mingwin32.new mingwin32.mak  && \
cat mingwin32.mak | sed 's|del|rm|g' > mingwin32.new  && \
mv mingwin32.new mingwin32.mak  && \
make -f mingwin32.mak libs  && \
install pdcurses.a ${LOCALDESTDIR}/lib/libpdcurses.a  && \
make -f mingwin32.mak clean  && \
make -f mingwin32.mak DLL=Y libs  && \
install pdcurses.dll ${LOCALDESTDIR}/bin  && \
cd ..  && \
install curses.h ${LOCALDESTDIR}/include
Note: the sed lines replace the DOS commands in the install script with their UNIX equivalent.
freeglut is a free implementation of the OpenGL Utility Toolkit
- Homepage: http://freeglut.sourceforge.net/
- Download: freeglut-2.8.1.tar.gz
Build and install freeglut by executing the following commands:
cd ${LOCALSOURCEDIR} && \
wget -c http://downloads.sourceforge.net/project/freeglut/freeglut/2.8.1/freeglut-2.8.1.tar.gz && \
cd ${LOCALBUILDDIR} && \
tar xzf ${LOCALSOURCEDIR}/freeglut-2.8.1.tar.gz && \
cd freeglut-2.8.1 && \
./configure --prefix=${LOCALDESTDIR} && \
make && \
make install
Run the freeglut demos to test your build:
cd progs/demos/one
one
Bullet is a collision detection and physics library
- Homepage: http://www.bulletphysics.com/
- Download: bullet-2.82-r2704.tgz
Build and install bullet by executing the following commands:
cd ${LOCALSOURCEDIR} && \
wget -c http://bullet.googlecode.com/files/bullet-2.82-r2704.tgz && \
cd ${LOCALBUILDDIR} && \
tar xzf ${LOCALSOURCEDIR}/bullet-2.82-r2704.tgz && \
cd bullet-2.82-r2704 && \
./autogen.sh && \
./configure --prefix=${LOCALDESTDIR} --disable-demos && \
make && \
make install && \
install src/BulletDynamics/ConstraintSolver/btFixedConstraint.h ${LOCALDESTDIR}/include/bullet/BulletDynamics/ConstraintSolver/
PhysicsFS is a library to provide abstract access to various archives.
- Homepage: http://icculus.org/physfs/
- Download: physfs-2.0.3.tar.bz2
Build and install PhysicsFS by executing the following commands:
cd ${LOCALSOURCEDIR} && \
wget http://icculus.org/physfs/downloads/physfs-2.0.3.tar.bz2 && \
wget -c http://ingar.satgnu.net/devenv/mingw32/files/physfs-2.0.3-size_t.patch  && \
cd ${LOCALBUILDDIR} && \
tar xjf ${LOCALSOURCEDIR}/physfs-2.0.3.tar.bz2 && \
cd physfs-2.0.3 && \
patch -Np0 -i ${LOCALSOURCEDIR}/physfs-2.0.3-size_t.patch
mkdir build && \
cd build && \
cmake -DCURSES_LIBRARY=${LOCALDESTDIR}/bin/pdcurses.dll \
-DZLIB_LIBRARY=${LOCALDESTDIR}/lib/libz.dll.a -DZLIB_INCLUDE_DIR=${LOCALDESTDIR}/include \
-DCMAKE_INSTALL_PREFIX=${LOCALDESTDIR} -G "MSYS Makefiles" .. && \
make && \
make install
Notes:
-
wget http://icculus.org/physfs/downloads/physfs-2.0.3.tar.bz2
- icculus.org seems to have issues with wget -c patch -Np0 -i ${LOCALSOURCEDIR}/physfs-2.0.3-size_t.patch
- The 64-bit version does not build without patching.
Part 3: Building GTK+
This section describes how to compile the GTK+ library and necessary dependencies.
Content
libiconv is a text encoding library
- Website:http://www.gnu.org/software/libiconv
- Download: libiconv-1.14.tar.gz
cd ${LOCALSOURCEDIR} && \
wget -c http://ftp.gnu.org/pub/gnu/libiconv/libiconv-1.14.tar.gz && \
cd ${LOCALBUILDDIR} && \
tar xzf ${LOCALSOURCEDIR}/libiconv-1.14.tar.gz && \
cd libiconv-1.14 && \
./configure --prefix=${LOCALDESTDIR} && \
make && \
make install
gettext is a tool for localizing and translating programs
- Website: http://www.gnu.org/software/gettext
- Dowload: gettext-0.18.3.1.tar.gz
Build and install the gettext runtime by executing the following commands:
cd ${LOCALSOURCEDIR} && \
wget -c http://ftp.gnu.org/pub/gnu/gettext/gettext-0.18.3.1.tar.gz && \
cd ${LOCALBUILDDIR} && \
tar xzf ${LOCALSOURCEDIR}/gettext-0.18.3.1.tar.gz && \
mv gettext-0.18.3.1 gettext-0.18.3.1-runtime && \
cd gettext-0.18.3.1-runtime && \
cat gettext-tools/woe32dll/gettextlib-exports.c | grep -v rpl_opt > gettext-tools/woe32dll/gettextlib-exports.c.new && \
mv gettext-tools/woe32dll/gettextlib-exports.c.new gettext-tools/woe32dll/gettextlib-exports.c && \
CFLAGS="-mms-bitfields -mthreads -O2" ./configure --prefix=${LOCALDESTDIR} --enable-threads=win32 --enable-relocatable && \
cd gettext-runtime && \
make && \
make install
Build and install the gettext tools by executing the following commands:
cd ${LOCALBUILDDIR} && \
tar xzf ${LOCALSOURCEDIR}/gettext-0.18.3.1.tar.gz && \
mv gettext-0.18.3.1 gettext-0.18.3.1-static && \
cd gettext-0.18.3.1-static && \
CFLAGS="-mms-bitfields -mthreads -O2" ./configure --prefix=${LOCALDESTDIR} --enable-threads=win32 --enable-relocatable --disable-shared && \
make && \
install gettext-tools/src/msgfmt.exe ${LOCALDESTDIR}/bin && \
install gettext-tools/src/msgmerge.exe ${LOCALDESTDIR}/bin && \
install gettext-tools/src/xgettext.exe ${LOCALDESTDIR}/bin
References:
glib is a low-level core library that forms the basis of GTK+
- Download: glib-2.28.8.tar.xz
Build and install glib by executing the following commands:
cd ${LOCALSOURCEDIR} && \
wget -c http://ftp.gnome.org/pub/gnome/sources/glib/2.28/glib-2.28.8.tar.xz && \
cd ${LOCALBUILDDIR} && \
tar xJf ${LOCALSOURCEDIR}/glib-2.28.8.tar.xz && \
cd glib-2.28.8 && \
./configure --prefix=${LOCALDESTDIR} --with-pcre=internal --enable-debug=no --disable-gtk-doc && \
make && \
make install
pkg-config is a helper tool used when compiling applications and libraries.
This build will replace the static binary we installed earlier.
Build and install pkg-config by executing the following commands:
cd ${LOCALSOURCEDIR} && \
wget -c http://pkgconfig.freedesktop.org/releases/pkg-config-0.28.tar.gz && \
cd ${LOCALBUILDDIR} && \
tar xzf ${LOCALSOURCEDIR}/pkg-config-0.28.tar.gz && \
cd pkg-config-0.28 && \
./configure --prefix=${LOCALDESTDIR} && \
make && \
make install
Freetype is a library for rendering TrueType fonts.
- Website: freetype home page
- Download: freetype-2.5.2.tar.gz
Build and install freetype by executing the following commands:
cd ${LOCALSOURCEDIR}  && \
wget -c http://download.savannah.gnu.org/releases/freetype/freetype-2.5.2.tar.gz && \
cd ${LOCALBUILDDIR} && \
tar xzf ${LOCALSOURCEDIR}/freetype-2.5.2.tar.gz && \
cd freetype-2.5.2 && \
./configure --prefix=${LOCALDESTDIR} && \
make && \
make install
By default, freetype disables a few options that may have patent restrictions. You can enable them by editing the file include/config/ftoption.h after unpacking the source code. Uncomment the line that says #define FT_CONFIG_OPTION_SUBPIXEL_RENDERING. Make sure you read http://www.freetype.org/patents.html before enabling this option.
expat is an XML parsing library
- Website: http://expat.sourceforge.net/
- Download: expat-2.0.1.tar.gz
Build and install expat by executing the following commands:
cd ${LOCALSOURCEDIR} && \
wget -c http://downloads.sourceforge.net/project/expat/expat/2.0.1/expat-2.0.1.tar.gz && \
cd ${LOCALBUILDDIR} && \
tar xzf ${LOCALSOURCEDIR}/expat-2.0.1.tar.gz && \
cd expat-2.0.1 && \
./configure --prefix=${LOCALDESTDIR} && \
make && \
make install
libxml2 is an XML parsing library
- Website: http://xmlsoft.org/
- Download: libxml2-2.9.1.tar.gz
Build and install libxml2 by executing the following commands:
cd ${LOCALSOURCEDIR} && \
wget -c ftp://xmlsoft.org/libxml2/libxml2-2.9.1.tar.gz && \
cd ${LOCALBUILDDIR} && \
tar xzf ${LOCALSOURCEDIR}/libxml2-2.9.1.tar.gz && \
cd libxml2-2.9.1 && \
./configure --prefix=${LOCALDESTDIR} --with-zlib=${LOCALDESTDIR} && \
make && \
make install
Configuration options:
-
--without-python
- libxml2 fails to build if it finds python in your PATH. Add this configure option to disable python detection (Thanks to Thomas Hooge).
fontconfig is a library for font customization and configuration
- Website: http://www.freedesktop.org/wiki/Software/fontconfig
- Download: fontconfig-2.11.0.tar.gz
Build and install fontconfig by executing the following commands:
cd ${LOCALSOURCEDIR} && \
wget -c http://www.freedesktop.org/software/fontconfig/release/fontconfig-2.11.0.tar.gz && \
cd ${LOCALBUILDDIR} && \
tar xzf ${LOCALSOURCEDIR}/fontconfig-2.11.0.tar.gz && \
cd fontconfig-2.11.0 && \
./configure --prefix=${LOCALDESTDIR} --enable-libxml2 --disable-docs && \
make && \
make install
pixman is a low-level pixel manipulation library
- Website: http://cairographics.org
- Download: pixman-0.32.4.tar.gz
Build and install pixman by executing the following commands:
cd ${LOCALSOURCEDIR} && \
wget -c http://cairographics.org/releases/pixman-0.32.4.tar.gz && \
cd ${LOCALBUILDDIR} && \
tar xzf ${LOCALSOURCEDIR}/pixman-0.32.4.tar.gz && \
cd pixman-0.32.4 && \
./configure --prefix=${LOCALDESTDIR} && \
make && \
make install
cairo is a 2d graphics library
- Website: http://cairographics.org
- Download: cairo-1.12.16.tar.xz
Build and install cairo by executing the following commands:
cd ${LOCALSOURCEDIR} && \
wget -c http://cairographics.org/releases/cairo-1.12.16.tar.xz && \
cd ${LOCALBUILDDIR} && \
tar xJf ${LOCALSOURCEDIR}/cairo-1.12.16.tar.xz && \
cd cairo-1.12.16 && \
./configure --prefix=${LOCALDESTDIR} && \
make && \
make install
pango is a text rendering library
- Download: pango-1.29.4.tar.bz2
Build and install pango by executing the following commands:
cd ${LOCALSOURCEDIR} && \
wget -c http://ftp.gnome.org/pub/gnome/sources/pango/1.29/pango-1.29.4.tar.bz2 && \
cd ${LOCALBUILDDIR} && \
tar xjf ${LOCALSOURCEDIR}/pango-1.29.4.tar.bz2 && \
cd pango-1.29.4 && \
./configure --prefix=${LOCALDESTDIR} --with-included-modules=yes \
--disable-debug --disable-gtk-doc --without-x && \
make && \
make install
Configuration options:
-
--with-included-modules=yes
- This options causes pango modules to be staticly linked into the main library.
atk is the gnome accessibility toolkit
- Download: atk-1.32.0.tar.bz2
Build and install atk by executing the following commands:
cd ${LOCALSOURCEDIR} && \
wget -c http://ftp.gnome.org/pub/gnome/sources/atk/1.32/atk-1.32.0.tar.bz2 && \
cd ${LOCALBUILDDIR} && \
tar xjf ${LOCALSOURCEDIR}/atk-1.32.0.tar.bz2 && \
cd atk-1.32.0 && \
./configure --prefix=${LOCALDESTDIR} --disable-debug && \
make && \
make install
GdkPixBuf provides pixel buffer and rendering functions
- Download: gdk-pixbuf-2.24.0.tar.bz2
Build and install GdkPixBuf by executing the following commands:
cd ${LOCALSOURCEDIR} && \
wget -c http://ftp.gnome.org/pub/gnome/sources/gdk-pixbuf/2.24/gdk-pixbuf-2.24.0.tar.bz2 && \
cd ${LOCALBUILDDIR} && \
tar xjf ${LOCALSOURCEDIR}/gdk-pixbuf-2.24.0.tar.bz2 && \
cd gdk-pixbuf-2.24.0 && \
./configure --prefix=${LOCALDESTDIR} --with-included-loaders=yes \
--without-libjasper --disable-debug && \
make && \
make install
Configuration options::
-
--with-included-loaders=yes
- This option causes the gdk image loaders to be staticly linked into the gdk-pixbuf library --without-libjasper
- disable JPEG2000 support
gtk+ is an application framework library
- Website: http://www.gtk.org/
- Download: gtk+-2.24.10.tar.bz2
- The 32-bit build will fail around gtk-update-icon-cache unless you run the msys shell as administrator.
- Edit gdk/win32/gdkdnd-win32.c and remove #define INITGUID, otherwise the builds fails on the newer mingw-w64.
- For the 64-bit build, you need to rm gtk/gtk.def before running make.
Build and install gtk+ by executing the following commands:
cd ${LOCALSOURCEDIR} && \
wget -c http://ftp.gnome.org/pub/gnome/sources/gtk+/2.24/gtk+-2.24.10.tar.xz && \
cd ${LOCALBUILDDIR} && \
tar xJf ${LOCALSOURCEDIR}/gtk+-2.24.10.tar.xz && \
cd gtk+-2.24.10 && \
./configure --prefix=${LOCALDESTDIR} --with-gdktarget=win32 \
--with-included-immodules=ime --disable-debug --disable-gtk-doc && \
make && \
make install
Configuration options::
-
--with-included-immodules=ime
- This options causes the ime input module to be staticly linked into the main library.

At this point, you should test your gtk installation. The pixbuf-demo demonstrates image capabilities.
cd demos
./pixbuf-demo
You should see a window with rotating icons.

The gtk-demo demonstrates gtk widgets:
cd gtk-demo
gtk-demo
References:
gtkglext is an opengl extension for gtk+
- Website: http://projects.gnome.org/gtkglext/
- Download: gtkglext-1.2.0.tar.gz
- Patch: gtkglext-1.2.0-gtk-2.20.patch
gtkglext does not build without patching, the patch provided is from the arch linux gtkglext package.
Build and install gtkglext by executing the following commands:
cd ${LOCALSOURCEDIR} && \
wget -c http://downloads.sourceforge.net/gtkglext/gtkglext-1.2.0.tar.gz && \
wget -c http://ingar.satgnu.net/devenv/mingw32/files/gtkglext-1.2.0-gtk-2.20.patch && \
cd ${LOCALBUILDDIR} && \
tar xzf ${LOCALSOURCEDIR}/gtkglext-1.2.0.tar.gz && \
cd gtkglext-1.2.0 && \
patch -Np1 -i ${LOCALSOURCEDIR}/gtkglext-1.2.0-gtk-2.20.patch && \
cat configure | sed 's/pangox/pangowin32/' > configure.new && \
mv configure.new configure && \
./configure --prefix=${LOCALDESTDIR} --with-gdktarget=win32 --enable-debug=no && \
make && \
make install
Command explanation:
-
cat configure | sed 's/pangox/pangowin32/' > configure.new && mv configure.new configure
- These commands correct the configure script so it links binaries with the pango win32 library instead of the pango X11 libraries.
Build and install the wglinfo program:
cd examples
make wglinfo.exe
install wglinfo.exe ${LOCALDESTDIR}/bin
Part 4: Building Qt 4
This section describes how to compile the Qt library.
Qt 4 is a framework for application development.
- Website:http://qt-project.org/
- Download: qt-everywhere-opensource-src-4.8.5.zip
Downlaod and build the Qt library using the following commands:
cd $LOCALBUILDDIR && \
wget -c http://download.qt-project.org/official_releases/qt/4.8/4.8.5/qt-everywhere-opensource-src-4.8.5.zip && \
unzip qt-everywhere-opensource-src-4.8.5.zip && \
cd qt-everywhere-opensource-src-4.8.5 && \
./configure.exe -prefix $LOCALDESTDIR/qt4 -release -opensource && \
mingw32-make
Press y to accept the license.
Install it:
mingw32-make install
Qt builds can take a very long time.
Part 5: Building extra tools
This section describes how to compile some extra packages. You can skip this section if you don't need them.
Content
Readline is a set of libraries that offers command-line editing and history capabilities.
- Homepage: http://cnswww.cns.cwru.edu/php/chet/readline/rltop.html
- Download: readline-6.2.tar.gz
Build and install readline by executing the following commands:
cd $LOCALBUILDDIR && \
wget -c ftp://ftp.cwru.edu/pub/bash/readline-6.2.tar.gz && \
tar zxf readline-6.2.tar.gz && \
cd readline-6.2 && \
./configure --prefix=$LOCALDESTDIR && \
make SHLIB_LIBS=-lpdcurses && \
make install
gperf is a perfect hash function generator.
- Homepage: http://www.gnu.org/software/gperf/
- Download: gperf-3.0.4.tar.gz
Build and install gperf by executing the following commands:
cd $LOCALBUILDDIR && \
wget -c http://ftp.gnu.org/pub/gnu/gperf/gperf-3.0.4.tar.gz && \
tar zxf gperf-3.0.4.tar.gz && \
cd gperf-3.0.4 && \
./configure --prefix=$LOCALDESTDIR && \
make && \
make install
wget is a utility for downloading files from the internet
- Homepage: http://www.gnu.org/software/wget/
- Download: http://ftp.gnu.org/gnu/wget/wget-1.12.tar.bz2
By building wget we replace
Build and install wget by executing the following commands:
# edit src/host.c
# comment out the line
#	/extern int h_errno;
#
# after configure: edit src/config.h
#	#undef HAVE_SYMLINK
#	#undef HAVE_USLEEP
#
# make fails to link the exe:
#	append -lws2_32 to the command
# (adding LDFLAGS to ./configure doesn't work)
#
cd $LOCALBUILDDIR && \
wget http://ftp.gnu.org/gnu/wget/wget-1.12.tar.bz2 && \
tar xjf wget-1.12.tar.bz2 && \
cd wget-1.12 && \
CPPFLAGS="$CPPFLAGS -DWINDOWS" ./configure --prefix=$LOCALDESTDIR --disable-iri && \
make && \
make install
Part 5: Building projects
This part descries how to build specific projects.
This part is out of date!
NetRadiant is a Quake map editor
- Homepage: http://dev.alientrap.org/wiki/netradiant
The NetRadiant build fails if it finds the system libjpeg headers. We move them to a temporary location:
Get the src... (not described)
Build and install netradiant by executing the following commands:
make DEPENDENCIES_CHECK=false DOWNLOAD_GAMEPACKS=no
Note: DEPENDENCIES_CHECK=false is necessary because we did not install git.
Notes: disabled install-dlls.sh by adding exit 0 to the start of the script.


 1466
1466

 被折叠的 条评论
为什么被折叠?
被折叠的 条评论
为什么被折叠?
 到【灌水乐园】发言


