


ceph源码编译不是一件很容易的事情,中间报了很多错误,比如对C++11的依赖,对BOOST的依赖以及大量其他库的依赖,这些过程都要一一解决。本文对编译的过程进行了一个详细的说明,并对碰到的问题进行了记录。
具体过程
git clone https://github.com/ceph/ceph
2. 编译
./autogen.sh
./configure
环境检查的过程中报如下错误

系统报错,缺少C++11的支持。需要升级GCC版本以支持C++11。 我咨询过使用CentOS7系列的同学,他们自带的GCC是高版本的,可以支持C++11.
3. GCC c++11支持
wget http://ftp.gnu.org/gnu/gcc/gcc-4.8.1/gcc-4.8.1.tar.gztar xzf gcc-4.8.1.tar.gz
cd gcc-4.8.1
./contrib/download_prerequisites //安装依赖库
cd ..
mkdir build_gcc4.8.1
cd build_gcc4.8.1
../configure --prefix=/usr -enable-checking=release --enable-languages=c,c++ --disable-multilib
make -j8
sudo make install 4. 编译Ceph源码
编译的过程中同样出现了很多问题
configure: error: in `/home/ceph/ceph-src/ceph':
configure: error: libsnappy not found
See `config.log' for more details.
------------------------------------------------------------------------------------

configure: error: in `/home/ceph/ceph-src/ceph':
configure: error: libleveldb not found
See `config.log' for more details.
-------------------------------------------------------------------------------------
checking blkid/blkid.h usability... no
checking blkid/blkid.h presence... no
checking for blkid/blkid.h... no
configure: error: blkid/blkid.h not found (libblkid-dev, libblkid-devel)
-------------------------------------------------------------------------------------
checking libudev.h usability... no
checking libudev.h presence... no
checking for libudev.h... no
configure: error: libudev.h not found (libudev-dev, libudev-devel)
-------------------------------------------------------------------------------------
checking for malloc in -ltcmalloc... no
configure: error: in `/home/ceph/ceph-src/ceph':
configure: error: no tcmalloc found (use --without-tcmalloc to disable)
-------------------------------------------------------------------------------------
checking for FCGX_Init in -lfcgi... no
checking for LIBFUSE... yes
checking atomic_ops.h usability... no
checking atomic_ops.h presence... no
checking for atomic_ops.h... no
configure: error: in `/home/ceph/ceph-src/ceph':
configure: error: no libatomic-ops found (use --without-libatomic-ops to disable)
See `config.log' for more details.
-------------------------------------------------------------------------------------
checking xfs/xfs.h usability... no
checking xfs/xfs.h presence... no
checking for xfs/xfs.h... no
configure: error: xfs/xfs.h not found (--without-libxfs to disable)
----------------------------------------------------------------------------------------
Boost random library not found.

..........................................
主要采用如下办法解决
4.1先把能安装的依赖包给安装
sudo yum install make automake autoconf boost-devel fuse-devel gcc-c++ libtool libuuid-devel libblkid-devel keyutils-libs-devel cryptopp-devel fcgi-devel libcurl-devel expat-devel gperftools-devel libedit-devel libatomic_ops-devel snappy-devel leveldb-devel libaio-devel xfsprogs-devel git libudev-devel libcrypto++-dev libcrypto++-utils4.3 部分包不需要,直接without
./configure --without-tcmalloc --without-libatomic-ops4.4 BOOST 库缺失问题
[root@gnop029-ct-zhejiang_wenzhou-16-12 home]# ls
boost_1_59_0  boost_1_59_0.tar.gz  c11  ceph  ceph.log  civetweb  dlftp  gcc4.7_build.tar.bz2  gcc-4.8.1  gcc-4.8.1.tar.bz2  usr  wget-log

 ./bootstrap.sh
 ./bjam -sTOOLS=gcc install
5 最后对ceph源码进行
./autogen.sh
./configure
make
此处同样出现了很多问题,编译过程中出现了大量undefined reference boost库的情况。
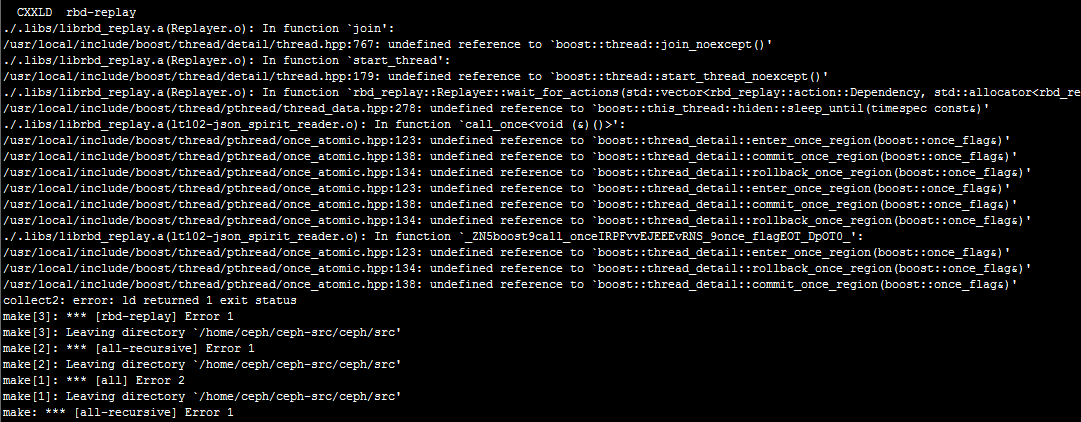
但是我在/usr/local/中可以找到boost的头文件以及二进制库。
于是追查makefile文件,发现其中涉及到的BOOST库内容如下:
BOOST_PROGRAM_OPTIONS_LIBS = -lboost_program_options-mt
BOOST_RANDOM_LIBS = -lboost_random
BOOST_REGEX_LIBS = -lboost_regex-mt
BOOST_THREAD_LIBS = -lboost_thread-mt
上网查资料发现,带mt和不带mt,分别意味这对多线程的支持。不禁让我想到在WINDOWS 平台下开发时,在VS2010下进行项目配置时,同样会涉及到对运行时库配置时,也有mutlithread版本的。应是类似道理。于是我对boost进行了重新编译。
./bjam --TOOLS=gcc --build-type=complete --layout=tagged install
用complete的模式进行编译,在相关路径下可以发现对应的二进制文件:可以发现采用新模式编译后,很多库的release版本,debug版本,多线程支持版本都编译出来了,想用哪个用那个。

最后,重复步骤5,编译ceph.
------------------------------------------------------------------------------------------------------------
在后来的编译中,mon,osd,mds等等都编译成功,却发现rgw没有编译出来。通过显示的增加
./configure --with-radosgw,得知了错误,是缺少fcgi的相关依赖。但是系统中已经安装fcgi于是清理重装。
[root@gnop029-ct-zhejiang_wenzhou-16-12 yum.repos.d]# sudo yum install fcgi-devel

58 packages excluded due to repository priority protections
Resolving Dependencies
--> Running transaction check
---> Package fcgi-devel.x86_64 0:2.4.0-12.el6 will be installed
--> Processing Dependency: fcgi = 2.4.0-12.el6 for package: fcgi-devel-2.4.0-12.el6.x86_64
--> Processing Dependency: libfcgi.so.0()(64bit) for package: fcgi-devel-2.4.0-12.el6.x86_64
--> Processing Dependency: libfcgi++.so.0()(64bit) for package: fcgi-devel-2.4.0-12.el6.x86_64
--> Running transaction check
---> Package fcgi.x86_64 0:2.4.0-10.el6 will be installed
---> Package fcgi-devel.x86_64 0:2.4.0-12.el6 will be installed
--> Processing Dependency: fcgi = 2.4.0-12.el6 for package: fcgi-devel-2.4.0-12.el6.x86_64
--> Finished Dependency Resolution
Error: Package: fcgi-devel-2.4.0-12.el6.x86_64 (epel)
           Requires: fcgi = 2.4.0-12.el6
           Available: fcgi-2.4.0-10.el6.x86_64 (Ceph)
               fcgi = 2.4.0-10.el6
Error: Package: fcgi-devel-2.4.0-12.el6.x86_64 (epel)
           Requires: fcgi = 2.4.0-12.el6
           Installing: fcgi-2.4.0-10.el6.x86_64 (Ceph)
               fcgi = 2.4.0-10.el6
 You could try using --skip-broken to work around the problem
rgw/rgw_fcgi.cc:10:22: fatal error: fcgiapp.h: No such file or directory
 # include "fcgiapp.h"
                      ^
compilation terminated.


 1512
1512

 被折叠的 条评论
为什么被折叠?
被折叠的 条评论
为什么被折叠?
 到【灌水乐园】发言


