


Jedis
概述
Jedis是Redis官方推荐的Java连接开发工具。要在Java开发中使用好Redis中间件,必须对Jedis熟悉才能写成漂亮的代码,下面我们就来对Jedis的使用进行详细介绍。

一、基本的使用
redis配置文件的修改
1、注释掉绑定的信息
在redis.conf的配置文件中bind配置的信息表示的是redis服务可以接收外部访问的地址,这个主要还是为了提高安全性,我们在学习阶段可以将这个信息直接注释掉,这样的话任意的外部IP地址都可以访问。bind是protected-mode配合使用的。  我们注释掉既可。
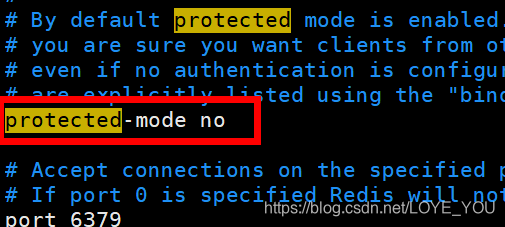
2、关闭保护模式
redis3.2版本后,配置文件中新增了protected-mode配置,默认是yes,也就是默认是开启。设置外部网络连接redis服务,配置方式如下:
1、关闭protected-mode模式,此时外部网络可以直接访问 2、开启protected-mode保护模式,需要配置bind IP或者设置访问密码。
在这里,我们选择关闭保护模式:
创建项目
为了添加依赖方便,这里我们就使用maven管理项目,创建一个maven的Java项目,添加依赖如下:
<dependency>
			<groupId>redis.clients</groupId>
			<artifactId>jedis</artifactId>
			<version>3.0.1</version>
		</dependency>
		<dependency>
			<groupId>junit</groupId>
			<artifactId>junit</artifactId>
			<version>4.12</version>
			<scope>test</scope>
		</dependency>
Redis单机版本
案例代码如下:
/**
* 测试是否连接成功
*/
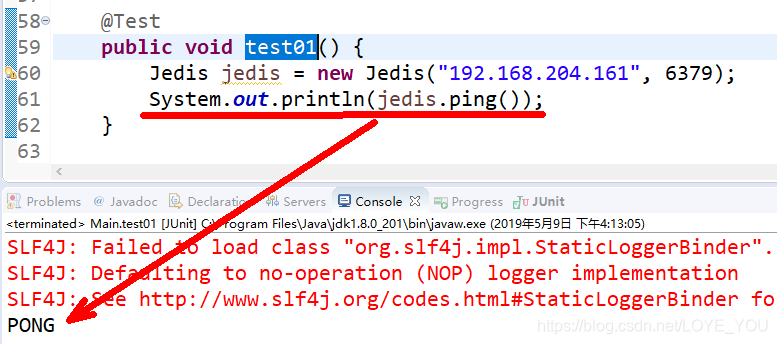
public void ping(){
Jedis jedis = new Jedis("192.168.204.161", 6379);
System.out.println(jedis.ping());
}
控制台输出:
	/**
	 * 设置key/value对
	 */
	public void set(){
		Jedis jedis = new Jedis("192.168.204.161", 6379);
		jedis.set("name", "張三");
		jedis.set("age", "18");
		jedis.close();
	}
redis中的数据:

	/**
	 * 通过key获取对应的value
	 */
	public void get(){
		Jedis jedis = new Jedis("192.168.204.161", 6379);
		String name = jedis.get("name");
		String age = jedis.get("age");
		System.out.println(name+"--"+age);
		jedis.close();
	}

以下是通过连接池连接的,效果一样,就不贴图了。
	/**
	 * 通过Jedis的连接池Pool
	 */
	public void testJedisPool() {
		// 创建Jedis连接池
		JedisPool pool = new JedisPool("192.168.204.161", 6379);
		// 从连接池中获取Jedis对象
		Jedis jedisItem = pool.getResource();

		String name = jedisItem.get("name");
		System.out.println(name);

		jedisItem.close();
		pool.close();
	}

	/**
	 * 操作incr方法自增1
	 */
	public void incr(){
		Jedis jedis = new Jedis("192.168.204.161", 6379);
		Long age = jedis.incr("age");
		System.out.println(age);
	}
Redis集群版本
	/**
	 * 操作Redis集群的数据
	 * @throws IOException
	 */
	public void testRedisCluster() throws IOException{
		JedisPoolConfig pool = new JedisPoolConfig();
		// 设置最大的空闲数
		pool.setMaxIdle(2);
		// 设置最大连接数
		pool.setMaxTotal(30);
		Set<HostAndPort> nodes = new HashSet<>();
		nodes.add(new HostAndPort("192.168.204.161", 7001));
		nodes.add(new HostAndPort("192.168.204.161", 7002));
		nodes.add(new HostAndPort("192.168.204.161", 7003));
		nodes.add(new HostAndPort("192.168.204.161", 7004));
		nodes.add(new HostAndPort("192.168.204.161", 7005));
		nodes.add(new HostAndPort("192.168.204.161", 7006));
		JedisCluster jedis = new JedisCluster(nodes,pool );
		String name = jedis.set("name","zmf");
		System.out.println(name);
		jedis.close();
		pool.clone();
	}

二、Jedis整合Spring
Jedis单独使用情况是比较少见的,实际开发中和Spring整合的使用场景还是不少的,所以此处我们介绍以下Jedis和Spring一起使用的情况。
添加依赖
<dependencies>
		<dependency>
			<groupId>org.springframework</groupId>
			<artifactId>spring-context</artifactId>
			<version>5.1.5.RELEASE</version>
		</dependency>
		<dependency>
			<groupId>redis.clients</groupId>
			<artifactId>jedis</artifactId>
			<version>3.0.1</version>
		</dependency>
		<dependency>
			<groupId>junit</groupId>
			<artifactId>junit</artifactId>
			<version>4.12</version>
			<scope>test</scope>
		</dependency>
	</dependencies>
spring 的配置文件:
<?xml version="1.0" encoding="UTF-8"?>
<beans xmlns="http://www.springframework.org/schema/beans"
	xmlns:xsi="http://www.w3.org/2001/XMLSchema-instance"
	xmlns:context="http://www.springframework.org/schema/context"
	xsi:schemaLocation="http://www.springframework.org/schema/beans http://www.springframework.org/schema/beans/spring-beans.xsd
		http://www.springframework.org/schema/context http://www.springframework.org/schema/context/spring-context-4.3.xsd">

	<context:component-scan base-package="com.sxt.dao.impl"/>

	<!-- 连接池配置 -->
	<bean id="jedisPoolConfig" class="redis.clients.jedis.JedisPoolConfig">
		<!-- 最大连接数 -->
		<property name="maxTotal" value="30" />
		<!-- 最大空闲连接数 -->
		<property name="maxIdle" value="10" />
		<!-- 每次释放连接的最大数目 -->
		<property name="numTestsPerEvictionRun" value="1024" />
		<!-- 释放连接的扫描间隔(毫秒) -->
		<property name="timeBetweenEvictionRunsMillis" value="30000" />
		<!-- 连接最小空闲时间 -->
		<property name="minEvictableIdleTimeMillis" value="1800000" />
		<!-- 连接空闲多久后释放, 当空闲时间>该值 且 空闲连接>最大空闲连接数 时直接释放 -->
		<property name="softMinEvictableIdleTimeMillis" value="10000" />
		<!-- 获取连接时的最大等待毫秒数,小于零:阻塞不确定的时间,默认-1 -->
		<property name="maxWaitMillis" value="1500" />
		<!-- 在获取连接的时候检查有效性, 默认false -->
		<property name="testOnBorrow" value="false" />
		<!-- 在空闲时检查有效性, 默认false -->
		<property name="testWhileIdle" value="false" />
		<!-- 连接耗尽时是否阻塞, false报异常,ture阻塞直到超时, 默认true -->
		<property name="blockWhenExhausted" value="false" />
	</bean>
	<!-- jedis客户端单机版 -->
	<bean id="redisClient" class="redis.clients.jedis.JedisPool">
		<constructor-arg name="host" value="192.168.204.161"></constructor-arg>
		<constructor-arg name="port" value="6379"></constructor-arg>
		<constructor-arg name="poolConfig" ref="jedisPoolConfig"></constructor-arg>
	</bean>
</beans>
创建一个bean对象
public class User {

	private Integer id;
	private String name;
	private String password;

	public User() {
		super();
	}

	public User(Integer id, String name, String password) {
		super();
		this.id = id;
		this.name = name;
		this.password = password;
	}

	public Integer getId() {
		return id;
	}

	public void setId(Integer id) {
		this.id = id;
	}

	public String getName() {
		return name;
	}

	public void setName(String name) {
		this.name = name;
	}

	public String getPassword() {
		return password;
	}

	public void setPassword(String password) {
		this.password = password;
	}

	@Override
	public String toString() {
		return "User [id=" + id + ", name=" + name + ", password=" + password + "]";
	}
}
dao层
/**
 *	dao层
 */
public interface IUserDao {
	/**
	 * 添加一条信息
	 * @param user
	 * @return
	 */
	public int save(User user);

	/**
	 * 删除一条信息
	 * @param id
	 * @return
	 */
	public int delete(Integer id);

	/**
	 * 更新一条信息
	 * @param user
	 * @return
	 */
	public int update(User user);

	/**
	 * 查询所有信息
	 * @return
	 */
	public List<User> query();
}
实现类
/**
 * 实现类
 * @author Z&F
 *
 */
@Repository
public class UserDaoImpl implements IUserDao {

	@Resource
	JedisPool jedispool;

	@Override
	public int save(User user) {
		Jedis jedis = jedispool.getResource();
		jedis.hsetnx("user:" + user.getId(),"id" , user.getId() + "");
		jedis.hsetnx("user:" + user.getId(), "name", user.getName());
		jedis.hsetnx("user:" + user.getId(), "password", user.getPassword());
		return 0;
	}

	@Override
	public int delete(Integer id) {
		Jedis jedis = jedispool.getResource();
		Long del = jedis.del("user:" + id);
		System.out.println(del);
		return 0;
	}

	@Override
	public int update(User user) {
		Jedis jedis = jedispool.getResource();
		jedis.hset("user:" + user.getId(),"id" , user.getId() + "");
		jedis.hset("user:" + user.getId(), "name", user.getName());
		jedis.hset("user:" + user.getId(), "password", user.getPassword());
		return 0;
	}

	@Override
	public List<User> query() {
		Jedis jedis = jedispool.getResource();
		Set<String> keys = jedis.keys("user:*");
		List<User> list = new ArrayList<User>();

		for (String string : keys) {
			User user = new User();
			String id = jedis.hget(string, "id");
			String name = jedis.hget(string, "name");
			String password = jedis.hget(string, "password");
			user.setId(Integer.valueOf(id));
			user.setName(name);
			user.setPassword(password);
			list.add(user);
		}
		return list;
	}
}
测试
public class Main {

	IUserDao dao;

	@Before
	public void before() {
		ApplicationContext ac = new ClassPathXmlApplicationContext("applicationContext.xml");
		dao = ac.getBean(IUserDao.class);
	}

	@Test
	public void test() {
		User user = new User();
		user.setId(2);
		user.setName("zmf");
		user.setPassword("admin");

		dao.save(user);
	}
	@Test
	public void update() {
		User user = new User();
		user.setId(1);
		user.setName("zmf");
		user.setPassword("admin");
		dao.update(user);
	}
	@Test
	public void delete() {
		dao.delete(1);
	}

	@Test
	public void query() {
		List<User> query = dao.query();
		for (User user : query) {
			System.out.println(user);
		}
	}
}
这里就测试查询好了:
 好了,本此教程到此介绍!!!


 1055
1055


 被折叠的 条评论
为什么被折叠?
被折叠的 条评论
为什么被折叠?
 到【灌水乐园】发言


