


CI自带的这套表单验证库还是挺好的,能够将大部分信息都集成到php里,基本做到不依赖js代码。
以下是测试代码:
首先在控制器Controller里建立 Test.php
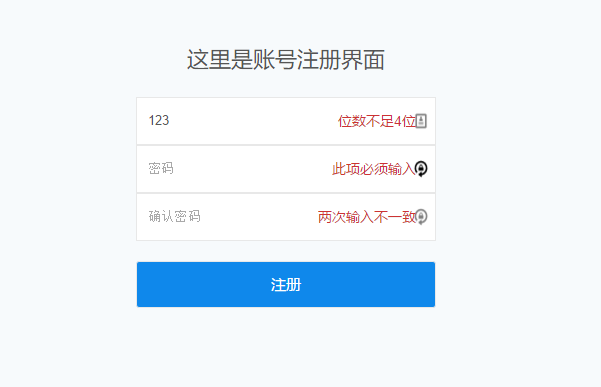
这个文件打开了一个表单界面,并且判断了:
账号/密码/确认密码必须输入
确认密码 与 密码 必须相同
账号>=4 并且在数据库中唯一
<?php
class Test extends CI_Controller {

    public function __construct()
    {
        parent::__construct();
        // 打开数据库
        $this->load->database();
    }

    // 表单验证|账户名唯一
    public function user_check($username)
    {
        $this->db->query("select * from users where user='$username'");
        if( $this->db->affected_rows() > 0 )
        {
            $this->form_validation->set_message('user_check','已存在的用户名');
            return FALSE;
        }
        return TRUE;
    }

    public function index()
    {
        $this->load->helper(['form','url']);
        $this->load->library('form_validation');

        // 规则设置
        $rqerr = [
            'required'=>'此项必须输入',
            'matches'=>'两次输入不一致',
            'min_length'=>'位数不足{param}位'
        ];
        $this->form_validation->set_rules('username','用户名','required|min_length[4]|callback_user_check',$rqerr);
        $this->form_validation->set_rules('password','密码','required',$rqerr);
        $this->form_validation->set_rules('passconf','确认密码','required|matches[password]',$rqerr);

        // 运行表单页面
        if($this->form_validation->run() == FALSE)
        {
            $this->load->view('test_reg');
        }
        else
        {
            date_default_timezone_set('PRC');
            $data = [
                'user' => $this->input->post('username'),
                'pass' => $this->input->post('password'),
                'money'=> 10,
                'reg_date' => date("Y-m-d H:i:s")
            ];
            // 账号插入到账号数据库中的users表中
            $this->db->insert('users',$data);
            // 显示成功页面
            $this->load->view('test_reg_suc',$data);
        }
    }

}
?>
下面是注册界面的模板文件:
在视图View中建立文件 test_reg.php
在html文件中使用了短标记 <?= xxxxx ?> 代替了 <?php echo xxxx ?>
<?=form_open('Test');?> 这个函数生成了真实的form代码(运行时使用开发者工具一看便知),它POST到Controller/Test.php
<?=form_error('username','<span class="err">','</span>');?> 这个函数会检测控制器发来的指定验证结果(例子是username),并显示错误结果,后面的参数2和3就是输出时的两边标记。
<html>
<head>
<meta charset="utf-8">
<title>My Form</title>
<style>
  body{
    margin:0;
    background:#F7FAFC;
    color:#555;
    font-family:'Helvetica Neue',Helvetica,'PingFang SC','Hiragino Sans GB','Microsoft YaHei',Arial,sans-serif;
  }
  .main{
    text-align: center;
    width: 100%;
    height:100%;
  }
  /*浮动层,占据50%的高度 用于contrainer的垂直居中*/
  .floater{
    width:100%;
    height:50%;
    float:left;
  }
  .container{
    /*父元素设置了内联元素居中,so这里设置为内联*/
    display:inline-block;
    width:300px;
    margin-top:-170px;
  }
  .top{
    font-size:22px;
    font-weight:400;
    line-height:35px;
    margin:20px 0;
  }
  .input-wrapper{
    position:relative;
  }
  input{
    padding: 1em 0.8em;
    width:100%;
    line-height:19px;
    color:#555;
    border:1px solid #e8e8e8;
  }
  .button{
    font-family:inherit;
    background:#0f88eb;
    color:#fff;
    line-height:41px;
    border-radius:3px;
    font-size:15px;
    line-height:15px;
    margin:20px 0;
  }
  .err{
    font-size:14px;
    line-height: 48px;
    position:absolute;
    right:20px;
    top:0px;
    color:#c33;
  }
</style>
</head>

<body>

  <div class="main">
    <div class="floater"></div>

    <div class="container">
      <div class="top">这里是账号注册界面</div>
      <!-- 这里初始化form,使form的post目标为Test.php -->
      <?=form_open('Test');?>
        <div class="input-wrapper">
          <input type="text" name="username" placeholder="账号" value="<?=set_value('username')?>" size="50" />
          <?=form_error('username','<span class="err">','</span>');?>
        </div>
        <div class="input-wrapper">
          <input type="password" name="password" placeholder="密码" value="" size="50" />
          <?=form_error('password','<span class="err">','</span>');?>
        </div>
        <div class="input-wrapper">
          <input type="password" name="passconf" placeholder="确认密码" value="" size="50" />
          <?=form_error('passconf','<span class="err">','</span>');?>
        </div>
        <input class="button" type="submit" value="注册" />
      </form>
    </div>
  </div>

</body>

</html>
最后是成功后显示的界面 简单测试下:
在视图View中创建 test_reg_suc.php
<html>
<head>
<title>My Form</title>
</head>
<body>

<div style="text-align:center">

    <h3>Your form was successfully submitted!</h3>

    <h2>user:<?=$user?> ----- pass:<?=$pass?> ----- reg_date: <?=$reg_date?></h2>

    <p><?php echo anchor('test', 'Try it again!'); ?></p>

</div>

</body>
</html>


 246
246


 被折叠的 条评论
为什么被折叠?
被折叠的 条评论
为什么被折叠?
 到【灌水乐园】发言


