


二维码扫描:
修改:
<!-- lang: cpp -->
import Foundation
import AVFoundation
import QuartzCore
class ReadQrCodeController: BaseController {

private var codeReader: QRCodeReader?


@IBOutlet weak var topview: UIView!


var looper:CADisplayLink?

private var line_1 = CommonUtil.newLineOverlay(0x2bcd9c)
private var line_2 = CommonUtil.newLineOverlay(0x2bcd9c)
private var line_3 = CommonUtil.newLineOverlay(0x2bcd9c)
private var line_4 = CommonUtil.newLineOverlay(0x2bcd9c)
private var line_5 = CommonUtil.newLineOverlay(0x2bcd9c)
private var line_6 = CommonUtil.newLineOverlay(0x2bcd9c)
private var line_7 = CommonUtil.newLineOverlay(0x2bcd9c)
private var line_8 = CommonUtil.newLineOverlay(0x2bcd9c)

private var gradientLayer:CAGradientLayer?

func backtomain(){

    self.loading?.dismissAnimated(false)
    self.loading?.dismiss()

    CommonUtil.transitionWithType(kCATransitionReveal, withSubType: kCATransitionFromBottom, forView: self.view.window!)

    self.navigationController?.popViewControllerAnimated(false)
}

var loading:JGProgressHUD?

override func viewDidLoad() {


    let reader = QRCodeReader(metadataObjectTypes: [AVMetadataObjectTypeQRCode])

    codeReader           = reader
    view.backgroundColor = UIColor.blackColor()

    codeReader?.completionBlock = { [unowned self] (resultAsString) in


        if(resultAsString != nil){

            var myStringArr:[String] = resultAsString!.componentsSeparatedByString("/")

            if( myStringArr.count > 0 ){


            }

        }


    }

    setupUIComponentsWithCancelButtonTitle()


    topview.layer.insertSublayer(codeReader!.previewLayer, atIndex: 0)

    NSNotificationCenter.defaultCenter().addObserver(self, selector: "orientationDidChanged:", name: UIDeviceOrientationDidChangeNotification, object: nil)


    let shapeLayer = CommonUtil.newLineOverlay()
    shapeLayer.frame = view.layer.frame
    var recttemp:CGRect = CGRect(x:(view.layer.frame.size.width - 220) / 2, y: 65, width: 220, height: 220)
    var path:UIBezierPath = UIBezierPath(roundedRect: recttemp
        , cornerRadius: 0)

    shapeLayer.masksToBounds = true

    var rect = view.layer.frame

    path.appendPath(UIBezierPath(rect: rect))
    shapeLayer.path = path.CGPath
    shapeLayer.fillRule = kCAFillRuleEvenOdd

    let overlay = CommonUtil.newLineOverlayDefult()
    overlay.path = UIBezierPath(roundedRect: recttemp
        , cornerRadius: 0).CGPath


    topview.layer.addSublayer(shapeLayer)
    topview.layer.addSublayer(overlay)


    var recttemp1:CGRect = CGRect(x:(rect.size.width - 220) / 2, y: 65, width: 16, height: 2)
    line_1.path  = UIBezierPath(roundedRect: recttemp1
        , cornerRadius: 0).CGPath

    var recttemp2:CGRect = CGRect(x:(rect.size.width - 220) / 2, y: 65, width: 2, height: 16)
    line_2.path  = UIBezierPath(roundedRect: recttemp2
        , cornerRadius: 0).CGPath


    var recttemp3:CGRect = CGRect(x:(rect.size.width - 220) / 2, y: 65+220-16, width: 2, height: 16)
    line_3.path  = UIBezierPath(roundedRect: recttemp3
        , cornerRadius: 0).CGPath

    var recttemp4:CGRect = CGRect(x:(rect.size.width - 220) / 2, y: 65+220-2, width: 16, height: 2)
    line_4.path  = UIBezierPath(roundedRect: recttemp4
        , cornerRadius: 0).CGPath


    var recttemp5:CGRect = CGRect(x:(rect.size.width - 220) / 2  + 220 - 16, y: 65, width: 16, height: 2)
    line_5.path  = UIBezierPath(roundedRect: recttemp5
        , cornerRadius: 0).CGPath

    var recttemp6:CGRect = CGRect(x:(rect.size.width - 220) / 2 + 220 - 2, y: 65, width: 2, height: 16)
    line_6.path  = UIBezierPath(roundedRect: recttemp6
        , cornerRadius: 0).CGPath


    var recttemp7:CGRect = CGRect(x:(rect.size.width - 220) / 2 + 220 - 2, y: 65+220-16, width: 2, height: 16)
    line_7.path  = UIBezierPath(roundedRect: recttemp7
        , cornerRadius: 0).CGPath

    var recttemp8:CGRect = CGRect(x:(rect.size.width - 220) / 2 + 220 - 16, y: 65+220-2, width: 16, height: 2)
    line_8.path  = UIBezierPath(roundedRect: recttemp8
        , cornerRadius: 0).CGPath


    gradientLayer = CAGradientLayer(layer: topview.layer)
    gradientLayer?.frame = CGRect(x:(rect.size.width - 220) / 2, y: 65, width: 220, height: 2 )

    gradientLayer?.colors = [UIColor(red: 43/255.0, green: 205/255.0, blue: 156/255.0, alpha: 0).CGColor,UIColor(red: 43/255.0, green: 205/255.0, blue: 156/255.0, alpha: 1).CGColor,UIColor(red: 43/255.0, green: 205/255.0, blue: 156/255.0, alpha: 0).CGColor  ]

    gradientLayer?.locations = [0,0.5,1.0];

    gradientLayer?.startPoint = CGPointMake(0, 0);
    gradientLayer?.endPoint = CGPointMake(1, 0);


    topview.layer.addSublayer(gradientLayer)


    addtoView()


    lexingcodeButton = CommonUtil.buttonSetImage(lexingcodeButton, name: "remove_devicebtn", states: [UIControlState.Normal,UIControlState.Selected,UIControlState.Highlighted])
    lexingcodeButton.setTitleColor(UIColor.whiteColor(), forState: UIControlState.Selected)
    lexingcodeButton.setTitleColor(UIColor.whiteColor(), forState: UIControlState.Highlighted)

    self.navigationItem.leftBarButtonItem?.tintColor = UIColor.whiteColor()

    self.navigationItem.title = "连接乐行宝设备"

    self.navigationController?.navigationBar.tintColor=UIColor.whiteColor()


}


func addtoView(){

    topview.layer.addSublayer(line_1)
    topview.layer.addSublayer(line_2)
    topview.layer.addSublayer(line_3)
    topview.layer.addSublayer(line_4)
    topview.layer.addSublayer(line_5)
    topview.layer.addSublayer(line_6)
    topview.layer.addSublayer(line_7)
    topview.layer.addSublayer(line_8)

}

var dotimeer = true
var _y:CGFloat = 0


var  duration:CFTimeInterval?;
var  timeOffset:CFTimeInterval?;
var  lastStep:CFTimeInterval?;


func chageline(link:CADisplayLink) -> Void {


    if(_y>=(220)){
        _y = 0
    }


    CATransaction.begin()
    CATransaction.setAnimationDuration(0)
     self.gradientLayer?.position.y =  65 + _y
    CATransaction.commit()


    var thisStep = CACurrentMediaTime()

    var stepDuration1 = thisStep - self.lastStep!;

    self.lastStep = thisStep;


     _y = _y + CGFloat(100 * (stepDuration1))


}


deinit {
    codeReader?.stopScanning()

    NSNotificationCenter.defaultCenter().removeObserver(self)
}

override func viewDidAppear(animated: Bool) {


}


override func viewWillAppear(animated: Bool) {
    super.viewWillAppear(animated)
    dotimeer = true
    looper?.invalidate()
    looper = CADisplayLink(target: self, selector: Selector("chageline:"))
    looper?.addToRunLoop(NSRunLoop.mainRunLoop(), forMode: NSDefaultRunLoopMode)
    lastStep = CACurrentMediaTime()


    codeReader?.startScanning()
}

override func viewWillDisappear(animated: Bool) {
    codeReader?.stopScanning()

    dotimeer = false

    looper?.invalidate()

    super.viewWillDisappear(animated)
}


override func viewWillLayoutSubviews() {
    super.viewWillLayoutSubviews()

    codeReader?.previewLayer.frame = view.bounds

    self.view.bringSubviewToFront(topview)
    self.topview.bringSubviewToFront(self.textLable1)
    self.topview.bringSubviewToFront(self.textLable2)
    self.topview.bringSubviewToFront(self.lexingcodeButton)

}


// MARK: - Managing the Orientation

func orientationDidChanged(notification: NSNotification) {
    topview.setNeedsDisplay()

    if codeReader?.previewLayer.connection != nil {
        let orientation = UIApplication.sharedApplication().statusBarOrientation

        codeReader?.previewLayer.connection.videoOrientation = QRCodeReader.videoOrientationFromInterfaceOrientation(orientation)
    }
}

// MARK: - Initializing the AV Components

private func setupUIComponentsWithCancelButtonTitle() {


}

private func setupAutoLayoutConstraints() {
    let views: [NSObject: AnyObject] = ["cameraView": topview]

    view.addConstraints(NSLayoutConstraint.constraintsWithVisualFormat("V:|[cameraView]|", options: .allZeros, metrics: nil, views: views))
    view.addConstraints(NSLayoutConstraint.constraintsWithVisualFormat("H:|[cameraView]|", options: .allZeros, metrics: nil, views: views))

}}
效果: 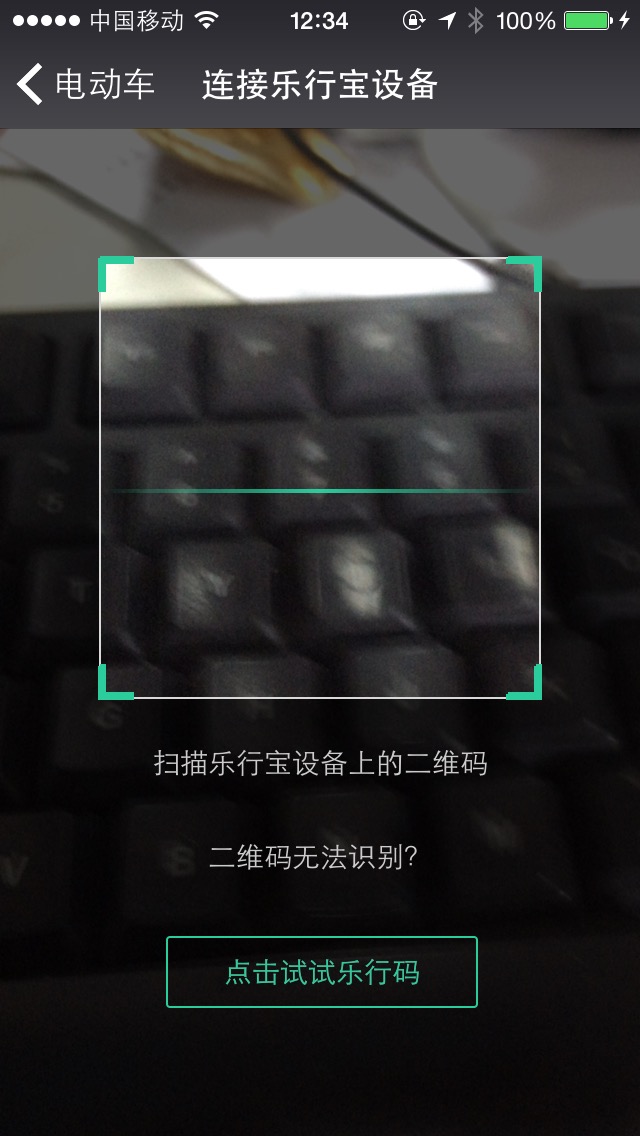
中间的扫描线不能用NSTimer做,,需采用CADisplayLink 即在界面渲染帧前做 这样才不会出现卡顿感(位置计算不要过于复杂,,会影响帧率)


 978
978


 被折叠的 条评论
为什么被折叠?
被折叠的 条评论
为什么被折叠?
 到【灌水乐园】发言


