


在iphone手机上用手指拖动图片移动,这功能很Cool,咱Android也不能含糊,用Gallery类就可以实现这个功能。
今天我就做了个小小的电子相册:
假设你已经新建好了项目。
首先我们事先准备好的图片存放在drawable文件夹下,然后新建一个接口:
- public interface ImageResource {
- //用一个Integer数组保存图像资源
这个接口里有一个int型的数组保存了咱drawable下的图片,这样方便以后修改。
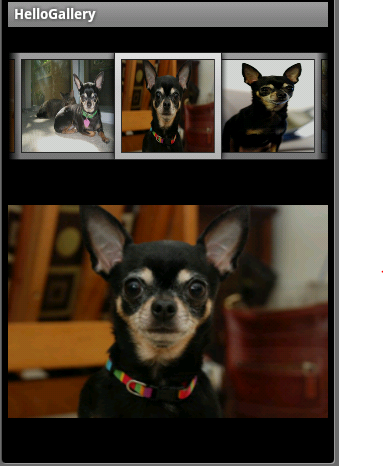
要用Gallery实现这个功能,先要有一个容器来存放Gallery要显示的图片,我使用的是一个继承自BaseAdapter的ImageAdapter。这个电子相册分两部分,上部分是用户可以拖动图像列表,下部分是用户选中上面图像后更大的显示出来。看图:
负责上部分显示的ImageView是imageAll,负责下部分显示的是imageOne,代码如下:
- import android.app.Activity;
- import android.content.Context;
import android.content.res.TypedArray; import android.os.Bundle; import android.view.View; import android.view.ViewGroup; import android.widget.BaseAdapter; import android.widget.ImageView; import android.widget.Gallery; public class HelloGallery extends Activity { //这个ImageView是用来显示单个图像 private ImageView imageOne; //这个ImageView是用来显示所有图像 private ImageView imageAll; @Override public void onCreate(Bundle savedInstanceState) { super.onCreate(savedInstanceState); setContentView(R.layout.main); imageOne = (ImageView)findViewById(R.id.imageView); //新建一个Gallery类,这是是实现拖动效果的关键 //Gallery is 一个用来水平卷动显示对象的视图 Gallery gallery = (Gallery)findViewById(R.id.gallery); //ImageAdapter就是gallery要显示的对象 gallery.setAdapter( new ImageAdapter( this)); } //实现ImageResource接口获得我自己创建的图像资源 class ImageAdapter extends BaseAdapter implements ImageResource{ //每一个gallery中图像的背景资源 private int galleryItemBackground; private Context context; public ImageAdapter(Context context) { this.context = context; //这里实现的功能就是上半部分每个图像的那个背景框 //对应的xml文件就是attr.xml TypedArray a = obtainStyledAttributes(R.styleable.Gallery1); galleryItemBackground = a.getResourceId( R.styleable.Gallery1_android_galleryItemBackground, 0); a.recycle(); } public int getCount() { return dImageID.length; } public Object getItem( int position) { return position; } //这个方法获得是呈现在用户面前的图像下标 public long getItemId( int position) { //将此索引的图像设为imageOne显示 imageOne.setImageResource(ImageAdapter.dImageID[position]); imageOne.setScaleType(ImageView.ScaleType.FIT_CENTER); return position; } //这个方法返回的ImageView就是实现拖动效果的图像 public View getView( int position, View convertView, ViewGroup parent) { imageAll= new ImageView(context); //设置图像资源 imageAll.setImageResource(dImageID[position]); //设置imageAll视图为120×120 imageAll.setLayoutParams( new Gallery.LayoutParams( 120, 120)); //设置图像相对于视图的比例,FIT_XY表示充满X和Y轴 imageAll.setScaleType(ImageView.ScaleType.FIT_XY); //设置imageAll中每一个Item的背景资源 imageAll.setBackgroundResource(galleryItemBackground); return imageAll; } } } import android.app.Activity; import android.content.Context; import android.content.res.TypedArray; import android.os.Bundle; import android.view.View; import android.view.ViewGroup; import android.widget.BaseAdapter; import android.widget.ImageView; import android.widget.Gallery; public class HelloGallery extends Activity { //这个ImageView是用来显示单个图像 private ImageView imageOne; //这个ImageView是用来显示所有图像 private ImageView imageAll; @Override public void onCreate(Bundle savedInstanceState) { super.onCreate(savedInstanceState); setContentView(R.layout.main); imageOne = (ImageView)findViewById(R.id.imageView); //新建一个Gallery类,这是是实现拖动效果的关键 //Gallery is 一个用来水平卷动显示对象的视图 Gallery gallery = (Gallery)findViewById(R.id.gallery); //ImageAdapter就是gallery要显示的对象 gallery.setAdapter(new ImageAdapter(this)); } //实现ImageResource接口获得我自己创建的图像资源 class ImageAdapter extends BaseAdapter implements ImageResource{ //每一个gallery中图像的背景资源 private int galleryItemBackground; private Context context; public ImageAdapter(Context context) { this.context = context; //这里实现的功能就是上半部分每个图像的那个背景框 //对应的xml文件就是attr.xml TypedArray a = obtainStyledAttributes(R.styleable.Gallery1); galleryItemBackground = a.getResourceId( R.styleable.Gallery1_android_galleryItemBackground, 0); a.recycle(); } public int getCount() { return dImageID.length; } public Object getItem(int position) { return position; } //这个方法获得是呈现在用户面前的图像下标 public long getItemId(int position) { //将此索引的图像设为imageOne显示 imageOne.setImageResource(ImageAdapter.dImageID[position]); imageOne.setScaleType(ImageView.ScaleType.FIT_CENTER); return position; } //这个方法返回的ImageView就是实现拖动效果的图像 public View getView(int position, View convertView, ViewGroup parent) { imageAll= new ImageView(context); //设置图像资源 imageAll.setImageResource(dImageID[position]); //设置imageAll视图为120×120 imageAll.setLayoutParams(new Gallery.LayoutParams(120,120)); //设置图像相对于视图的比例,FIT_XY表示充满X和Y轴 imageAll.setScaleType(ImageView.ScaleType.FIT_XY); //设置imageAll中每一个Item的背景资源 imageAll.setBackgroundResource(galleryItemBackground); return imageAll; } } }
布局文件如下:
Mail.xml:
- <?xml version="1.0" encoding="utf-8"?>
- <LinearLayout xmlns:android="http://schemas.android.com/apk/res/android"
android:layout_height= "fill_parent" > <TextView android:layout_width= "fill_parent" android:layout_height= "wrap_content" android:text= "@string/hello" /> <Gallery android:id= "@+id/gallery" android:layout_width= "fill_parent" android:layout_height= "wrap_content" > </Gallery> <ImageView android:id= "@+id/imageView" android:layout_height= "fill_parent" android:layout_width= "fill_parent" > </ImageView> </LinearLayout> <?xml version="1.0" encoding="utf-8"?> <LinearLayout xmlns:android="http://schemas.android.com/apk/res/android" android:orientation="vertical" android:layout_width="fill_parent" android:layout_height="fill_parent" > <TextView android:layout_width="fill_parent" android:layout_height="wrap_content" android:text="@string/hello" /> <Gallery android:id="@+id/gallery" android:layout_width="fill_parent" android:layout_height="wrap_content"> </Gallery> <ImageView android:id="@+id/imageView" android:layout_height="fill_parent" android:layout_width="fill_parent"> </ImageView> </LinearLayout>
下面就是上文中提到的attr.xml:
Attr.xml:
- <?xml version="1.0" encoding="utf-8"?>
- <resources>
<declare-styleable name= "Gallery1" > <attr name= "android:galleryItemBackground" /> </declare-styleable> <declare-styleable name= "LabelView" > <attr name= "text" format= "string" /> <attr name= "textColor" format= "color" /> <attr name= "textSize" format= "dimension" /> </declare-styleable> </resources> <?xml version="1.0" encoding="utf-8"?> <resources> <declare-styleable name="Gallery1"> <attr name="android:galleryItemBackground" /> </declare-styleable> <declare-styleable name="LabelView"> <attr name="text" format="string" /> <attr name="textColor" format="color" /> <attr name="textSize" format="dimension" /> </declare-styleable> </resources>
http://libin52008.blog.163.com/blog/static/105327187201110309334647/


 946
946


 被折叠的 条评论
为什么被折叠?
被折叠的 条评论
为什么被折叠?
 到【灌水乐园】发言


