


更详细的内容可以参考官方文档 《Text Programming Guide for iOS》。
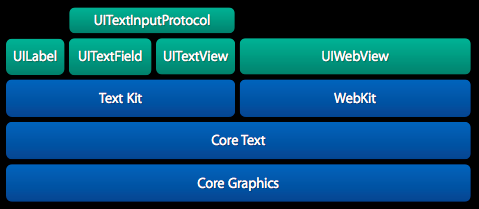
“Text Kit指的是UIKit框架中用于提供高质量排版服务的一些类和协议,它让程序能够存储,排版和显示文本信息,并支持排版所需要的所有特性,包括字距调整、连写、换行和对齐等。”
以前,如果我们想实现复杂的文本排版,例如在textView中显示不同样式的文本,或者图片和文字混排,你可能就需要借助于UIWebView或者深入研究一下Core Text。在iOS6中,UILabel、UITextField、UITextView增加了一个NSAttributedString属性,可以稍微解决一些排版问题,但是支持的力度还不够。现在Text Kit完全改变了这种现状。
Text Kit是基于Core Text构建的快速、先进的文本排版和渲染引擎,并且与UIKit很好的集合。UITextView,UITextField、UILabel都已经基于Text Kit重新构建,所以它们都支持分页文本、文本包装、富文本编辑、交互式文本着色、文本折叠和自定义截取等特性。所有这些UI控件现在都以同样的方式构建,在它们后面,一个NSTextStorage对象保存着文本的主要信息,它本身是NSMutableAttributedString的子类,支持分批编辑。这就意味着你可以改变一个范围内的字符的样式而不用整体替换文本内容。
[self.textView.textStorage beginEditing]; [self markWord:@"Alice" inTextStorage:self.textView.textStorage]; [self.textView.textStorage endEditing];
Text storage管理者一系列的NSLayoutManager对象,当它的字符或者属性改变时会通知到自己所管理的layout Manager对象以便它们作出相应的反应。在layout manager上面是一个NSTextContainer对象,用于为layout manager定义坐标系和一些几何特性。例如,如果你想UITextView中的文本环绕在一张图片四周,你可以给text container设定一个排除路径(exclusion path)。
UIBezierPath *exclusion = ButterflyBezierPath; self.textView.textContainer.exclusionPaths = @[exclusion];

Text container能够处理击中测试(hit tests),所以可以定位到点击的字符在文本中的位置。此外它还提供一些代理方法让开发者能够自己定义链接点击后的处理事件。
通过基于Text Kit重新构建UILabel、UITextField和UITextView,苹果给开发者更大的灵活性和能力来设计富文本视图,同时简化了这些控件的使用,因为它们是以同样的方式设计的,所有这些好处都是站在巨人(Core Text)的肩上。通常更强大的功能和灵活性也就意味着需要更多的设置和管理,但是,如果你只是想显示一段简单的文本,你还是可以像以前一样使用。
self.textLabel.text = @"Hello Text Kit";
本文翻译自《
iOS 7: Text Kit》
Text Kit进阶

上一篇文章Text Kit入门中我们主要了解了什么是Text Kit及它的一些架构和基本特性,这篇文章中会涉及关于Text Kit的更多具体应用。
Text Kit是建立在Core Text框架上的,我们知道CoreText.framework是一个庞大而复杂的框架,而Text Kit在继承了Core Text强大功能的同时给开发者提供了比较友好的面向对象的API。
本文主要介绍Text Kit下面四个特性:
动态字体(Dynamic type)
凸版印刷体效果(Letterpress effects)
路径排除(Exclusion paths)
动态文本格式化和存储(Dynamic text formatting and storage)
动态字体(Dynamic type)
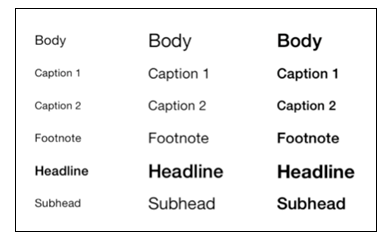
动态字体是iOS7中新增加的比较重要的特性之一,程序应该按照用户设定的字体大小和粗细来显示文本内容。
分别在设置\通用\辅助功能和设置\通用\文字大小中可以设置文本在应用程序中显示的粗细和大小。

iOS7对系统字体在显示上做了一些优化,让不同大小的字体在屏幕上都能清晰的显示。通常用户设置了自己偏好的字体,他们希望在所有程序中都看到文本显示是根据他们的设定进行调整。为了实现这个,开发者需要在自己的应用中给文本控件设置当前用户设置字体,而不是指定死字体及大小。可以通过UIFont中新增的preferredFontForTextStyle:方法来获取用户偏好的字体。
iOS7中给出了6中字体样式供选择:
UIFontTextStyleHeadline
UIFontTextStyleBody
UIFontTextStyleSubheadline
UIFontTextStyleFootnote
UIFontTextStyleCaption1
UIFontTextStyleCaption2
为了让我们的程序支持动态字体,需要按一下方式给文本控件(通常是指UILabel,UITextField,UITextView)设定字体:
self.textView.font = [UIFont preferredFontForTextStyle:UIFontTextStyleBody];
这样设置之后,文本控件就会以用户设定的字体大小及粗细显示,但是如果程序在运行时,用户切换到设置里修改了字体,这是在切回程序,字体并不会自动跟着变。这时就需要我们自己来更新一下控件的字体了。
在系统字体修改时,系统会给运行中的程序发送UIContentSizeCategoryDidChangeNotification通知,我们只需要监听这个通知,并重新设置一下字体即可。
[[NSNotificationCenter defaultCenter] addObserver:self selector:@selector(preferredContentSizeChanged:) name:UIContentSizeCategoryDidChangeNotification object:nil];
- (void)preferredContentSizeChanged:(NSNotification *)notification{ self.textView.font = [UIFont preferredFontForTextStyle:UIFontTextStyleBody]; }
当然,有的时候要适应动态修改的字体并不是这么设置一下就完事了,控件的大小可能也需要进行相应的调整,这时我们程序中的控件大小也不应该写死,而是需要根据字体大小来计算.
凸版印刷体效果(Letterpress effects)
凸版印刷替效果是给文字加上奇妙阴影和高光,让文字看起有凹凸感,像是被压在屏幕上。当然这种看起来很高端大气上档次的效果实现起来确实相当的简单,只需要给AttributedString加一个NSTextEffectAttributeName属性,并指定该属性值为NSTextEffectLetterpressStyle就可以了。
tionary *attributes = @{ NSForegroundColorAttributeName: [UIColor redColor], NSFontAttributeName: [UIFont preferredFontForTextStyle:UIFontTextStyleHeadline], NSTextEffectAttributeName: NSTextEffectLetterpressStyle }; self.titleLabel.attributedText = [[NSAttributedString alloc] initWithString:@"Title" attributes:attributes];
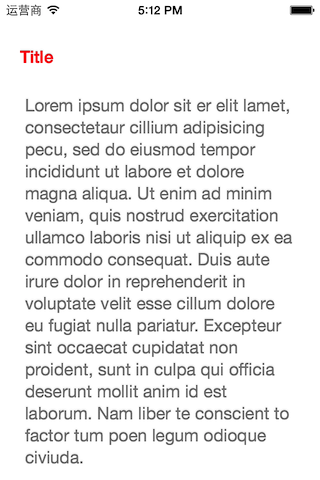
在iOS7系统自带的备忘录应用中,苹果就使用了这种凸版印刷体效果。
路径排除(Exclusion paths)
在排版中,图文混排是非常常见的需求,但有时候我们的图片并一定都是正常的矩形,这个时候我们如果需要将文本环绕在图片周围,就可以用路径排除(exclusion paths)了。
Explosion pats基本原理是将需要被文本留出来的形状的路径告诉文本控件的NSTextContainer对象,NSTextContainer在文字排版时就会避开该路径。
UIBezierPath *floatingPath = [self pathOfImage]; self.textView.textContainer.exclusionPaths = @[floatingPath];

所以实现Exclusion paths的主要工作就是获取这个path。
动态文本格式化和存储(Dynamic text formatting and storage)
好了,到现在我们知道了Text Kit可以动态的根据用户设置的字体大小进行调整,但是如果具体某个文本显示控件中的文本样式能够动态调整是不是会更酷一些呢?

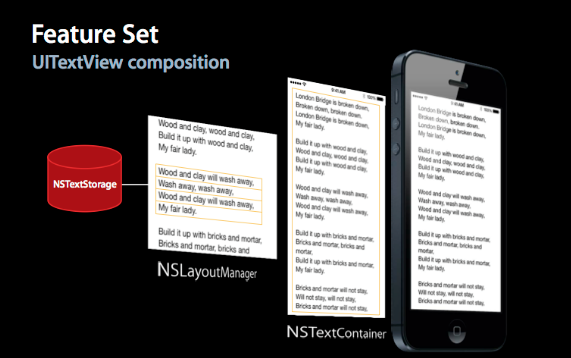
实现这些才是真正体现Text Kit强大之处的时候,在此之前你需要理解Text Kit中的文本存储系统是怎么工作的,下图显示了Text Kit中文本的保存、渲染和现实之间的关系。

当你使用UITextView、UILabel、UITextField控件的时候,系统会自动创建上面这些类,你可以选择直接使用这么默认的实现或者为你的控件自定义这几个中的任何一个。
1.NSTextStorage本身继承与NSMutableAttributedString,它是以attributed string的形式保存需要渲染的文本,并在文本内容改变的时候通知到对应的layout manager对象。通常你需要创建NSTextStorage的子类来在文本改变时进行文本显示样式的更新。
2.NSLayoutManager作为文本控件中的排版引擎接收保存的文本并在屏幕上渲染出来。
3.NSTextContainer描述了文本在屏幕上显示时的几何区域,每个text container与一个具体的UITextView相关联。如果你需要定义一个很复杂形状的区域来显示文本,你可能需要创建NSTextContainer子类。
要实现我们上面描述的动态文本格式化功能,我们需要创建NSTextStorage子类以便在用户输入文本的时候动态的增加文本属性。自定义了text storage后,我们需要替换调UITextView默认的text storage。
创建NSTextStorage的子类
我们创建NSTextStorage子类,命名为MarkupTextStorage,在实现文件中添加一个成员变量:
#import "MarkupTextStorage.h" @implementation MarkupTextStorage { NSMutableAttributedString *_backingStore; } - (id)init { self = [super init]; if (self) { _backingStore = [[NSMutableAttributedString alloc] init]; } return self; } @end
NSTextStorage的子类需要重载一些方法提供NSMutableAttributedString类型的backing store信息,所以我们继续添加下面代码:
- (NSString *)string { return [_backingStore string]; } - (NSDictionary *)attributesAtIndex:(NSUInteger)location effectiveRange:(NSRangePointer)range { return [_backingStore attributesAtIndex:location effectiveRange:range]; } - (void)replaceCharactersInRange:(NSRange)range withString:(NSString *)str { [self beginEditing]; [_backingStore replaceCharactersInRange:range withString:str]; [self edited:NSTextStorageEditedCharacters | NSTextStorageEditedAttributes range:range changeInLength:str.length - range.length]; [self endEditing]; } - (void)setAttributes:(NSDictionary *)attrs range:(NSRange)range { [self beginEditing]; [_backingStore setAttributes:attrs range:range]; [self edited:NSTextStorageEditedAttributes range:range changeInLength:0]; [self endEditing]; }
后面两个方法都是代理到backing store,然后需要被beginEditing edited endEditing包围,而且必须在文本编辑时按顺序调用来通知text storage对应的layout manager。
你可能发现子类化NSTextStorage需要写不少的代码,因为NSTextStorage是一个类集群中的一个开发接口,不能只是继承它然后重载很少的方法来拓展它的功能,而是需要自己实现很多细节。
类集群(Class cluster)是苹果Cocoa(Touch)框架中常用的设计模式之一。
类集群是Objective-C中对抽象工厂模式的简单实现,为创建一些列相关或独立对象提供了统一的接口而不用指定具体的类。常用的像NSArray和NSNumber事实上也是一系列类集群的开放接口。
苹果使用类集群是为了将一些类具体类隐藏在开放的抽象父类之下,外面通过抽象父类的方法来创建私有子类的实例,并且外界也完全不知道工厂分配到了哪个私有类,因为它们始终只和开放接口交互。
使用类集群确实简化了接口,让类更容易被使用,但是要知道鱼和熊掌不可兼得,你又想简单又想可拓展性强,哪有那么好的事啊?所以创建一个类集群中的抽象父类就没有那么简单了。
好了,上面解释了这么多其实主要就说明了为什么子类化NSTextStorage需要写这么多代码,下面要在UITextView使用我们自定义的text storage了。
设置UITextView
- (void)createMarkupTextView { NSDictionary *attributes = @{NSFontAttributeName: [UIFont preferredFontForTextStyle:UIFontTextStyleBody]}; NSString *content = [NSString stringWithContentsOfFile:[[NSBundle mainBundle] pathForResource:@"content" ofType:@"txt"] encoding:NSUTF8StringEncoding error:nil]; NSAttributedString *attributedString = [[NSAttributedString alloc] initWithString:content attributes:attributes]; _textStorage = [[MarkupTextStorage alloc] init]; [_textStorage setAttributedString:attributedString]; CGRect textViewRect = CGRectMake(20, 60, 280, self.view.bounds.size.height - 100); NSLayoutManager *layoutManager = [[NSLayoutManager alloc] init]; NSTextContainer *textContainer = [[NSTextContainer alloc] initWithSize:CGSizeMake(textViewRect.size.width, CGFLOAT_MAX)]; [layoutManager addTextContainer:textContainer]; [_textStorage addLayoutManager:layoutManager]; _textView = [[UITextView alloc] initWithFrame:textViewRect textContainer:textContainer]; _textView.delegate = self; [self.view addSubview:_textView]; }
很长的代码,下面我们来看看都做了些啥:
1.创建了一个自定义的text storage对象,并通过attributed string保存了需要显示的内容;
2.创建了一个layout manager对象;
3.创建了一个text container对象并将它与layout manager关联,然后该text container再和text storage对象关联;
4.通过text container创建了一个text view并显示。
你可以将代码和前面那对象间的关系图对应着理解一下。
动态格式化
继续在MarkupTextStorage.m文件中添加如下方法:
- (void)processEditing { [self performReplacementsForRange:[self editedRange]]; [super processEditing]; }
processEditing在layout manager中文本修改时发送通知,它通常也是处理一些文本修改逻辑的好地方。
继续添加:
- (void)performReplacementsForRange:(NSRange)changedRange { NSRange extendedRange = NSUnionRange(changedRange, [[_backingStore string] lineRangeForRange:NSMakeRange(changedRange.location, 0)]); extendedRange = NSUnionRange(changedRange, [[_backingStore string] lineRangeForRange:NSMakeRange(NSMaxRange(changedRange), 0)]); [self applyStylesToRange:extendedRange]; }
这个方法用于扩大文本匹配的范围,因为changedRange只是标识出一个字符,lineRangeForRange会将范围扩大到当前的一整行。
下面就剩下匹配特定格式的文本来显示对应的样式了:
- (NSDictionary*)createAttributesForFontStyle:(NSString*)style withTrait:(uint32_t)trait { UIFontDescriptor *fontDescriptor = [UIFontDescriptor preferredFontDescriptorWithTextStyle:UIFontTextStyleBody]; UIFontDescriptor *descriptorWithTrait = [fontDescriptor fontDescriptorWithSymbolicTraits:trait]; UIFont* font = [UIFont fontWithDescriptor:descriptorWithTrait size: 0.0]; return @{ NSFontAttributeName : font }; } - (void)createMarkupStyledPatterns { UIFontDescriptor *scriptFontDescriptor = [UIFontDescriptor fontDescriptorWithFontAttributes: @{UIFontDescriptorFamilyAttribute: @"Bradley Hand"}]; // 1. base our script font on the preferred body font size UIFontDescriptor* bodyFontDescriptor = [UIFontDescriptor preferredFontDescriptorWithTextStyle:UIFontTextStyleBody]; NSNumber* bodyFontSize = bodyFontDescriptor. fontAttributes[UIFontDescriptorSizeAttribute]; UIFont* scriptFont = [UIFont fontWithDescriptor:scriptFontDescriptor size:[bodyFontSize floatValue]]; // 2. create the attributes NSDictionary* boldAttributes = [self createAttributesForFontStyle:UIFontTextStyleBody withTrait:UIFontDescriptorTraitBold]; NSDictionary* italicAttributes = [self createAttributesForFontStyle:UIFontTextStyleBody withTrait:UIFontDescriptorTraitItalic]; NSDictionary* strikeThroughAttributes = @{ NSStrikethroughStyleAttributeName : @1, NSForegroundColorAttributeName: [UIColor redColor]}; NSDictionary* scriptAttributes = @{ NSFontAttributeName : scriptFont, NSForegroundColorAttributeName: [UIColor blueColor] }; NSDictionary* redTextAttributes = @{ NSForegroundColorAttributeName : [UIColor redColor]}; _replacements = @{ @"(\\*\\*\\w+(\\s\\w+)*\\*\\*)" : boldAttributes, @"(_\\w+(\\s\\w+)*_)" : italicAttributes, @"(~~\\w+(\\s\\w+)*~~)" : strikeThroughAttributes, @"(`\\w+(\\s\\w+)*`)" : scriptAttributes, @"\\s([A-Z]{2,})\\s" : redTextAttributes }; } - (void)applyStylesToRange:(NSRange)searchRange { NSDictionary* normalAttrs = @{NSFontAttributeName: [UIFont preferredFontForTextStyle:UIFontTextStyleBody]}; // iterate over each replacement for (NSString* key in _replacements) { NSRegularExpression *regex = [NSRegularExpression regularExpressionWithPattern:key options:0 error:nil]; NSDictionary* attributes = _replacements[key]; [regex enumerateMatchesInString:[_backingStore string] options:0 range:searchRange usingBlock:^(NSTextCheckingResult *match, NSMatchingFlags flags, BOOL *stop){ // apply the style NSRange matchRange = [match rangeAtIndex:1]; [self addAttributes:attributes range:matchRange]; // reset the style to the original if (NSMaxRange(matchRange)+1 < self.length) { [self addAttributes:normalAttrs range:NSMakeRange(NSMaxRange(matchRange)+1, 1)]; } }]; } }
在
createMarkupStyledPatterns初始化方法中调用createMarkupStyledPatterns,通过正则表达式来给特定格式的字符串设定特定显示样式,形成一个对应的字典。然后在applyStylesToRange:中利用已定义好的样式字典来给匹配的文本端增加样式。
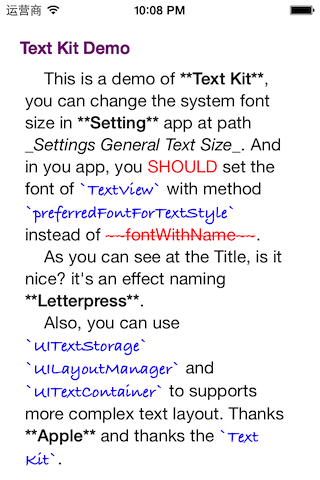
到这里本篇文章的内容就结束了,其实前面三点都很简单,稍微过一下就能用。最后一个动态文本格式化内容稍微多一点,可以结合我的代码TextKitDemo来看。
参考链接:


 被折叠的 条评论
为什么被折叠?
被折叠的 条评论
为什么被折叠?
 到【灌水乐园】发言


