


这里介绍的是window下安装memcached 和与spring 的集成
1. memcached 的安装和运行
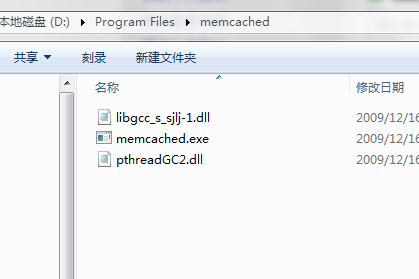
首先要去下载memecached的安装包 ,安装包中的dll文件最好不要少,不然会导致无法启动memcached的服务
然后在 cmd 中进入 memcached.exe的所在路径 ,执行安装语句,memcached -d install
然后可以看到在服务中能看到memcached的服务,

然后执行
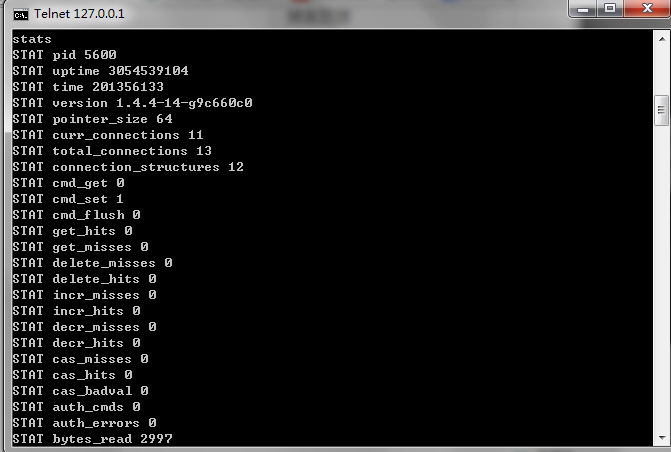
这样memcached 就启动了,我们可以用 telnet客户端来查看memcached的运行状态,首先连接telnet客户端memcached 默认的端口是11211,你也可以通过 memcached -p 端口号 来修改

连接后在弹出框中输入 stats 可以看到memcached 的运行状态
2 memcached与spring 的集成
我们可以用simple-spring-memcached组件 来实现spring与memcached的集成,
本质上是采用了AOP的方式来实现缓存的调用和管理,其核心组件声明了一些Advice,当遇到相应的切入点时,会执行这些Advice来对memcached加以管理。
切入点是通过标签的方式来进行声明的,在项目开发时,通常在DAO的方法上加以相应的标签描述,来表示组件对该方法的拦截
组件所提供的切入点主要包括以下几种:
ReadThroughSingleCache、ReadThroughMultiCache、ReadThroughAssignCache
当遇到查询方法声明这些切入点时,组件首先会从缓存中读取数据,取到数据则跳过查询方法,直接返回。
取不到数据在执行查询方法,并将查询结果放入缓存,以便下一次获取。
InvalidateSingleCache、InvalidateMultiCache、InvalidateAssignCache
当遇到删除方法声明这些切入点时,组件会删除缓存中的对应实体
UpdateSingleCache、UpdateMultiCache、UpdateAssignCache
当遇到更新方法声明这些切入点是,组件会更新缓存中对应的实体,以便下次从缓存中读取出的数据状态是最新的
simple-spring-memcached本身并不提供cache机制的实现,只是为了cache的调用更加简单而设计的。
在cache的实现上使用的是第三方组件(如x-memcached和spy-memcached),官方给出了针对这两种组件的相关配置
首先要下载必要的jar包
spring所需要的jar包就不列出了,列出的只是在集成memcached,我又另外加的jar包

新建一个spring-memcached.xml的文件,用来单独配置memcached
<beans
	xmlns="http://www.springframework.org/schema/beans"
	xmlns:xsi="http://www.w3.org/2001/XMLSchema-instance"
	xmlns:p="http://www.springframework.org/schema/p"
	xmlns:util="http://www.springframework.org/schema/util"
	xmlns:aop="http://www.springframework.org/schema/aop"
	  xmlns:jaxws="http://cxf.apache.org/jaxws"
	   xmlns:jaxrs="http://cxf.apache.org/jaxrs"
	   xmlns:tx="http://www.springframework.org/schema/tx"
	   xmlns:cache="http://www.springframework.org/schema/cache"
	xsi:schemaLocation="http://www.springframework.org/schema/beans
						http://www.springframework.org/schema/beans/spring-beans-4.2.xsd
						http://www.springframework.org/schema/util
    					http://www.springframework.org/schema/util/spring-util.xsd
						http://cxf.apache.org/jaxws
	 					http://cxf.apache.org/schemas/jaxws.xsd
	 					http://cxf.apache.org/jaxrs
	 					http://cxf.apache.org/schemas/jaxrs.xsd
	 					http://www.springframework.org/schema/aop
						http://www.springframework.org/schema/aop/spring-aop-4.1.xsd
	 					http://www.springframework.org/schema/tx
						http://www.springframework.org/schema/tx/spring-tx-4.1.xsd
						http://www.springframework.org/schema/cache
						http://www.springframework.org/schema/cache/spring-cache-4.2.xsd">
	<!--memcached的配置  -->
	<cache:annotation-driven cache-manager="cacheManager" />
	<bean id="cacheManager" class="org.springframework.cache.concurrent.ConcurrentMapCacheManager">
	</bean>
	<!-- ***********************  simple-spring-memcache ******************************* -->
    <aop:aspectj-autoproxy/>
    <!-- com.google.code.ssm.CacheFactory是一个FactoryBean,会返回Cache(高速缓存)实体供Advice使用 -->
    <!-- FactoryBean解决的是如何创建无法直接通过new运算符创建的Bean,并注入到其他的bean中。也就是说FactoryBean是创建或者管理其他被注入和管理Bean的工厂Bean -->
    <bean name="defaultMemcachedClient" class="com.google.code.ssm.CacheFactory">
        <property name="cacheClientFactory">
            <!-- xmemcached配置方法 -->
            <bean name="cacheClientFactory" class="com.google.code.ssm.providers.xmemcached.MemcacheClientFactoryImpl" />
            <!--  spymemcached配置方法
            <bean name="cacheClientFactory" class="com.google.code.ssm.providers.spymemcached.MemcacheClientFactoryImpl" />
            -->
        </property>
        <!-- 定义了缓存节点的IP地址和端口号 -->
        <property name="addressProvider">
            <bean class="com.google.code.ssm.config.DefaultAddressProvider">
                <property name="address" value="127.0.0.1:11211" />
            </bean>
        </property>
        <!-- 定义了缓存节点的查找方法 -->
        <property name="configuration">
            <bean class="com.google.code.ssm.providers.CacheConfiguration">
                <property name="consistentHashing" value="true" />
            </bean>
        </property>
    </bean>
<!-- ***********************  simple-spring-memcache ******************************* -->


</beans>
然后是applicationContext.xml的配置段落
<import resource="springstruts/spring-memcached.xml" />
	<!-- ssm 配置文件,主要用来加载组件核心的Advice,供程序调度使用;封装在 simple-spring-memcached-3.1.0.jar 文件中-->
    <import resource="simplesm-context.xml"/>
接下来就要对baseDao 的操作进行注解,下面是一篇注解讲解比较详细的链接http://blog.csdn.net/mwcsd/article/details/38495473
下面是部分实现缓存的接口
@SuppressWarnings("unchecked")
	@Override
	@ReadThroughSingleCache(namespace = "com.dang.dao.impl", expiration = 1200)
	public List<T> find(@ParameterValueKeyProvider String key, String hql) {

		return (List<T>) getHibernateTemplate().find(hql);

	}

	@Override
	@ReadThroughSingleCache(namespace = "com.dang.dao.impl", expiration = 1200)
	public List<T> find(@ParameterValueKeyProvider String key ,String hql,Object... values) {
		@SuppressWarnings("unchecked")
		List<T> lists=(List<T>)this.getHibernateTemplate().find(hql, values);
		return lists;
	}
发现在namespace 是必须要有的,key是由sql语句和参数值 hash得到的,确保唯一性,对于作为key的字符串要@ParameterValueKeyProvider 注解,expiration指的是过期时间 以秒为单位
我们可以测试下这样配置是否起效果,用junit进行测试

运行结果只执行了一句sql 
应为第二句sql查询的key值和第一次一样,所以缓存已经存在,这样 memcached与spring的集成就完成了,memcached 还可以放到另一台服务器上,进行集中式缓存,这样可以大大减少读操作多数据库的压力,当然前提是memcached的命中率在80%以上,越高越好。


 89
89


 被折叠的 条评论
为什么被折叠?
被折叠的 条评论
为什么被折叠?
 到【灌水乐园】发言


