


1.1 DOM是一个树型结构
当你在HTML里写下如下的结构的时候,浏览器会把它解析成一棵DOM树:
<!DOCTYPE html>
<html lang="en">
<head>
<title>HTML</title>
</head>
<body>
<!-- Add your content here-->
</body>
</html>

On the left you see the HTML document in its tree form. And on the right you see the corresponding JavaScript object that represents the selected element on the left. For example, the selected <body> element highlighted in blue, is an element node and an instance of the HTMLBodyElement interface.
左侧你会看到HTML的DOM树结构,右侧你会看到相关的有哪些js对象我们可以操作,比如高亮的body元素就是HTMLBodyElement的实例对象。
What you should take away here is that html documents get parsed by a browser and converted into a tree structure of node objects representing a live document. The purpose of the DOM is to provide a programatic interface for scripting (removing, adding, replacing, eventing, modifiying) this live document using JavaScript.
下面列一下最常见的节点类型:(eg是例如的意思)
- DOCUMENT_NODE (e.g. window.document)
- ELEMENT_NODE (e.g. <body>, <a>, <p>, <script>, <style>, <html>, <h1> etc...)
- ATTRIBUTE_NODE (e.g. class="funEdges")
- TEXT_NODE (e.g. text characters in an html document including carriage returns and white space)
- DOCUMENT_FRAGMENT_NODE (e.g. document.createDocumentFragment())
- DOCUMENT_TYPE_NODE (e.g. <!DOCTYPE html>)
上面的这些都是Node对象的属性,这些属性的值是数字:
<!DOCTYPE html>
<html lang="en">
<body>
<script>

console.log(Node.ELEMENT_NODE) //logs 1, one is the numeric code value for element nodes

</script>
</body>
</html>
我们可以用下面的方式来迭代的获取所有的Node对象的属性与值:
<!DOCTYPE html>
<html lang="en">
<body>
<script>

for(var key in Node){
    console.log(key,' = '+Node[key]);
};

/* the above code logs to the console the following
ELEMENT_NODE  = 1
ATTRIBUTE_NODE  = 2
TEXT_NODE  = 3
CDATA_SECTION_NODE  = 4
ENTITY_REFERENCE_NODE  = 5
ENTITY_NODE  = 6
PROCESSING_INSTRUCTION_NODE  = 7
COMMENT_NODE  = 8
DOCUMENT_NODE  = 9
DOCUMENT_TYPE_NODE  = 10
DOCUMENT_FRAGMENT_NODE  = 11
NOTATION_NODE  = 12
DOCUMENT_POSITION_DISCONNECTED  = 1
DOCUMENT_POSITION_PRECEDING  = 2
DOCUMENT_POSITION_FOLLOWING  = 4
DOCUMENT_POSITION_CONTAINS  = 8
DOCUMENT_POSITION_CONTAINED_BY  = 16
DOCUMENT_POSITION_IMPLEMENTATION_SPECIFIC  = 32 */

</script>
</body>
</html>
for(var i in Node){console.log(i + " " +Node[i])}
VM360:2 ELEMENT_NODE 1
VM360:2 ATTRIBUTE_NODE 2
VM360:2 TEXT_NODE 3
VM360:2 CDATA_SECTION_NODE 4
VM360:2 ENTITY_REFERENCE_NODE 5
VM360:2 ENTITY_NODE 6
VM360:2 PROCESSING_INSTRUCTION_NODE 7
VM360:2 COMMENT_NODE 8
VM360:2 DOCUMENT_NODE 9
VM360:2 DOCUMENT_TYPE_NODE 10
VM360:2 DOCUMENT_FRAGMENT_NODE 11
VM360:2 NOTATION_NODE 12
VM360:2 DOCUMENT_POSITION_DISCONNECTED 1
VM360:2 DOCUMENT_POSITION_PRECEDING 2
VM360:2 DOCUMENT_POSITION_FOLLOWING 4
VM360:2 DOCUMENT_POSITION_CONTAINS 8
VM360:2 DOCUMENT_POSITION_CONTAINED_BY 16
VM360:2 DOCUMENT_POSITION_IMPLEMENTATION_SPECIFIC 32
VM360:2 toString function toString() { [native code] }
在下列的表中,我列出了一些常见的节点类型和他们的对应的值是多少,看完这张表我希望你明白的是nodeType只是我们用来分类当前的节点属于哪种类型,只是一个数字没什么特殊含义,比如HTMLBodyElement的nodeType是否,代表的是它是属于ELEMENT_NODE类型。

注意, ATTRIBUTE_NODE将要在DOM 4规范中被移除掉(译者:这......)
1.3 节点继承关系
- Object < Node < Element < HTMLElement < (e.g. HTML*Element)
- Object < Node < Attr (This is deprecated in DOM 4)
- Object < Node < CharacterData < Text
- Object < Node < Document < HTMLDocument
- Object < Node < DocumentFragment
译者也实验了一把:
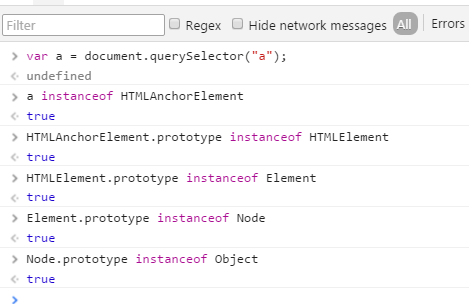
为了验证所有的节点继承自Node,我们看下面的代码:
<!DOCTYPE html>
<html lang="en">
<body>

<a href="#">Hi</a> <!-- this is a HTMLAnchorElement which inherits from... -->

<script>

//获得节点
var nodeAnchor = document.querySelector('a');

//创建一个空数组用于保存所有的属性
var props = [];

//loop over element node object getting all properties & methods (inherited too)
for(var key in nodeAnchor){
    props.push(key);
}

//log alphabetical list of properties & methods
console.log(props.sort());

</script>
</body>
</html>
译者:我认为作者上面的代码不能证明他的话,所以最好还再这么一段代码:
<!DOCTYPE html>
<html lang="en">
<body>

<a href="#">Hi</a> <!-- this is a HTMLAnchorElement which inherits from... -->

<script>
var props = [];
for(var key in Node){
    props.push(key);
}

//log alphabetical list of properties & methods
console.log(props.sort());

</script>
</body>
</html>
注:你可以扩展DOM对象,但是一般不推荐扩展宿主对象。
1.4 节点的属性与方法
Node属性:
- childNodes
- firstChild
- lastChild
- nextSibling
- nodeName
- nodeType
- nodeValue
- parentNode
- previousSibling
Node Methods:
- appendChild()
- cloneNode()
- compareDocumentPosition()
- contains()
- hasChildNodes()
- insertBefore()
- isEqualNode()
- removeChild()
- replaceChild()
Document Methods:
- document.createElement()
- document.createTextNode()
HTML * Element Properties:
- innerHTML
- outerHTML
- textContent
- innerText
- outerText
- firstElementChild
- lastElementChild
- nextElementChild
- previousElementChild
- children
HTML element Methods:
- insertAdjacentHTML()
1.5 确定节点的类型和值
<!DOCTYPE html>
<html lang="en">
<body>

<a href="#">Hi</a>

<script>

//This is DOCUMENT_TYPE_NODE or nodeType 10 because Node.DOCUMENT_TYPE_NODE === 10 doctype类型
console.log(
    document.doctype.nodeName, //logs 'html' also try document.doctype to get <!DOCTYPE html>
    document.doctype.nodeType //logs 10 which maps to DOCUMENT_TYPE_NODE
);

//This is DOCUMENT_NODE or nodeType 9 because Node.DOCUMENT_NODE === 9 document节点类型
console.log(
    document.nodeName, //logs '#document'
    document.nodeType //logs 9 which maps to DOCUMENT_NODE
);

//This is DOCUMENT_FRAGMENT_NODE or nodeType 11 because Node.DOCUMENT_FRAGMENT_NODE === 11 文档碎片节点
console.log(
    document.createDocumentFragment().nodeName, //logs '#document-fragment'
    document.createDocumentFragment().nodeType //logs 11 which maps to DOCUMENT_FRAGMENT_NODE
);

//This is ELEMENT_NODE or nodeType 1 because Node. ELEMENT_NODE === 1 元素节点类型
console.log(
    document.querySelector('a').nodeName, //logs 'A'
    document.querySelector('a').nodeType //logs 1 which maps to ELEMENT_NODE
);

//This is TEXT_NODE or nodeType 3 because Node.TEXT_NODE === 3 文档节点类型
console.log(
    document.querySelector('a').firstChild.nodeName, //logs '#text'
    document.querySelector('a').firstChild.nodeType //logs 3 which maps to TEXT_NODE
);

</script>
</body>
</html>
我们可以通过nodeType直接判断某个节点是否属于某一种类型的节点:(这块可以看最上面的那张表)
<!DOCTYPE html>
<html lang="en">
<body>

<a href="#">Hi</a>

<script>

//is <a> a ELEMENT_NODE?
console.log(document.querySelector('a').nodeType === 1); //logs true, <a> is an Element node

//or use Node.ELEMENT_NODE which is a property containg the numerice value of 1
console.log(document.querySelector('a').nodeType === Node.ELEMENT_NODE); //logs true, <a> is an Element node

</script>
</body>
</html>
注意:在DOM 4规范中,nodeNam的返回值有可能会变
1.6 获取nodeValue
只有文本类型和注释类型才有nodeValue
<!DOCTYPE html>
<html lang="en">
<body>

<a href="#">Hi</a>

<script>

//logs null for DOCUMENT_TYPE_NODE, DOCUMENT_NODE, DOCUMENT_FRAGMENT_NODE, ELEMENT_NODE below
console.log(document.doctype.nodeValue);
console.log(document.nodeValue);
console.log(document.createDocumentFragment().nodeValue);
console.log(document.querySelector('a').nodeVale);

//logs string of text
console.log(document.querySelector('a').firstChild.nodeValue); //logs 'Hi'

</script>
</body>
</html>
1.7 创建元素节点和文本节点
<!DOCTYPE html>
<html lang="en">
<body>
<script>

var elementNode = document.createElement('div');
console.log(elementNode, elementNode.nodeType); //log <div> 1, and 1 indicates an element node

var textNode = document.createTextNode('Hi');
console.log(textNode, textNode.nodeType); //logs Text {} 3, and 3 indicates a text node

</script>
</body>
</html>
注意:createElement只接受一个参数,这个字符串会返回和这个节点对象的tagName一样的字符串
<script>
var a = document.createElement("mmm");
console.log(a.tagName);
</script>
注意: createAttribute方法已经被废弃,现在推荐使用的是getAttribute,setAttribute,removeAttribute,createComment用于创建注释
1.8 创建和增加元素和文本节点
我们使用innerHTML,outerHTML,textContent和insertAdjacentHTML属性和方法来快速创建节点片段
<!DOCTYPE html>
<html lang="en">
<body>

<div id="A"></div>
<span id="B"></span>
<div id="C"></div>
<div id="D"></div>
<div id="E"></div>

<script>

//create a strong element and text node and add it to the DOM
document.getElementById('A').innerHTML = '<strong>Hi</strong>';

//create a div element and text node to replace <span id="B"></div> (notice span#B is replaced)
document.getElementById('B').outerHTML = '<div id="B" class="new">Whats Shaking</div>'

//create a text node and update the div#C with the text node
document.getElementById('C').textContent = 'dude';


//NON standard extensions below i.e. innerText & outerText

//create a text node and update the div#D with the text node
document.getElementById('D').innerText = 'Keep it';

//create a text node and replace the div#E with the text node (notice div#E is gone)
document.getElementById('E').outerText = 'real!';

console.log(document.body.innerHTML);
/* logs
<div id="A"><strong>Hi</strong></div>
<div id="B" class="new">Whats Shaking</div>
<span id="C">dude</span>
<div id="D">Keep it</div>
real!
*/

</script>
</body>
</html>
insertAdjacentHTML方法是最佳方法,它可以用来快速的在开始结尾前面后面添加元素。
<!DOCTYPE html>
<html lang="en">
<body><i id="elm">how</i>

<script>

var elm = document.getElementById('elm');

elm.insertAdjacentHTML('beforebegin', '<span>Hey-</span>');
elm.insertAdjacentHTML('afterbegin', '<span>dude-</span>');
elm.insertAdjacentHTML('beforeend', '<span>-are</span>');
elm.insertAdjacentHTML('afterend', '<span>-you?</span>');

console.log(document.body.innerHTML);
/* logs
<span>Hey-</span><i id="A"><span>dude-</span>how<span>-are</span></i><span>-you?</span>
*/

</script>
</body>
</html>注意:insertAdjacentHTML 的beforebegin和afterend只有在某节点有父节点的时候才可以工作
outerhtml在firefox 11之前不兼容,要使用polyfill
textContent可以获取script标签里的内容,innerText不能
innerText可以返回隐藏元素的值,而textContent不能
1.10 抽取一部分节点片段
<!DOCTYPE html>
<html lang="en">
<body>
<div id="A"><i>Hi</i></div>
<div id="B">Dude<strong> !</strong></div>
<script>
console.log(document.getElementById('A').innerHTML); //logs '<i>Hi</i>'
console.log(document.getElementById('A').outerHTML); //logs <div id="A">Hi</div>
//notice that all text is returned even if its in child element nodes (i.e. <strong> !</strong>)
console.log(document.getElementById('B').textContent); //logs 'Dude !'
//NON standard extensions below i.e. innerText & outerText
console.log(document.getElementById('B').innerText); //logs 'Dude !'
console.log(document.getElementById('B').outerText); //logs 'Dude !'
</script>
</body>
</html>
1.10 appendChild和insertBefore
<!DOCTYPE html>
<html lang="en">
<body>

<p>Hi</p>

<script>

//create a blink element node and text node
var elementNode = document.createElement('strong');
var textNode = document.createTextNode(' Dude');

//append these nodes to the DOM
document.querySelector('p').appendChild(elementNode);
document.querySelector('strong').appendChild(textNode);

//log's <p>Hi<strong> Dude</strong></p>
console.log(document.body.innerHTML);

</script>
</body>
</html>
<!DOCTYPE html>
<html lang="en">
<body>

<ul>
    <li>2</li>
    <li>3</li>
</ul>

<script>

//create a text node and li element node and append the text to the li
var text1 = document.createTextNode('1');
var li = document.createElement('li');
li.appendChild(text1);

//select the ul in the document
var ul = document.querySelector('ul');

/*
add the li element we created above to the DOM, notice I call on <ul> and pass reference to <li>2</li> using ul.firstChild
*/
ul.insertBefore(li,ul.firstChild);

console.log(document.body.innerHTML);
/*logs
<ul>
<li>1</li>
<li>2</li>
<li>3</li>
</ul>
*/

</script>
</body>
</html>
注意:insertBefore如果没有传二个参数,那和appendChild效果是一样的。
1.11 removeChild和replaceChild
移除一个节点需要二步,首先你需要确定你要移动的节点,然后你需要用它的parentNode来移除。
<!DOCTYPE html>
<html lang="en">
<body>

<div id="A">Hi</div>
<div id="B">Dude</div>

<script>

//remove element node
var divA = document.getElementById('A');
divA.parentNode.removeChild(divA);

//remove text node
var divB = document.getElementById('B').firstChild;
divB.parentNode.removeChild(divB);

//log the new DOM updates, which should only show the remaining empty div#B
console.log(document.body.innerHTML);

</script>
</body>
</html>
<!DOCTYPE html>
<html lang="en">
<body>

<div id="A">Hi</div>
<div id="B">Dude</div>

<script>

//replace element node
var divA = document.getElementById('A');
var newSpan = document.createElement('span');
newSpan.textContent = 'Howdy';
divA.parentNode.replaceChild(newSpan,divA);

//replace text node
var divB = document.getElementById('B').firstChild;
var newText = document.createTextNode('buddy');
divB.parentNode.replaceChild(newText, divB);

//log the new DOM updates,
console.log(document.body.innerHTML);

</script>
</body>
</html>
注意: 推荐使用innerHTML,outerHTML 而不是用replaceChild,removeChild,replaceChild和removeChild的返回值是你移除的节点对象,它们还保存在内存当中你可以使用。DOM 4里面我们会引入remove()和replace()
1.12 cloneNode
<!DOCTYPE html>
<html lang="en">
<body>

<ul>
  <li>Hi</li>
  <li>there</li>
</ul>

<script>

var cloneUL = document.querySelector('ul').cloneNode();

console.log(cloneUL.constructor); //logs HTMLUListElement()
console.log(cloneUL.innerHTML); //logs (an empty string) as only the ul was cloned

</script>
</body>
</html>
注意:当克隆一个元素节点的时候,所有的属性和值都会被克隆,事实上,属性只是拷贝,所有的能在DOM节点上加的比如事件句柄都会被丢失掉。
cloneNode的风险在于有可能引起DOM树里多个同id的节点。
1.13 NodeList 和 HTMLCollection
1.14 遍历
<!DOCTYPE html>
<html lang="en">
<body>

<ul>
  <li>Hi</li>
  <li>there</li>
</ul>

<script>

var ulElementChildNodes = document.querySelector('ul').childNodes;

console.log(ulElementChildNodes); //logs an array like list of all nodes inside of the ul

/*Call forEach as if its a method of NodeLists so we can loop over the NodeList. Done because NodeLists are array like, but do not directly inherit from Array*/
Array.prototype.forEach.call(ulElementChildNodes,function(item){
   console.log(item); //logs each item in the array
});

</script>
</body>
</html>
注意:childNodes不仅返回元素节点,还会返回其他类型的节点
在ES6中,我们可以使用Array.from
- parentNode
- firstChild
- lastChild
- nextSibling
- previousSibling
- firstElementChild
- lastElementChild
- nextElementChild
- previousElementChild
- children
注意:childElementCount虽然没有提到但是这个方法可以用来获取元素节点的数量
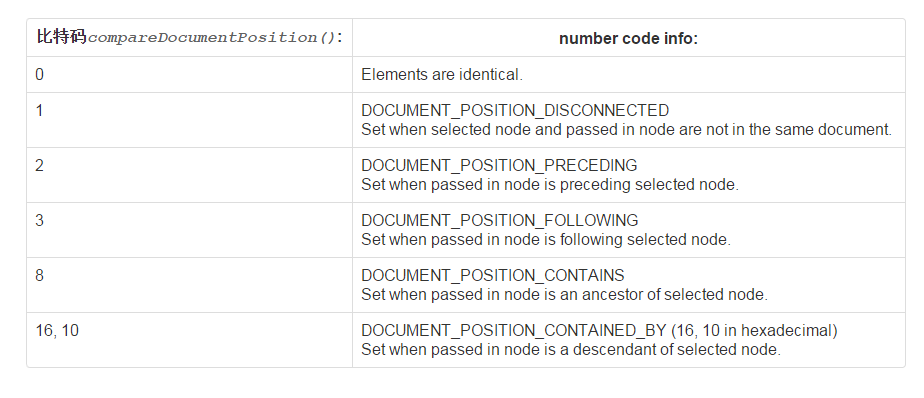
1.17 使用contains和compareDocumentPosition判断节点的位置
<!DOCTYPE html>
<html lang="en">
<body>

<script>

// is <body> inside <html lang="en"> ?
var inside = document.querySelector('html').contains(document.querySelector('body'));

console.log(inside); //logs true

</script>
</body>
</html>
1.18 确定二个节点关系
<!DOCTYPE html>
<html lang="en">
<body>

<input type="text">
<input type="text">

<textarea>foo</textarea>
<textarea>bar</textarea>

<script>

//logs true, because they are exactly idential
var input = document.querySelectorAll('input');
console.log(input[0].isEqualNode(input[1]));

//logs false, because the child text node is not the same
var textarea = document.querySelectorAll('textarea');
console.log(textarea[0].isEqualNode(textarea[1]));

</script>
</body>
</html>
compareDocumentPosition
1.18 比较二个元素节点是否相等
<!DOCTYPE html>
<html lang="en">
<body>

<input type="text">
<input type="text">

<textarea>foo</textarea>
<textarea>bar</textarea>

<script>

//logs true, because they are exactly idential
var input = document.querySelectorAll('input');
console.log(input[0].isEqualNode(input[1]));

//logs false, because the child text node is not the same
var textarea = document.querySelectorAll('textarea');
console.log(textarea[0].isEqualNode(textarea[1]));

</script>
</body>
</html>
注意:如果你不介意二个节点要相等,而只想确定一下他们的引用的指针是否是同一个,直接可以用 ===
(第一章完)


 220
220

 被折叠的 条评论
为什么被折叠?
被折叠的 条评论
为什么被折叠?
 到【灌水乐园】发言


