


既然说到Android Studio就是唠叨一下坑,最起码自己遇到问题查起来方便些
版本问题,在一路走来的过程中,几次抛弃,几次爱惜,不过现在好多了,但是如果学习的时候使用的是旧版本的资料,可能会遇到一些莫名的问题,此类问题解决之道——使用最新版本,包括gradle
墙的问题,这个——没辙,自行解决。
本文主要说打包共享资源的问题,就不多说了
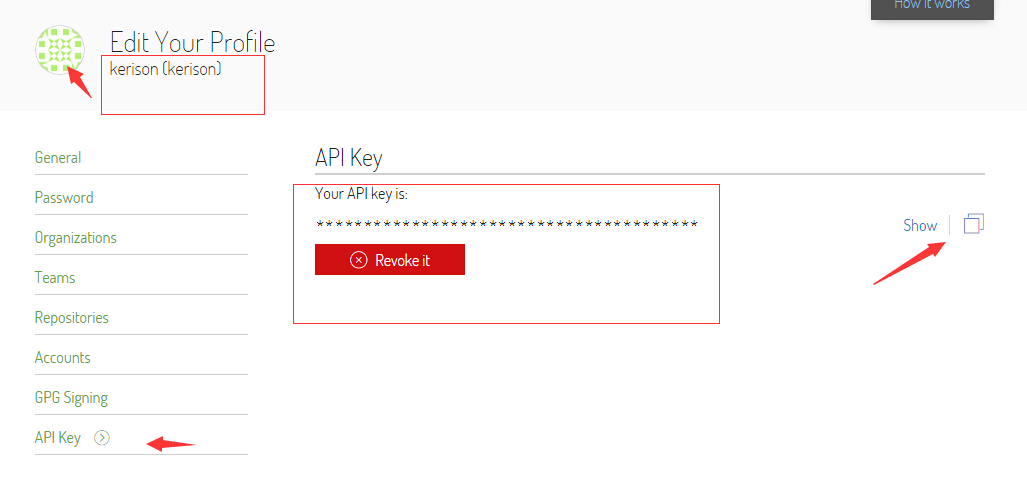
注册 https://bintray.com,发布的话总的有个账号之类的
记住两个关键词,点击自己的头像-->Edit-->APIKey
bintray.user=用户名
bintray.apikey=xxxx
3.接下来就是配置了
项目的build.gradle
// Top-level build file where you can add configuration options common to all sub-projects/modules.

buildscript {
    repositories {
        jcenter()
        mavenCentral()
    }
    dependencies {
        classpath 'com.android.tools.build:gradle:1.1.2'
        // NOTE: Do not place your application dependencies here; they belong
        // in the individual module build.gradle files

        //自动化maven打包插件
        classpath 'com.github.dcendents:android-maven-plugin:1.2'
        //自动上传至Bintray平台插件
        classpath "com.jfrog.bintray.gradle:gradle-bintray-plugin:1.0"
    }
}

allprojects {
    repositories {
        jcenter()
        mavenCentral()
    }
}
Librady Model 的build.gradle
apply plugin: 'com.android.library' //应用库
apply plugin: 'com.github.dcendents.android-maven' //maven 打包
apply plugin: 'com.jfrog.bintray' //bintray上传

//jar 版本
version = "1.0.0"

android {
    compileSdkVersion 21
    buildToolsVersion "21.1.2"
    resourcePrefix "kerison_logkit_"

    defaultConfig {
        minSdkVersion 8
        targetSdkVersion 21
        versionCode 1
        versionName "1.0"
    }

    buildTypes {
        release {
            minifyEnabled false
            proguardFiles getDefaultProguardFile('proguard-android.txt'), 'proguard-rules.pro'
        }
    }
}

dependencies {
    compile fileTree(dir: 'libs', include: ['*.jar'])
}

//联系信息
def siteUrl = "https://github.com/xxx"
def gitUrl = "https://github.com/xxx.git"

//唯一包名
group = "cn.kerison"

install {

    repositories.mavenInstaller {
        // This generates POM.xml with proper paramters
        pom {
            project {

                //maven 打包类型
                packaging 'aar'

                //添加项目描述
                name '...'

                //站点链接
               url siteUrl

                //设置开源证书信息
                licenses {
                    license {
                        name 'The Apache Software License, Version 2.0'
                        url 'http://www.apache.org/licenses/LICENSE-2.0.txt'
                    }
                }

                //添加开发者信息
                developers {
                    developer {
                        id 'xxx'
                        name 'xxx'
                        email 'xxx'
                    }
                }

                scm {
                    connection gitUrl
                    developerConnection gitUrl
                    url siteUrl
                }
            }
        }
    }
}

//编译源码
task sourcesJar(type: Jar) {
    from android.sourceSets.main.java.srcDirs
    classifier = 'sources'
}

task javadoc(type: Javadoc) {
    source = android.sourceSets.main.java.srcDirs
    //javadoc 默认不支持GBK
    options.encoding = "utf-8"

    //支持依赖包的javadoc,默认是android
   // classpath += project.files(configurations.compile.files,android.getBootClasspath().join(File.pathSeparator))
    classpath += project.files(android.getBootClasspath().join(File.pathSeparator))
}

task javadocJar(type: Jar, dependsOn: javadoc) {
    classifier = 'javadoc'
    from javadoc.destinationDir
}

artifacts {
    archives javadocJar
    archives sourcesJar
}

Properties properties = new Properties()
properties.load(project.rootProject.file('local.properties').newDataInputStream())

//配置上传Bintray相关信息
bintray {
    //读取Bintray帐号和密码。
    //一般的为了保密和安全性,在项目的local.properties文件中添加两行句话即可:
    //bintray.user=username
    //bintray.apikey=apikey
    user = properties.getProperty("bintray.user")
    key = properties.getProperty("bintray.apikey")

    configurations = ['archives']

    pkg {
        repo = "maven"//上传的中央仓库名称
        name = "xxx"//上传的项目的名字
        websiteUrl = siteUrl
        vcsUrl = gitUrl
        licenses = ["Apache-2.0"]
        publish = true  //是否发布
    }
}
项目的local.properties,这个配置一般是本地的,所以账户信息卸载里面比较安全些
bintray.user=用户名
bintray.apikey=[apikey]
4.接下来就可以编译安装测试,发布了
gradlew install  //安装到本地 会生成默认的pom.xml文件

gradlew bintrayUpload
然后已经发布到maven了,如果需要在android studio中直接使用,发布到jcenter还需要申请一下
https://bintray.com/bintray/jcenter
然后……就是等待审核了……[俺是四个多小时]
最后引用的路径为group:name:verison
cn.kerison:logkit:1.0.0
只是搜不到还是得上传签名后的文件到maven center


 1106
1106

 被折叠的 条评论
为什么被折叠?
被折叠的 条评论
为什么被折叠?
 到【灌水乐园】发言


