1. 编写用于查询数据的功能函数
应用目录 下的
views.py文件通常用于保存响应各种请求的函数或类
from django.shortcuts import render
from .models import BlogArticles

# Create your views here.
def blog_title(request): # request 负责响应所接收到的请求
    # 查询得到所有 BlogArticles 表中的所有实例数据
    blogs = BlogArticles.objects.all()
    """
    render() 作用是将数据渲染到指定模板上
    "blog/titles.html" 指定渲染到哪个页面,页面路径为应用目录下的templates目录
    {"blogs": blogs} 为传给页面的数据
    """
    return render(request, "blog/titles.html", {"blogs": blogs})
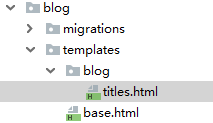
2. 在应用目录下创建相关html页面文件
- 文件目录结构如下:

- 编写相关页面代码
<!-- base.html公共模板页面 -->
<!DOCTYPE html>
<html lang="zh-CN">
  <head>
    <meta charset="utf-8">
    <meta http-equiv="X-UA-Compatible" content="IE=edge">
    <meta name="viewport" content="width=device-width, initial-scale=1">
    <title>{% block title %}{% endblock %}</title> <!-- 表示里面的内容被 title block 代替 -->

    <!-- Bootstrap -->
    <link href="https://cdn.jsdelivr.net/npm/bootstrap@3.3.7/dist/css/bootstrap.min.css" rel="stylesheet">

    <!--[if lt IE 9]>
      <script src="https://cdn.jsdelivr.net/npm/html5shiv@3.7.3/dist/html5shiv.min.js"></script>
      <script src="https://cdn.jsdelivr.net/npm/respond.js@1.4.2/dest/respond.min.js"></script>
    <![endif]-->
  </head>
  <body>
    <div class="container">
        {% block content %} <!-- 表示页面的内容被 content block 代替 -->
        {% endblock %}
    </div>
    <script src="https://cdn.jsdelivr.net/npm/jquery@1.12.4/dist/jquery.min.js"></script>
    <script src="https://cdn.jsdelivr.net/npm/bootstrap@3.3.7/dist/js/bootstrap.min.js"></script>
  </body>
</html>

<!-- titles.html -->
{% extends "base.html" %} <!-- 继承 base.html 模板页 -->

{% block  title %}
博客标题
{% endblock %}

{% block content %}
    <div class="row text-center vertical-middles-sm">
        <h1>我的博客</h1>
    </div>
    <div class="row">
        <div class="col-xs-12 col-md-8">
            <ul>
                <!-- 循环遍历 blogs 里的对象 -->
                {% for blog in blogs %}
                    <li>{{ blog.title }}</li>
                {% endfor %}
            </ul>
        </div>
    </div>
{% endblock %}
3. 配置URL
- 编写 项目目录 下的
urls.py文件
from django.contrib import admin
from django.urls import path, include

urlpatterns = [
    path('admin/', admin.site.urls),
    path("blog/", include('blog.urls')), # 通过这里将blog/请求转向blog应用的urls.py,即./blog/urls.py文件
]
- 编写 应用目录 下的
urls.py文件
from django.urls import path
from . import views

"""
第一个参数为空,表示访问根,因为该文件在blog应用中,则要为blog/
views.blog_title 表示响应该请求的函数
"""
urlpatterns = [
    path('', views.blog_title),
]
- 启动项目访问:
http://127.0.0.1:8000/blog/即可看到结果
4. 给url传参数
- 修改
titles.html文件给文章标题添加链接
<!-- 循环遍历 blogs 里的对象 -->
{% for blog in blogs %}
<li><a href="{{ blog.id }}">{{ blog.title }}</a></li>
{% endfor %}
- 为该请求编写对应的函数(
./blog/views.py)
def blog_article(request, article_id): # 该请求传入 article_id 参数
    article = BlogArticles.objects.get(id=article_id)
    pub = article.publish
    return render(request, "blog/content.html",{"article":article, "publish":pub})
- 编写显示文件内容的html页面(templates/blog/content.html)
{% extends "base.html" %} <!-- 继承 base.html 模板页 -->

{% block  title %}
博客标题
{% endblock %}

{% block content %}
    <div class="row text-center vertical-middles-sm">
        <h1>{{ article.title }}</h1>
    </div>
    <div class="row">
        <div class="col-xs-12 col-md-8 col-md-offset-2">
            <p class="text-center">
                <span>{{ article.author.username }}</span>
                <span style="margin-left: 20px;">{{ publish }}</span>
            </p>
            <div>{{ article.body }}</div>
        </div>
    </div>
{% endblock %}
- 增加请求所对应的url(./blog/urls.py)
urlpatterns = [
    path('', views.blog_title),
    path('<int:article_id>/', views.blog_article),
]
URL配置和查询
当用户通过浏览器请求某个URL时,Django会根据请求路径依次在URLConf中查询,并将第一个符合条件的映射关系作为查询结果。
例如,访问 http://localhost:8000/blog/1,其请求过程如下:
localhost:8000:主域名部分,不进行查询/blog/:首先在项目目录/urls.py中查询,遇到符合条件的URL映射(path('blog/', include('blog.urls')),),根据此映射中的描述,到blog.urls(./blog/urls.py)中查询/1:在./blog/urls.py中有URL(path('<int:article_id>/', views.blog_article))配置,请求路径正好符合,从而确定最终访问的视图函数views.blog_article


 被折叠的 条评论
为什么被折叠?


