


这篇文章主要介绍了微信小程序授权获取用户详细信息openid的实例详解的相关资料,希望通过本文能帮助到大家,需要的朋友可以参考下
小程序获取用户的头像昵称openid之类

第一种使用wx.getUserInfo直接获取微信头像,昵称
[js] view plain copy
- wx.getUserInfo({
- success: function (res) {
- that.setData({
- nickName: res.userInfo.nickName,
- avatarUrl: res.userInfo.avatarUrl,
- })
- },
- })
第二种
我们在使用小程序wx.login API进行登录的时候,直接使用wx.getUserInfo是不能获取更多的信息的,如微信用户的openid。
官方提示,需要发送获取到的code进行请求到微信的后端API,进行用户解密之类的操作才可以获取,
根据文档,只需要进行一个get请求到如下地址即可:
[js] view plain copy
- https://api.weixin.qq.com/sns/jscode2session?appid=APPID&secret=SECRET&js_code=JSCODE&grant_type=authorization_code
- appid和secret在微信小程序后台可以看到,js_code为使用wx.login登录时获取到的code参数数据,grant_type这个不用改动。
js文件
[js] view plain copy
- var openId = (wx.getStorageSync('openId'))
- if (openId) {
- wx.getUserInfo({
- success: function (res) {
- that.setData({
- nickName: res.userInfo.nickName,
- avatarUrl: res.userInfo.avatarUrl,
- })
- },
- fail: function () {
- // fail
- console.log("获取失败!")
- },
- complete: function () {
- // complete
- console.log("获取用户信息完成!")
- }
- })
- } else {
- wx.login({
- success: function (res) {
- console.log(res.code)
- if (res.code) {
- wx.getUserInfo({
- withCredentials: true,
- success: function (res_user) {
- wx.request({
- //后台接口地址
- url: 'https://....com/wx/login',
- data: {
- code: res.code,
- encryptedData: res_user.encryptedData,
- iv: res_user.iv
- },
- method: 'GET',
- header: {
- 'content-type': 'application/json'
- },
- success: function (res) {
- // this.globalData.userInfo = JSON.parse(res.data);
- that.setData({
- nickName: res.data.nickName,
- avatarUrl: res.data.avatarUrl,
- })
- wx.setStorageSync('openId', res.data.openId);
- }
- })
- }, fail: function () {
- wx.showModal({
- title: '警告通知',
- content: '您点击了拒绝授权,将无法正常显示个人信息,点击确定重新获取授权。',
- success: function (res) {
- if (res.confirm) {
- wx.openSetting({
- success: (res) => {
- if (res.authSetting["scope.userInfo"]) {如果用户重新同意了授权登录
- wx.login({
- success: function (res_login) {
- if (res_login.code) {
- wx.getUserInfo({
- withCredentials: true,
- success: function (res_user) {
- wx.request({
- url: 'https://....com/wx/login',
- data: {
- code: res_login.code,
- encryptedData: res_user.encryptedData,
- iv: res_user.iv
- },
- method: 'GET',
- header: {
- 'content-type': 'application/json'
- },
- success: function (res) {
- that.setData({
- nickName: res.data.nickName,
- avatarUrl: res.data.avatarUrl,
- })
- wx.setStorageSync('openId', res.data.openId);
- }
- })
- }
- })
- }
- }
- });
- }
- }, fail: function (res) {
- }
- })
- }
- }
- })
- }, complete: function (res) {
- }
- })
- }
- }
- })
- }
- },
- globalData: {
- userInfo: null
- }
后台是php 框架是laravel5.4版本
官方文档:
https://mp.weixin.qq.com/debug/wxadoc/dev/api/signature.html
微信官方提供了多种编程语言的示例代码(点击下载)。每种语言类型的接口名字均一致。调用方式可以参照示例。
下载之后在php文件中引入:
[js] view plain copy
- <?php
- namespace App\Http\Controllers\Admin;
- use Illuminate\Http\Request;
- use App\Http\Controllers\Controller;
- use App\Models\User;
- use App\Models\Wechatuser;
- include_once app_path('/Http/Controllers/Admin/PHP/wxBizDataCrypt.php');
- // 获取微信用户信息
- public function getWxLogin(Request $request)
- {
- // require_once ROOTPATH . "./PHP/wxBizDataCrypt.php";
- $code = $request->get('code');
- $encryptedData = $request->get('encryptedData');
- $iv = $request->get('iv');
- $appid = "***" ;
- $secret = "***";
- $URL = "https://api.weixin.qq.com/sns/jscode2session?appid=$appid&secret=$secret&js_code=$code&grant_type=authorization_code";
- $apiData=file_get_contents($URL);
- // var_dump($code,'wwwwwwww',$apiData['errscode']);
- // $ch = curl_init();
- // curl_setopt($ch, CURLOPT_URL, $URL);
- // curl_setopt($ch, CURLOPT_RETURNTRANSFER, 1);
- // curl_setopt($ch, CURLOPT_HEADER, 0);
- // $output = curl_exec($ch);
- // curl_close($ch)
- if(!isset($apiData['errcode'])){
- $sessionKey = json_decode($apiData)->session_key;
- $userifo = new \WXBizDataCrypt($appid, $sessionKey);
- $errCode = $userifo->decryptData($encryptedData, $iv, $data );
- if ($errCode == 0) {
- return ($data . "\n");
- } else {
- return false;
- }
- }
- }
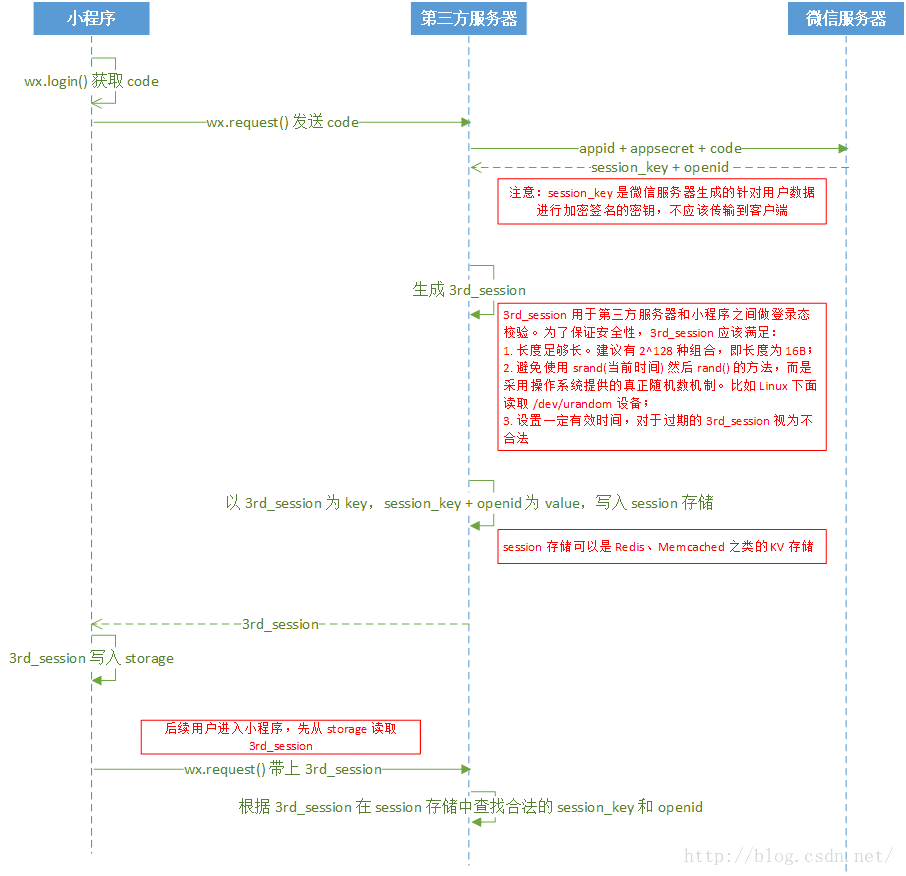
官方文档的登录流程图,整个登录流程基本如下图所示:


 851
851


 被折叠的 条评论
为什么被折叠?
被折叠的 条评论
为什么被折叠?
 到【灌水乐园】发言


