


11月29日
12.17 Nginx负载均衡
Nginx负载均衡
· vim /uer/local/nginx/conf/vhost/load.conf 写入如下内容
upstream qq_com 名字
{
ip_hash; 目的让同一个用户始终保持在一个机器上
server 61.135.157.156:80;
server 125.39.240.113:80;
}
server
{
listen 80;
server_name www.qq.com;
location/
{
proxy_pass http://qq_com;
proxy_set_header Host $host;
proxy_set_header X_Real_IP $remote_addr;
peoxy_set_header X-Forwarded-for $proxy_add_x_forwarded_for;
}
}
· upstream来指定多个web server
yum install -y bind-utils
dig qq.ocm 查看qq的ip(域名解析)
/usr/local/nginx/sbin/nginx -t
/usr/loacal/nginx/sbin/nginx -s reload 检查脚本并重新加载
curl -x127.0.0.1:80 www.qq.com
Nginx不支持代理https
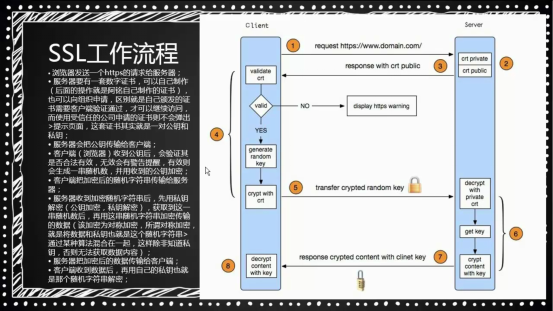
12.18 ssl原理
12.19 生成ssl密钥对
生成ssl密钥对
· cd /usr/local/nginx/conf
rpm -qf ‘which openssl’ 查看命令用哪个包安装
· openssl genrsa -des3 -out tmp.key 2048 key文件为私钥。需要输入密码
· openssl rsa -in tmp.key -out aminglinux.key 转换key,取消密码 -in指定密钥 -out指定输入
· rm -f tmp.key
· openssl req -new -key aminglinux.key -out aminglinux.csr 生成证书请求文件,需要拿这个文件和私钥一起生成公钥文件
· openssl x509 -req -days 365 -in aminglinux.csr -singkey aminglinux.key -out aminglinux.crt -days证书日期
· 这里的aminglinux.crt为公钥
12.20 Nginx配置ssl
Nginx 配置ssl
· vim /usr/local/nginx/conf/vhost/ssl.conf 加入如下内容
server
{
listen 443;
server_name aming.com;
index index.html index.php;
root /data/wwwroot/aming.com;
ssl on; 开启ssl
ssl_certificate aminglinux.crt; 指定公钥
ssl_certificate_key aminglinux.key; 指定私钥
ssl_protocols TLSv1 TLSv1.1 TLSv1.2; 指定协议
}
·/usr/local/nginx/sbin/nginx -t && -s reload 若报错unknown directive “ssl”,需要重新编译nginx,加上--with-http_ssl_module
cd /usr/local/src/nginx-1.12.1/
· ./configure --prefix=/usr/local/nginx --with-http_ssl_module
make install
· mkdir /data/wwwroot/aming.com
/usr/local/nginx/sbin/nginx -t && -s reload 检查并重新加载
· echo “ssl test page.” >/data/wwwroot/aming.com/index.html
· vi /etc/hosts 编辑hosts, 增加127.0.0.1 aming.com
· curl https://aming.com/


 1397
1397

 被折叠的 条评论
为什么被折叠?
被折叠的 条评论
为什么被折叠?
 到【灌水乐园】发言


