


Java提供了网络编程,并且在实际中有着大量运用
网络编程
网络编程概述
-
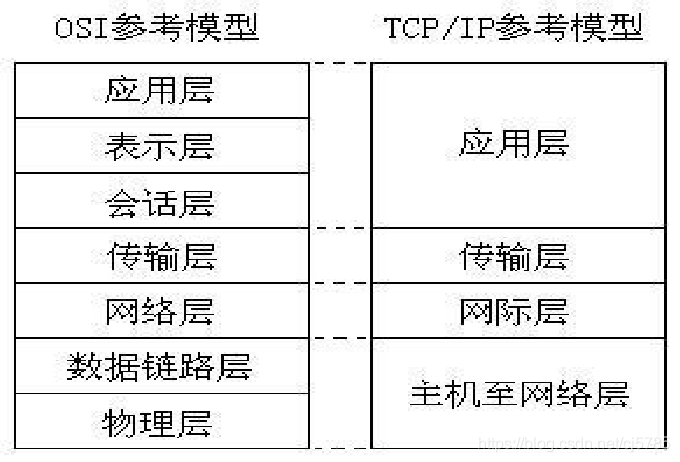
网络模型
OSI参考模型
TCP/IP参考模型 -
网络通讯要素
IP地址
端口号
传输协议
网络参考模型
网络通讯要素
- IP地址:InetAddress
网络中设备的标识
不易记忆,可用主机名
本地回环地址:127.0.0.1 主机名:localhost
InetAddress ia = InetAddress.getByName("www.baidu.com");
System.out.println("address : " + ia.getHostAddress());
System.out.println("name : " + ia.getHostName());
-
端口号
用于标识进程的逻辑地址,不同进程的标识
有效端口:065535,其中01024系统使用或保留端口 -
传输协议
通讯的规则
常见协议:TCP,UDP
TCP和UDP
-
UDP
将数据及源和目的封装成数据包中,不需要建立连接
每个数据报的大小在限制在64k内
因无连接,是不可靠协议
不需要建立连接,速度快 -
TCP
建立连接,形成传输数据的通道
在连接中进行大数据量传输
通过三次握手完成连接,是可靠协议
必须建立连接,效率会稍低
Socket
- Socket就是为网络服务提供的一种机制
- 通信的两端都有Socket
- 网络通信其实就是Socket间的通信
- 数据在两个Socket间通过IO传输
UDP传输
发送端与接收端是两个独立的运行程序
- DatagramSocket与DatagramPacket
- 建立发送端,接收端
- 建立数据包
- 调用Socket的发送接收方法
- 关闭Socket
发送端
在发送端,要在数据包对象中明确目的地 IP 及端口
DatagramSocket ds = new DatagramSocket();
byte[] by = "hello,udp".getBytes();
DatagramPacket dp = new DatagramPacket(by, 0, by.length, InetAddress.getByName("127.0.0.1"), 10000);
ds.send(dp);
ds.close();
接收端
在接收端,要指定监听的端口
DatagramSocket ds = new DatagramSocket(10000);
byte[] by = new byte[1024];
DatagramPacket dp = new DatagramPacket(by, by.length);
ds.receive(dp);
String str = new String(dp.getData(), 0, dp.getLength());
System.out.println(str + "---" + dp.getAddress());
ds.close();
基于UDP的聊天程序
import java.io.*;
import java.net.*;
class Send implements Runnable {

	private DatagramSocket ds;

	public Send(DatagramSocket ds) {
		this.ds = ds;
	}

	public void run() {
		try {
			BufferedReader bufr = new BufferedReader(new InputStreamReader(System.in));
			String line = null;
			while((line = bufr.readLine()) != null) {
				byte[] buf = line.getBytes();
				DatagramPacket dp = new DatagramPacket(buf, buf.length, InetAddress.getByName("192.168.1.255"), 10002);
				ds.send(dp);
				if("886".equals(line))
					break;
			}
		} catch (Exception e) {
			throw new RuntimeException("发送端失败");
		}
	}
}

class Rece implements Runnable {

	private DatagramSocket ds;

	public Rece(DatagramSocket ds) {
		this.ds = ds;
	}

	public void run() {
		try {
			while(true) {
				byte[] buf = new byte[1024];
				DatagramPacket dp = new DatagramPacket(buf, buf.length);
				ds.receive(dp);
				String ip = dp.getAddress().getHostAddress();
				String data = new String(dp.getData(), 0, dp.getLength());
				if("886".equals(data)) {
					System.out.println(ip + "...离开聊天室");
					break;
				}
				System.out.println(ip + ":" + data);
			}
		} catch (Exception e) {
			throw new RuntimeException("接收端失败");
		}
	}
}

class Test {
	public static void main(String[] args) throws Exception {
		DatagramSocket sendSocket = new DatagramSocket();
		DatagramSocket receSocket = new DatagramSocket(10002);
		new Thread(new Send(sendSocket)).start();
		new Thread(new Rece(receSocket)).start();
	}
}
TCP传输
- Socket和ServerSocket
- 建立客户端和服务器端
- 建立连接后,通过Socket中的IO流进行数 据的传输
- 关闭socket同样,客户端与服务器端是两个独立的应用程序
基本思路(客户端)
- 客户端需要明确服务器的ip地址以及端口,这样才可以去试着建立连接,如果连接失败,会出现异常
- 连接成功,说明客户端与服务端建立了通道,那么通过IO流就可以进行数据的传输,而Socket对象已经提供了输入流和输出流对象,通过getInputStream(),getOutputStream()获取即可
- 与服务端通讯结束后,关闭Socket
客户端
通过Socket建立对象并指定要连接的服务端主机以及端口
Socket s = new Socket(“192.168.1.1”, 9999);
OutputStream out = s.getOutputStream();
out.write("hello".getBytes());
s.close();
基本思路(服务端)
- 服务端需要明确它要处理的数据是从哪个端口进入的
- 当有客户端访问时,要明确是哪个客户端,可通过accept()获取已连接的客户端对象,并通过该对象与客户端通过IO流进行数据传输
- 当该客户端访问结束,关闭该客户端
服务端
建立服务端需要监听一个端口
ServerSocket ss = new ServerSocket(9999);
Socket s = ss.accept ();
InputStream in = s.getInputStream();
byte[] buf = new byte[1024];
int num = in.read(buf);
String str = new String(buf,0,num);
System.out.println(s.getInetAddress().toString() + ":" + str);
s.close();
ss.close();
基于TCP的发送返回示例
import java.net.*;
import java.io.*;

class TcpClient {
	public static void main(String[] args) throws IOException {
		Socket s = new Socket("192.168.1.2",10004);
		OutputStream out = s.getOutputStream();
		out.write("Client Test".getBytes());
		InputStream in = s.getInputStream();
		byte[] buf = new byte[1024];
		int len = in.read();
		System.out.printf(new String(buf,0,len));
		s.close();
	}
}

class TcpServer {
	public static void main(String[] args) throws IOException {
		ServerSocket ss = new ServerSocket(10004);
		Socket s = ss.accept();
		String ip = s.getInetAddress().getHostAddress();
		System.out.printf(ip + "···connected");
		InputStream in = s.getInputStream();
		byte[] buf = new byte[1024];
		int len = in.read(buf);
		System.out.printf(new String(buf, 0 ,len));
		OutputStream out = s.getOutputStream();
		out.write("Server Get MSG".getBytes());
		s.close();
		ss.close();
	}
}
Tcp传输最容易出现的问题
- 客户端连接上服务端,两端都在等待,没有任何数据传输
- 通过例程分析:
因为read方法或者readLine方法是阻塞式 - 解决办法:
自定义结束标记
使用shutdownInput,shutdownOutput方法
import java.io.*;
import java.net.*;

class TransClient {
	public static void main(String[] args) throws Exception {
		Socket s = new Socket("192.168.1.2", 10005);
		//定义读取键盘数据的流对象。
		BufferedReader bufr = new BufferedReader(new InputStreamReader(System.in));
		//定义目的,将数据写入到socket输出流。发给服务端
		//BufferedWriter bufOut = new BufferedWriter(new OutputStreamWriter(s.getOutputStream()));
		PrintWriter out = new PrintWriter(s.getOutputStream(),true);
		//定义一个socket读取流,读取服务端返回的大写信息
		BufferedReader bufIn =  new BufferedReader(new InputStreamReader(s.getInputStream()));
		String line = null;
		while((line = bufr.readLine()) != null) {
			if("over".equals(line))
				break;
			out.println(line); //此行直接替代以下三行
			//bufOut.write(line);
			//bufOut.newLine();
			//bufOut.flush();

			String str =bufIn.readLine();
			System.out.println("server:"+str);

		}

		bufr.close();
		s.close();


	}
}

class TransServer {
	public static void main(String[] args) throws Exception {
		ServerSocket ss = new ServerSocket(10005);
		Socket s = ss.accept();
		String ip = s.getInetAddress().getHostAddress();
		System.out.println(ip + "···connected");
		//读取socket读取流中的数据。
		BufferedReader bufIn = new BufferedReader(new InputStreamReader(s.getInputStream()));
		//socket输出流。将大写数据写入到socket输出流,并发送给客户端
		//BufferedWriter bufOut = new BufferedWriter(new OutputStreamWriter(s.getOutputStream()));
		PrintWriter out = new PrintWriter(s.getOutputStream(),true);
		String line = null;
		while((line = bufIn.readLine()) != null) {
			System.out.println(line);
			out.println(line.toUpperCase()); //此行直接替代以下三行
			//bufOut.write(line.toUpperCase());
			//bufOut.newLine();
			//bufOut.flush();
		}
		s.close();
		ss.close();
	}
}
TCP的并发
当A客户端连接上以后。被服务端获取到。服务端执行具体流程,这时B客户端连接,只有等待
因为服务端还没有处理完A客户端的请求,还有循环回来执行下次accept方法。所以暂时获取不到B客户端对象
那么为了可以让多个客户端同时并发访问服务端,服务端最好就是将每个客户端封装到一个单独的线程中,这样,就可以同时处理多个客户端请求
示例:并发上传文件
import java.io.*;
import java.net.*;
class PicClient {
	public static void main(String[] args) throws Exception {

		if(args.length != 1) {
			System.out.println("请选择一个jpg格式的图片");
			return ;
		}

		File file = new File(args[0]);
		if(!(file.exists() && file.isFile())) {
			System.out.println("该文件有问题,要么不存在,要么不是文件");
			return ;
		}

		if(!file.getName().endsWith(".jpg")) {
			System.out.println("图片格式错误,请重新选择");
			return ;
		}

		if(file.length() > 1024 * 1024 * 5) {
			System.out.println("文件过大,请重新选择");
			return ;
		}

		Socket s = new Socket("192.168.1.2",10007);
		FileInputStream fis = new FileInputStream(file);
		OutputStream out = s.getOutputStream();
		byte[] buf = new byte[1024];
		int len = 0;
		while((len = fis.read(buf)) != -1) {
			out.write(buf,0,len);
		}
		//告诉服务端数据已写完
		s.shutdownOutput();
		InputStream in = s.getInputStream();
		byte[] bufIn = new byte[1024];
		int num = in.read(bufIn);
		System.out.println(new String(bufIn, 0, num));
		fis.close();
		s.close();
	}
}

class PicThread implements Runnable {
	private Socket s;
	PicThread(Socket s) {
		this.s = s;
	}
	public void run() {
		int count = 1;
		String ip  = s.getInetAddress().getHostAddress();
		try {
			System.out.println(ip + "···connected");
			InputStream in = s.getInputStream();
			File dir =  new File("d:\\pic");
			File file = new File(dir, ip + "(" + (count) + ")" + ".jpg");
			while(file.exists())
				file = new File(dir, ip + "(" + (count++) + ")" + ".jpg");
			FileOutputStream fos = new FileOutputStream(file);
			byte[] buf = new byte[1024];
			int len = 0;
			while((len = in.read(buf)) != -1) {
				fos.write(buf,0,len);
			}
			OutputStream out = s.getOutputStream();
			out.write("上传成功".getBytes());
			fos.close();
			s.close();
		} catch (Exception e) {
			throw new RuntimeException(ip+"上传失败");
		}
	}
}

class PicServer {
	public static void main(String[] args) throws Exception {
		ServerSocket ss = new ServerSocket(10007);
		while(true) {
			Socket s = ss.accept();
			new Thread(new PicThread(s)).start();
		}
	}
}
URI
Uniform Resource Identifies(统一资源定位符)
import java.net.*;
class Test {
	public static void main(String[] args) throws MalformedURLException {
		URL url = new URL("http://192.168.1.2/web/index.html?name=cj&age=20");
		System.out.println("getProtocol() :" + url.getProtocol());
		System.out.println("getHost() :" + url.getHost());
		System.out.println("getPort() :" + url.getPort());
		System.out.println("getPath() :" + url.getPath());
		System.out.println("getFile() :" + url.getFile());
		System.out.println("getQuery() :" + url.getQuery());

        URLConnection conn = url.openConnection();
		System.out.println(conn);
		InputStream in = conn.getInputStream();
		byte[] buf = new byte[1024];
		int len = in.read(buf);
		System.out.println(new String(buf, 0, len));
	}
}


 被折叠的 条评论
为什么被折叠?
被折叠的 条评论
为什么被折叠?
 到【灌水乐园】发言


