authenticator解决了什么问题

1,authenticator是什么?

谷歌Authenticator是谷歌推出的一种双因素身份验证应用程序,它是一种为用户提供额外层次的账户保护的安全工具.传统的认证方式通常只依赖于用户名和密码,而双因素身份验证则需要用户提供两个不同类型的验证信息,以增加账户的安全性.

谷歌Authenticator通过生成动态的一次性密码来实现双因素身份.当你登录一个已启用谷歌Authenticator的系统或服务时,需要输入用户名和密码,然后打开Authenticator应用来获取当前的一次性密码,这个密码每30秒更新一次,只在短暂的时间段内有效.

这种一次性密码是通过基于时间戳的算法计算得出的,同时还需要通过与账号绑定的密码进行验证.由于每个密码只在极短的时间内有效,并且密码是动态变化的,即使有人获得您的用户名和密码,他们也我无法成功登录您的账户,因为他们没有有效的一次性密码.

谷歌Authenticator还可以与多个账户关联,这意味着您可以在一个应用中管理多个账户的一次性密码,它对于保护您的各种在线账户非常有用.简而言之,谷歌Authenticator是一种提供额外层次安全保护的双因素身份验证应用程序,它通过生成动态的一次性密码来增加账户的安全性,并在登录过程中要求用户提供额外的验证信息.

2,它本质上解决了什么问题?

  • 强化账户安全性:谷歌Authenticator提供了一种额外的身份验证层,以保护您的账户免受未授权的访问.即使有人获取您的用户名和密码,他们仍然需要有效的一次性密码才能成功登录.
  • 降低密码泄露风险:由于谷歌Authenticator生成的一次性密码在每30秒钟更新一次,并且只在特定的时间段内有效,即使密码泄露,公鸡者也只能在一个非常短的时间窗口内进行利用,这大大降低了密码被滥用的风险.
  • 抵御钓鱼和网络针对性公鸡:通过生成每30秒钟更改的动态一次性密码,谷歌Authenticator防止了恶意用户和公鸡者使用被窃取的认证凭据进行登录.这增加了实施钓鱼和网络针对性公鸡的难度.
  • 提供离线身份验证:由于一次性密码是基于时间戳计算的,所以即使在没有网络连接的情况下,您仍然可以进行身份验证,这对于旅行,临时网络中断或无法接收短信验证码的情况非常有用.

二,authenticator的原理

1,基于时间的TOTP

谷歌Authenticator是基于TOTP算法实现的验证方式,TOT是谷歌Authenticator中使用的一种身份验证方法,它基于时间的动态密码算法,用于生成一次性密码.

当未特定用户开启谷歌Authenticator时,它会与该账户关联一个密钥(这个密钥和用户绑定关系数据可以存进mysql或者redis中),每30秒钟,该密钥都会与当前时间戳进行计算,并生成一个新的一次性密码.

当您需要进行身份验证时,您可以打开谷歌Authenticator应用程序,输入相关账户的用户名,然后应用程序会基于与服务器同步的时间戳生成相应的一次性密码.您将次密码输入到身份验证页面或应用程序中,以确认您是合法用户.
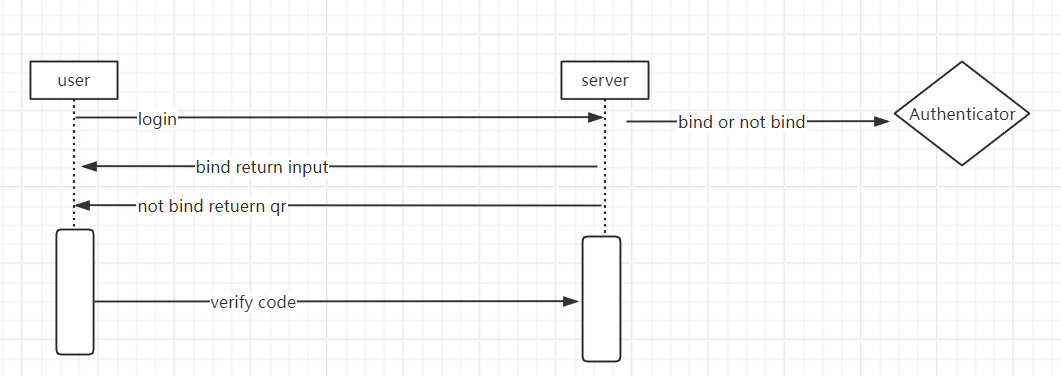
2,认证流程

Django接入谷歌Authenticator的一次简单尝试_谷歌Authenticator

3,python代码实现

1,生成随机密钥并与用户进行绑定bind,同时还具有解绑动作
# 随机生成一个base32密钥
  def random_base32(self, length=32, random=_random.SystemRandom(),
                    chars=None):
    if chars is None:
      chars = list('ABCDEFGHIJKLMNOPQRSTUVWXYZ234567')
      return ''.join(
        random.choice(chars)
        for _ in range(length)
      )
 
def bind(username, randomsk):
   login2_secret = cache.get(username)
   if not login2_secret:
      cache.set(username, login2_secret)

def unbind(username):
   login2_secret = cache.get(username)
   if login2_secret:
      cache.delete(username, login2_secret)
  • 1.
  • 2.
  • 3.
  • 4.
  • 5.
  • 6.
  • 7.
  • 8.
  • 9.
  • 10.
  • 11.
  • 12.
  • 13.
  • 14.
  • 15.
  • 16.
  • 17.
  • 18.
  • 19.
2, 根据绑定的密钥生成qr二维码
# 生成二维码地址
    def getQRCodeGoogleUrl(self, name, secret):
        """
        :param self:
        :param name:  用户名
        :param secret: 秘钥
        :return:
        """
        print(self)
        return "otpauth://totp/" + name + "?secret=%s" % secret
 
    # 生成二维码base64格式
    def genQr64(self, url):
        print(self)
        # 原文链接:https: // blog.csdn.net / weixin_44070137 / article / details / 107097403
        qr = qrcode.make(url)
        buf = io.BytesIO()
        qr.save(buf)
        img_buf = buf.getvalue()
        img_stream = base64.b64encode(img_buf)
        return img_stream
  • 1.
  • 2.
  • 3.
  • 4.
  • 5.
  • 6.
  • 7.
  • 8.
  • 9.
  • 10.
  • 11.
  • 12.
  • 13.
  • 14.
  • 15.
  • 16.
  • 17.
  • 18.
  • 19.
  • 20.
  • 21.
3, 根据绑定的密钥生成动态密码列表
def byte_secret(self, secret):
        print(self)
        missing_padding = len(secret) % 8
        if missing_padding != 0:
            secret += '=' * (8 - missing_padding)
        return base64.b32decode(secret, casefold=True)
 
def int_to_bytestring(self, i, padding=8):
    print(self)
    result = bytearray()
    while i != 0:
        result.append(i & 0xFF)
        i >>= 8
        return bytes(bytearray(reversed(result)).rjust(padding, b'\0'))

 # 根据约定的密钥计算当前动态密码
def generate_otp(self, secret, timestamp=None):
    if not timestamp:
        timestamp = datetime.datetime.now()
        for_time = timestamp
        i = time.mktime(for_time.timetuple())
        intput = int(i / 30)
        digest = hashlib.sha1
        digits = 6
        if intput < 0:
            raise ValueError('input must be positive integer')
            hasher = hmac.new(self.byte_secret(secret), self.int_to_bytestring(intput), digest)
            hmac_hash = bytearray(hasher.digest())
            offset = hmac_hash[-1] & 0xf
            code = ((hmac_hash[offset] & 0x7f) << 24 |
                    (hmac_hash[offset + 1] & 0xff) << 16 |
                    (hmac_hash[offset + 2] & 0xff) << 8 |
                    (hmac_hash[offset + 3] & 0xff))
            str_code = str(code % 10 ** digits)
            while len(str_code) < digits:
                str_code = '0' + str_code
                return str_code
 
def get_code(self, sKey):
    """
        使用说明
        使用random_base32 生成 密钥 sKey
        使用generate_otp(sKey) 生成 code 时间戳默认为当前,一般情况要传递30s 60s 90s 120s 之前 共计五个时间戳来生成code
        """
    print(self)
    now = datetime.datetime.now()
    now_30s = now - datetime.timedelta(seconds=30)
    now_60s = now - datetime.timedelta(seconds=60)
    now_90s = now - datetime.timedelta(seconds=90)
    now_120s = now - datetime.timedelta(seconds=120)
    code_list = [self.generate_otp(sKey, now),
                 self.generate_otp(sKey, now_30s),
                 self.generate_otp(sKey, now_60s),
                 self.generate_otp(sKey, now_90s),
                 self.generate_otp(sKey, now_120s)]
    return code_list
  • 1.
  • 2.
  • 3.
  • 4.
  • 5.
  • 6.
  • 7.
  • 8.
  • 9.
  • 10.
  • 11.
  • 12.
  • 13.
  • 14.
  • 15.
  • 16.
  • 17.
  • 18.
  • 19.
  • 20.
  • 21.
  • 22.
  • 23.
  • 24.
  • 25.
  • 26.
  • 27.
  • 28.
  • 29.
  • 30.
  • 31.
  • 32.
  • 33.
  • 34.
  • 35.
  • 36.
  • 37.
  • 38.
  • 39.
  • 40.
  • 41.
  • 42.
  • 43.
  • 44.
  • 45.
  • 46.
  • 47.
  • 48.
  • 49.
  • 50.
  • 51.
  • 52.
  • 53.
  • 54.
  • 55.
  • 56.
4,验证一次性密码方法
def verify_code(self, two_code, sKey):
    """
        验证二次登录验证码
        """
    if two_code in self.get_code(sKey):
        return True
    else:
        return False
  • 1.
  • 2.
  • 3.
  • 4.
  • 5.
  • 6.
  • 7.
  • 8.