


SpringSecurity(下文简称ss)发展历史悠久,配置方式和配置项一直在发生变化,工程环境如依赖的 Spring、Springboot 框架版本也影响着配置方式和内容。本文将详细介绍在不同的环境下如何配置搭建 ss 框架,以及配置中应注意的事项。
文中出现的源码、配置基于JDK1.8,ss版本参看每个章节的说明。
一、依赖配置
配置 ss 框架首先要选择合适的版本。如果对 ss 框架的功能没有特殊的要求,应当根据项目是否使用 springboot(版本是多少)、servlet 版本(系统未引入 springboot 时才需关注)等环境因素做出选择。如果 ss 版本选择的不好,虽然有些时候系统还是跑的起来,但终究是存在隐患的。
如果项目中 springboot 选用 3.0 及以上版本,ss 框架建议选择 6.0.0 及以上版本。如果是2.0 - 3.0(不含)之间的版本,则ss框架应选择低于 6.0.0的版本。
1. Maven
建议采用引入 spring-boot-dependencies.pom 的方式配置 ss 依赖,这样做不仅保障了springboot 版本和 ss 版本的契合,还能在多模块Maven环境中维持统一的 ss 版本。
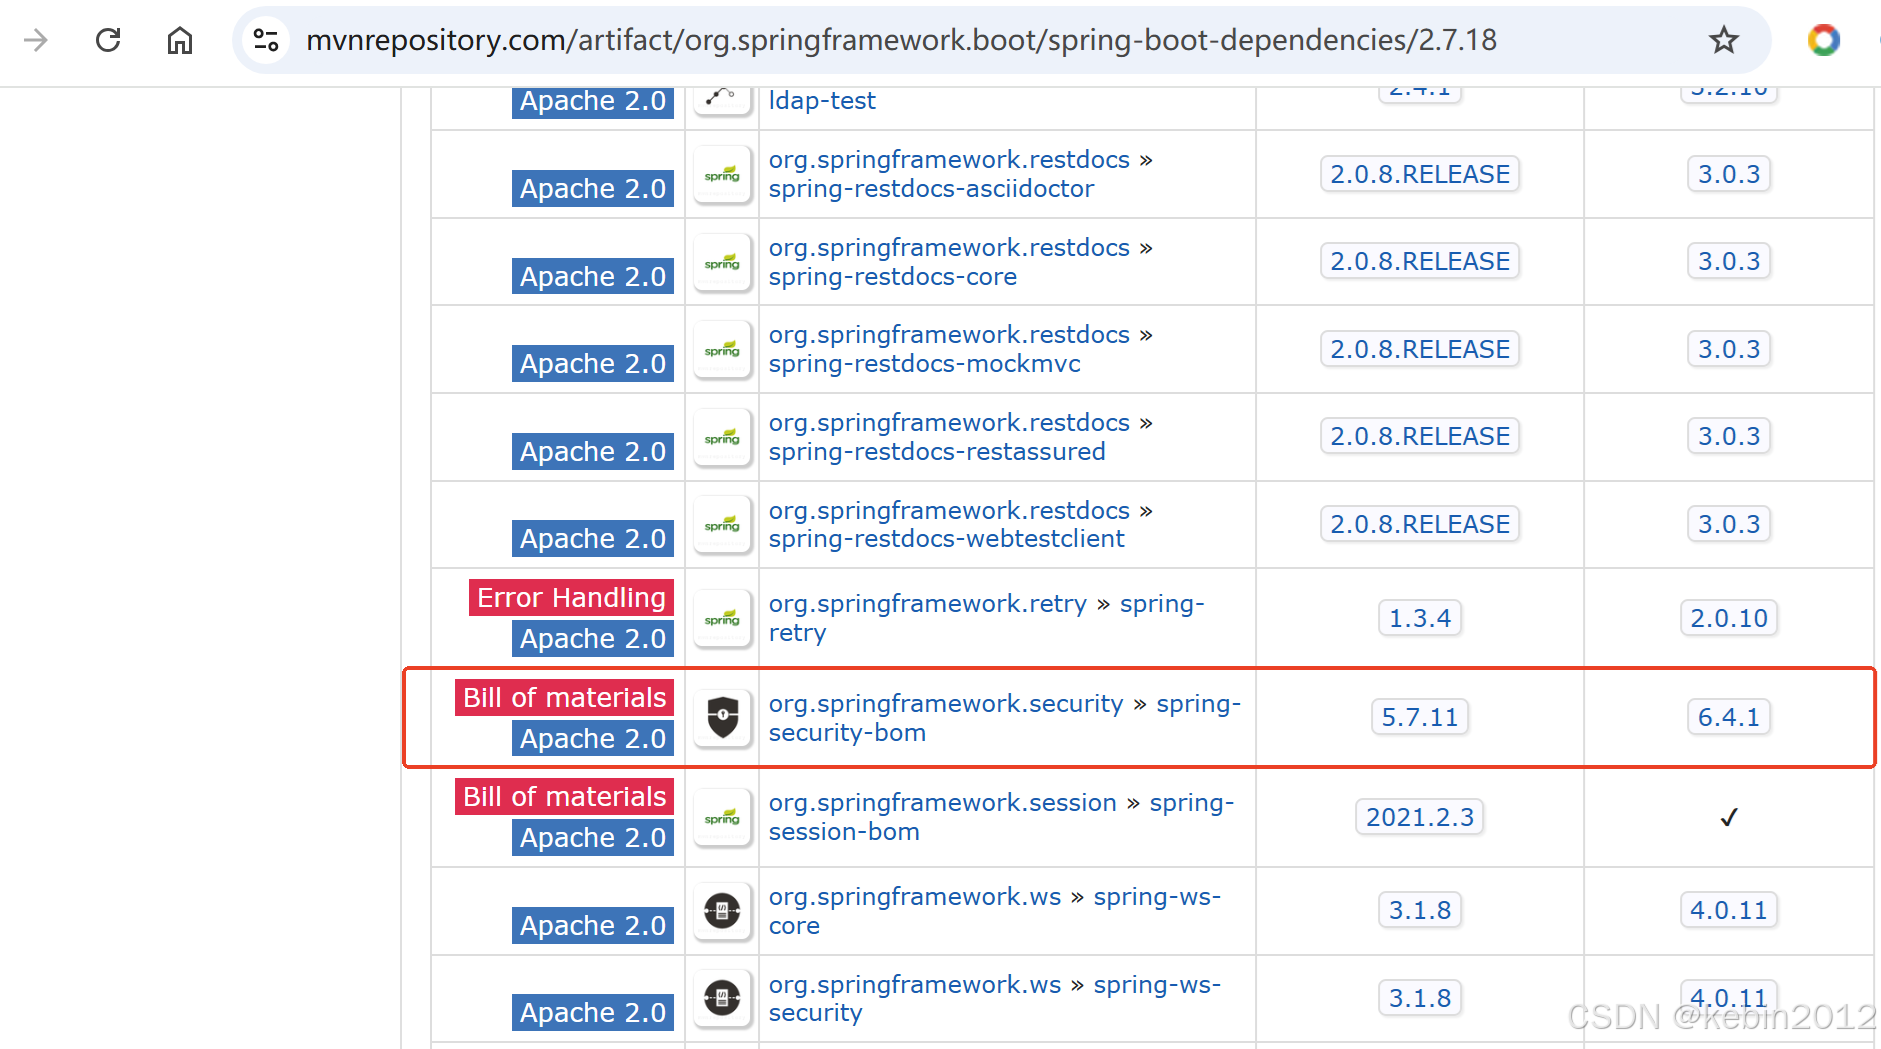
下面是通过 spring-boot-dependencies.pom 引入ss框架的配置方式:
<?xml version="1.0" encoding="UTF-8"?>
<project xmlns:xsi="http://www.w3.org/2001/XMLSchema-instance"
         xmlns="http://maven.apache.org/POM/4.0.0"
         xsi:schemaLocation="http://maven.apache.org/POM/4.0.0 http://maven.apache.org/xsd/maven-4.0.0.xsd">
    ...
    <properties>
        ...
        <spring-boot.version>2.7.18</spring-boot.version>
    </properties>
    </dependencyManagement>
        ...
        <dependency>
            <groupId>org.springframework.boot</groupId>
            <artifactId>spring-boot-dependencies</artifactId>
            <version>${spring-boot.version}</version>
            <type>pom</type>
            <scope>import</scope>
        </dependency>
    </dependencyManagement>
	<dependencies>
        ...
        <dependency>
            <!-- springboot2.7.18对应的ss版本是5.7.11 -->
            <groupId>org.springframework.boot</groupId>
            <artifactId>spring-boot-starter-security</artifactId>
        </dependency>
    </dependencies>
    ...
</project>
如果项目未使用 springboot 框架,或是希望在项目中直接指定依赖版本,配置方式如下:
<?xml version="1.0" encoding="UTF-8"?>
<project xmlns:xsi="http://www.w3.org/2001/XMLSchema-instance"
         xmlns="http://maven.apache.org/POM/4.0.0"
         xsi:schemaLocation="http://maven.apache.org/POM/4.0.0 http://maven.apache.org/xsd/maven-4.0.0.xsd">
    ...
    <properties>
        ...
        <spring-security.version>5.7.11</spring-security.version>
    </properties>

	<dependencies>
        ...
		<dependency>
		    <groupId>org.springframework.security</groupId>
		    <artifactId>spring-security-config</artifactId>
		    <version>${spring-security.version}</version>
		</dependency>
		<dependency>
		    <groupId>org.springframework.security</groupId>
		    <artifactId>spring-security-web</artifactId>
		    <version>${spring-security.version}</version>
		</dependency>
    </dependencies>
    ...
</project>
注:spring-boot-dependencies 版本和 ss 版本的对应关系可以通过 mvnrepository.com 搜索查看
2. Gradle
Springboot 环境的配置如下
...
ext {
    ...
    springSecurityStarterVersion = "2.7.18"
}
dependencies {
    ...
	compile "org.springframework.boot:spring-boot-starter-security:${springSecurityStarterVersion}"
}
非 springboot 环境的配置如下:
...
ext {
    ...
    springSecurityVersion = "5.7.11"
}
dependencies {
	compile "org.springframework.security:spring-security-web:${springSecurityVersion}"
	compile "org.springframework.security:spring-security-config:${springSecurityVersion}"
}
二、Springboot 环境下配置
Springboot 框架广泛应用于web应用开发,springboot + ss 也是目前较为常见的安全管理框架组合。本文将重点介绍 springboot 环境下ss框架的配置方式。
SpringSecurity 自 5.7.0 版本开始废弃了WebSecurityConfigurerAdapter(6.0.0 版本彻底移除)。如果仍想通过继承该类进行配置,则引入的 ss 版本不要超过 5.6.12。
本章内容未在 4.x 版本中测试过,适用范围从5.0.0.RELEASE 版本开始。
1. WebSecurityConfigurerAdapter 配置 [5.0.0.RELEASE - 5.7.0)
WebSecurityConfigurerAdapter的配置主要是围绕 WebSecurity、HttpSecurity 两个配置类完成的,前者可看作是对 ss 框架的全局配置,后者则是对过滤器链的具体配置。本节以 ss 5.6.3 版本为基础环境讲解配置的要点。
下图是配置的样例:
@Configuration
@EnableWebSecurity
public class WebSecurityConfig extends WebSecurityConfigurerAdapter {
// ss全局配置, 即配置FilterChainProxy
// 可在此处实行配置过滤忽略路径、自定义防火墙(HttpFirewall)等操作
@Override
public void configure(WebSecurity web) throws Exception {
// 替换 HttpFirewall 实现
web.httpFirewall(new DefaultHttpFirewall());
// 配置不经过ss滤器链处理的请求路径
web.ignoring().antMatchers("/favicon.ico", "/webjars/**", "/v2/**", "/**/*.css", "/**/*.js", "/imgs/**");
}
// 配置过滤器链
// 可在此处完成各个过滤器及其内置组件、配置项的具体内容
@Override
protected void configure(HttpSecurity http) throws Exception {
// http.authorizeRequests() 方法用于配置 FilterSecurityInterceptor 及 FilterInvocationSecurityMetadataSource 组件
// 可在此处执行配置资源匹配方式、配置请求所需权限、自定义访问决策管理器(AccessDecisionManager)等操作
http.authorizeRequests()
// 配置自定义访问决策管理器(一致性策略)
// .accessDecisionManager(new DefaultUnanimousBased())
// 允许通过请求
.antMatchers("/*.html", "/**/*.html", "/upload-image/**", "/public/**", "/system/get", "/login").permitAll()
// 允许匿名访问请求
.antMatchers("/swagger-ui.html").anonymous()
.antMatchers("/swagger-resources/**").anonymous()
.antMatchers("/webjars/**").anonymous()
.antMatchers("/*/api-docs").anonymous()
.antMatchers("/favicon.ico").anonymous()
.antMatchers(HttpMethod.OPTIONS, "/**").anonymous()
// 其余请求均需通过验证
.anyRequest().authenticated();
// http.sessionManagement() 方法用于配置 ConcurrentSessionFilter、SessionManagementFilter 及 SecurityContextRepository 组件
// 可在此处执行配置session创建、过期、校验策略、设置session最大并发、是否允许url重写等操作
http.sessionManagement()
// 针对Session Fixation攻击采用变动会话标识的策略
.sessionFixation().changeSessionId()
// 重定向时不允许将HttpSessionID重写到Url中
.enableSessionUrlRewriting(false)
// 设置HttpSession创建策略
.sessionCreationPolicy(SessionCreationPolicy.IF_REQUIRED);
// http.logout() 方法用于配置 LogoutFilter
// 可在此处执行配置注销路径、配置注销成功/失败处理策略等操作
http.logout()
// 配置自定义注销行为处理器
.addLogoutHandler(logoutHandler())
// 配置自定义注销成功处理器
.logoutSuccessHandler(new DefaultLogoutSuccessHandler())
// 配置注销请求路径
.logoutUrl("/logout");
// http.logout() 方法用于配置 ExceptionTranslationFilter
// 可在此处执行配置令牌校验异常处理器、拒绝访问处理器等操作
http.exceptionHandling()
// 配置自定义令牌校验异常处理器
.authenticationEntryPoint(new DefaultAuthenticationEntryPoint())
// 配置自定义拒绝访问异常处理器
.accessDeniedHandler(new DefaultAccessDeniedHandler());
// http.anonymous() 方法用于配置 AnonymousAuthenticationFilter
// 可在此处执行配置是否启用匿名、设置匿名用户名、授予匿名用户权限等操作
http.anonymous()
// 禁用匿名登录
.key("anonymous");
// http.formLogin() 方法用于配置 UsernamePasswordAuthenticationFilter
// 可在此处执行配置登录路径、跳转路径、登陆参数、设置登录成功/失败策略等操作
http.formLogin()
// 配置登录请求路径
.loginPage("/login")
// 自定义登录成功处理器
.successHandler(authenticationSuccessHandler())
// 自定义登录失败处理器
.failureHandler(authenticationFailureHandler())
// 修改登录参数名
.usernameParameter("username").passwordParameter("pass")
// 配置登录成功默认跳转路径
.defaultSuccessUrl("/dashboard")
// 配置登录失败跳转路径
.failureForwardUrl("/error");
// 自定义Jwt过滤器,并插入过滤器链中
JwtAuthenticationFilter jwtFilter = new JwtAuthenticationFilter(authenticationManagerBean());
http.addFilterAfter(jwtFilter, UsernamePasswordAuthenticationFilter.class);
// http.cors()用于跨域配置
http.cors().configurationSource(corsConfigurationSource()).and().csrf().disable();
}
// 配置 AuthenticationManager
@Override
protected void configure(AuthenticationManagerBuilder auth) throws Exception {
auth.authenticationProvider(jwtAuthenticationProvider())
.authenticationProvider(defaultDaoAuthenticationProvider());
}
// 跨域配置
@Bean
public CorsConfigurationSource corsConfigurationSource() {
CorsConfiguration corsConfiguration = new CorsConfiguration().applyPermitDefaultValues();
corsConfiguration.addAllowedOriginPattern("*");
corsConfiguration.addAllowedMethod("*");
corsConfiguration.addAllowedHeader("*");
corsConfiguration.setAllowCredentials(true);
UrlBasedCorsConfigurationSource configSource = new UrlBasedCorsConfigurationSource();
configSource.registerCorsConfiguration("/**", corsConfiguration);
return configSource;
}
// 令牌校验失败(即登录失败)处理器
@Bean
public DefaultAuthenticationFailureHandler authenticationFailureHandler() {
return new DefaultAuthenticationFailureHandler();
}
// 令牌校验成功(即登录成功)处理器
@Bean
public DefaultAuthenticationSuccessHandler authenticationSuccessHandler() {
return new DefaultAuthenticationSuccessHandler();
}
// 注销处理器
@Bean
public DefaultLogoutHandler logoutHandler() {
return new DefaultLogoutHandler();
}
// 定制处理Jwt令牌的 AuthenticationProvider
@Bean
public JwtAuthenticationProvider jwtAuthenticationProvider() {
return new JwtAuthenticationProvider();
}
// 扩展 DaoAuthenticationProvider
@Bean
public DefaultDaoAuthenticationProvider defaultDaoAuthenticationProvider() {
DefaultDaoAuthenticationProvider provider = new DefaultDaoAuthenticationProvider();
provider.setUserDetailsService(licenceService()); // 配置自定义 UserDetailsService 组件
provider.setPasswordEncoder(new DefaultPasswordEncoder()); // 配置自定义加密器
return provider;
}
// 定制化 UserDetailsService
@Bean
public UserDetailsService licenceService() {
return new LicenceService();
}
}从上面的例子可以看出,ss 配置的主要工作是对各个过滤器及组件的定制。如果你对ss框架的常用过滤器及相关组件的原理有一定了解,配置就很简单,因为绝大多数配置名和过滤器类中定义的成员变量非常相似。
下面讲述一下配置需要注意的地方:
1) WebSecurity.ignoring 设置的路径不会走 ss 过滤器链,HttpSecurity中设置的路径都会交由ss 过滤器链处理。因此,虽然 WebSecurity.ignoring 和 HttpSecurity...permitAll 配置的效果都是对请求放行,但内在机制截然不同。
2) 路径匹配设置应遵循从特殊到通用的规则排列。ss在匹配路径时先遍历到的路径有更高的优先级,因此,无论是将资源URL写死在配置类中,还是从yaml中读取,亦或是通过数据库查询,都要注意顺序不能错。例如:/device/config/** 和 /device/config/update,后者就应当配置在靠前的位置。
3) 如果不需要将 AuthenticationManager 暴露在Spring环境中,只需要像上例一样重写configure(AuthenticationManagerBuilder auth) 方法即可;如果有spring注入的需求,则按官方推荐的方式配置:
 @Bean(name name="myAuthenticationManager")
 @Override
 public AuthenticationManager authenticationManagerBean() throws Exception {
     return super.authenticationManagerBean();
 }
注:通过 HttpSecurity.authenticationManager() 去配置 AuthenticationManager 是可行的,但应谨慎使用,这个方法未采用官方默认生成方式——即通过 AuthenticationManagerBuilder 创建管理器,而是直接指定,此时如果再通过 authenticationManagerBean() 方法为其它过滤器手动设置AuthenticationManager (传递的其实是一个封装了默认Builder的代理对象),就可能出现多个过滤器最终引入的 AuthenticationManager 不相同的现象,这可能并非你的本意。
4) 想要配置多条过滤器链,只需再创建一些继承 WebSecurityConfigurerAdapter 的配置类即可,但这些配置类须添加 @Order 注解去指定优先级(最多只允许1个配置类不添加注解,该类将采用默认配置即 Order 值为100),这是因为多个配置类的Order值不能相同。
2. SecurityFilterChain 配置 [5.7.0 - 6.0.0)
ss 5.7.0 之后的版本废弃了WebSecurityConfigurerAdapter 配置类,改用配置SecurityFilterChain 的方式,部分组件的配置方式也随之变化(如UserDetailService、AuthenticationManager ),这种方式看起来更清晰了一些。
本节以 ss 5.7.11 版本为基础环境讲解配置的要点
下图是新版本配置的例子:
public class WebSecurityConfig {
// ss全局配置, 即配置FilterChainProxy
// 可在此处实行配置过滤忽略路径、自定义防火墙(HttpFirewall)等操作
@Bean
public WebSecurityCustomizer webSecurityCustomizer() {
return (web) -> {
// 替换 HttpFirewall 实现
web.httpFirewall(new DefaultHttpFirewall());
// 配置不经过ss滤器链处理的请求路径
web.ignoring().antMatchers("/favicon.ico", "/webjars/**", "/v2/**", "/**/*.css", "/**/*.js", "/imgs/**");
};
}
// 配置过滤器链
// 可在此处完成各个过滤器及其内置组件、配置项的具体内容
@Bean
public SecurityFilterChain securityFilterChain(HttpSecurity http) throws Exception {
// http.authorizeRequests() 方法用于配置 FilterSecurityInterceptor 及 FilterInvocationSecurityMetadataSource 组件
// 可在此处执行配置资源匹配方式、配置请求所需权限、自定义访问决策管理器(AccessDecisionManager)等操作
http.authorizeRequests()
// 配置自定义访问决策管理器(一致性策略)
// .accessDecisionManager(new DefaultUnanimousBased())
// 允许通过请求
.antMatchers("/*.html", "/**/*.html", "/upload-image/**", "/public/**", "/system/get", "/login").permitAll()
// 允许匿名访问请求
.antMatchers("/swagger-ui.html").anonymous()
.antMatchers("/swagger-resources/**").anonymous()
.antMatchers("/webjars/**").anonymous()
.antMatchers("/*/api-docs").anonymous()
.antMatchers("/favicon.ico").anonymous()
.antMatchers(HttpMethod.OPTIONS, "/**").anonymous()
// 其余请求均需通过验证
.anyRequest().authenticated();
// 直接手动设置authenticationManager
http.authenticationManager(authenticationManager());
// http.sessionManagement() 方法用于配置 ConcurrentSessionFilter、SessionManagementFilter 及 SecurityContextRepository 组件
// 可在此处执行配置session创建、过期、校验策略、设置session最大并发、是否允许url重写等操作
http.sessionManagement()
// 针对Session Fixation攻击采用变动会话标识的策略
.sessionFixation().changeSessionId()
// 重定向时不允许将HttpSessionID重写到Url中
.enableSessionUrlRewriting(false)
// 设置HttpSession创建策略
.sessionCreationPolicy(SessionCreationPolicy.IF_REQUIRED);
// http.logout() 方法用于配置 LogoutFilter
// 可在此处执行配置注销路径、配置注销成功/失败处理策略等操作
http.logout()
// 配置自定义注销行为处理器
.addLogoutHandler(logoutHandler())
// 配置自定义注销成功处理器
.logoutSuccessHandler(new DefaultLogoutSuccessHandler())
// 配置注销请求路径
.logoutUrl("/logout");
// http.logout() 方法用于配置 ExceptionTranslationFilter
// 可在此处执行配置令牌校验异常处理器、拒绝访问处理器等操作
http.exceptionHandling()
// 配置自定义令牌校验异常处理器
.authenticationEntryPoint(new DefaultAuthenticationEntryPoint())
// 配置自定义拒绝访问异常处理器
.accessDeniedHandler(new DefaultAccessDeniedHandler());
// http.anonymous() 方法用于配置 AnonymousAuthenticationFilter
// 可在此处执行配置是否启用匿名、设置匿名用户名、授予匿名用户权限等操作
http.anonymous()
// 禁用匿名登录
.key("anonymous");
// http.formLogin() 方法用于配置 UsernamePasswordAuthenticationFilter
// 可在此处执行配置登录路径、跳转路径、登陆参数、设置登录成功/失败策略等操作
http.formLogin()
// 配置登录请求路径
.loginPage("/login")
// 自定义登录成功处理器
.successHandler(authenticationSuccessHandler())
// 自定义登录失败处理器
.failureHandler(authenticationFailureHandler())
// 修改登录参数名
.usernameParameter("username").passwordParameter("pass")
// 配置登录成功默认跳转路径
.defaultSuccessUrl("/dashboard")
// 配置登录失败跳转路径
.failureForwardUrl("/error");
// 自定义Jwt过滤器,并插入过滤器链中
JwtAuthenticationFilter jwtFilter = new JwtAuthenticationFilter(authenticationManager());
http.addFilterAfter(jwtFilter, UsernamePasswordAuthenticationFilter.class);
// http.cors()用于跨域配置
http.cors().configurationSource(corsConfigurationSource());
// 禁用CSRF
http.csrf().disable();
return http.build();
}
// 配置 AuthenticationManager
@Bean
public AuthenticationManager authenticationManager() throws Exception {
List<AuthenticationProvider> providerList = new ArrayList<>();
providerList.add(jwtAuthenticationProvider());
providerList.add(defaultDaoAuthenticationProvider());
return new ProviderManager(providerList);
}
// 跨域配置
@Bean
public CorsConfigurationSource corsConfigurationSource() {
CorsConfiguration corsConfiguration = new CorsConfiguration().applyPermitDefaultValues();
corsConfiguration.addAllowedOriginPattern("*");
corsConfiguration.addAllowedMethod("*");
corsConfiguration.addAllowedHeader("*");
corsConfiguration.setAllowCredentials(true);
UrlBasedCorsConfigurationSource configSource = new UrlBasedCorsConfigurationSource();
configSource.registerCorsConfiguration("/**", corsConfiguration);
return configSource;
}
// 令牌校验失败(即登录失败)处理器
@Bean
public DefaultAuthenticationFailureHandler authenticationFailureHandler() {
return new DefaultAuthenticationFailureHandler();
}
// 令牌校验成功(即登录成功)处理器
@Bean
public DefaultAuthenticationSuccessHandler authenticationSuccessHandler() {
return new DefaultAuthenticationSuccessHandler();
}
// 注销处理器
@Bean
public DefaultLogoutHandler logoutHandler() {
return new DefaultLogoutHandler();
}
// 定制 Jwt登录方式的 AuthenticationProvider
@Bean
public JwtAuthenticationProvider jwtAuthenticationProvider() {
return new JwtAuthenticationProvider();
}
// 扩展 DaoAuthenticationProvider
@Bean
public DefaultDaoAuthenticationProvider defaultDaoAuthenticationProvider() {
DefaultDaoAuthenticationProvider provider = new DefaultDaoAuthenticationProvider();
provider.setUserDetailsService(licenceService()); // 配置自定义 UserDetailsService 组件
provider.setPasswordEncoder(new DefaultPasswordEncoder()); // 配置自定义加密器
return provider;
}
// 定制化 UserDetailsService
@Bean
public UserDetailsService licenceService() {
return new LicenceService();
}
}从上例可以看出,相比5.7之前的版本,过滤器组件自身的配置方式并未改变多少,但仍需注意以下几点:
1) 例中使用 HttpSecurity.authenticationManager() 设置 AuthenticationManager,是因为仅仅声明Spring环境下的 Bean, 会导致自定义Filter 和默认Filter中的 AuthenticationManager 对象不同。另一种配置AuthenticationManager的方法是
// 暴露AuthenticationManager Bean
@Bean
public AuthenticationManager authenticationManager(AuthenticationConfiguration config) throws Exception {
    return config.getAuthenticationManager();
}

// 配置AuthenticationProvider
@Autowired
public void configureGlobal(AuthenticationManagerBuilder authenticationManager) {
    authenticationManager.authenticationProvider(jwtAuthenticationProvider());
    authenticationManager.authenticationProvider(defaultDaoAuthenticationProvider());
}
2) 5.7.0版本后,SecurityContextPersistenceFilter 被废弃,如有用到该过滤器应替换为SecurityContextHolderFilter。
3) 5.8.0版本后,HttpSecurity.authorizeRequests 及 antMatchers 方法被废弃,应分别替换为HttpSecurity.authorizeHttpRequests 和 requestMatchers 方法
http.authorizeHttpRequests().requestMatchers("/*.html", "/**/*.html", "/upload-image/**", "/public/**", "/system/get", "/login").permitAll()4) 想要配置多条过滤器链,只需配置多个 SecurityFilterChain Bean即可,并通过添加 @Order注解指定优先级。
3. SpringSecurity 6.x配置
本节不会详述 6.x 版本的配置方式。6.x 版本依赖于JDK17 以及 Springboot 3.0 环境,但从接口层面来看与 5.7+ 变动不大,新的变化有支持Lambda表达式,取消了用于链式操作的 and() 方法等等。需要升级的同学可以在第2节样例的基础上参照官方文档做一些微调。
需要了解 6.x 版本新特性的同学可访问下面的网址:
三、非 springboot 环境下配置
未使用springboot的的系统大部分都是一些老系统,ss 的版本不会很高。本章以 5.0.0.RELEASE 版本为基础环境讲解非springboot环境下如何配置。
1. 零配置方式
由于这一类的系统比较老旧,大多还是通过 WebSecurityConfigurerAdapter 的方式进行配置,且配置的接口调用和 Springboot 环境下的配置没有太大差异。本节主要介绍springSecurityFilterChain 过滤器的注册配置,不再展示 ss 框架具体的配置代码,可参看第二章第1节的内容。
如果当前Web服务引入的Servlet标准是3.0或以上(可查看maven依赖或托管服务器提供的Servlet包版本),说明系统允许通过 ServletContainerInitializer 来加载web组件(如Filter、Servlet等),Spring框架进一步提供 WebApplicationInitializer 接口为自定义扩展提供便利。下面是配置的内容:
1) 首先创建 SecurityWebApplicationInitializer 用于注册 springSecurityFilterChain 过滤器
public class SecurityWebApplicationInitializer extends AbstractSecurityWebApplicationInitializer {

}
2) 再将 ss 框架的配置类加载到系统已有的Spring容器环境中
public class WebmvcInitializer extends AbstractAnnotationConfigDispatcherServletInitializer {

    @Override
    protected Class<?>[] getRootConfigClasses() {
        // 添加ss的配置类
        return new Class<?>[] { SecurityConfig.class };
    }

}
2. Xml配置方式
Servlet3.0 以下的系统,只能通过web.xml的配置方式完成 springSecurityFilterChain 的注册,而 ss 的具体配置内容通常放在单独的xml文件中。
下面是web.xml文件的配置
<web-app xmlns:xsi="http://www.w3.org/2001/XMLSchema-instance"
	xmlns="http://java.sun.com/xml/ns/javaee" xmlns:web="http://java.sun.com/xml/ns/javaee/web-app_2_5.xsd"
	xsi:schemaLocation="http://java.sun.com/xml/ns/javaee http://java.sun.com/xml/ns/javaee/web-app_3_0.xsd"
	id="WebApp_ID" version="3.0">
	<display-name>kebin-webapps</display-name>

	<context-param>
		<param-name>contextConfigLocation</param-name>
		<param-value>classpath:META-INF/security.spring.xml</param-value>
	</context-param>
    <listener>
        <listener-class>org.springframework.web.context.ContextLoaderListener</listener-    class>
    </listener>
	<!-- 配置SpringSecurity -->
	<filter>
		<filter-name>springSecurityFilterChain</filter-name>
		<filter-class>org.springframework.web.filter.DelegatingFilterProxy</filter-class>
	</filter>
	<filter-mapping>
		<filter-name>springSecurityFilterChain</filter-name>
		<url-pattern>/*</url-pattern>
	</filter-mapping>
    ...
</web-app>
下面是 ss 框架的配置文件,本文只截取了部分内容
<?xml version="1.0" encoding="UTF-8"?>
<beans xmlns="http://www.springframework.org/schema/beans"
    xmlns:xsi="http://www.w3.org/2001/XMLSchema-instance"
    xmlns:sec="http://www.springframework.org/schema/security"
    xsi:schemaLocation="http://www.springframework.org/schema/beans http://www.springframework.org/schema/beans/spring-beans-3.2.xsd
                        http://www.springframework.org/schema/security http://www.springframework.org/schema/security/spring-security-3.2.xsd">

<bean id="springSecurityFilterChain" class="org.springframework.security.web.FilterChainProxy">
		<constructor-arg>
			<list>
				<sec:filter-chain pattern="/user/register" filters="none" />
				<sec:filter-chain pattern="/image/uploadByUrl" filters="none" />
				<sec:filter-chain pattern="/image/upload" filters="none" />
				<sec:filter-chain pattern="/product/info" filters="none" />
				<sec:filter-chain pattern="/**"
					filters="
					optionsMethodFilter,
	                concurrentSessionFilter,
	                securityContextPersistenceFilter,
	                logoutFilter,
	                authenticationProcessingFilter,
	                rememberMeFilter,
	                sessionManagementFilter,
	                exceptionTranslationFilter,
	                filterSecurityInterceptor" />
			</list>
		</constructor-arg>
	</bean>
    ...
</beans>
ss 的配置讲解到此就结束了,搭建一个默认配置的 ss 框架并不难,简单的样例配置通常运行起来不会出什么问题。真正的难点在于定制化之后的配置和调试,ss 复杂的实现往往会让调试人员头晕眼花。因此,应当先了解想要扩展的过滤器或组件的运行机制,再去尝试做一些自定义开发,这才是定制化 ss 正确的姿势。


 1259
1259

 被折叠的 条评论
为什么被折叠?
被折叠的 条评论
为什么被折叠?
 到【灌水乐园】发言


