


 本文介绍如何将Sikuli与Robot Framework集成用于自动化测试,包括安装配置、运行Sikuli脚本、升级脚本为测试库及高级用法等步骤。
Introduction
Integration Details
Step 0: Installation
Step 1: Run Sikuli Script from command line
Step 2: Upgrade Sikuli Scripts to Test Libraries
Step 3: Tips and Tricks
Summary
References
Introduction
Sikuli and Robot Framework are both freely available open source tools that provide interesting possibilities for automation testers, QA and other IT people.
Sikuli introduces new way of automated testing - test using screenshots and images, without using any internal API of objects under test. This approach (using purely images/screenshots and generating mouse and keyboard events) is more similar to manual testing activities performed by real people which have just monitor, mouse and keyboard.
Robot Framework is an excellent implementation of keyword- and data-driven approaches to test automation and besides it includes a lot of interesting features and tools, such as:
- RIDE (Robot Integrated Development Environment)
easy-to-use editor for creating and maintaining test data.
- Provides easy-to-read reports and logs in HTML format.
- Provides a simple library API for creating customized test libraries.
Integration Details
Robot Framework is written on python and provides tools for running test cases using either python or jython. Sikuli scripts are run using jython.
Taking into account all statements above, it is possible to run test cases using "jybot" tool, where keywords are implemented in Sikuli scripts. In other words, Sikuli scripts will play role of Test Libraries for Robot Framework.

Pic. 1 - Sikuli and Robot Framework Integration Architecture
The following integration how-to is splited on four main steps:
- Installation
- Run Sikuli Scripts using command line
- Upgrade Sikuli Scripts to Test Libraries
- Tips and tricks
First of all this how-to is for Windows XP SP3, although everything should work on Windows 7 also.
The following software should be installed on your test machine:
1) Java Runtime Environment (JRE 6_23) to run jython scripts.
2) Jython 2.5.1 itself.
3) Python 2.7.1 (it is required by Robot Framework exe distribution. See a note below).
4) Robot Framework 2.5.5 (exe distribution)
5) Sikuli X.
NOTE: It is actually possible to install the framework using Jython without having Python installed at all, but this requires using the source distribution. More information could be found on the Instalation wiki page.
In case you are planning to use RobotFramework2.5.5.jar instead of installing the exe distribution you only need JRE and Sikuli X because Jython is already packed in RobotFramework2.5.5.jar.
Step 1: Run Sikuli Script from command line
Lets write simple Sikuli script for testing standart Windows calculator:
| 12345678910111213141516171819202122232425262728293031323334353637383940414243444546474849505152535455565758596061626364656667686970 |
|
I assume that you made following screenshots:
- calcApp.png - screenshot of Calculator application
- btn2.png, btnC.png, ... - screenshot of corresponding buttons of the calculator
So far you should be able to run this Sikuli script from Sikuli IDE.
All what we want now is to be able to run this script from the command line without using Sikuli IDE.
Sikuli 10.2
Here you can find detailed tutorial with steps and settings required for using Sikuli 10.2 from the command line. Briefly, what we should do according to the tutorial above:
Sikuli 10.2
Here you can find detailed tutorial with steps and settings required for using Sikuli 10.2 from the command line. Briefly, what we should do according to the tutorial above:
- Copy sikuli-script.jar from Sikuli installation directory (by default "C:\Program Files\Sikuli") to the directory of your Sikuli project.
- Extract "Lib" directory from sikuli-script.jar to the directory of your Sikuli project.
- Add the following statement to the beginning of your Sikuli script:
 1 from sikuli.Sikuli import *
 2
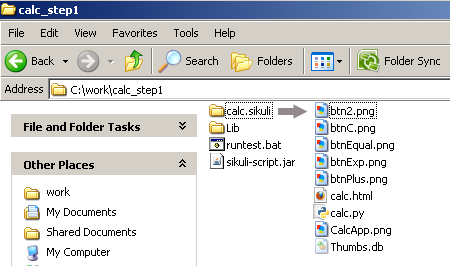
Pic. 2 - Sikuli project layout
runtest.bat file is a batch file for running your Sikuli script:
| 123 |
|
Sikuli X
- Copy libs from Sikuli installation (by default: C:\Program Files\Sikuli X\libs) to the Temp directory (C:\Documents and Settings\Local Settings\Temp\tempdir\).
- Add path to the JRE bin directory (by default: C:\Program Files\Java\jre6\bin) to the Path environment variable.
Starting from Sikuli X some Java dll-s are required by Sikuli libraries. For example: Win32Util.dll depends on jawt.dll.
That's all what you need to be able to run your Sikuli script from the command line. One more thing here (I noticed, when I was writing this How-To):
NOTE: Using Sikuli X you can skip steps 1 and 2 (coping sikuli-script.jar and Lib directory) and just run your Sikuli script using following command. You even do not need explicitly to indicate path to the Lib directory as it is automatically added to the PYTHONPATH variable.
C:\work\> java -jar "C:\Program Files\Sikuli X\sikuli-script.jar" calc.sikuli
2. Upgrade Sikuli Scripts to Test Libraries
Now we can run our Sikuli script using Java Runtime Environment. To use our script from Robot Framework it should be updated to support one of available Library APIs.
According to the Robot Framework User Guide, Library Static API:
The simplest approach is having a module (in Python) or a class (in Python or Java) with methods which map directly to keyword names. Keywords also take the same arguments as the methods implementing them. Keywords report failures with exceptions, log by writing to standard output and can return values using the return statement.
Taking into account all above our Sikuli script is already a Test Library implemented using Static API. Thus no further changes required except one line of code in order to find images/screenshots:
 3
 4 addImagePath("calc.sikuli")
 5
addImagePath() has been added since Sikuli X, for older version of Sikuli use setBundlePath() instead.
What we need now that is to write a new Test Case for Robot Framework using keywords from the Sikuli script.
| 12345678910111213141516 |
|
Lets place this test case under robot_suite directory. At this point, there are two way of using Robot Framework:
- use robotframework-2.5.5.jar without any further installation.
- install robotframework-2.5.5.exe and use jybot.bat.
For this case, Python (required by Robot Framework exe distribution) and Jython (required by jybot) should be installed.
Run test cases using robotframework.jar.
- Download robotframework-2.5.5.jar file and place it to your Sikuli project directory.
- Run test cases using robottest.bat file, that is shown below, using command:
C:\work\> robottest.bat robot_suite\verify_operations.txt
Below is the content of
robottest.bat. As you can see, this is simple run of java command with CLASSPATH parameter, that import two jar files and some extra parameters for Robot Framework: such as where to put logs and reports, log level and path to your Sikuli script added to python path.
| 1234567891011 |
|
Run test using jybot.bat.
- Install Python, Jython and Robot Framework
- Add pathes to Python/Script (jybot.bat is there) and Jython (jython.bat is there) directories to the PATH environment variable (by default "C:\Python27\Scripts;C:\jython2.5.1")
- Run test cases using jybottest.bat file, that is shown below, using command:
C:\work\> jybottest.bat robot_suite\verify_operations.txt
This is the content of
jybottest.bat. Here
JYTHONPATH variable contains path to the Lib directory under sikuli-script.jar file.
That's all what you need to be able to run test cases that consist of keywords implemented by Sikuli scripts from Robot Framework. What to use: robotframework.jar or jybot.bat to run your test cases - depends on you and requirements of the project.
| 1234567891011 |
|
3. Tips and tricks
So far we easily can edit our Sikili scripts in Sikuli IDE, edit our test cases in Robot IDE and run all that from the command line.
What is explained in this section?
- Benefits that we can achieve from Sikuli and Robot Framework Integration, particularly detailed logs, that are accompanied by screenshots.
Such logs can significantly decrease time for result analysis, to find the reasons of failures and errors in the test suite.
Here is the example of log file where Find Failed Exception raised by Sikuli is used for getting info about a source image and a region within this image was searched.
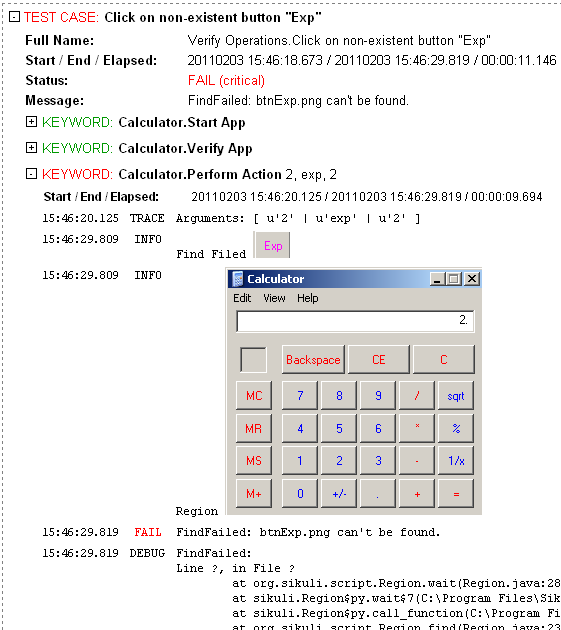
Pic. 3 - Robot Framework log file with screenshoots
Implementation of such logging features is quite simple. All what we need is
- a wrapper for the Sikuli functions and classes
- a custom Robot Logger class
Lets have a deep look at both.
Global Sikuli functions, e.g.
click(), exists(), find() that are actually methods of
Screen class are moved to the global level using a hack (manually push methods to the internal
globals dictionary, for details).
To wrap these global functions we can use similar hack. Look at code below:
 9
10 # =============================================== #
11 #          Overwritten sikuli methods             #
12 # =============================================== #
13
14 # function for calling native sikuli methods
15 def sikuli_method(name, *args, **kwargs):
16     return sys.modules['sikuli.Sikuli'].__dict__[name](*args, **kwargs)
17
18 # overwritten Screen.exists method
19 def exists(target, timeout=None):
20     addFoundImage(getFilename(target))
21     return sikuli_method('exists', target, timeout)
22
Here sikuli_method() is a way to call native Sikuli global function and exists() is an example of overwritten method.
Even easier situation is with Sikuli classes. You can extend them in natural object oriented way. What you need is just to import Sikuli class with alternative name (for example SikuliRegion), in order to use original name (for example Region) in Sikuli scripts. have a look at code below.
 3 from sikuli.Sikuli import Region as SikuliRegion

23 # =============================================== #
24 #          Overwritten sikuli classes             #
25 # =============================================== #
26
27 # overwriten Sikuli Region class
28 class Region(SikuliRegion, BaseLogger):
29
30     def click(self, target, modifiers=0):
31         try:
32             return SikuliRegion.click(self, target, modifiers)
33         except FindFailed, e:
34             self.log.html_img("Find Filed", "images/" + getFilename(target))
35             self.log.screenshot(msg="Region", region=(self.getX(), self.getY(), self.getW(), self.getH()))
36             raise e
37     def exists(self, target, timeout=None):
38         img = getFilename(target)
39         reg = (self.getX(), self.getY(), self.getW(), self.getH())
40         addFoundImage(img, reg)
41         return SikuliRegion.exists(self, target, timeout)
So far we have our overwritten Sikuli methods and as you may notice have a possibility to use them in Sikuli scripts - no changes required to our Sikuli scripts, except importing sikuliwrapper module instead of sikuli.Sikuli.
The purpose of the Sikuli wrapper module is to gather an additional info about what image is being searched and a region within it is being looked for. Such information later is used by Robot Logger.
Robot Logger
Robot Logger is an derived class from Python's standard Logger class from logging module.
What is added there is the following:
- a custom handler for printing messages in Robot Framework's style, e.g. "*INFO* Message text"
- special methods for passed and failed statuses of test cases
- methods for making screenshots of desired regions and adding them as html records to the Robot log
The whole
logger.py file can be found
here.
I tried to show how easy to work with open source test automation tools where all undocumented problems can be solved in one quick look into source code, in spite of limitation you may find with similar commerce tools.
I really like both Sikuli and Robot Framework tools, and hope this how-to describes some of their advantages, its flexibly and extendability.
I added all code mentioned here on
github. Feel free to clone and have a look at it.
I look forward to hearing from you, especially about your tips and tricks with these amazing tools.
- Sikuli and Robot Framework Integration Project on GitHub: https://github.com/imikemo/Sikuli-and-Robot-Framework-Integration
- Sikuli Project: http://sikuli.org/
- Robot Framework Project: http://code.google.com/p/robotframework/


 被折叠的 条评论
为什么被折叠?
被折叠的 条评论
为什么被折叠?
 到【灌水乐园】发言


