


 本文详细探讨了UIView的三大核心功能:显示与动画、布局管理和事件处理。指出UIView实质上是封装了CoreAnimation功能,其frame、bounds和center属性决定了视图在坐标系统中的位置和大小。此外,还介绍了UIView的层次管理,包括子视图的添加顺序、bringSubviewToFront和sendSubviewToBack方法,以及如何判断视图是否为另一视图的子视图。最后,文章讨论了UIView的交互性、自定义动画以及响应用户事件的方法。
UIView继承自UIResponder:
参考自http://blog.csdn.net/mengtnt/article/details/6716289
UIView具有三个基本的功能,画图和动画,管理内容的布局,控制事件。正是因为UIView具有这些功能,它才能担当起MVC中视图层的作用。
首先看视图最基本的功能显示和动画,其实UIView的所有的绘图和动画的接口,都是可以用CALayer和CAAnimation实现的,也就是说苹果公司是不是把CoreAnimation的功能封装到了UIView中,这个文档中没有提到过,也没法断言。但是每一个UIView都会包含一个CALayer,并且CALayer里面可以加入各种动画。
再次我们来看UIView管理布局的思想其实和CALayer也是非常的接近的。最后控制事件的功能,是因为UIView继承了UIResponder。经过上面的分析很容易就可以分解出UIView的本质。UIView就相当于一块白墙,这块白墙只是负责把加入到里面的东西显示出来而已。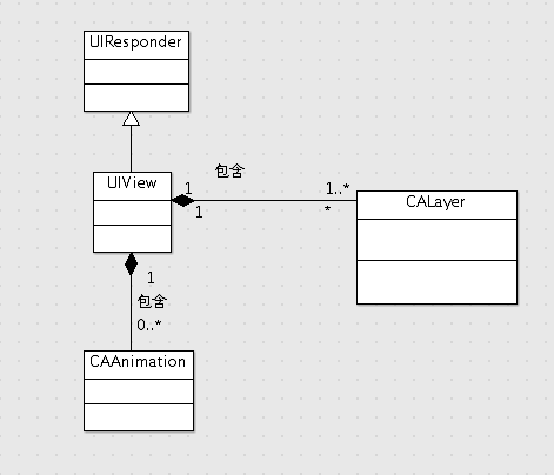
uiview的frame.center与bounds关系:
参考:
http://blog.csdn.net/muyu114/article/details/7431141
1、概要
翻开ios官方开发文档,赫然发现上面对这三个属性的解释如下:
- frame:描述当前视图在其父视图中的位置和大小。
- bounds:描述当前视图在其自身坐标系统中的位置和大小。
- center:描述当前视图的中心点在其父视图中的位置。
是不是有点迷糊?好吧,别急,让我们先说说ios的坐标系统。
2、ios坐标系统
CGRect则是结合了CGPoint和CGSize,用来表示矩形的位置和大小。它的origin表示矩形左上角所在位置(CGPoint),size表示矩形的大小(CGSize)。
3、frame、bounds和center的使用场景
一般来说,bounds属性比较少用,通常使用frame来设置视图的大小和位置,使用center来改变(移动)视图的位置(也可用frame来改变位置)。另外,对视图进行旋转、缩放也都是相对于center进行操作的。
From: http://unmi.cc/ios-bounds-frame
frame和bounds是UIView中的两个属性(property)。
frame指的是:该view在父view坐标系统中的位置和大小。(参照点是父亲的坐标系统)
bounds指的是:该view在本身坐标系统中 的位置和大小。(参照点是本身坐标系统)bounds的用处一般是在自身坐标系统中确定子View相对于自身的位置,这个值也常被用作返回值,用来对相对坐标系转换。
-(CGRect)frame{
  return CGRectMake(self.frame.origin.x,self.frame.origin.y,self.frame.size.width,self.frame.size.height);
}
-(CGRect)bounds{
  return CGRectMake(0,0,self.frame.size.width,self.frame.size.height);
}

center属性理解起来也很简单,它就是视图的中心点在其父视图坐标系中的位置坐标。简单讲,center属性就定义了当前视图在父视图中的位置。
那么bounds属性呢?它指的是视图在其自己的坐标系中的位置与尺寸。由于视图的定位一定需要针对父视图,而不是针对自己,所以bounds属性并不能够决定当前视图的位置(因为它与父视图根本无关,就谈不上定位),所以bounds属性与center属性是完全独立的,前者规定尺寸,后者定义位置。换句话说,修改bounds不影响center;修改center不影响bounds。
uiview层次感:
uiview的子视图的层次是根据uiview addsubview顺序递增的。
bringSubviewToFront:将某个子视图放到最顶层。
sendSubviewToBack:将某个视图放到最底层。
注意:所有的层次改变都会影响到其它层次的顺序,因为uiview会有一个subviews数组,用来管理被添加到这个uiview中的其他view对象。同样,删除或者添加一个元素
到这个数组中都会直接修改其他元素的下标。也就是修改其他view的层次。
isdescendantofview:判断当前视图是不是指定view的子视图。
uiview官方属性解释:
NSInteger _tag;所有的uiview都存在一个tag,用来标识当前uiview,用于区分不同的uiview。
@property(nonatomic,getter=isUserInteractionEnabled)BOOL userInteractionEnabled; // default is YES. if set to NO, user events (touch, keys) are ignored and removed from the event queue.
如果将用户交互设置为NO,将不会再接受用户事件,事件不会被这个View截断(如果不设置NO,那么就算没有定义事件处理方法,也会被截断(所有用户事件,单击,双击等))。使用情况:一个UIView处在另外一个UIView的上面(盖住了下面的UIView),如果我们想要下面的UIView接受事件,那么应该将上面的UIView的userInteractionEnabled设置为NO。
@property(nonatomic,readonly,retain) CALayer *layer; // returns view's layer. Will always return a non-nil value. view is layer's delegate
返回当前UIview的layer。可以根据这个layer生成一个新的图片。
@property(nonatomic)CGAffineTransform transform; // default is CGAffineTransformIdentity. animatable
仿射变换--返回当前的taransform
@property(nonatomic) CGFloat contentScaleFactor NS_AVAILABLE_IOS(4_0);
可参考:查看contentmode与contentScaleFactor
在iphone的retina屏幕上面,必须要设置,contentScaleFactor属性。这个属性的默认值是1。二对应的retina屏幕需要是2.
http://blog.csdn.net/zhoutao198712/article/details/8762012
@property(nonatomic,getter=isExclusiveTouch)BOOL exclusiveTouch; // default is NO
exclusiveTouch属性的正确用法。
exclusiveTouch属性顾名思义是指UIView会独占整个Touch事件。 对于多点触摸的事件来说这个属性非常重要。比如在我上一篇《UIScrollView表情选择的选实现》的DEMO其实暗藏着一个多点触摸的bug:可以多个手指选择不同的表情进行拖曳发送,这种表现明显是很诡异的。可以通过设置每个表情控件的exclusiveTouch来屏蔽掉这个“feature”。类似的场景还有很多,不赘述。不过对于exclusiveTouch属性有几个小细节需要注意:
a.exclusiveTouch的意义在于:如果当前设置了exclusiveTouch的UIView是整个触摸事件的第一响应者,那么到你所有的手指离开屏幕前其他的UIView是无法接受到整个事件周期内所有的触摸事件。而如果当前UIView设置了exclusiveTouch,却只是在一个事件周期中的某个时期被捎带触碰到,那么还是会投递相应的事件到当前这个UIView。这也就是很多人认为exclusiveTouch属性不起作用的原因。
b.手势识别会忽略exclusiveTouch设置。
- (UIView *)hitTest:(CGPoint)point withEvent:(UIEvent *)event; // recursively calls -pointInside:withEvent:. point is in the receiver's coordinate system
无论你定义什么控件,最原始也最自由的实现方式就是继承UIView,绘制自己想要的控件,但若要响应点击等事件而且自己的控件还比较异形那自然要响应touch事件。
当控件被点击时,若控件可见度(alpha值)小与0.01,则控件默认是不响应touch事件的。
当控件中有个别subview显示在控件外部(即subview的frame不在控件区域内),该subview默认也不响应touch事件,但自己偏偏又想处理怎么办? 经过测试调试阅读文档将此问题解决。
让控件复写 -(UIView *)hitTest:(CGPoint)point withEvent:(UIEvent *)event方法。 只要控件存在无论可见度是什么uikit框架会递归回调此接口。关于此方法可查看
http://blog.csdn.net/zaitianaoxiang/article/details/7554490
- (BOOL)pointInside:(CGPoint)point withEvent:(UIEvent *)event;
参考:
http://blog.sina.com.cn/s/blog_59fb90df0101ab26.html
- (CGPoint)convertPoint:(CGPoint)point toView:(UIView *)view;
- (CGPoint)convertPoint:(CGPoint)point fromView:(UIView *)view;
- (CGRect)convertRect:(CGRect)rect toView:(UIView *)view;
- (CGRect)convertRect:(CGRect)rect fromView:(UIView *)view;
通过这四个方法,可以得到某个point或者rect相对于处于某个指定的UIView的坐标位置。
@property(nonatomic)BOOL autoresizesSubviews;// default is YES. if set, subviews are adjusted according to their autoresizingMask if self.bounds changes
父视图设置。
@property(nonatomic)UIViewAutoresizing autoresizingMask; // simple resize. default is UIViewAutoresizingNone
子视图设置随父视图改变而改变的规则。
如:UIViewAutoresizingFlexibleWidth代表当前视图随着父视图宽度变化而响应变化。
调整子视图随父视图大小改变而对应改变
- (CGSize)sizeThatFits:(CGSize)size; // return 'best' size to fit given size. does not actually resize view. Default is return existing view size
默认的实现返回当前view本身大小, 子类重写这个方法用来返回特定视图的大小。举个例子,UISwitch返回一个修正过的大小,UIImageView返回图片的大小 这个方法并没有改变接收者的大小
- (void)sizeToFit; // calls sizeThatFits: with current view bounds and changes bounds size.
这个方法使用sizeThatFits: 方法来决定大小。子类需要重写sizeThatFits:用来计算正确的尺寸大小。默认的实现不做任何事情。
- (void)didAddSubview:(UIView *)subview;
- (void)willRemoveSubview:(UIView *)subview;
子类通过覆写这个方法,在某个子View被添加或者移除的时刻做一些事情。这个方法被addSubview调用
- (void)willMoveToSuperview:(UIView *)newSuperview;
- (void)didMoveToSuperview;
- (void)willMoveToWindow:(UIWindow *)newWindow;
- (void)didMoveToWindow;
同样,子类通过覆写这些方法,决定当前View状态改变的时刻的附加操作。
- (void)setNeedsLayout;
setNeedsLayout方法将主动(异步执行)调用layoutSubView来实现view中subView的重新布局。但是不会对图文进行操作。系统对这个方法进行了优化,如果这个view当前并没有显示的话,就不会进行layoutSubviews操作,而如果直接调用layoutSubviews,就会做这种无用功。
- (void)layoutIfNeeded;
- (void)layoutSubviews;
当用户旋转设备的时候,会调用layoutSubviews方法,我们只需重写 这个方法,然后判断用户屏幕的方向,在调整每个空间的位置即可。
- (void)setNeedsDisplay;
刷新当前View,同理,在合理的情况下调用系统的drawRect进行刷新。
- (void)setNeedsDisplayInRect:(CGRect)rect;
刷新某快区域,会调用系统的drawRect方法。
参考:http://hi.baidu.com/bunsman/item/4c191def8215abf2e1a5d4c2
---------------
@property(nonatomic) BOOL clearsContextBeforeDrawing;// default is YES. ignored for opaque views. for non-opaque views causes the active CGContext in drawRect: to be pre-filled with transparent pixels
- 正常情况下,在view请求 drawRect: 之前都会清除current context buffer,来更新相同区域.如果在滚动的时候,反复的清除,很浪费时间,这样的话就把view的clearsContextBeforeDrawing 设置成NO。
uiview自带动画:
// no getters. if called outside animation block, these setters have no effect.
+ (void)setAnimationDelegate:(id)delegate; // default = nil
+ (void)setAnimationWillStartSelector:(SEL)selector; // default = NULL. -animationWillStart:(NSString *)animationID context:(void *)context
+ (void)setAnimationDidStopSelector:(SEL)selector; // default = NULL. -animationDidStop:(NSString *)animationID finished:(NSNumber *)finished context:(void *)context
如果我们为动画设置了,setAnimationWillStartSel
那么当动画开始或者停止的时候,动画的animationID参数和context参数,会传递给setAnimationWillStartSel
+ (void)setAnimationCurve:(UIViewAnimationCurve)curve; // default = UIViewAnimationCurveEaseInOut
设置动画块中的动画属性变化的曲线。
动画曲线是动画运行过程中相对的速度。如果在动画块外调用这个方法将会无效。
+ (void)setAnimationRepeatCount:(float)repeatCount; // default = 0.0. May be fractional
+ (void)setAnimationRepeatAutoreverses:(BOOL)repeatAutoreverses; // default = NO. used if repeat count is non-zero
设置动画多次执行
+ (void)setAnimationBeginsFromCurrentState:(BOOL)fromCurrentState; // default = NO. If YES, the current view position is always used for new animations -- allowing animations to "pile up" on each other. Otherwise, the last end state is used for the animation (the default).
设置动画从当前状态开始播放。如果设置为YES那么当动画在运行过程中,当前视图的位置将会作为新的动画的开始状态。如果设置为NO,当前动画结束前新动画将使用视图最後状态的位置作为开始状态。这个方法将不会做任何事情如果动画没有运行或者没有在动画块外调用。
+ (void)setAnimationTransition:(UIViewAnimationTransition)transition forView:(UIView *)view cache:(BOOL)cache; // current limitation - only one per begin/commit block
如果你想要在转变过程中改变视图的外貌。举个例子,文件从一个视图到另一个视图,然後使用一个UIView子类的容器视图
uiview块动画:
推介使用块动画取代上面的动画。
+ (void)animateWithDuration:(NSTimeInterval)duration delay:(NSTimeInterval)delay options:(UIViewAnimationOptions)options animations:(void (^)(void))animations completion:(void (^)(BOOL finished))completionNS_AVAILABLE_IOS(4_0);
+ (void)animateWithDuration:(NSTimeInterval)duration animations:(void (^)(void))animations completion:(void (^)(BOOL finished))completionNS_AVAILABLE_IOS(4_0);// delay = 0.0, options = 0
+ (void)animateWithDuration:(NSTimeInterval)duration animations:(void (^)(void))animationsNS_AVAILABLE_IOS(4_0);// delay = 0.0, options = 0, completion = NULL
+ (void)transitionWithView:(UIView *)view duration:(NSTimeInterval)duration options:(UIViewAnimationOptions)options animations:(void (^)(void))animations completion:(void (^)(BOOL finished))completionNS_AVAILABLE_IOS(4_0);
+ (void)transitionFromView:(UIView *)fromView toView:(UIView *)toView duration:(NSTimeInterval)duration options:(UIViewAnimationOptions)options completion:(void (^)(BOOL finished))completionNS_AVAILABLE_IOS(4_0);// toView added to fromView.superview, fromView removed from its superview


 1564
1564

 被折叠的 条评论
为什么被折叠?
被折叠的 条评论
为什么被折叠?
 到【灌水乐园】发言


