


继续解析UIImage:
1:构造函数:
+ (UIImage *)imageNamed:(NSString *)name;
+ (UIImage *)imageWithContentsOfFile:(NSString *)path;
关于这两个的区别请参考:
http://www.cnblogs.com/pengyingh/articles/2355033.html
使用的区别,下面的初始化必须使用绝对路径,也就是要用【NSBundle mainBundle】的PathForResource方法转换。
而上面的虽然使用简单,但是会消耗内存(如果图片被经常使用,这种方式也是一种好处)。
--------------------------
+ (UIImage *)imageWithData:(NSData *)data scale:(CGFloat)scaleNS_AVAILABLE_IOS(6_0);使用NSdata初始化并改变比例
------------
这些构造函数都是不能得到网络图片的,只能获得本地图片。
2:方法:
@property(nonatomic,readonly) CGImageRef CGImage;
@property(nonatomic,readonly) CIImage *CIImage
获取对应cgImage或ciimage。底层只会是其中一种,另外的方法返回nil;
@property(nonatomic,readonly) NSArray *images
这个属性只对animated image有效,非动画其值为nil;
@property(nonatomic,readonly) NSTimeInterval duration
同上============
UIimage中的draw方法:
这些方法,只有在UIview的drawRect方法中使用,将image绘制到这个UIview之中。
- (void)drawAtPoint:(CGPoint)point; // mode = kCGBlendModeNormal, alpha = 1.0
将图片绘制到某个点
- (void)drawAtPoint:(CGPoint)point blendMode:(CGBlendMode)blendMode alpha:(CGFloat)alpha;
- (void)drawInRect:(CGRect)rect; // mode = kCGBlendModeNormal, alpha = 1.0
- (void)drawInRect:(CGRect)rect blendMode:(CGBlendMode)blendMode alpha:(CGFloat)alpha;
关于CgBlendMode:
用来设置图片在draw的时刻的色彩效果,类似于滤镜效果:
如:设置为
kCGBlendModeLuminosity

还有其他效果,自己去尝试。

- (void)drawAsPatternInRect:(CGRect)rect;// draws the image as a CGPattern
这个方法类似于截取图片的某一部分显示。
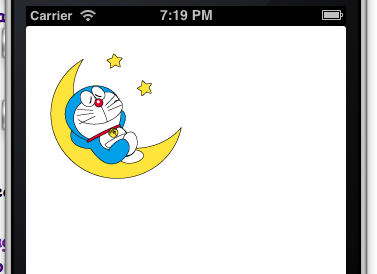
设置Cgrect为
(0,0,100,100)以后:
可以看出:只会绘制图片的长和宽小于100的区域。
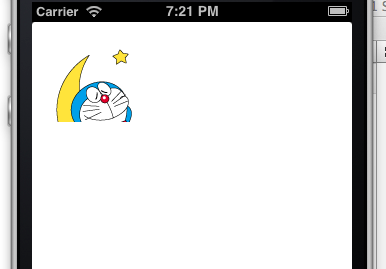
如果设置为
(50,50,100,100),则效果为:
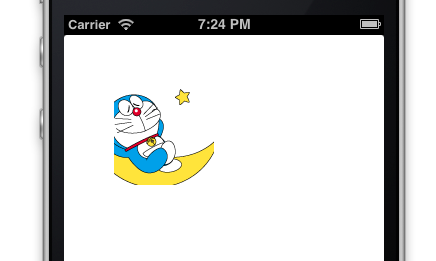
当我们设置为
(150,50,100,100)时:图片效果为:
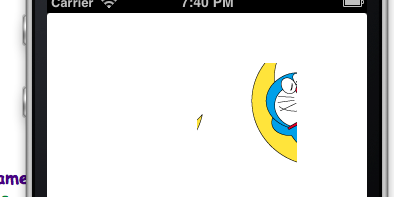
结论:
我们可以得出,使用这个方法的时刻,图片会被平铺到整个屏幕上面,设置CGrect只能决定想要显示的区域,不管如何修改,图片都是从左上角开始平铺的。
这个方法一般用来做背景,就像网页中一样,通过平铺一个小图片就可以不必要再使用大的背景图片。
参考:http://www.cnblogs.com/syxchina/archive/2012/10/14/2723630.html
附加:
- (UIImage *)imageWithAlignmentRectInsets:(UIEdgeInsets)alignmentInsets
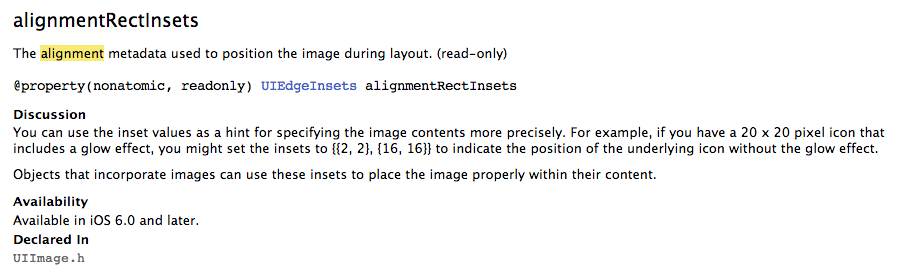
官方解释:
大致意思为:某个图片可能包含某种效果,如发光。其真实内容就不应该是整个图片,而是除去发光部分的内容,这里定义一个矩形区域来划分出真正内容所在区域。
官方UIIMage部分的文档:
http://pan.baidu.com/s/11Rlen


 2260
2260

 被折叠的 条评论
为什么被折叠?
被折叠的 条评论
为什么被折叠?
 到【灌水乐园】发言


