1.安装
(1)从maven repository中下载autoconfig-1.2.tgz和autoexpand-1.2.tgz
-
http://repo1.maven.org/maven2/com/alibaba/citrus/tool/antx-autoconfig/1.2/antx-autoconfig-1.2.tgz
-
http://repo1.maven.org/maven2/com/alibaba/citrus/tool/antx-autoexpand/1.2/antx-autoexpand-1.2.tgz
实际上就是将解压出来的文件复制到system32文件夹下(windows)
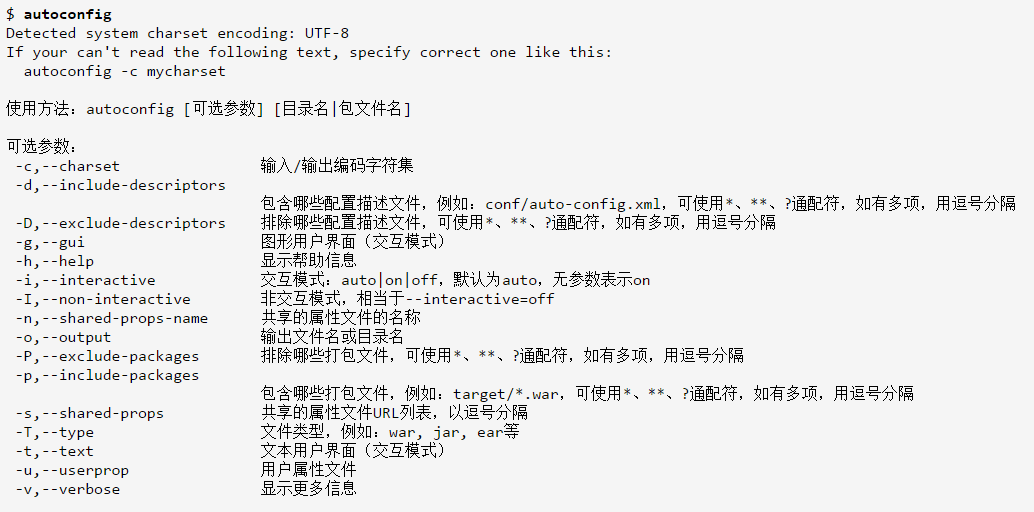
(3)在命令行中执行autoconfig命令,如果出现下图则说明安装成功
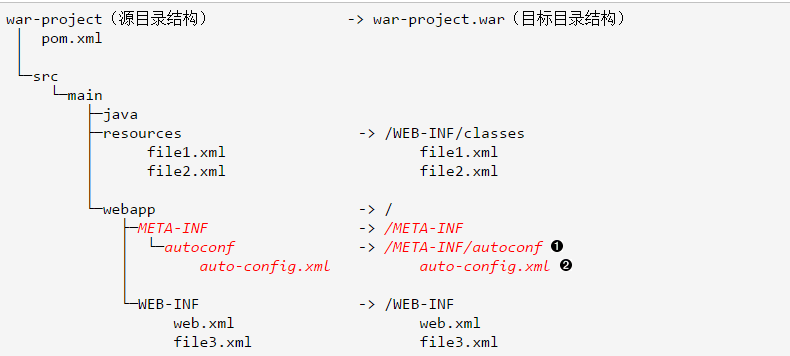
2.目录写法
(1)war包的目录结构(maven项目)
(2)jar包的目录结构(maven项目)
3.auto-config.xml文件
(1)作用
实际上就是模板文件和实际参数文件之间的桥梁,模板文件中存储placeholder,实际参数文件中存储实际环境参数
(2)组成1)properties定义
指定properties的名称、描述、默认值、约束条件等信息
2)指定包含placeholders的模板文件
指定使用哪个模板,并且指定生成的文件的位置
(3)实例
<?xml version="1.0" encoding="UTF-8"?>
<config>
    <group name="test">

        <property name="petstore.work"
                    description="应用程序的工作目录" />

        <property name="petstore.loggingRoot"
                    defaultValue="${petstore.work}/logs"
                    description="日志文件目录" />

        <property name="petstore.upload"
                    defaultValue="${petstore.work}/upload"
                    description="上传文件的目录" />

        <property name="petstore.loggingLevel"
                    defaultValue="warn"
                    description="日志文件级别">

            <validator name="choice"
                         choice="trace, debug, info, warn, error" />

        </property>

    </group>
    <script>
        <generate template="config.properties.vm"  destfile="biz/config.properties" charset="UTF-8"/>
        <generate template="WEB-INF/common/resources.xml" />
    </script>
</config>
(4)定义property
1)定义
<property
    name="..."
    [defaultValue="..."]
    [description="..."]
    [required="true|false"]
>
    <validator name="..." />
    <validator name="..." />
    ...
</property>
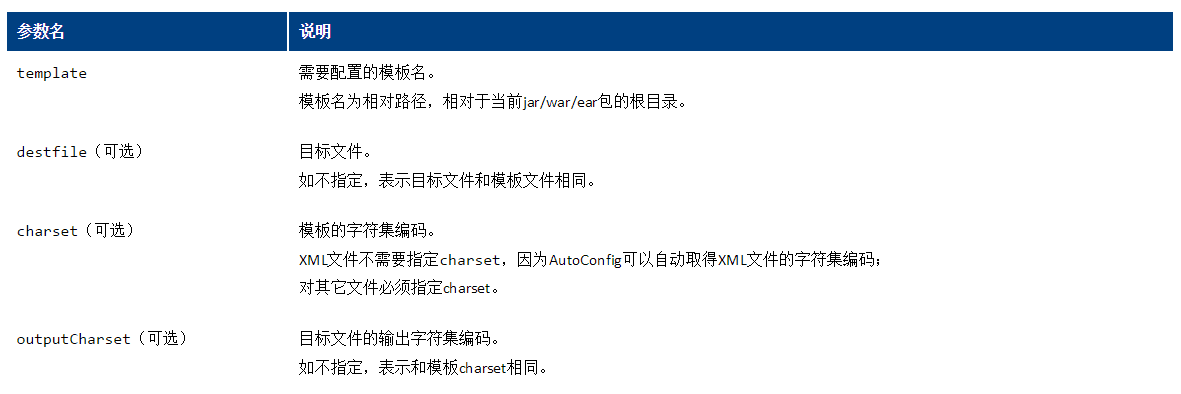
2)可用的参数
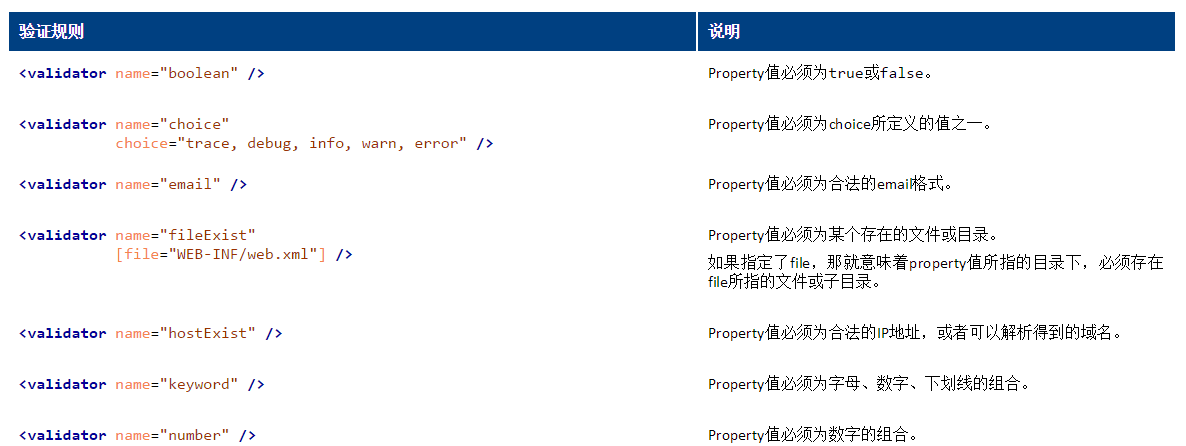
3)property的验证规则
(4)生成配置文件的指令
auto-config.xml中,每个<generate>标签指定了一个包含placeholders的配置文件模板
1)格式
<generate
    template="..."
    [destfile="..."]
    [charset="..."]
    [outputCharset="..."]
>
4.模板文件
(1)作用
实模板文件中存储placeholder,等待填充实际参数
(2)位置一般在auto-config.xml所在目录下(也可以在包的根目录中)
(3)写法
1)希望被替换的地方配置成placeholder:"${property.name}"
2)不希望被替换的地方改为“${D}{...}”
(4)实例
################## basic config ################
alibaba.intl.s2s.tddl.appname=${alibaba_intl_s2s_tddl_appname}
alibaba.intl.s2s.idservice.version=${alibaba_intl_s2s_idservice_version}
alibaba.intl.s2s.jingwei.taskname=${alibaba_intl_s2s_jingwei_taskname}
5.实际参数存储文件
现在定义placeholder的auto-config.xml,含有placeholder的模板xx.properties.vm也有了,只差定义数据了
(1)位置
1)当前工作目录的antx.properties文件2)${user.home}/antx.properties文件
(2)写法
和properties文件完全相同,例如net.kiminotes.value = hello, world
6.在pom.xml中配置maven autoconfig插件
整个pom如下
<project xmlns="http://maven.apache.org/POM/4.0.0" xmlns:xsi="http://www.w3.org/2001/XMLSchema-instance"
  xsi:schemaLocation="http://maven.apache.org/POM/4.0.0 http://maven.apache.org/maven-v4_0_0.xsd">
  <modelVersion>4.0.0</modelVersion>
  <groupId>com.mycompany.app</groupId>
  <artifactId>testAutoConfig</artifactId>
  <packaging>jar</packaging>
  <version>1.0-SNAPSHOT</version>
  <name>testAutoConfig</name>
  <url>http://maven.apache.org</url>


  <build>
      <plugins>
        <plugin>
            <groupId>com.alibaba.citrus.tool</groupId>
            <artifactId>maven-autoconfig-plugin</artifactId>
            <version>1.0.9</version>
            <executions>
                <!-- 配置在package phase中运行maven-autoconfig-plugin的autoconfig goal -->
                <execution>
                   <id>config</id>
                   <goals>
                      <goal>autoconfig</goal>
                   </goals>
                   <phase>package</phase>
                </execution>
            </executions>
        </plugin>
        <plugin>
            <artifactId>maven-jar-plugin</artifactId>
            <configuration>
               <archive>
                  <!-- 打出的jar包中的 MANIFEST.MF 文件中增加 Main-Class 这一项配置,这样就能在命令行中通过 java -jar 来执行打出的jar包 -->
                  <manifestEntries>
                      <Main-Class>com.mycompany.app.Main</Main-Class>
                  </manifestEntries>
               </archive>
           </configuration>
        </plugin>
        <plugin>
             <groupId>org.apache.maven.plugins</groupId>
             <artifactId>maven-compiler-plugin</artifactId>
             <version>2.3.2</version>
             <configuration>
                 <target>1.6</target>
                 <source>1.6</source>
             </configuration>
        </plugin>
      </plugins>
  </build>

  <dependencies>
    <dependency>
      <groupId>junit</groupId>
      <artifactId>junit</artifactId>
      <version>3.8.1</version>
      <scope>test</scope>
    </dependency>
  </dependencies>
</project>
7.使用实例
(1)创建auto-config.xml文件
<?xml version="1.0" encoding="UTF-8"?>
<config>
    <group>
        <property name="net.kiminotes.value" />
    </group>

    <script>
        <generate template="config.properties.vm" destfile="config.properties" charset="utf-8" />
    </script>
</config> key = ${net_kiminotes_value} 如前配置
(4)编写测试类
com.mycompany.app.Main
package com.mycompany.app;

import java.io.IOException;
import java.io.InputStream;
import java.util.Properties;

public class Main
{
    public static void main( String[] args ) throws IOException
    {
    	 InputStream is = Main.class.getClassLoader().getResourceAsStream( "config.properties" );
         if ( is == null )
         {
             System.err.println( "Can not load config resource config.properties in classpath" );
         }
         else
         {
             Properties prop = new Properties();
             prop.load( is );
             is.close();
             for( String key : prop.stringPropertyNames() )
             {
                 String value = prop.getProperty( key );
                 if ( value != null )
                 {
                     System.out.printf( "%s = %s %n", key, value );
                 }
             }
         }
    }
}
(5)项目打包
mvn clean package -DskipTests
(6)执行编写的jar
java -jar target/testAutoConfig-1.0-SNAPSHOT.jar
结果为:key = hello,world
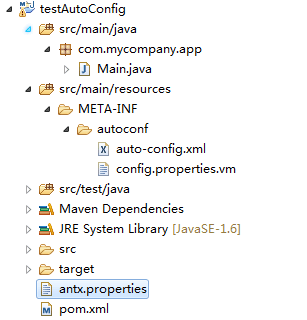
(7)附项目目录







 807
807

 被折叠的 条评论
为什么被折叠?


