


? 一点网络基础
-
应用层:http/ftp等协议所在层
-
传输层:TCP/UDP链接所在层
-
网络层:主要是IP地址所在层
? http协议进化史
- http/0.9:
- 只有一个命令Get
- 没有Header等描述数据的信息
- 服务器发送完毕,就关闭TCP链接
ps: 一个TCP链接可以包含多个http请求,在http请求发送之前需要建立TCP链接,也就是三次握手
- http/1.0
- 增加了很多命令,如post,set等
- 增加了status code和header
- 增加了多字符集支持,多部分发送,权限,缓存等
- http/1.1 (Current)
- 持久链接
- pipeline
- 增加了host和其他一些命令,host可以让我们方便的访问一台服务器上不同的服务资源
- Http2
- 所有数据以二进制传输,1.x中大部分是字符串传输
- 同一个链接里面发送的多个请求不再需要按照顺序来处理,让请求可以并行执行
- 头信息压缩以及推送等提高效率的功能
主要是对http1.x中的功能进行优化并提高请求效率
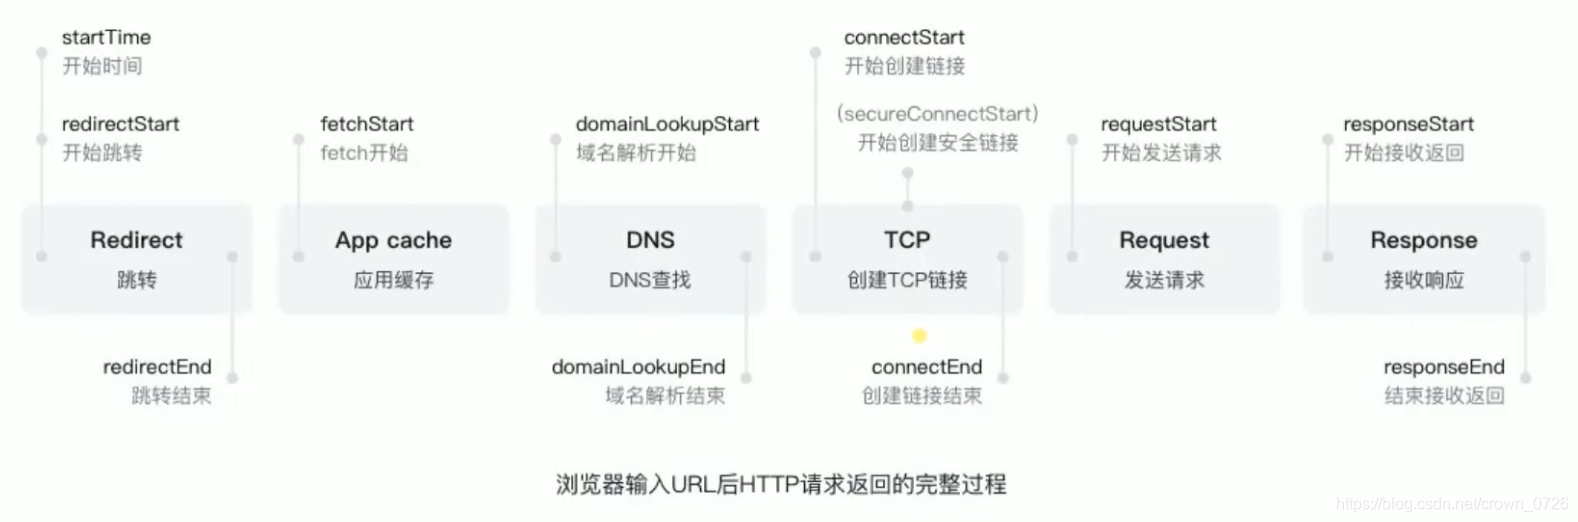
? 深入TCP每个节点过程
? http三次握手
          ---------    1. SYN=1, Seq=x       ---------->
Client    <-------- 2. SYN=1, ACK=x+1, Seq=y ----------      Server
          ---------    3. ACK=y+1, Seq=z     ---------->
? URI URL URN
- UIR:Uniform Resource Identifier
- 用来标识互联网上的信息资源
- 包括URL和URN
- URN:永久资源统一定位符
- 在资源移动位置之后还能够找到
- 目前还没有成熟的解决方案
- URL:Uniform Resource Locator
可以用user:pwd的方式对请求地址进行认证,不安全,不推荐。
www.baidu.com, mail.baidu.com 其实已经是二级域名,baidu.com才是一级域名。
#hash是用来部分获取资源的信息的,为了解决文件过大的问题,但目前一般用来做锚点使用。
? HTTP报文格式
request和response一半包含三部分:request line,header和body。
Request example
GET /home/xman/data/tipspluslist?indextype=manht HTTP/1.1
Host: www.baidu.com
Connection: keep-alive
Accept: text/plain, */*; q=0.01
X-Requested-With: XMLHttpRequest
User-Agent: Mozilla/5.0 (Macintosh; Intel Mac OS X 10_13_6) AppleWebKit/537.36 (KHTML, like Gecko) Chrome/67.0.3396.99 Safari/537.36
Referer: https://www.baidu.com/
Accept-Encoding: gzip, deflate, br
Accept-Language: en-US,en;q=0.9,zh-CN;q=0.8,zh;q=0.7
Cookie: BIDUPSID=6065AEB76A82DED2796B2EEBA442F1BE; PSTM=1516926306; BD_UPN=123253; sug=3; ORIGIN=0; bdime=0; MCITY=-282%3A; BAIDUID=EADD12721AC63FB4E7EDFA4594473556:FG=1; BDUSS=03MTZseGY2aFdvQXExOXYtR0F6N1Z6YU9sYzlpaWxlVGtEc3ZwZVFSMXQ3b2xiQVFBQUFBJCQAAAAAAAAAAAEAAAAqeTAYY3Jvd25fMDcyNgAAAAAAAAAAAAAAAAAAAAAAAAAAAAAAAAAAAAAAAAAAAAAAAAAAAAAAAAAAAAAAAAAAAAAAAG1hYlttYWJbSW; ispeed_lsm=0; BDORZ=B490B5EBF6F3CD402E515D22BCDA1598; BD_CK_SAM=1; PSINO=2; cflag=15%3A3; BD_HOME=1; BDRCVFR[feWj1Vr5u3D]=I67x6TjHwwYf0; delPer=1; H_PS_PSSID=1462_21093_26350_26922_22157; sugstore=0
Response example
HTTP/1.1 200 OK
Cache-Control: private
Connection: Keep-Alive
Content-Encoding: gzip
Content-Type: text/html;charset=utf-8
Date: Sun, 19 Aug 2018 02:45:24 GMT
Expires: Sun, 19 Aug 2018 02:45:24 GMT
Server: BWS/1.0
Tracecode: 27242056710740693770081910
Vary: Accept-Encoding
Content-Length: 78
以上两个examples是request和response信息,两个文件中第一行分别是request line,剩下的都是header信息。body就是一些用户自定义的传输信息了。
**PS:**request line和header的分隔是换行,header和body的分隔是空行。
? Status code
- 100 - 199: 操作持续进行
- 200 - 299: 成功
- 300 - 399: 页面重定向
- 400 - 499: 用户请求有问题,401为认证错误,403是没有权限,404page not found
- 500 - 599: 服务器内部有错误,503是服务器在维护
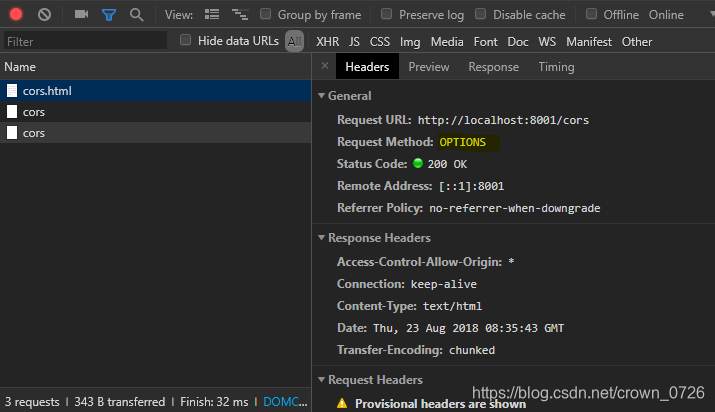
? CORS跨域请求
注意,不管有没有'Access-Control-Allow-Origin' : '*',浏览器都会发送请求,并且内容也返回了。因此,跨越完全是浏览器的行为,用其他请求工具就不存在跨域问题了。
Jsonp做了什么解封跨域,因为浏览器允许
<script>,<link>标签的跨域,因此jsonp的原理就是将跨域代码挂载到这些标签上执行。
在地址栏的直接请求不存在跨域问题。
在console调试工具写的代码不存在跨域问题。
<!DOCTYPE html>
<html lang="en">

<head>
    <meta charset="UTF-8">
    <meta name="viewport" content="width=device-width, initial-scale=1.0">
    <meta http-equiv="X-UA-Compatible" content="ie=edge">
    <title>Document</title>
    <script>
        var xhr = new XMLHttpRequest();
        xhr.open('GET', 'http://localhost:8001/cors');
        xhr.send();
    </script>
</head>
<body>
</body>
</html>
let http = require('http');


http.createServer(function (request, response) {
    console.log(request.url);
    if (request.url === "/cors") {
        response.writeHeader(200, {
            'Content-Type': 'text/plain',
            'Access-Control-Allow-Origin': "*"
        });

        response.end("123");
    }

}).listen(8001);

console.log('server is listening');
PS: *其实,在浏览器进行请求的时候,请求已经发发出去了,并且也返回了正确的数据,但是浏览器认为这个请求是不合法的,因此会有一条预请求出现,合法请求主要有以下几类,对于此类不合法请求的解决办法attach在代码中。参考下面与请求:
- 1.允许的方法 GET HEAD POST, 其他的方法等都不被允许
- 2.允许的form表单提交数据格式
text/plain
mutipart/form-data
application/x-www-form-urlencoding
- 3.请求头限制,比如自定义请求头是不被允许的。
请求头限制参考网址:https://fetch.spec.whatwg.org/#cors-safelisted-request-header
- 4.其他限制,不常用
XMLHttpRequestUpload对象均没有注册任何事件监听器
请求中没有使用ReadableStream对象
Example below
<!DOCTYPE html>
<html lang="en">

<head>
    <meta charset="UTF-8">
    <meta name="viewport" content="width=device-width, initial-scale=1.0">
    <meta http-equiv="X-UA-Compatible" content="ie=edge">
    <title>Document</title>
    <script>
        var xhr = new XMLHttpRequest();
        xhr.open('GET', 'http://localhost:8001/cors');
        xhr.send();


        fetch('http://localhost:8001/cors', {
            method: 'POST',
            headers: {
                'X-Test-Cors': 123
            }
        });
    </script>
</head>
<body>
</body>
</html>

> Failed to load http://localhost:8001/cors: Request header field X-Test-Cors is not allowed by Access-Control-Allow-Headers in preflight response.
let http = require('http');

// Use the response setting below to inform browser to widen limition of 'Access-Control-Allow-Origin'
http.createServer(function (request, response) {
    console.log(request.url);
    if (request.url === "/cors") {
        response.writeHeader(200, {
            'Content-Type': 'text/plain',
            'Access-Control-Allow-Origin': "*",
            'Access-Control-Allow-Origin': 'X-Test-Cors',
            'Access-Control-Allow-Methods': 'POST, PUT, Delete',
            'Access-Control-Max-Age': '1000', // The effect timefram to the about setting
        });

        response.end("123");
    }

}).listen(8001);

console.log('server is listening');
? Cache-Control
public: 所有的节点,包括代理服务器可以进行缓存。
private: 只有浏览器才可以缓存。
no-cache: 可以缓存,但是每次要去服务器验证可不可以使用缓存来决定是否使用。
max-age=<seconds>: 用于告诉浏览器缓存的时间
s-maxage=<secnds>: 专门用于代理服务器,浏览器则依然用max-age
max-stale: 发起请求一方主动带的头,当缓存即便缓存过期,也使用缓存
must-revalidate: 当内容过期,必须去源头验证
proxy-revalidate: 用在代理服务器,当缓存过期,必须去源头请求缓存。
以上两个不常用
no-store: 浏览器和代理服务器都彻底不可以缓存。
no-transform: 一些代理服务器可能会将缓存进行压缩等操作以优化处理,这个告诉代理服务器不要做任何操作。
常用的: public, private, no-cache, max-age, must-revalidate.
? no-cache/no-store in detail
no-cache 是每次要去服务器验证可不可以用缓存再决定要不要使用,而no-store是完全不缓存。
no-cache 主要配合If-Modified-Since/Last-Modified(Mainly recoed time)或If-None-Match/Etag(use hash or other method, also known as digital signature)使用,前者是Request,后者是Response。
当客户端请求的时候,服务器会通过
Last-Modified/Etag设置客户端的If-Modified-Since/If-None-Match属性,当浏览器再次请求的时候,会带着If-Modified-Since/If-None-Match这两个属性去服务端验证时候重新拿取资源,也就是我们常见的304请求。
let http = require('http');

http.createServer(function (request, response) {
    console.log(request.url);
    if (request.url === "/script.js") {
        // lower case to get key "If-None-Match"
        const etag = request.headers['if-none-match'];
        console.log(etag);

        if (etag === "666") {
            response.writeHeader(304, { // 304 no-modified
                'Content-Type': 'text/javascript',
                'Cache-Control': 'max-age=2000000, no-cache',
                'Last-Modified': '123',
                'Etag': '666'
            });

            response.end("");
        } else {
            response.writeHeader(200, {
                'Content-Type': 'text/javascript',
                'Cache-Control': 'max-age=2000000, no-cache',
                'Last-Modified': '123',
                'Etag': '666'
            });

            response.end("console.log('Hello')");

            /**
             *  Request            /      Response
             *  If-None-Match      /      Etag
             *  If-Modified-Since  /      Last-Modified
             */
        }
    }

}).listen(8001);

console.log('server is listening');
? cookie / session
属性如下(key-value pair):
max-age/expires: 设置过期时间,如果不设置,在默认浏览器关闭就清空。
secure 只在https的时候发送
HttpOnly 无法通过document.cookie访问
domain=test.com 可以通过这个设置同域中下的二级域的cookie访问限制,注意,不同域肯定是不能访问的。
Node example is as below:
let http = require('http');

http.createServer(function (request, response) {
console.log(request.url);
response.writeHeader(200, {
'Content-Type': 'text/html', // text/plain
// 'Set-Cookie': ['id=123;max-age=2','abc=456; HttpOnly']
'Set-Cookie': ['iddddddd=123;max-age=200000', 'abc=456; HttpOnly']
});
response.end("<h2>success</h2>");
}).listen(8001);
? 长连接 Connection
长连接TCP链接创建后可以保持让http进行请求复用,http/1.1在一个长连接中是串行的(2.0是并行的,信道复用)。chrome一般一次可以创建6个并发长连接。默认连接是Connection: keep-alive
可以通过下面代码设置为端连接,即用完直接关闭,不去复用。现在都是合理利用长连接的,因此不用设置。
response.writeHeader(200, {
    'Content-Type': 'text/javascript',
    'Connection': 'close',
});
? 数据协商
PS: 数据协商指的是当用户端进行请求的时候会通过一些header信息告诉服务器其想要获得数据的方式和可接受内容格式等,并且当服务器返回的时候会告知客户端其多返回的数据格式以及通知客户端用什么方式进行数据解析。
下面是一个请求客户端所带的请求头信息,一般客户端都会自己设置好,不用显示声明。
User-Agent: Mozilla/5.0 (Windows NT 10.0; Win64; x64) AppleWebKit/537.36 (KHTML, like Gecko) Chrome/68.0.3440.106 Safari/537.36
Accept: text/html,application/xhtml+xml,application/xml;q=0.9,image/webp,image/apng,*/*;q=0.8
// q指的是权重
Accept-Encoding: gzip, deflate, br
Accept-Language: en-US,en;q=0.9,zh-CN;q=0.8,zh;q=0.7
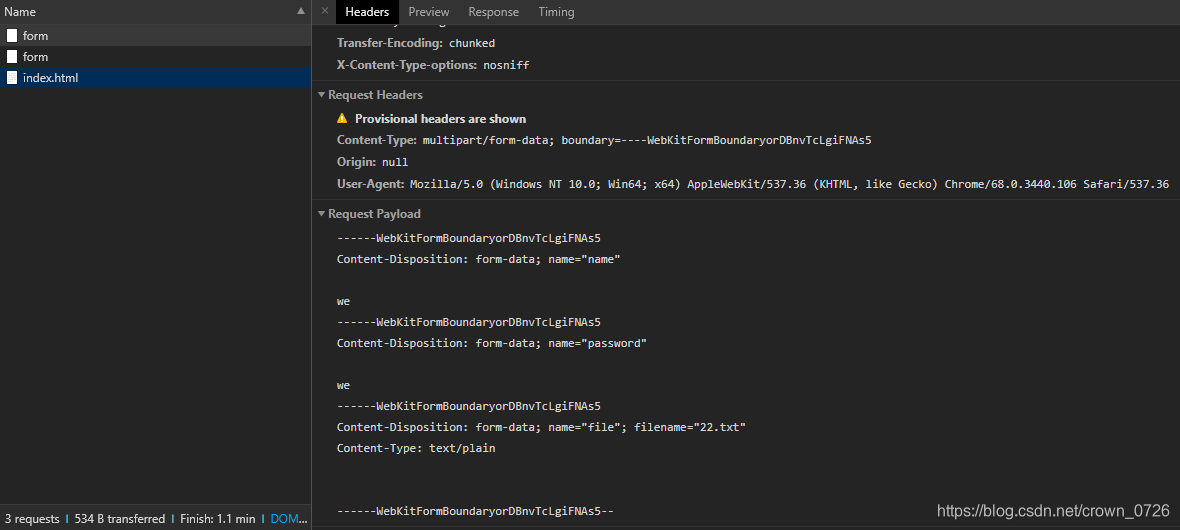
同理,reponse也会向浏览器返回数据类型,编码等信息。下面例子同时实现了form表单提交数据的唯一的三种格式,想要提交json等现代格式需要用ajax请求进行。
<!DOCTYPE html>
<html lang="en">

<head>
    <meta charset="UTF-8">
    <meta name="viewport" content="width=device-width, initial-scale=1.0">
    <meta http-equiv="X-UA-Compatible" content="ie=edge">
    <title>Document</title>
</head>

<body>
    <!--
        application/x-www-form-urlencoded    // abc=123&de=789
        multipart/form-data                  // comprised of many parts
        text/plain
    -->
    <form id="form" method="POST" enctype="application/x-www-form-urlencoded">
        <input type="text" name="name">
        <input type="text" name="password">
        <input type="file" name="file">
        <input type="submit" name="submit">
    </form>

    <script>
        var form = document.getElementById('form');
        form.addEventListener('submit', function (e) {
            e.preventDefault()

            var formData = new FormData(form);
            fetch('http:localhost:8001/form', {
                method: "POST",
                body: formData
            })
        });
    </script>
</body>
</html>
let http = require('http');
let zlib = require('zlib');


http.createServer(function (request, response) {
    console.log(request.url);

    response.writeHeader(200, {
        'Access-Control-Allow-Origin': '*',
        'Content-Type': 'text/html',
        // When browser can't judge the return type, it will gudge them with itself in the "old browser". This will prohibit this behave for the sake of security.
        'X-Content-Type-options': 'nosniff',
        'Content-Encoding': 'gzip'
    });

    response.end(zlib.gzipSync("<h2>success</h2>"));
}).listen(8001);

console.log('server is listening');
The shape of multipart/form-data
? Rediect
当一个链接移动位置之后,这时候则会使用页面重定向,也就是302,可以参考下面代码的实现。
let http = require('http');

http.createServer(function (request, response) {
    console.log(request.url);
    if (request.url === "/old") {
        response.writeHeader(302, {
            'Location': '/new'
        });

        response.end("");
    }

    console.log(request.url);
    if (request.url === "/new") {
        response.writeHeader(200, {
            'Content-Type': 'text/plain',
        });

        response.end("123");
    }

}).listen(8001);

console.log('server is listening');
PS:可以将状态码改为301,表示页面永久重定向,在用户第一次请求的时候,浏览器会尽可能的缓存跳转数据,将链接永久重定向,除非主动清除缓存操作来终止行为。因此慎用。
? csp (Content-Security-Policy)
- 限制资源获取
- 报告资源获取越权
这个头的作用主要是服务器通知浏览器哪些资源允许使用或不允许使用,必须不允许执行<script><.script>里面的内容,或是不允许src进行资源请求等。其方式主要有两种,全局限制和特定资源类型限制。
全局限制使用default-src,特定资源类型限制主要包括connect-src, manifest-src, img-src, font-src, frame-src, media-src, style-src, script-src...。
let http = require('http');
let fs = require('fs');

// Use the response setting below to inform browser to widen limition of 'Access-Control-Allow-Origin'
http.createServer(function (request, response) {
    console.log(request.url);
    if (request.url === "/csp") {
        const html = fs.readFileSync('csp.html', 'utf8');
        response.writeHeader(200, {
            'Content-Type': 'text/html',
            // 'Content-Security-Policy': "default-src http: https:", // This will block all http and https accesses.
            // 'Content-Security-Policy': "default-src 'self'", // This will bock all execution regarding inline script
            'Content-Security-Policy': 'default-src \'self\'; img-src *; media-src media1.com media2.com; script-src userscripts.example.com; report-uri /report'
            // A web site administrator wants to allow users of a web application to include images from any origin in their own content, but to restrict audio or video media to trusted providers, and all scripts only to a specific server that hosts trusted code.
            // report-uri /report, This will inform browser report the inappropriate use of resource when violation happens.
        });

        response.end(html);
    }

}).listen(8001);

console.log('server is listening');
<!DOCTYPE html>
<html lang="en">

<head>
    <meta charset="UTF-8">
    <meta name="viewport" content="width=device-width, initial-scale=1.0">
    <meta http-equiv="X-UA-Compatible" content="ie=edge">
    <title>Document</title>
    <!-- <script>
        var xhr = new XMLHttpRequest();
        xhr.open('GET', 'http://localhost:8001');
        xhr.send();

    </script> -->
    <script>
        console.log(123);
    </script>
</head>

<body>
    <div>csp</div>
</body>

</html>
BTW, 这个字段头同样可以用在meta标签中:
Alternatively, the element can be used to configure a policy, for example:
See exhaustive info from website “https://developer.mozilla.org/en-US/docs/Web/HTTP/CSP”
? nginx 的使用
ngnix不同于其他服务,其是一个单纯的http服务器,一般作为代理服务器,负载均衡,缓存代理等使用。
# include self config to main config files.
include  test.conf;
# Set cache, param1: cache folder name; param2: Allow subfolder in cache folder; param3:
proxy_cache_path cache levels=1:2 keys_zone=my_cache:10m;

server {
    listen       808;
    server_name  test.com;

    location / {
		# Use cache
		proxy_cache my_cache;
        proxy_pass http://127.0.0.1:8888;
        proxy_set_header Host $host;
    }
}
<!DOCTYPE html>
<html lang="en">

<head>
    <meta charset="UTF-8">
    <meta name="viewport" content="width=device-width, initial-scale=1.0">
    <meta http-equiv="X-UA-Compatible" content="ie=edge">
    <title>Document</title>
    <script>
        console.log(123);

        fetch("/data", {
            method: 'POST',
            headers: {
                'X-Test-Cache': 'changableFlag' // We can change the value of X-Test-Cache to let browser don't use cache.
            }
        });
    </script>
</head>

<body>
    <div>csp</div>
</body>
</html>
let http = require('http');
let fs = require('fs');

// Use the response setting below to inform browser to widen limition of 'Access-Control-Allow-Origin'
http.createServer(function (request, response) {
    console.log(request.url);
    if (request.url === "/") {
        const html = fs.readFileSync('nginx.html', 'utf8');
        response.writeHeader(200, {
            'Content-Type': 'text/html',
        });

        response.end(html);
    }

    if (request.url === "/data") {
        response.writeHeader(200, {
            'Content-Type': 'text/plain',
            // 可以在这里设置各种cache-control的策略来控制缓存了。
            'Cache-Control': 'no-cache',
            // Vary的意思是,当客户端第二次请求的时候,客户端发送过来的X-Test-Cache的值和服务器端一样的时候才会使用缓存。
            'Vary': 'X-Test-Cache'
        });

        response.end("success");
    }

}).listen(8888);

console.log('server is listening');
? https
其使用私钥和公钥来保证传输的安全性。中间进行传输的数据都是加密后的数据,无法被破解的。具体的流程如下图所示。
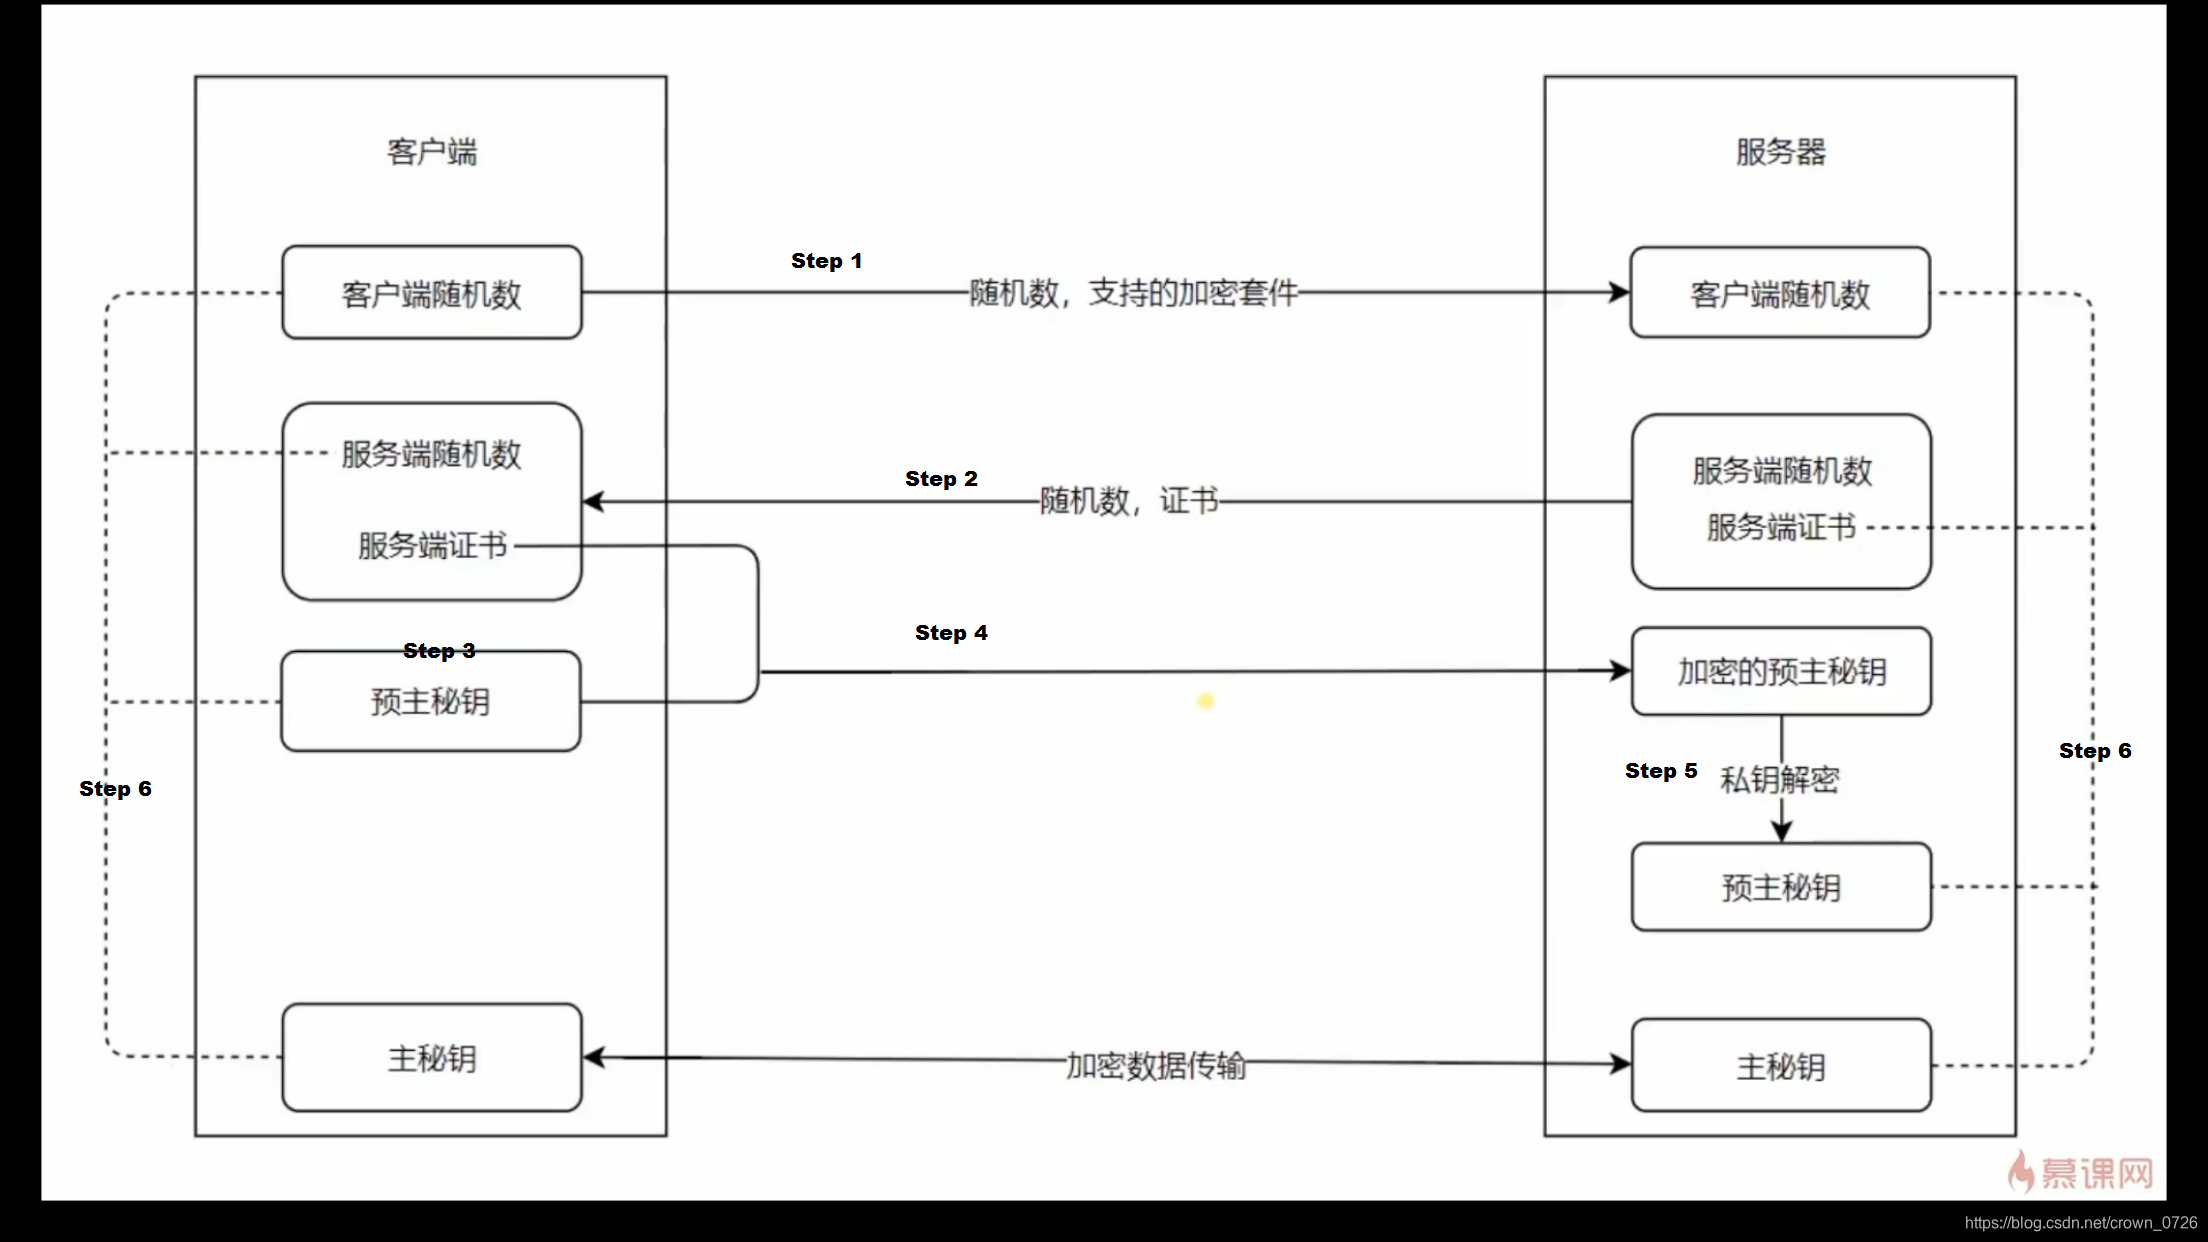
Step 1. 客户端将生成的随机数和支持的加密套件发给服务端,服务端存储这个随机数。
Step 2. 服务器将端生成的随机数和公钥(证书)发送给客户端,客户端存储这个随机数。
Step 3. 客户端生成预主密钥(其实也是随机数)。
Step 4. 客户端用服务端发送过来的公钥加密预主密钥并发给服务端。
Step 5. 服务端用自己的私钥解密得到预主密钥。
Step 6. 客户端和服务端一起用各自的三个随机数生成主密钥。
- config nginx https server
proxy_cache_path cache levels=1:2 keys_zone=my_cache:10m;

server {
    listen       80 default_server;
	listen       [::]:80 default_server;
    server_name  test.com;
	return 302 http://$server_name$request_uri;
}

server {
    listen       443;
    server_name  test.com;

	# Be sure you have generate the below 2 .pem files via openssl command.
	ssl on;
	ssl_certificate_key ../cert/localhost-privkey.pem;
	ssl_certificate ../cert/localhost-cert.pem;

    location / {
		proxy_cache my_cache;
        proxy_pass http://127.0.0.1:8888;
        proxy_set_header Host $host;
    }
}
? http2的一些知识
主要改进主要有信道复用,分帧传输,server push等改进。
- 信道复用:http1.1中,在一个链接中,必须一个请求全部完成才可以发第二个请求,不能进行并行发送。
- 分帧传输:这个可以将请求数据分为多部分进行传输,在客户端/服务器拿到所有的分片数据之后进行组装使用,从而可以使得多个请求在一个TCP链接上发送,也可以说这一点让信道复用得以实现,从而提高传输效率。
- server push:这种服务器推送服务,可以使得服务器主动向客户端推送图片等文件,从而提高数据传输效率。


 5万+
5万+


 被折叠的 条评论
为什么被折叠?
被折叠的 条评论
为什么被折叠?
 到【灌水乐园】发言


