


说明
-
Harbor 概述
Harbor是由VMWare公司开源的容器镜像仓库。事实上,Harbor是在Docker Registry上进行了相应的企业级扩展, 从而获得了更加广泛的应用,这些新的企业级特性包括:管理用户界面,基于角色的访问控制 ,AD/LDAP集成以及 审计日志等,足以满足基本企业需求。 -
官方:
https://goharbor.io/ -
Github:
https://github.com/goharbor/harbor -
使用端口是 :
80 -
就不对原理做更多说明了,直接开干。
harbor配置及使用
配置文件修改
说明
-
harbor使用的是80端口,但我们需要配置使其能正常访问容器所属主机【修改方法和registry一样的】
-
下面两种方式二选一,不能两种都配!!!
容器所属主机和所有需要使用到该容器仓库的主机都需要做该操作
方式1
- 先查看下 docker 的启动脚本
下面的Loaded内容就是路径了
[root@ccx ~]# systemctl status docker
● docker.service - Docker Application Container Engine
   Loaded: loaded (/usr/lib/systemd/system/docker.service; enabled; vendor preset: disabled)
   Active: active (running) since Mon 2021-06-21 09:05:53 CST; 3h 41min ago
     Docs: http://docs.docker.com
- vim打开这个启动脚本
这里面有一个service,下面有一个ExecStart选项,后面就是默认启动的路径了,我们可以通过/usr/bin/dockerd-current --help查看全部默认选项,可以自行设置
# 如下,我删了多余内容,只展示下面2行了
# 只是说明这个默认路径是可以自定义配置的,比如修改Runtime
# 那么下面行就成这样了:
# ExecStart=/usr/bin/dockerd-current --default-runtime kata \
[Service]
ExecStart=/usr/bin/dockerd-current \
- 新增内容:
--insecure-registry 192.168.159.129【默认80端口可忽略,所以直接ip即可】
新增方式如下:
[root@ccx ~]# cat /usr/lib/systemd/system/docker.service | egrep -A 2 ExecStart
ExecStart=/usr/bin/dockerd-current \
          --insecure-registry 192.168.159.129 \
          --add-runtime docker-runc=/usr/libexec/docker/docker-runc-current \
[root@ccx ~]#
- 修改完毕以后重启docker服务
[root@ccx ~]# systemctl daemon-reload ; systemctl restart docker
[root@ccx ~]#
方式2
- 在配置文件:
/etc/docker/daemon.json中添加一行:"insecure-registries": ["192.168.26.22"]【ip换成你容器所属主机ip,80默认端口可不写】,如果你配置了第一行的加速器,需要在最后面加个,,如果没配置加速器,直接就加这一行内容即可。
[root@ccx ~]# cat /etc/docker/daemon.json
{
  "registry-mirrors": ["https://iacg4xqt.mirror.aliyuncs.com"],
  "insecure-registries": ["192.168.26.22"]
}
[root@ccx ~]#
- 然后重启docker服务
[root@ccx ~]# systemctl restart docker
[root@ccx ~]#
docker-compose服务安装
安装命令:yum -y install docker-compose
全部流程如下
[root@ccx ~]# yum -y install docker-compose
Loaded plugins: fastestmirror, langpacks, product-id, search-disabled-repos, subscription-manager

This system is not registered with an entitlement server. You can use subscription-manager to register.

Loading mirror speeds from cached hostfile
Resolving Dependencies
--> Running transaction check
---> Package docker-compose.noarch 0:1.18.0-4.el7 will be installed
--> Processing Dependency: python(abi) = 3.6 for package: docker-compose-1.18.0-4.el7.noarch
--> Processing Dependency: python36-cached_property >= 1.2.0 for package: docker-compose-1.18.0-4.el7.noarch
--> Processing Dependency: python36-docker >= 2.6.1 for package: docker-compose-1.18.0-4.el7.noarch
--> Processing Dependency: python36-dockerpty >= 0.4.1 for package: docker-compose-1.18.0-4.el7.noarch
--> Processing Dependency: python36-docopt >= 0.6.1 for package: docker-compose-1.18.0-4.el7.noarch
--> Processing Dependency: python36-jsonschema >= 2.5.1 for package: docker-compose-1.18.0-4.el7.noarch
--> Processing Dependency: python36-pysocks >= 1.5.6 for package: docker-compose-1.18.0-4.el7.noarch
--> Processing Dependency: python36-requests >= 2.6.1 for package: docker-compose-1.18.0-4.el7.noarch
--> Processing Dependency: python36-six >= 1.3.0 for package: docker-compose-1.18.0-4.el7.noarch
--> Processing Dependency: python36-texttable >= 0.9.0 for package: docker-compose-1.18.0-4.el7.noarch
--> Processing Dependency: python36-websocket-client >= 0.32.0 for package: docker-compose-1.18.0-4.el7.noarch
--> Processing Dependency: python36-yaml >= 3.10 for package: docker-compose-1.18.0-4.el7.noarch
--> Processing Dependency: /usr/bin/python3.6 for package: docker-compose-1.18.0-4.el7.noarch
--> Processing Dependency: python36-setuptools for package: docker-compose-1.18.0-4.el7.noarch
--> Running transaction check
---> Package python3.x86_64 0:3.6.8-18.el7 will be installed
--> Processing Dependency: python3-libs(x86-64) = 3.6.8-18.el7 for package: python3-3.6.8-18.el7.x86_64
--> Processing Dependency: python3-pip for package: python3-3.6.8-18.el7.x86_64
--> Processing Dependency: libpython3.6m.so.1.0()(64bit) for package: python3-3.6.8-18.el7.x86_64
---> Package python3-setuptools.noarch 0:39.2.0-10.el7 will be installed
---> Package python36-PyYAML.x86_64 0:3.13-1.el7 will be installed
---> Package python36-cached_property.noarch 0:1.5.1-2.el7 will be installed
---> Package python36-docker.noarch 0:2.6.1-3.el7 will be installed
--> Processing Dependency: python36-docker-pycreds >= 0.2.1 for package: python36-docker-2.6.1-3.el7.noarch
---> Package python36-dockerpty.noarch 0:0.4.1-18.el7 will be installed
---> Package python36-docopt.noarch 0:0.6.2-8.el7 will be installed
---> Package python36-jsonschema.noarch 0:2.5.1-4.el7 will be installed
---> Package python36-pysocks.noarch 0:1.6.8-7.el7 will be installed
---> Package python36-requests.noarch 0:2.14.2-2.el7 will be installed
--> Processing Dependency: python36-chardet for package: python36-requests-2.14.2-2.el7.noarch
--> Processing Dependency: python36-idna for package: python36-requests-2.14.2-2.el7.noarch
--> Processing Dependency: python36-urllib3 for package: python36-requests-2.14.2-2.el7.noarch
---> Package python36-six.noarch 0:1.14.0-3.el7 will be installed
---> Package python36-texttable.noarch 0:1.6.2-1.el7 will be installed
---> Package python36-websocket-client.noarch 0:0.47.0-2.el7 will be installed
--> Running transaction check
---> Package python3-libs.x86_64 0:3.6.8-18.el7 will be installed
---> Package python3-pip.noarch 0:9.0.3-8.el7 will be installed
---> Package python36-chardet.noarch 0:3.0.4-1.el7 will be installed
---> Package python36-docker-pycreds.noarch 0:0.2.1-2.el7 will be installed
---> Package python36-idna.noarch 0:2.10-1.el7 will be installed
---> Package python36-urllib3.noarch 0:1.25.6-2.el7 will be installed
--> Finished Dependency Resolution

Dependencies Resolved

===================================================================================================
 Package                            Arch            Version                 Repository        Size
===================================================================================================
Installing:
 docker-compose                     noarch          1.18.0-4.el7            epel             222 k
Installing for dependencies:
 python3                            x86_64          3.6.8-18.el7            updates           70 k
 python3-libs                       x86_64          3.6.8-18.el7            updates          6.9 M
 python3-pip                        noarch          9.0.3-8.el7             base             1.6 M
 python3-setuptools                 noarch          39.2.0-10.el7           base             629 k
 python36-PyYAML                    x86_64          3.13-1.el7              epel             149 k
 python36-cached_property           noarch          1.5.1-2.el7             epel              18 k
 python36-chardet                   noarch          3.0.4-1.el7             epel             190 k
 python36-docker                    noarch          2.6.1-3.el7             epel             180 k
 python36-docker-pycreds            noarch          0.2.1-2.el7             epel              15 k
 python36-dockerpty                 noarch          0.4.1-18.el7            epel              30 k
 python36-docopt                    noarch          0.6.2-8.el7             epel              29 k
 python36-idna                      noarch          2.10-1.el7              epel              99 k
 python36-jsonschema                noarch          2.5.1-4.el7             epel              76 k
 python36-pysocks                   noarch          1.6.8-7.el7             epel              30 k
 python36-requests                  noarch          2.14.2-2.el7            epel             112 k
 python36-six                       noarch          1.14.0-3.el7            epel              34 k
 python36-texttable                 noarch          1.6.2-1.el7             epel              23 k
 python36-urllib3                   noarch          1.25.6-2.el7            epel             178 k
 python36-websocket-client          noarch          0.47.0-2.el7            epel              59 k

Transaction Summary
===================================================================================================
Install  1 Package (+19 Dependent packages)

Total download size: 11 M
Installed size: 55 M
Downloading packages:
(1/20): docker-compose-1.18.0-4.el7.noarch.rpm                              | 222 kB  00:00:00
(2/20): python3-3.6.8-18.el7.x86_64.rpm                                     |  70 kB  00:00:00
(3/20): python36-cached_property-1.5.1-2.el7.noarch.rpm                     |  18 kB  00:00:00
(4/20): python36-PyYAML-3.13-1.el7.x86_64.rpm                               | 149 kB  00:00:00
(5/20): python36-chardet-3.0.4-1.el7.noarch.rpm                             | 190 kB  00:00:00
(6/20): python3-setuptools-39.2.0-10.el7.noarch.rpm                         | 629 kB  00:00:01
(7/20): python36-docker-pycreds-0.2.1-2.el7.noarch.rpm                      |  15 kB  00:00:00
(8/20): python36-docker-2.6.1-3.el7.noarch.rpm                              | 180 kB  00:00:00
(9/20): python36-dockerpty-0.4.1-18.el7.noarch.rpm                          |  30 kB  00:00:00
(10/20): python36-docopt-0.6.2-8.el7.noarch.rpm                             |  29 kB  00:00:00
(11/20): python36-idna-2.10-1.el7.noarch.rpm                                |  99 kB  00:00:00
(12/20): python36-pysocks-1.6.8-7.el7.noarch.rpm                            |  30 kB  00:00:00
(13/20): python36-jsonschema-2.5.1-4.el7.noarch.rpm                         |  76 kB  00:00:00
(14/20): python3-pip-9.0.3-8.el7.noarch.rpm                                 | 1.6 MB  00:00:02
(15/20): python36-requests-2.14.2-2.el7.noarch.rpm                          | 112 kB  00:00:00
(16/20): python36-texttable-1.6.2-1.el7.noarch.rpm                          |  23 kB  00:00:00
(17/20): python36-six-1.14.0-3.el7.noarch.rpm                               |  34 kB  00:00:00
(18/20): python36-websocket-client-0.47.0-2.el7.noarch.rpm                  |  59 kB  00:00:00
(19/20): python36-urllib3-1.25.6-2.el7.noarch.rpm                           | 178 kB  00:00:00
(20/20): python3-libs-3.6.8-18.el7.x86_64.rpm                               | 6.9 MB  00:00:05
---------------------------------------------------------------------------------------------------
Total                                                              2.0 MB/s |  11 MB  00:00:05
Running transaction check
Running transaction test
Transaction test succeeded
Running transaction
  Installing : python3-libs-3.6.8-18.el7.x86_64                                               1/20
  Installing : python3-pip-9.0.3-8.el7.noarch                                                 2/20
  Installing : python3-3.6.8-18.el7.x86_64                                                    3/20
  Installing : python3-setuptools-39.2.0-10.el7.noarch                                        4/20
  Installing : python36-six-1.14.0-3.el7.noarch                                               5/20
  Installing : python36-websocket-client-0.47.0-2.el7.noarch                                  6/20
  Installing : python36-pysocks-1.6.8-7.el7.noarch                                            7/20
  Installing : python36-urllib3-1.25.6-2.el7.noarch                                           8/20
  Installing : python36-dockerpty-0.4.1-18.el7.noarch                                         9/20
  Installing : python36-docker-pycreds-0.2.1-2.el7.noarch                                    10/20
  Installing : python36-PyYAML-3.13-1.el7.x86_64                                             11/20
  Installing : python36-texttable-1.6.2-1.el7.noarch                                         12/20
  Installing : python36-jsonschema-2.5.1-4.el7.noarch                                        13/20
  Installing : python36-chardet-3.0.4-1.el7.noarch                                           14/20
  Installing : python36-idna-2.10-1.el7.noarch                                               15/20
  Installing : python36-requests-2.14.2-2.el7.noarch                                         16/20
  Installing : python36-docker-2.6.1-3.el7.noarch                                            17/20
  Installing : python36-docopt-0.6.2-8.el7.noarch                                            18/20
  Installing : python36-cached_property-1.5.1-2.el7.noarch                                   19/20
  Installing : docker-compose-1.18.0-4.el7.noarch                                            20/20
  Verifying  : python36-requests-2.14.2-2.el7.noarch                                          1/20
  Verifying  : python36-PyYAML-3.13-1.el7.x86_64                                              2/20
  Verifying  : python36-texttable-1.6.2-1.el7.noarch                                          3/20
  Verifying  : python3-setuptools-39.2.0-10.el7.noarch                                        4/20
  Verifying  : python3-libs-3.6.8-18.el7.x86_64                                               5/20
  Verifying  : python36-jsonschema-2.5.1-4.el7.noarch                                         6/20
  Verifying  : python36-pysocks-1.6.8-7.el7.noarch                                            7/20
  Verifying  : python36-dockerpty-0.4.1-18.el7.noarch                                         8/20
  Verifying  : python36-docker-2.6.1-3.el7.noarch                                             9/20
  Verifying  : python36-chardet-3.0.4-1.el7.noarch                                           10/20
  Verifying  : python3-pip-9.0.3-8.el7.noarch                                                11/20
  Verifying  : docker-compose-1.18.0-4.el7.noarch                                            12/20
  Verifying  : python36-idna-2.10-1.el7.noarch                                               13/20
  Verifying  : python36-docker-pycreds-0.2.1-2.el7.noarch                                    14/20
  Verifying  : python36-urllib3-1.25.6-2.el7.noarch                                          15/20
  Verifying  : python3-3.6.8-18.el7.x86_64                                                   16/20
  Verifying  : python36-docopt-0.6.2-8.el7.noarch                                            17/20
  Verifying  : python36-cached_property-1.5.1-2.el7.noarch                                   18/20
  Verifying  : python36-six-1.14.0-3.el7.noarch                                              19/20
  Verifying  : python36-websocket-client-0.47.0-2.el7.noarch                                 20/20

Installed:
  docker-compose.noarch 0:1.18.0-4.el7

Dependency Installed:
  python3.x86_64 0:3.6.8-18.el7                     python3-libs.x86_64 0:3.6.8-18.el7
  python3-pip.noarch 0:9.0.3-8.el7                  python3-setuptools.noarch 0:39.2.0-10.el7
  python36-PyYAML.x86_64 0:3.13-1.el7               python36-cached_property.noarch 0:1.5.1-2.el7
  python36-chardet.noarch 0:3.0.4-1.el7             python36-docker.noarch 0:2.6.1-3.el7
  python36-docker-pycreds.noarch 0:0.2.1-2.el7      python36-dockerpty.noarch 0:0.4.1-18.el7
  python36-docopt.noarch 0:0.6.2-8.el7              python36-idna.noarch 0:2.10-1.el7
  python36-jsonschema.noarch 0:2.5.1-4.el7          python36-pysocks.noarch 0:1.6.8-7.el7
  python36-requests.noarch 0:2.14.2-2.el7           python36-six.noarch 0:1.14.0-3.el7
  python36-texttable.noarch 0:1.6.2-1.el7           python36-urllib3.noarch 0:1.25.6-2.el7
  python36-websocket-client.noarch 0:0.47.0-2.el7

Complete!
[root@ccx ~]#
harbor包下载上传并解压
-
这个需要去官网下载,可以直接百度
harbor-offline,有挺多方式下载的,现在最新的到了2.3了吧,我之前已经下载了一个2.06的,不过无所谓,安装方式都是一样的,如果不想去找包的,可以直接下载我的2.06【有500多M】
下载地址: -
包下载好以后上传的主机上:
我是通过sftp上传到主机的/root目录下的,命令如下:
sftp> lcd C:\Users\Administrator\Desktop
sftp> cd /root
sftp> put harbor-offline-installer-v2.0.6.tgz
Uploading harbor-offline-installer-v2.0.6.tgz to /root/harbor-offline-installer-v2.0.6.tgz
  100% 544925KB  10684KB/s 00:00:51
C:\Users\Administrator\Desktop\harbor-offline-installer-v2.0.6.tgz: 558003770 bytes transferred in 51 seconds (10684 KB/s)
sftp>
- 下面的步骤跟着做,不要漏!
- 解压:
tar zxvf harbor-offline-installer-v2.0.6.tgz【这个过程可能有点长,我都甚至怀疑是不是卡主了,耐心等待】
[root@ccx ~]# tar zxvf harbor-offline-installer-v2.0.6.tgz
harbor/harbor.v2.0.6.tar.gz
harbor/prepare
harbor/LICENSE
harbor/install.sh
harbor/common.sh
harbor/harbor.yml.tmpl
[root@ccx ~]#
- 进入到harbor目录并导入镜像
[root@ccx ~]# cd harbor/
[root@ccx harbor]# ls
common.sh  harbor.v2.0.6.tar.gz  harbor.yml.tmpl  install.sh  LICENSE  prepare
[root@ccx harbor]# docker load -i harbor.v2.0.6.tar.gz
16c66899afe2: Loading layer 34.51 MB/34.51 MB
140ffb3df060: Loading layer 9.639 MB/9.639 MB
4b1e11724eb9: Loading layer 6.318 MB/6.318 MB
6cbca54d9f4b: Loading layer 16.04 MB/16.04 MB
dd58d81ad95a: Loading layer 28.25 MB/28.25 MB
afd228b63447: Loading layer 22.02 kB/22.02 kB
900592c06d79: Loading layer 16.04 MB/16.04 MB
Loaded image: goharbor/notary-server-photon:v2.0.6
7242ca94a1c5: Loading layer 116.5 MB/116.5 MB
70b2ef02091f: Loading layer 12.63 MB/12.63 MB
56220c5e8642: Loading layer 3.072 kB/3.072 kB
9c10fdc202a0: Loading layer 49.15 kB/49.15 kB
2e6ba845f20b: Loading layer 4.096 kB/4.096 kB
e10c55c004d9: Loading layer  13.5 MB/13.5 MB
Loaded image: goharbor/clair-photon:v2.0.6
c048de2e27be: Loading layer 9.645 MB/9.645 MB
facd900963ec: Loading layer 4.096 kB/4.096 kB
b79026c5bd86: Loading layer 3.072 kB/3.072 kB
84857f59f602: Loading layer 13.28 MB/13.28 MB
6c8ac72362d1: Loading layer  14.1 MB/14.1 MB
Loaded image: goharbor/clair-adapter-photon:v2.0.6
aa31f773c326: Loading layer 11.49 MB/11.49 MB
cf10c2945c50: Loading layer 8.494 MB/8.494 MB
93908b71a428: Loading layer 178.7 kB/178.7 kB
0d73bea5837b: Loading layer 157.2 kB/157.2 kB
74a6d0b95d3b: Loading layer 33.28 kB/33.28 kB
ff79adc23c6a: Loading layer 17.41 kB/17.41 kB
b317e6a84b08: Loading layer 15.36 kB/15.36 kB
0de754b914e6: Loading layer 3.584 kB/3.584 kB
Loaded image: goharbor/harbor-portal:v2.0.6
28eecfa451f6: Loading layer 13.42 MB/13.42 MB
8470ab3f2651: Loading layer 3.584 kB/3.584 kB
b35e9592dfee: Loading layer  2.56 kB/2.56 kB
f1b6316833f6: Loading layer 49.99 MB/49.99 MB
1905745a13cc: Loading layer 5.632 kB/5.632 kB
f161b6a740c5: Loading layer 54.27 kB/54.27 kB
1e4a60ef27ff: Loading layer 50.81 MB/50.81 MB
a9908fbc2016: Loading layer  2.56 kB/2.56 kB
Loaded image: goharbor/harbor-core:v2.0.6
6b0aa29bcac4: Loading layer 63.62 MB/63.62 MB
3ce97e069d3c: Loading layer 79.28 MB/79.28 MB
eefe2b287e13: Loading layer 6.144 kB/6.144 kB
8e713632a10e: Loading layer  2.56 kB/2.56 kB
a67aae4afd9c: Loading layer  2.56 kB/2.56 kB
7af48c77c810: Loading layer  2.56 kB/2.56 kB
1286105fa250: Loading layer  2.56 kB/2.56 kB
7bdaad95aa83: Loading layer 11.26 kB/11.26 kB
Loaded image: goharbor/harbor-db:v2.0.6
542990a9cd95: Loading layer 13.42 MB/13.42 MB
48c661eefcb7: Loading layer 3.584 kB/3.584 kB
d03c0da177e7: Loading layer  2.56 kB/2.56 kB
710f9a50dfa6: Loading layer 60.51 MB/60.51 MB
3f2921344f65: Loading layer 61.33 MB/61.33 MB
Loaded image: goharbor/harbor-jobservice:v2.0.6
ac824f681ecb: Loading layer 40.66 MB/40.66 MB
6dd89aa571f5: Loading layer 3.072 kB/3.072 kB
1ab88978b7d6: Loading layer  59.9 kB/59.9 kB
4d65adbf3d7c: Loading layer 61.95 kB/61.95 kB
Loaded image: goharbor/redis-photon:v2.0.6
6380379a4dc8: Loading layer 14.61 MB/14.61 MB
518f1820e075: Loading layer 28.25 MB/28.25 MB
a9d0e3ba0b82: Loading layer 22.02 kB/22.02 kB
202e7f272f44: Loading layer 14.61 MB/14.61 MB
Loaded image: goharbor/notary-signer-photon:v2.0.6
12234460b034: Loading layer 75.92 MB/75.92 MB
84e6e04bc0e0: Loading layer 3.584 kB/3.584 kB
5693a3880a52: Loading layer 3.072 kB/3.072 kB
518d38be3f6d: Loading layer  2.56 kB/2.56 kB
ecec493b1270: Loading layer 3.072 kB/3.072 kB
e63cd8780cbc: Loading layer 3.584 kB/3.584 kB
3ab835f59a3f: Loading layer 12.29 kB/12.29 kB
5b30848e51e0: Loading layer 3.584 kB/3.584 kB
Loaded image: goharbor/harbor-log:v2.0.6
e1fc753918d0: Loading layer 9.645 MB/9.645 MB
716efc76027e: Loading layer 4.096 kB/4.096 kB
c21113e21386: Loading layer 20.94 MB/20.94 MB
080e7f017989: Loading layer 3.072 kB/3.072 kB
55dea557d4ef: Loading layer 8.726 MB/8.726 MB
a64446c5d548: Loading layer 30.49 MB/30.49 MB
Loaded image: goharbor/harbor-registryctl:v2.0.6
4a179e84af6f: Loading layer 10.95 MB/10.95 MB
0b7414e7b16f: Loading layer 4.096 kB/4.096 kB
ad62ef65d04f: Loading layer 3.072 kB/3.072 kB
467190d5b504: Loading layer 23.44 MB/23.44 MB
66d855ab3844: Loading layer 13.25 MB/13.25 MB
3fefdaf8c5bf: Loading layer 37.51 MB/37.51 MB
Loaded image: goharbor/trivy-adapter-photon:v2.0.6
a58d08c989ed: Loading layer 9.644 MB/9.644 MB
68151298ffb2: Loading layer 67.49 MB/67.49 MB
27df8635f227: Loading layer 3.072 kB/3.072 kB
f47ddcf87e35: Loading layer 4.096 kB/4.096 kB
e6ba620f60b8: Loading layer 68.31 MB/68.31 MB
Loaded image: goharbor/chartmuseum-photon:v2.0.6
527eaa1c3534: Loading layer 77.32 MB/77.32 MB
631d903c980c: Loading layer 51.58 MB/51.58 MB
77ad9a89f0f9: Loading layer  2.56 kB/2.56 kB
ab797dc18e3d: Loading layer 1.536 kB/1.536 kB
047e09499da9: Loading layer 18.43 kB/18.43 kB
1e239f0076e3: Loading layer 4.055 MB/4.055 MB
c941cbaba1ae: Loading layer 233.5 kB/233.5 kB
Loaded image: goharbor/prepare:v2.0.6
32157259d7b9: Loading layer 11.49 MB/11.49 MB
Loaded image: goharbor/nginx-photon:v2.0.6
57d114d5785d: Loading layer 9.645 MB/9.645 MB
690299ab67a4: Loading layer 4.096 kB/4.096 kB
cc159c85e0e1: Loading layer 3.072 kB/3.072 kB
47d60237e55f: Loading layer 20.94 MB/20.94 MB
5902fa0ab0c1: Loading layer 21.77 MB/21.77 MB
Loaded image: goharbor/registry-photon:v2.0.6
[root@ccx harbor]#
生成harbor.yml文件并编辑
- 这个文件有模版,可以直接cp一份
[root@ccx harbor]# pwd
/root/harbor
[root@ccx harbor]# cp harbor.yml.tmpl harbor.yml
[root@ccx harbor]# vim harbor.yml
- 需要编辑的4处内容如下所示
# 下面这个如果用ip就只能用ip访问,用自己的主机名,就只能用主机名访问
  5 hostname: 192.168.159.129

# 下面是http的端口,默认80,不建议修改。
http:
  # port for http, default is 80. If https enabled, this port will redirect to https port
  port: 80

# 如果你有https证书,就指定证书位置,没有的话,就注释掉,我没有,所以注释了
 13 #https:
 14   # https port for harbor, default is 443
 15  # port: 443
 16   # The path of cert and key files for nginx
 17   #certificate: /your/certificate/path
 18   #private_key: /your/private/key/path
 19

# 下面这个是登陆harbor用的密码,下面这个是默认密码,你可以自定义
 34 harbor_admin_password: Harbor12345
- 上面做完以后,在其他主机上添加 harbor服务器的解析
格式为:前面ip 后面主机名
[root@ccx harbor]# tail -n 1 /etc/hosts
192.168.159.129 ccx
[root@ccx harbor]#
- 上面的步骤做完以后,运行/prepare文件
[root@ccx harbor]# ./prepare
prepare base dir is set to /root/harbor
WARNING:root:WARNING: HTTP protocol is insecure. Harbor will deprecate http protocol in the future. Please make sure to upgrade to https
Generated configuration file: /config/log/logrotate.conf
Generated configuration file: /config/log/rsyslog_docker.conf
Generated configuration file: /config/nginx/nginx.conf
Generated configuration file: /config/core/env
Generated configuration file: /config/core/app.conf
Generated configuration file: /config/registry/config.yml
Generated configuration file: /config/registryctl/env
Generated configuration file: /config/registryctl/config.yml
Generated configuration file: /config/db/env
Generated configuration file: /config/jobservice/env
Generated configuration file: /config/jobservice/config.yml
Generated and saved secret to file: /data/secret/keys/secretkey
Successfully called func: create_root_cert
Generated configuration file: /compose_location/docker-compose.yml
Clean up the input dir
[root@ccx harbor]#
执行install文件
执行成功过程
- 执行
./install.sh - 这个过程有点漫长,耐心等待,最后显示:
✔ ----Harbor has been installed and started successfully.----则安装成功,全部过程如下。
我的这个过程中遇到了下面2样报错【如果你过程中报错了不要慌,下翻看看是不是我下面出现的2种情况】
[root@ccx harbor]# pwd
/root/harbor
[root@ccx harbor]# ./install.sh

[Step 0]: checking if docker is installed ...

Note: docker version: 20.10.7

[Step 1]: checking docker-compose is installed ...

Note: docker-compose version: 1.18.0

[Step 2]: loading Harbor images ...
Loaded image: goharbor/notary-server-photon:v2.0.6
Loaded image: goharbor/clair-photon:v2.0.6
Loaded image: goharbor/clair-adapter-photon:v2.0.6
Loaded image: goharbor/harbor-portal:v2.0.6
Loaded image: goharbor/harbor-core:v2.0.6
Loaded image: goharbor/harbor-db:v2.0.6
Loaded image: goharbor/harbor-jobservice:v2.0.6
Loaded image: goharbor/redis-photon:v2.0.6
Loaded image: goharbor/notary-signer-photon:v2.0.6
Loaded image: goharbor/harbor-log:v2.0.6
Loaded image: goharbor/harbor-registryctl:v2.0.6
Loaded image: goharbor/trivy-adapter-photon:v2.0.6
Loaded image: goharbor/chartmuseum-photon:v2.0.6
Loaded image: goharbor/prepare:v2.0.6
Loaded image: goharbor/nginx-photon:v2.0.6
Loaded image: goharbor/registry-photon:v2.0.6


[Step 3]: preparing environment ...

[Step 4]: preparing harbor configs ...
prepare base dir is set to /root/harbor
WARNING:root:WARNING: HTTP protocol is insecure. Harbor will deprecate http protocol in the future. Please make sure to upgrade to https
Clearing the configuration file: /config/log/logrotate.conf
Clearing the configuration file: /config/log/rsyslog_docker.conf
Clearing the configuration file: /config/nginx/nginx.conf
Clearing the configuration file: /config/core/env
Clearing the configuration file: /config/core/app.conf
Clearing the configuration file: /config/registry/passwd
Clearing the configuration file: /config/registry/config.yml
Clearing the configuration file: /config/registry/root.crt
Clearing the configuration file: /config/registryctl/env
Clearing the configuration file: /config/registryctl/config.yml
Clearing the configuration file: /config/db/env
Clearing the configuration file: /config/jobservice/env
Clearing the configuration file: /config/jobservice/config.yml
Generated configuration file: /config/log/logrotate.conf
Generated configuration file: /config/log/rsyslog_docker.conf
Generated configuration file: /config/nginx/nginx.conf
Generated configuration file: /config/core/env
Generated configuration file: /config/core/app.conf
Generated configuration file: /config/registry/config.yml
Generated configuration file: /config/registryctl/env
Generated configuration file: /config/registryctl/config.yml
Generated configuration file: /config/db/env
Generated configuration file: /config/jobservice/env
Generated configuration file: /config/jobservice/config.yml
loaded secret from file: /data/secret/keys/secretkey
Generated configuration file: /compose_location/docker-compose.yml
Clean up the input dir


Note: stopping existing Harbor instance ...
Stopping redis         ... done
Stopping registryctl   ... done
Stopping registry      ... done
Stopping harbor-db     ... done
Stopping harbor-portal ... done
Stopping harbor-log    ... done
Removing redis         ... done
Removing registryctl   ... done
Removing registry      ... done
Creating harbor-log ... done
Removing harbor-portal ... done
Removing harbor-log    ... done
Removing network harbor_harbor

Creating registry ... done
Creating harbor-core ... done
Creating network "harbor_harbor" with the default driver
Creating nginx ... done
Creating redis ...
Creating registryctl ...
Creating harbor-portal ...
Creating registry ...
Creating harbor-db ...
Creating harbor-core ...
Creating harbor-jobservice ...
Creating nginx ...
✔ ----Harbor has been installed and started successfully.----
[root@ccx harbor]#
- 编译成功以后,会自动启动很多容器
如下:
[root@ccx harbor]# docker ps
CONTAINER ID   IMAGE                                COMMAND                  CREATED         STATUS                   PORTS                                   NAMES
1c4c01c22a63   goharbor/nginx-photon:v2.0.6         "nginx -g 'daemon of…"   3 minutes ago   Up 3 minutes (healthy)   0.0.0.0:80->8080/tcp, :::80->8080/tcp   nginx
057400fb8307   goharbor/harbor-jobservice:v2.0.6    "/harbor/entrypoint.…"   3 minutes ago   Up 3 minutes (healthy)                                           harbor-jobservice
a8d2c6c1a6e0   goharbor/harbor-core:v2.0.6          "/harbor/entrypoint.…"   3 minutes ago   Up 3 minutes (healthy)                                           harbor-core
eac31c2cf384   goharbor/harbor-db:v2.0.6            "/docker-entrypoint.…"   3 minutes ago   Up 3 minutes (healthy)   5432/tcp                                harbor-db
2224d680fd3f   goharbor/harbor-portal:v2.0.6        "nginx -g 'daemon of…"   3 minutes ago   Up 3 minutes (healthy)   8080/tcp                                harbor-portal
d7e2d206f5dc   goharbor/harbor-registryctl:v2.0.6   "/home/harbor/start.…"   3 minutes ago   Up 3 minutes (healthy)                                           registryctl
8667f4a8f5b6   goharbor/registry-photon:v2.0.6      "/home/harbor/entryp…"   3 minutes ago   Up 3 minutes (healthy)   5000/tcp                                registry
c9b2749b3ff8   goharbor/redis-photon:v2.0.6         "redis-server /etc/r…"   3 minutes ago   Up 3 minutes (healthy)   6379/tcp                                redis
04adced97037   goharbor/harbor-log:v2.0.6           "/bin/sh -c /usr/loc…"   3 minutes ago   Up 3 minutes (healthy)   127.0.0.1:1514->10514/tcp               harbor-log
[root@ccx harbor]#
安装报错Need to upgrade…处理
- 报错内容如下
意思就是docker版本太低了,需要升级到17.0.6以上
[root@ccx harbor]# ./install.sh

[Step 0]: checking if docker is installed ...

Note: docker version: 1.13.1
✖ Need to upgrade docker package to 17.06.0+.
# 查看下现在的版本,是1.13的,确实很低。
[root@ccx harbor]# docker version
Client:
 Version:         1.13.1
 API version:     1.26
 Package version: docker-1.13.1-208.git7d71120.el7_9.x86_64
 Go version:      go1.10.3
 Git commit:      7d71120/1.13.1
 Built:           Mon Jun  7 15:36:09 2021
 OS/Arch:         linux/amd64

Server:
 Version:         1.13.1
 API version:     1.26 (minimum version 1.12)
 Package version: docker-1.13.1-208.git7d71120.el7_9.x86_64
 Go version:      go1.10.3
 Git commit:      7d71120/1.13.1
 Built:           Mon Jun  7 15:36:09 2021
 OS/Arch:         linux/amd64
 Experimental:    false
[root@ccx harbor]#
- 列出docker包并卸载
卸载docker-common的文件,会自动跟着卸载依赖的【注意看卸载前和卸载后的rpm包,如果没有自动卸载依赖,手动卸载没有卸载掉的包,一共要卸载这3个包:docker-1.13.1-103,docker-client-,docker-common-(复制粘贴完整这3个包后面的内容)】
[root@ccx harbor]# rpm -qa | grep docker
docker-common-1.13.1-208.git7d71120.el7_9.x86_64
python36-docker-pycreds-0.2.1-2.el7.noarch
docker-client-1.13.1-208.git7d71120.el7_9.x86_64
docker-1.13.1-208.git7d71120.el7_9.x86_64
docker-compose-1.18.0-4.el7.noarch
python36-dockerpty-0.4.1-18.el7.noarch
python36-docker-2.6.1-3.el7.noarch
[root@ccx harbor]# yum remove docker-common-1.13.1-208.git7d71120.el7_9.x86_64
Loaded plugins: fastestmirror, langpacks, product-id, search-disabled-repos, subscription-manager

This system is not registered with an entitlement server. You can use subscription-manager to register.

Resolving Dependencies
--> Running transaction check
---> Package docker-common.x86_64 2:1.13.1-208.git7d71120.el7_9 will be erased
--> Processing Dependency: docker-common = 2:1.13.1-208.git7d71120.el7_9 for package: 2:docker-1.13.1-208.git7d71120.el7_9.x86_64
--> Processing Dependency: docker-common for package: 2:docker-client-1.13.1-208.git7d71120.el7_9.x86_64
--> Running transaction check
---> Package docker.x86_64 2:1.13.1-208.git7d71120.el7_9 will be erased
---> Package docker-client.x86_64 2:1.13.1-208.git7d71120.el7_9 will be erased
--> Finished Dependency Resolution
base/7/x86_64                                                               | 3.6 kB  00:00:00
docker-ce-stable/x86_64                                                     | 3.5 kB  00:00:00
epel/x86_64                                                                 | 4.7 kB  00:00:00
extras/7/x86_64                                                             | 2.9 kB  00:00:00
kubernetes/signature                                                        |  844 B  00:00:00
kubernetes/signature                                                        | 1.4 kB  00:00:00 !!!
updates/7/x86_64                                                            | 2.9 kB  00:00:00

Dependencies Resolved

===================================================================================================
 Package               Arch           Version                                Repository       Size
===================================================================================================
Removing:
 docker-common         x86_64         2:1.13.1-208.git7d71120.el7_9          @extras         4.4 k
Removing for dependencies:
 docker                x86_64         2:1.13.1-208.git7d71120.el7_9          @extras          64 M
 docker-client         x86_64         2:1.13.1-208.git7d71120.el7_9          @extras          13 M

Transaction Summary
===================================================================================================
Remove  1 Package (+2 Dependent packages)

Installed size: 76 M
Is this ok [y/N]: y
Downloading packages:
Running transaction check
Running transaction test
Transaction test succeeded
Running transaction
  Erasing    : 2:docker-1.13.1-208.git7d71120.el7_9.x86_64                                     1/3
warning: /etc/sysconfig/docker-storage saved as /etc/sysconfig/docker-storage.rpmsave
warning: /etc/docker/daemon.json saved as /etc/docker/daemon.json.rpmsave
  Erasing    : 2:docker-client-1.13.1-208.git7d71120.el7_9.x86_64                              2/3
  Erasing    : 2:docker-common-1.13.1-208.git7d71120.el7_9.x86_64                              3/3
  Verifying  : 2:docker-common-1.13.1-208.git7d71120.el7_9.x86_64                              1/3
  Verifying  : 2:docker-1.13.1-208.git7d71120.el7_9.x86_64                                     2/3
  Verifying  : 2:docker-client-1.13.1-208.git7d71120.el7_9.x86_64                              3/3

Removed:
  docker-common.x86_64 2:1.13.1-208.git7d71120.el7_9

Dependency Removed:
  docker.x86_64 2:1.13.1-208.git7d71120.el7_9  docker-client.x86_64 2:1.13.1-208.git7d71120.el7_9

Complete!
[root@ccx harbor]# rpm -qa | grep docker
python36-docker-pycreds-0.2.1-2.el7.noarch
docker-compose-1.18.0-4.el7.noarch
python36-dockerpty-0.4.1-18.el7.noarch
python36-docker-2.6.1-3.el7.noarch
- 然后执行下载更新命令:
curl -fsSL https://get.docker.com/ | sh
[root@ccx harbor]# curl -fsSL https://get.docker.com/ | sh
# Executing docker install script, commit: 7cae5f8b0decc17d6571f9f52eb840fbc13b2737
+ sh -c 'yum install -y -q yum-utils'
No Presto metadata available for base
+ sh -c 'yum-config-manager --add-repo https://download.docker.com/linux/centos/docker-ce.repo'
Loaded plugins: fastestmirror, langpacks, product-id, subscription-manager

This system is not registered with an entitlement server. You can use subscription-manager to register.

adding repo from: https://download.docker.com/linux/centos/docker-ce.repo
grabbing file https://download.docker.com/linux/centos/docker-ce.repo to /etc/yum.repos.d/docker-ce.repo
repo saved to /etc/yum.repos.d/docker-ce.repo
+ '[' stable '!=' stable ']'
+ sh -c 'yum makecache'
Loaded plugins: fastestmirror, langpacks, product-id, search-disabled-repos, subscription-manager

This system is not registered with an entitlement server. You can use subscription-manager to register.

Loading mirror speeds from cached hostfile
base                                                                        | 3.6 kB  00:00:00
docker-ce-stable                                                            | 3.5 kB  00:00:00
epel                                                                        | 4.7 kB  00:00:00
extras                                                                      | 2.9 kB  00:00:00
kubernetes/signature                                                        |  844 B  00:00:00
kubernetes/signature                                                        | 1.4 kB  00:00:00 !!!
updates                                                                     | 2.9 kB  00:00:00
(1/11): epel/x86_64/prestodelta                                             |  927 B  00:00:00
(2/11): docker-ce-stable/7/x86_64/filelists_db                              |  26 kB  00:00:00
(3/11): docker-ce-stable/7/x86_64/other_db                                  | 119 kB  00:00:01
(4/11): extras/7/x86_64/filelists_db                                        | 235 kB  00:00:00
(5/11): extras/7/x86_64/other_db                                            | 143 kB  00:00:00
(6/11): kubernetes/filelists                                                |  31 kB  00:00:00
(7/11): kubernetes/other                                                    |  60 kB  00:00:00
(8/11): updates/7/x86_64/other_db                                           | 680 kB  00:00:02
(9/11): epel/x86_64/other_db                                                | 3.4 MB  00:00:11
(10/11): updates/7/x86_64/filelists_db                                      | 5.1 MB  00:00:17
(11/11): epel/x86_64/filelists_db                                           |  12 MB  00:00:40
kubernetes                                                                                 678/678
kubernetes                                                                                 678/678
Metadata Cache Created
+ '[' -n '' ']'
+ sh -c 'yum install -y -q docker-ce'
+ '[' -n 1 ']'
+ sh -c 'yum install -y -q docker-ce-rootless-extras'
Package docker-ce-rootless-extras-20.10.7-3.el7.x86_64 already installed and latest version

================================================================================

To run Docker as a non-privileged user, consider setting up the
Docker daemon in rootless mode for your user:

    dockerd-rootless-setuptool.sh install

Visit https://docs.docker.com/go/rootless/ to learn about rootless mode.


To run the Docker daemon as a fully privileged service, but granting non-root
users access, refer to https://docs.docker.com/go/daemon-access/

WARNING: Access to the remote API on a privileged Docker daemon is equivalent
         to root access on the host. Refer to the 'Docker daemon attack surface'
         documentation for details: https://docs.docker.com/go/attack-surface/

================================================================================
- 下载完成后可以看到docker包已经有了
[root@ccx harbor]# rpm -qa | grep docker
python36-docker-pycreds-0.2.1-2.el7.noarch
docker-ce-20.10.7-3.el7.x86_64
docker-ce-cli-20.10.7-3.el7.x86_64
docker-compose-1.18.0-4.el7.noarch
python36-dockerpty-0.4.1-18.el7.noarch
python36-docker-2.6.1-3.el7.noarch
docker-ce-rootless-extras-20.10.7-3.el7.x86_64
docker-scan-plugin-0.8.0-3.el7.x86_64
- 然后重启docker服务并加入开机启动,最后确认一下docker版本是否是最新的了
[root@ccx harbor]# systemctl restart docker
[root@ccx harbor]# systemctl enable docker
Created symlink from /etc/systemd/system/multi-user.target.wants/docker.service to /usr/lib/systemd/system/docker.service.
[root@ccx harbor]# docker version
Client: Docker Engine - Community
 Version:           20.10.7
 API version:       1.41
 Go version:        go1.13.15
 Git commit:        f0df350
 Built:             Wed Jun  2 11:58:10 2021
 OS/Arch:           linux/amd64
 Context:           default
 Experimental:      true

Server: Docker Engine - Community
 Engine:
  Version:          20.10.7
  API version:      1.41 (minimum version 1.12)
  Go version:       go1.13.15
  Git commit:       b0f5bc3
  Built:            Wed Jun  2 11:56:35 2021
  OS/Arch:          linux/amd64
  Experimental:     false
 containerd:
  Version:          1.4.6
  GitCommit:        d71fcd7d8303cbf684402823e425e9dd2e99285d
 runc:
  Version:          1.0.0-rc95
  GitCommit:        b9ee9c6314599f1b4a7f497e1f1f856fe433d3b7
 docker-init:
  Version:          0.19.0
  GitCommit:        de40ad0
[root@ccx harbor]#
安装ERROR…报错
- 报错内容如下,这是超时导致的
[Step 5]: starting Harbor ...
Creating network "harbor_harbor" with the default driver
Creating harbor-log ...
Creating harbor-portal ...
Creating harbor-db ...
Creating redis ...
Creating registry ...
Creating registryctl ...

ERROR: for registryctl  UnixHTTPConnectionPool(host='localhost', port=None): Read timed out. (read timeout=60)

ERROR: for redis  UnixHTTPConnectionPool(host='localhost', port=None): Read timed out. (read timeout=60)

ERROR: for registryctl  UnixHTTPConnectionPool(host='localhost', port=None): Read timed out. (read timeout=60)

ERROR: for redis  UnixHTTPConnectionPool(host='localhost', port=None): Read timed out. (read timeout=60)
ERROR: An HTTP request took too long to complete. Retry with --verbose to obtain debug information.
If you encounter this issue regularly because of slow network conditions, consider setting COMPOSE_HTTP_TIMEOUT to a higher value (current value: 60).
- 编辑配置文件:
vi /etc/profile
在最后面加上下面2行内容【将60秒改为500秒】
[root@ccx harbor]# tail -n 2 /etc/profile
export COMPOSE_HTTP_TIMEOUT=500
export DOCKER_CLIENT_TIMEOUT=500
[root@ccx harbor]#
- 重启该服务,让其立即生效
[root@ccx harbor]# source /etc/profile
[root@ccx harbor]#
登陆harbor及使用【网页】
登陆方式说明
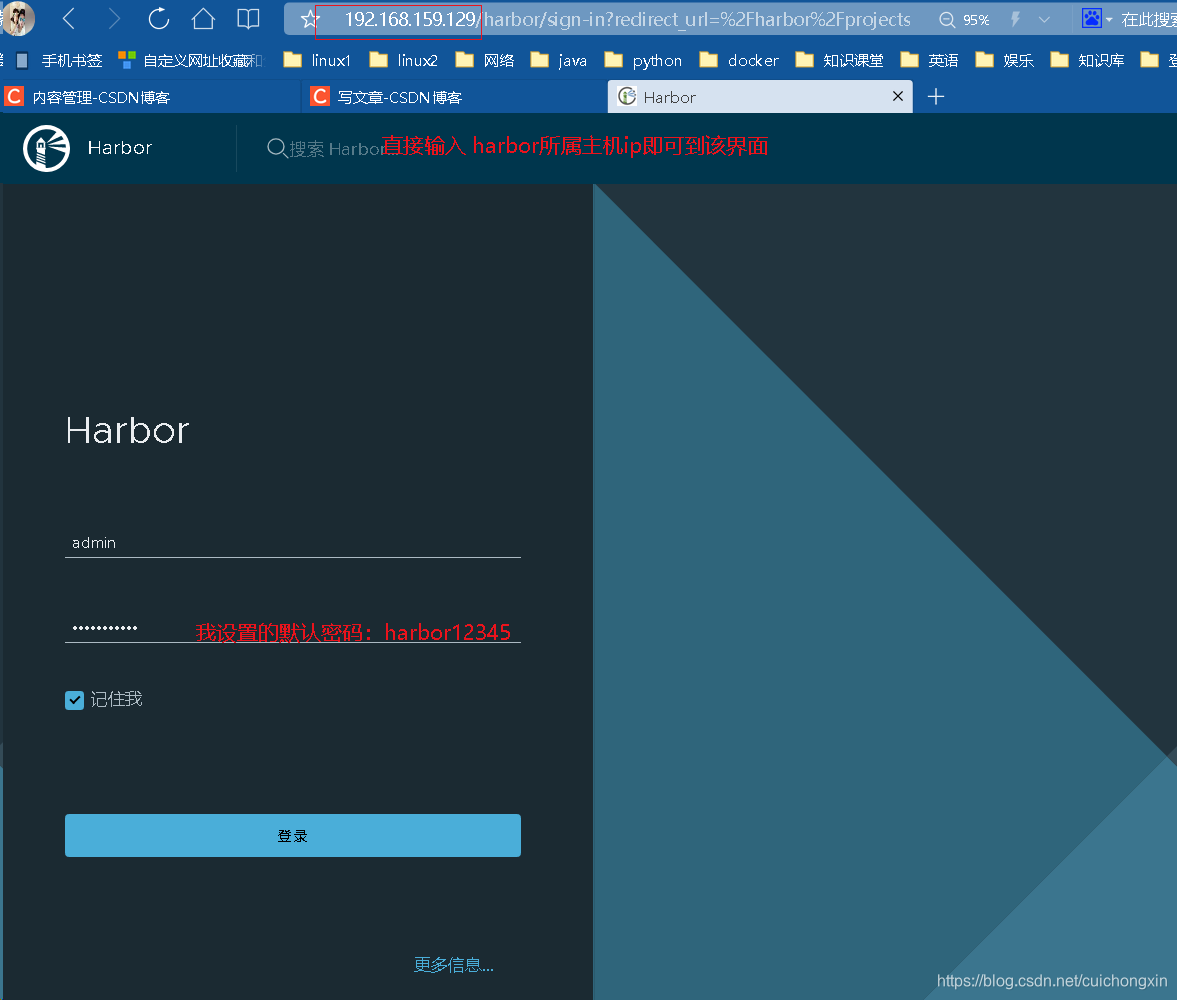
- 上面的配置完毕以后,直接在浏览器输入harbor所属主机ip即可
如,我的ip是:192.168.159.129
[root@ccx harbor]# docker ps
CONTAINER ID   IMAGE                                COMMAND                  CREATED         STATUS                   PORTS                                   NAMES
1c4c01c22a63   goharbor/nginx-photon:v2.0.6         "nginx -g 'daemon of…"   3 minutes ago   Up 3 minutes (healthy)   0.0.0.0:80->8080/tcp, :::80->8080/tcp   nginx
057400fb8307   goharbor/harbor-jobservice:v2.0.6    "/harbor/entrypoint.…"   3 minutes ago   Up 3 minutes (healthy)                                           harbor-jobservice
a8d2c6c1a6e0   goharbor/harbor-core:v2.0.6          "/harbor/entrypoint.…"   3 minutes ago   Up 3 minutes (healthy)                                           harbor-core
eac31c2cf384   goharbor/harbor-db:v2.0.6            "/docker-entrypoint.…"   3 minutes ago   Up 3 minutes (healthy)   5432/tcp                                harbor-db
2224d680fd3f   goharbor/harbor-portal:v2.0.6        "nginx -g 'daemon of…"   3 minutes ago   Up 3 minutes (healthy)   8080/tcp                                harbor-portal
d7e2d206f5dc   goharbor/harbor-registryctl:v2.0.6   "/home/harbor/start.…"   3 minutes ago   Up 3 minutes (healthy)                                           registryctl
8667f4a8f5b6   goharbor/registry-photon:v2.0.6      "/home/harbor/entryp…"   3 minutes ago   Up 3 minutes (healthy)   5000/tcp                                registry
c9b2749b3ff8   goharbor/redis-photon:v2.0.6         "redis-server /etc/r…"   3 minutes ago   Up 3 minutes (healthy)   6379/tcp                                redis
04adced97037   goharbor/harbor-log:v2.0.6           "/bin/sh -c /usr/loc…"   3 minutes ago   Up 3 minutes (healthy)   127.0.0.1:1514->10514/tcp               harbor-log
[root@ccx harbor]# ip a | grep 129
    inet 192.168.159.129/24 brd 192.168.159.255 scope global noprefixroute dynamic ens34
[root@ccx harbor]#
- 登陆界面如下图
默认用户名:admin
默认密码:Harbor12345【我是用的默认的,没有自定义修改】
- 登陆成功后的界面如下图
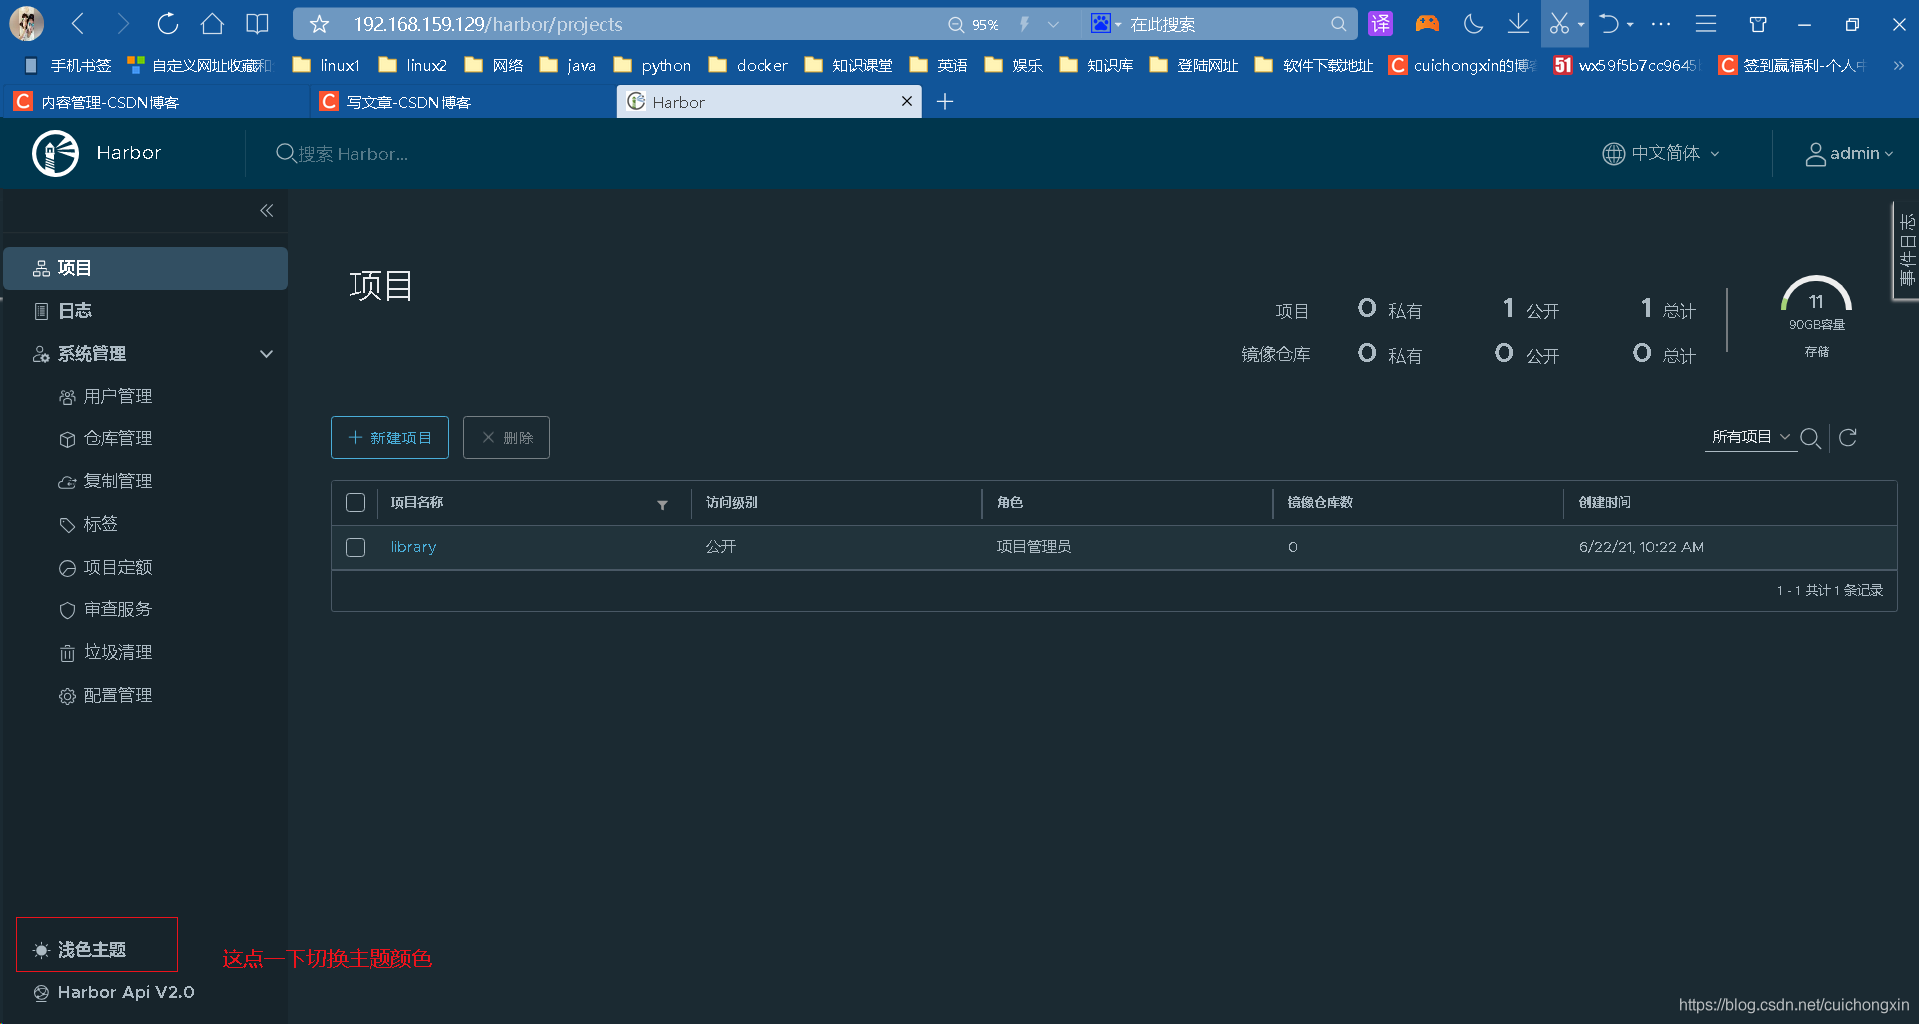
项目管理
新建项目
- 用于存放镜像:
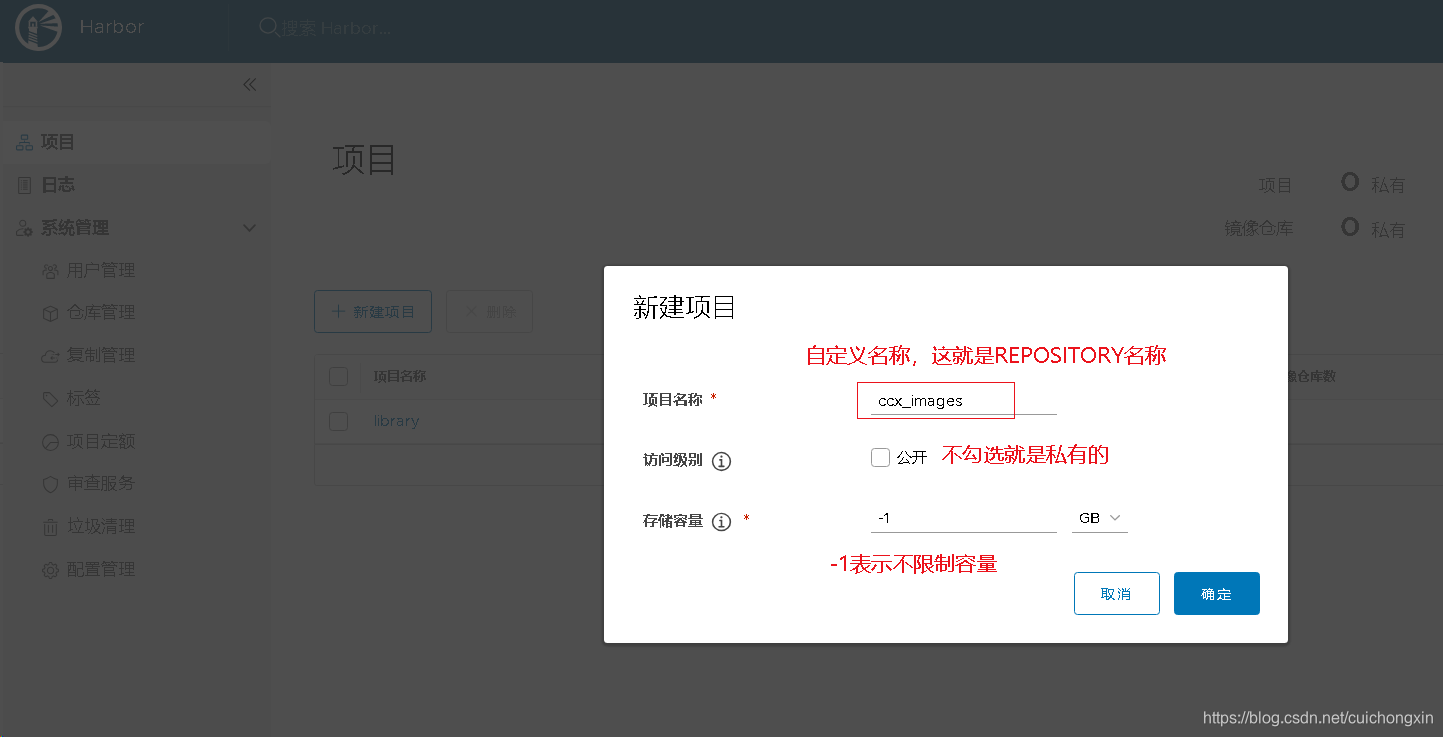
如:新增一个ccx_images项目,并设置为私有项目,只有登陆了相关用户才可以操作;如果勾选了 “公开” 则所有人都可以读取; - 项目-新建项目
其中项目名称就是docker images中的REPOSITORY名称
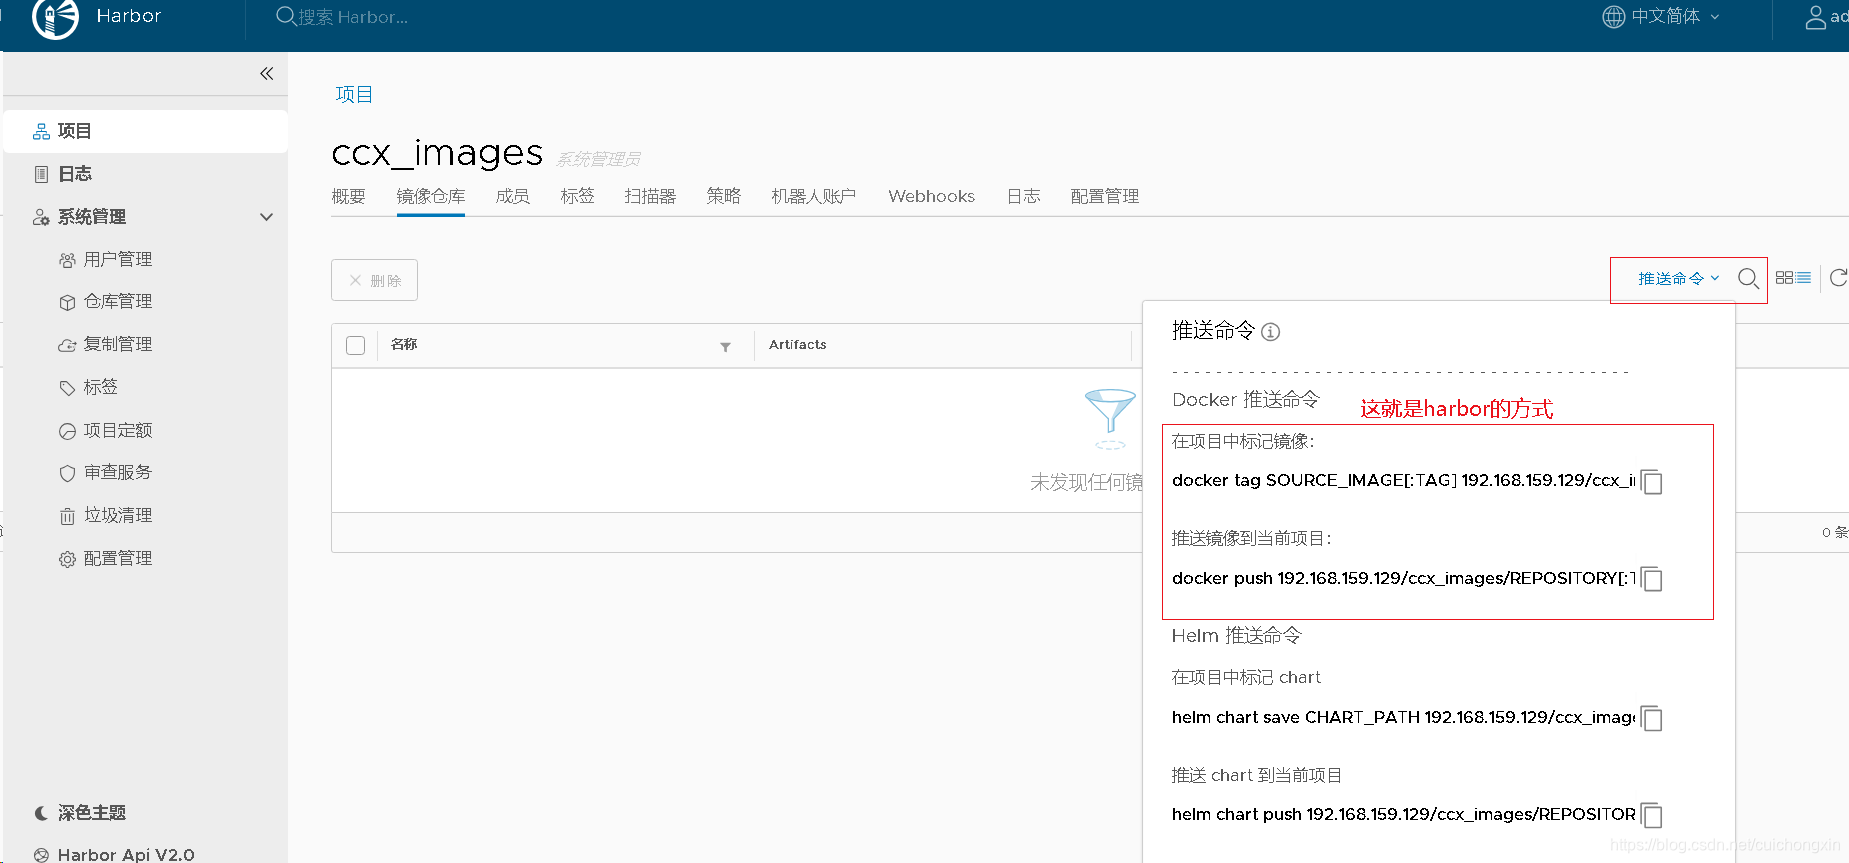
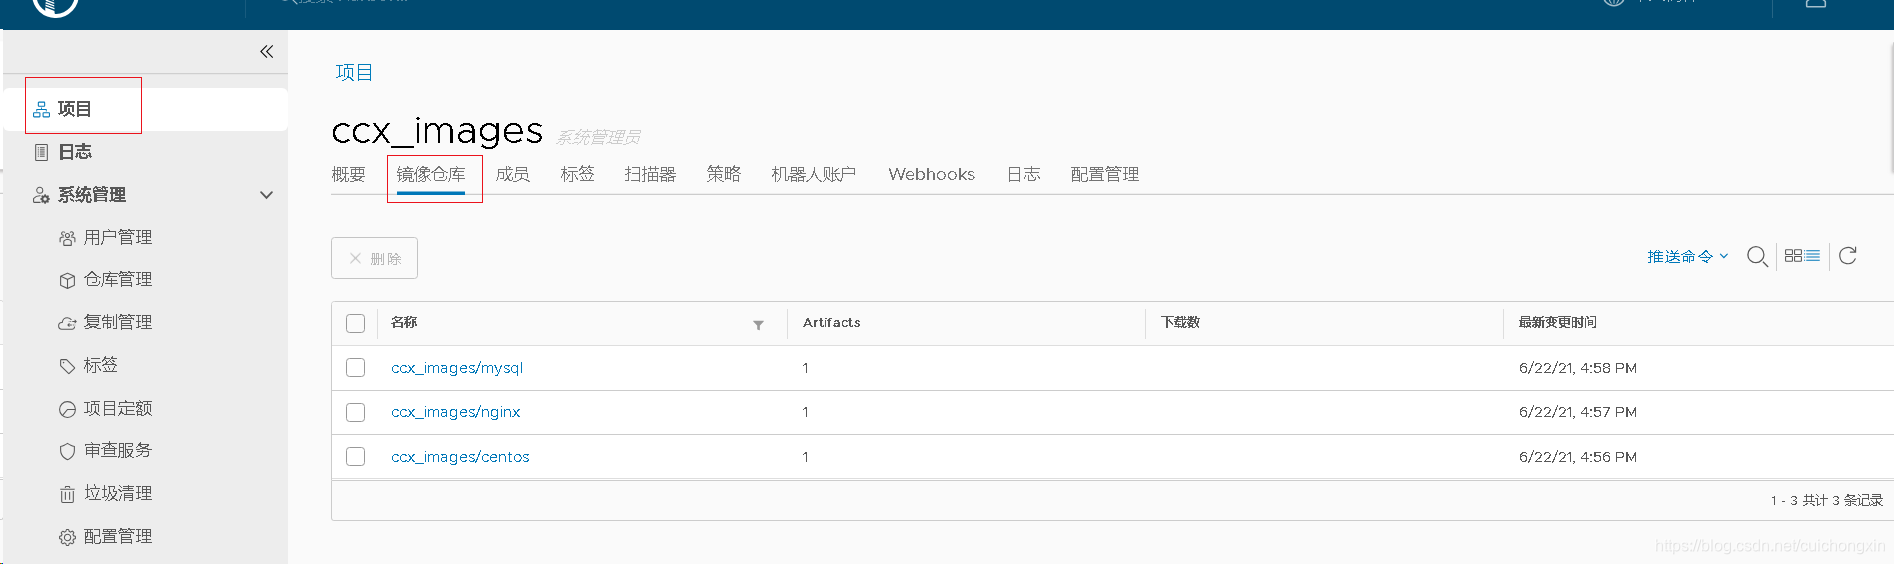
镜像仓库
- 因为没有上传镜像,所以是空的,右边有个推送命令,鼠标放上面就可以看到推送的方式了【推送需要在linux主机上操作,后面会说方法】。
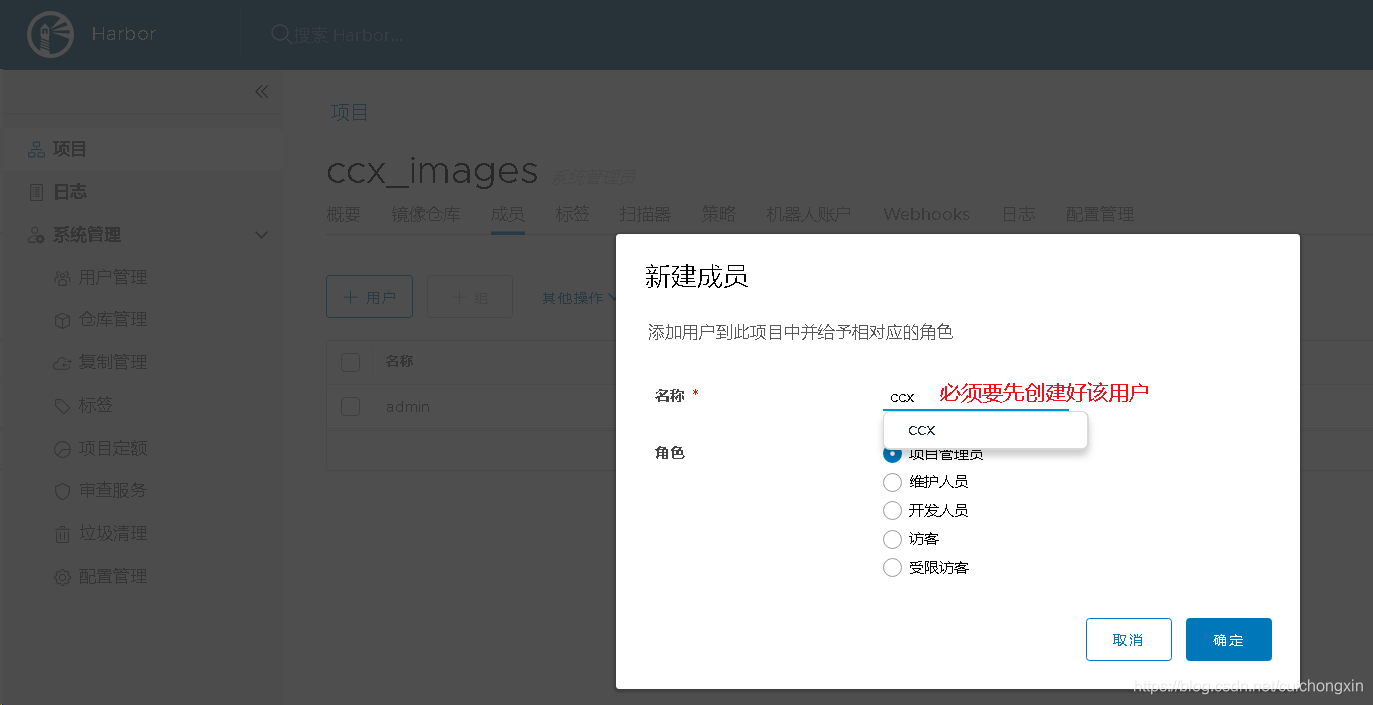
添加用户
- 权限说明:【pull是下载,push是上传】
- 管理员对这个项目拥有所有操作权限,push/pull/delete/复制策略等操作;
- 开发人员只能push/pull;
- 访客只能pull 。
访客:只能查看和下载镜像的权限
- 这个用户是用来绑定仓库的,必须登陆这里设置的用户后才能上传镜像。
说明
上面的3个是基本使用说明了,其他的自己按需设置折腾一下吧。
系统管理
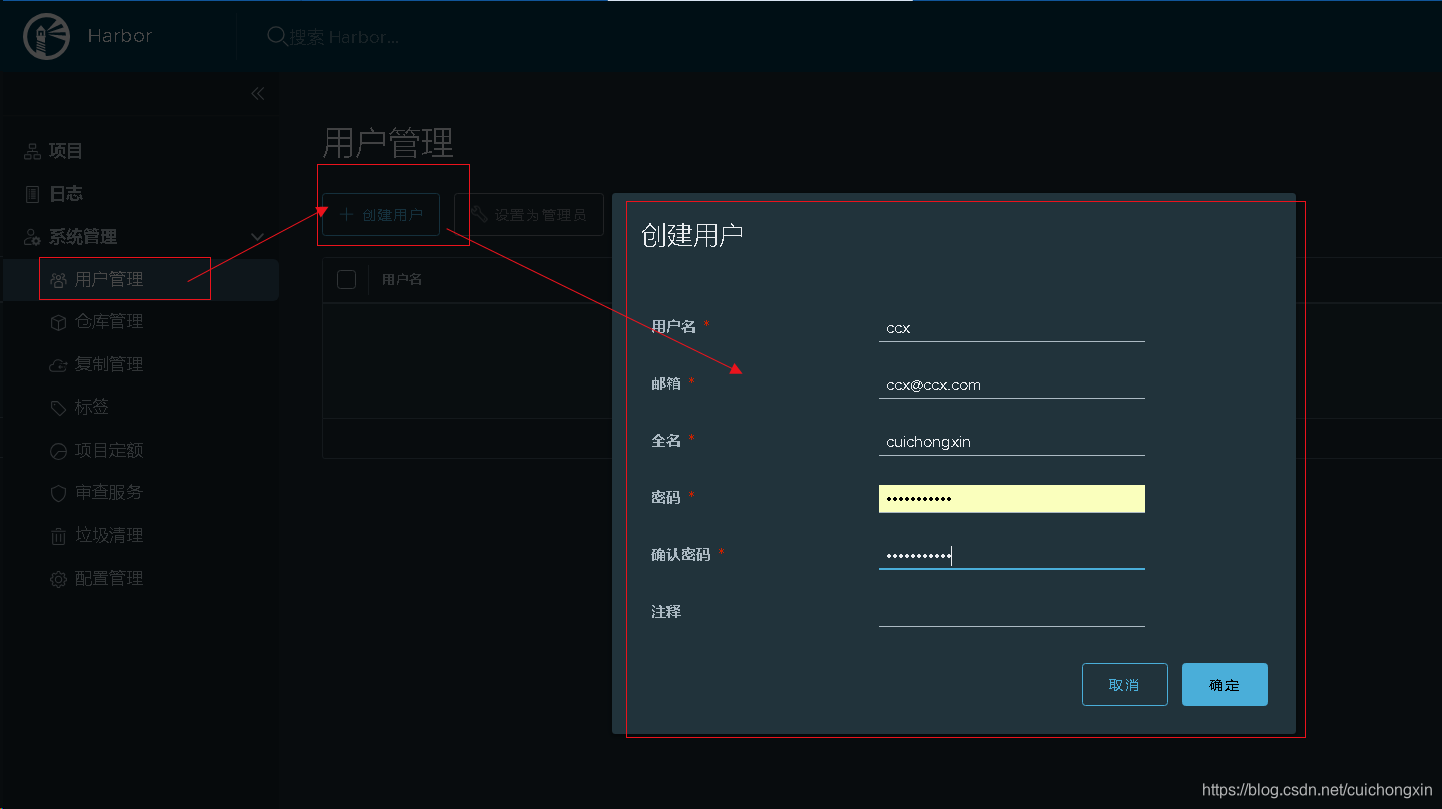
创建用户名
- 这个用户是后面用来绑定仓库的,必须登陆指定的用户才能上传镜像。
- 创建用户【用户名可以任意建没有限制】
用户管理-创建用户【邮箱可以随便写】
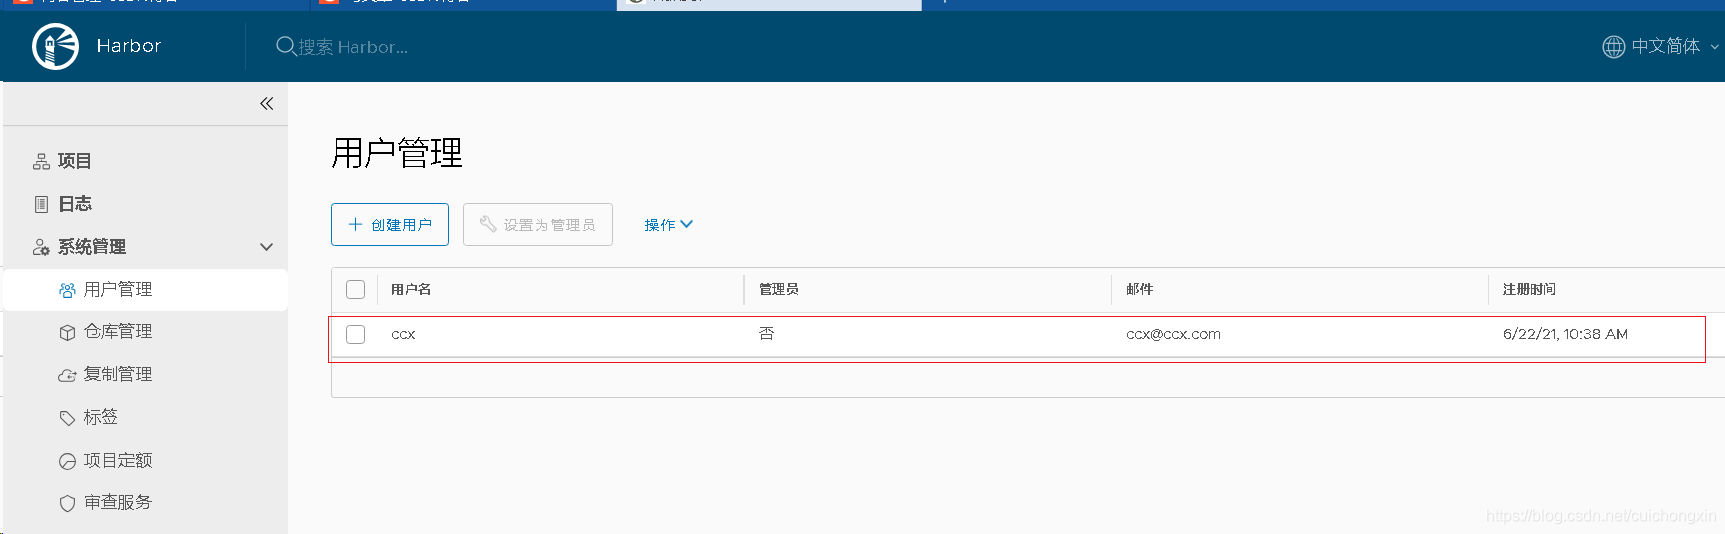
- 创建成功后就是这样的了
仓库管理
这是拉取别的harbor中的镜像用的,下面填的信息是别的harbor中的信息。
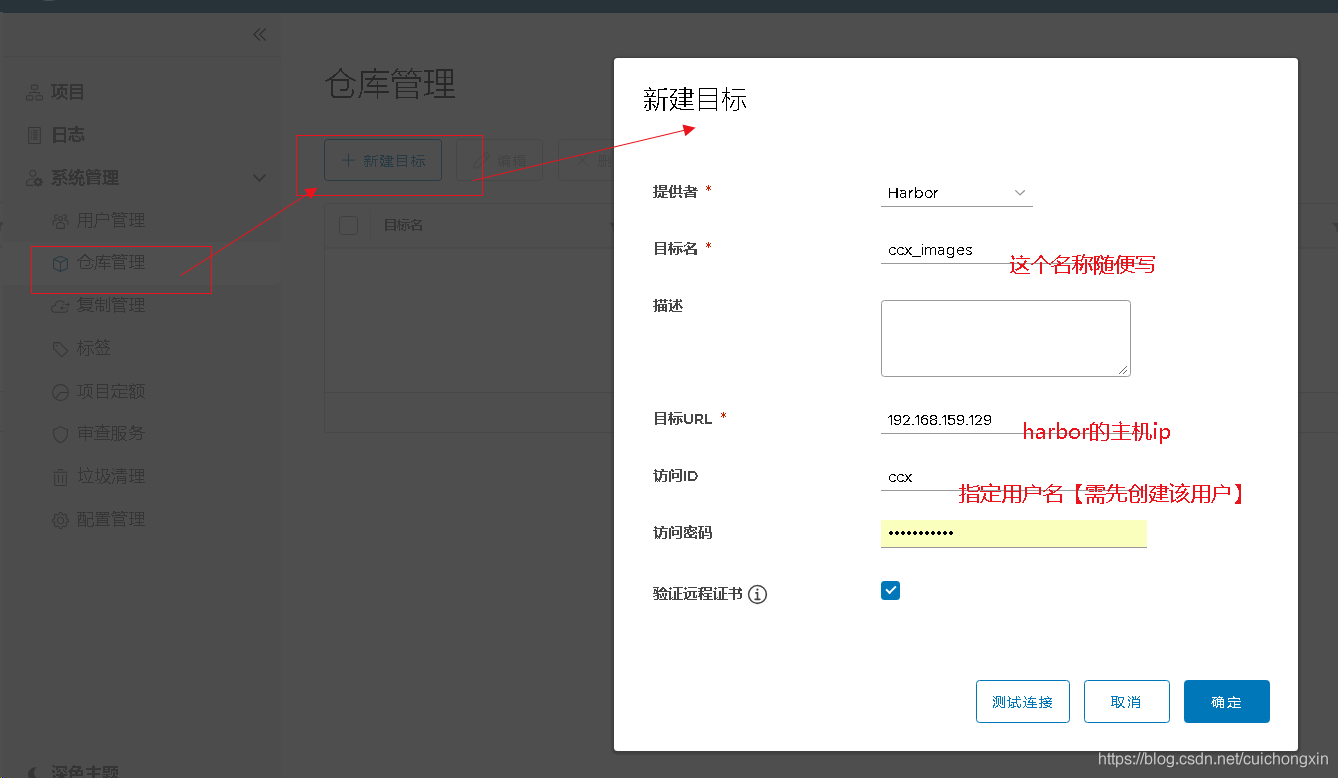
- 如果需要将 其他harbor仓库信息同步到本地【通过复制管理实现】,就需要先创建这个,后面用来选择。

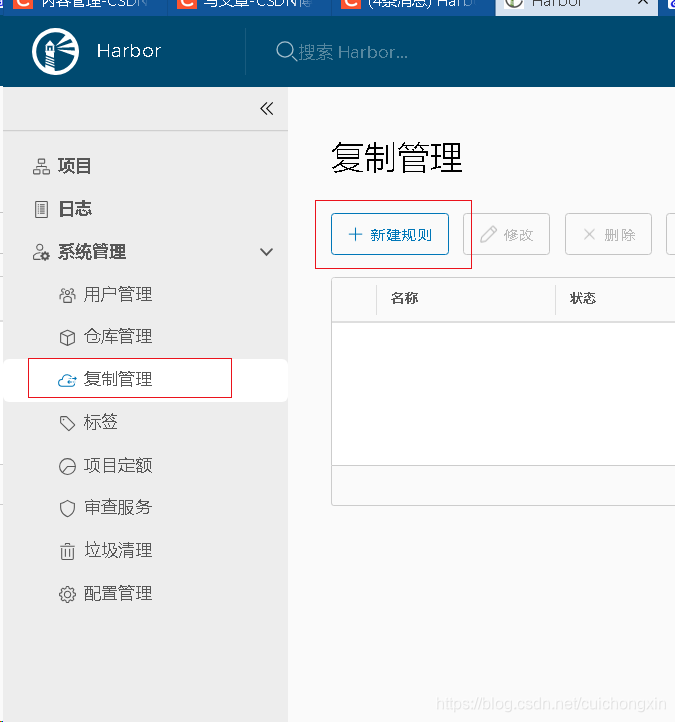
复制管理【harbor主备】
- 这玩意就相当于主备,需要搭建2个harbor服务器,用于数据同步用
如下
- 这是将本地仓库同步到另一个远程仓库,填写相关信息就行了,需要填写的信息放在感叹号上有详细说明的,我没有第二套设备,就不做测试了

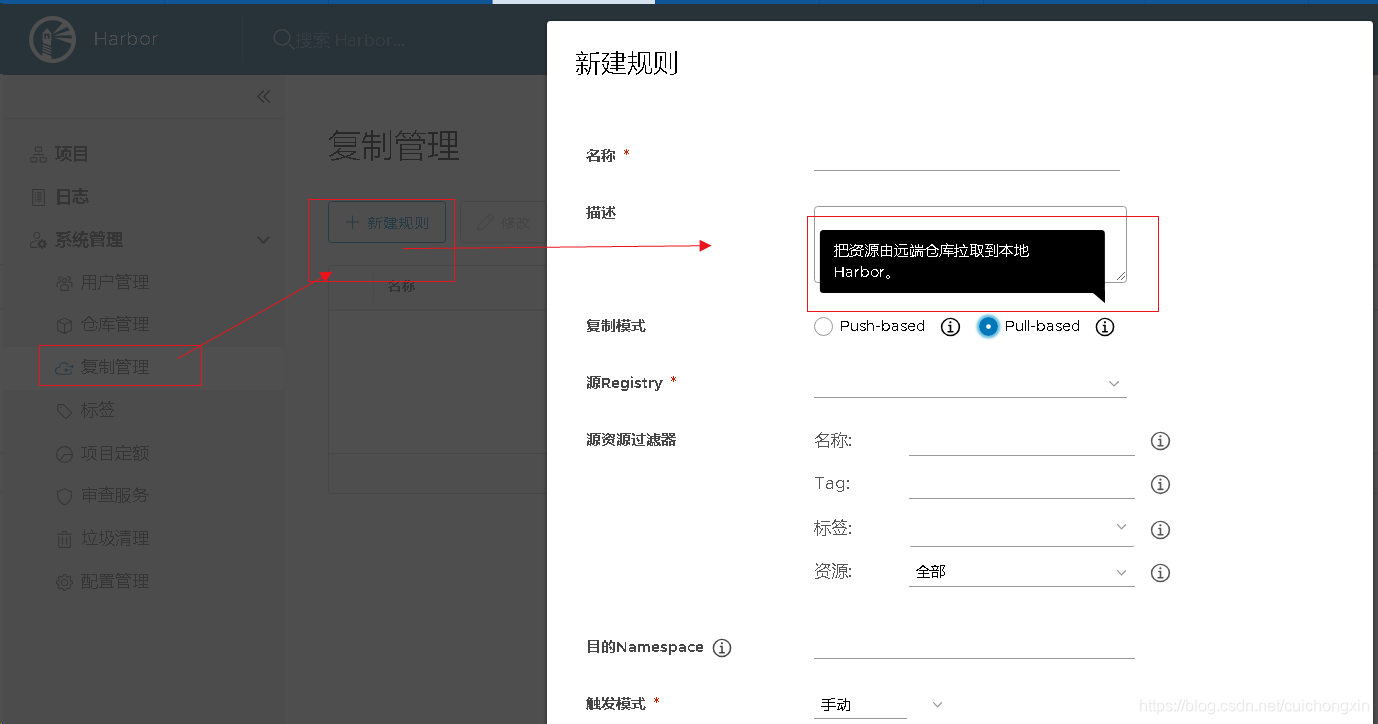
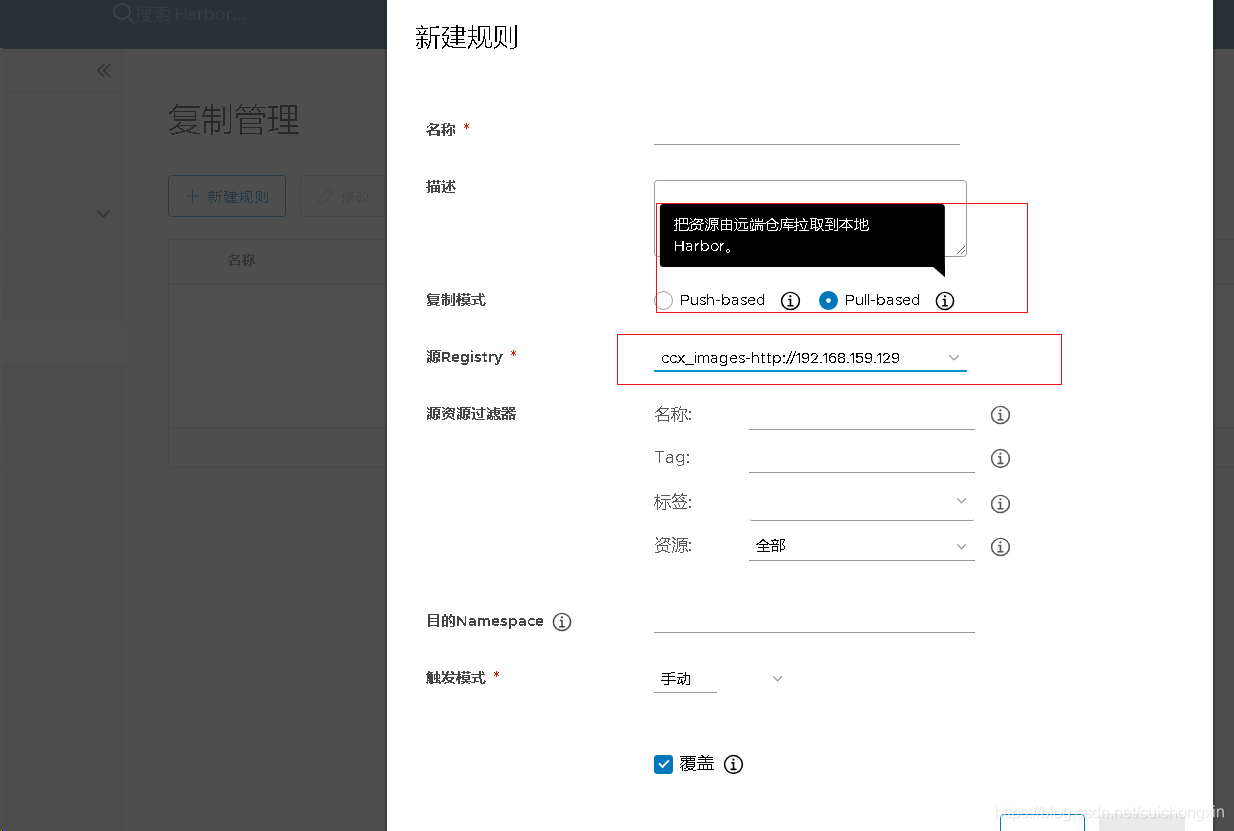
- 这是将其他harbor仓库拉取到本地,需要先创建一个仓库【仓库管理中创建】,然后填写相关信息就行了,需要填写的信息放在感叹号上有详细说明的,我没有第二套设备,就不做测试了
注意
- 2个harbor通信必须要添加本机和对方harbor的域名【主机名】
格式:前面ip后面主机名
[root@ccx ~]# tail -n 2 /etc/hosts
192.168.159.129 ccx
192.168.159.128 ccx
[root@ccx ~]#
- 修改
/etc/docker/daemon.json并添加一行下面内容【需要先添加解析,否则docker服务启动会报错】
"insecure-registries":["192.168.159.128","192.168.159.129]【分别是需要通信的两个harhor的ip】,然后下面是一个用于登陆的行信息,可以同时添加,两者间不冲突。
[root@ccx harbor]# cat /etc/docker/daemon.json
{
        "insecure-registries":["192.168.159.128","192.168.159.129],
        "insecure-registries":["192.168.159.129"]
}
[root@ccx harbor]#
上传下载镜像说明【linux主机操作】
上传镜像
登陆
登陆成功界面
- 前面【项目管理-添加用户】说过,后面创建镜像需要先登陆,登陆的就是这里创建的用户了
- 在linux中登陆方式为
docker login harbor主机ip回车后依次输入用户名密码即可
注:我下面登陆的ccx用户为管理员用户
[root@ccx ~]# docker login 192.168.159.129
Username: ccx
Password:
WARNING! Your password will be stored unencrypted in /root/.docker/config.json.
Configure a credential helper to remove this warning. See
https://docs.docker.com/engine/reference/commandline/login/#credentials-store

Login Succeeded
[root@ccx ~]#
- 注:如果你登陆的时候报错下面这个内容,处理方法看下面
Error response from daemon: Get https://192.168.159.129/v2/: dial tcp 192.168.159.129:443: connect: connection refused
登陆报错处理
- 报错内容
root@ccx ~]# docker login 192.168.159.129
Username: ccx
Password:
Error response from daemon: Get https://192.168.159.129/v2/: dial tcp 192.168.159.129:443: connect: connection refused
[root@ccx ~]#
- 报错原因:Docker自从1.3.X之后docker registry交互默认使用的是HTTPS,但是我们搭建私有镜像默认使用的是HTTP服务,所以与私有镜像交时出现以上错误。
- 报错解决:
添加Docker的配置文件/etc/docker/daemon.json:
增加一行:"insecure-registries":["192.168.159.129"]【80端口可以忽略不写】【如果有多行,第一行末尾需要加上一个逗号。
[root@ccx harbor]# cat /etc/docker/daemon.json
{
        "insecure-registries":["192.168.159.129"]
}
[root@ccx harbor]#
- 然后重启docker
[root@ccx harbor]# systemctl restart docker
[root@ccx harbor]#
- 如果上面操作做了登陆报错下面内容,要考虑是不是因为docker服务没启完,harbor服务正常有下面这些
[root@ccx ~]# docker login 192.168.159.129
Username: ccx
Password:
Error response from daemon: Get http://192.168.159.129/v2/: net/http: request canceled (Client.Timeout exceeded while awaiting headers)
[root@ccx ~]#
[root@ccx ~]# docker ps
CONTAINER ID   IMAGE                                COMMAND                  CREATED         STATUS                        PORTS                                   NAMES
4ce343c800db   goharbor/harbor-jobservice:v2.0.6    "/harbor/entrypoint.…"   9 minutes ago   Up About a minute (healthy)                                           harbor-jobservice
0e31e44d1135   goharbor/nginx-photon:v2.0.6         "nginx -g 'daemon of…"   9 minutes ago   Up About a minute (healthy)   0.0.0.0:80->8080/tcp, :::80->8080/tcp   nginx
9b049eb060fe   goharbor/harbor-core:v2.0.6          "/harbor/entrypoint.…"   9 minutes ago   Up About a minute (healthy)                                           harbor-core
366208a35b0c   goharbor/registry-photon:v2.0.6      "/home/harbor/entryp…"   9 minutes ago   Up About a minute (healthy)   5000/tcp                                registry
0877ac575708   goharbor/redis-photon:v2.0.6         "redis-server /etc/r…"   9 minutes ago   Up About a minute (healthy)   6379/tcp                                redis
2dae67cdaf95   goharbor/harbor-db:v2.0.6            "/docker-entrypoint.…"   9 minutes ago   Up About a minute (healthy)   5432/tcp                                harbor-db
ca31b61f1a71   goharbor/harbor-portal:v2.0.6        "nginx -g 'daemon of…"   9 minutes ago   Up About a minute (healthy)   8080/tcp                                harbor-portal
00cd85d083df   goharbor/harbor-registryctl:v2.0.6   "/home/harbor/start.…"   9 minutes ago   Up About a minute (healthy)                                           registryctl
b9261491e14b   goharbor/harbor-log:v2.0.6           "/bin/sh -c /usr/loc…"   9 minutes ago   Up About a minute (healthy)   127.0.0.1:1514->10514/tcp               harbor-log
[root@ccx ~]#
镜像格式修改
- 官网说过推送命令的格式如下:
docker tag SOURCE_IMAGE[:TAG] 192.168.159.129/ccx_images/REPOSITORY[:TAG]
- 下面我用几个之前registry格式的镜像修改为harbor格式
需要注意的是,下面的cka是我项目名称,这个不能乱来,必须是项目名称,这个在harbor网页中推送命令中也做出说明了。【就最后的centos/v2可以自定义】
[root@ccx harbor]# docker images | grep 129
192.168.159.129:5000/centos/centos   v1        c85441b108da   30 hours ago   193MB
192.168.159.129:5000/web/nginx       v1        d1a364dc548d   3 weeks ago    133MB
192.168.159.129:5000/mardb/mysql     v1        9e64176cd8a2   4 years ago    407MB
[root@ccx harbor]#
[root@ccx harbor]# docker tag 192.168.159.129:5000/centos/centos:v1 192.168.159.129/ccx_images/centos:v2
[root@ccx harbor]# docker tag 192.168.159.129:5000/web/nginx:v1 192.168.159.129/ccx_images/nginx:v2
[root@ccx harbor]# docker tag 192.168.159.129:5000/mardb/mysql:v1 192.168.159.129/ccx_images/mysql:v2
[root@ccx harbor]# docker images | grep 129/
192.168.159.129/ccx_images/centos    v2        c85441b108da   30 hours ago   193MB
192.168.159.129/ccx_images/nginx     v2        d1a364dc548d   3 weeks ago    133MB
192.168.159.129/ccx_images/mysql     v2        9e64176cd8a2   4 years ago    407MB
[root@ccx harbor]#
镜像推送【上传】
- 必须要先登陆成功以后才能推送啊。
- 推送命令:
docker push 镜像名:tag名
如,我推送上面3个修改后的镜像
[root@ccx harbor]# docker images | grep 129/
192.168.159.129/ccx_images/centos    v2        c85441b108da   30 hours ago   193MB
192.168.159.129/ccx_images/nginx     v2        d1a364dc548d   3 weeks ago    133MB
192.168.159.129/ccx_images/mysql     v2        9e64176cd8a2   4 years ago    407MB
[root@ccx harbor]# docker push 192.168.159.129/ccx_images/centos:v2
The push refers to repository [192.168.159.129/ccx_images/centos]
fe4dd64a3fde: Pushed
b362758f4793: Pushed
v2: digest: sha256:666eb5b6ea6b81a152f8ae56c1b5e221d112c2bf2736799ce2ef3fc8f881494a size: 737
[root@ccx harbor]# docker push 192.168.159.129/ccx_images/nginx:v2
The push refers to repository [192.168.159.129/ccx_images/nginx]
075508cf8f04: Pushed
5c865c78bc96: Pushed
134e19b2fac5: Pushed
83634f76e732: Pushed
766fe2c3fc08: Pushed
02c055ef67f5: Pushed
v2: digest: sha256:61191087790c31e43eb37caa10de1135b002f10c09fdda7fa8a5989db74033aa size: 1570
[root@ccx harbor]# docker push 192.168.159.129/ccx_images/mysql:v2
The push refers to repository [192.168.159.129/ccx_images/mysql]
8129a85b4056: Pushed
3c376267ac82: Pushed
fa9efdcb088a: Pushed
9e615ff77b4f: Pushed
e5de8ba20fae: Pushed
2bee3420217b: Pushed
904af8e2b2d5: Pushed
daf31ec3573d: Pushed
da4155a7d640: Pushed
3b7c5f5acc82: Pushed
295d6a056bfd: Pushed
v2: digest: sha256:c0806ac73235043de2a6cb4738bb2f6a74f71d9c7aa0f19c8e7530fd6c299e75 size: 2617
[root@ccx harbor]#
推送成功以后,我们去harbor的网页界面可以看到了
镜像拉取【下载】
说明
只有能访问harbor主机的服务器都是可以正常拉取的,因为我这只有这一台主机,所以我模拟一下,先删除现在有的镜像,重新下载
[root@ccx harbor]# docker images| grep 129/
192.168.159.129/ccx_images/centos    v2        c85441b108da   30 hours ago   193MB
192.168.159.129/ccx_images/nginx     v2        d1a364dc548d   3 weeks ago    133MB
192.168.159.129/ccx_images/mysql     v2        9e64176cd8a2   4 years ago    407MB
[root@ccx harbor]# docker rmi 192.168.159.129/ccx_images/centos:v2
Untagged: 192.168.159.129/ccx_images/centos:v2
Untagged: 192.168.159.129/ccx_images/centos@sha256:666eb5b6ea6b81a152f8ae56c1b5e221d112c2bf2736799ce2ef3fc8f881494a
[root@ccx harbor]# docker rmi 192.168.159.129/ccx_images/nginx:v2
Untagged: 192.168.159.129/ccx_images/nginx:v2
Untagged: 192.168.159.129/ccx_images/nginx@sha256:61191087790c31e43eb37caa10de1135b002f10c09fdda7fa8a5989db74033aa
[root@ccx harbor]# docker rmi 192.168.159.129/ccx_images/mysql:v2
Untagged: 192.168.159.129/ccx_images/mysql:v2
Untagged: 192.168.159.129/ccx_images/mysql@sha256:c0806ac73235043de2a6cb4738bb2f6a74f71d9c7aa0f19c8e7530fd6c299e75
[root@ccx harbor]#
下载网页获取镜像链接【不推荐】
查看下载路径
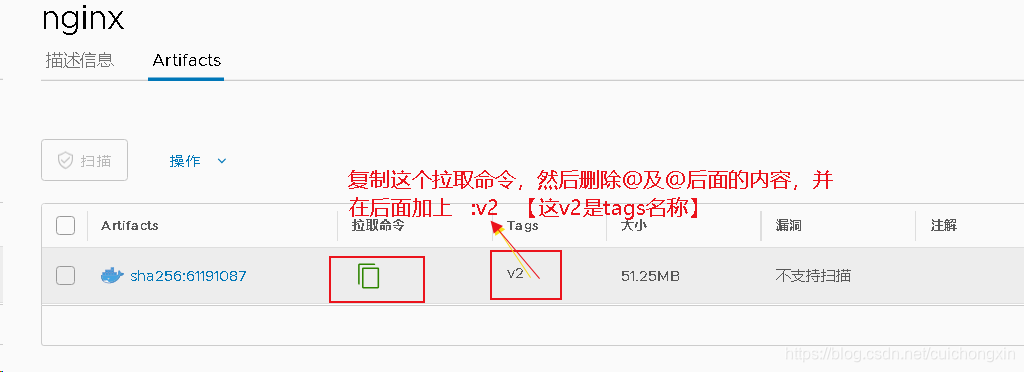
我们可以直接从harbor网页上查看下载地址的,登陆进去以后,点击项目名称-镜像仓库-点击需要下载的名称
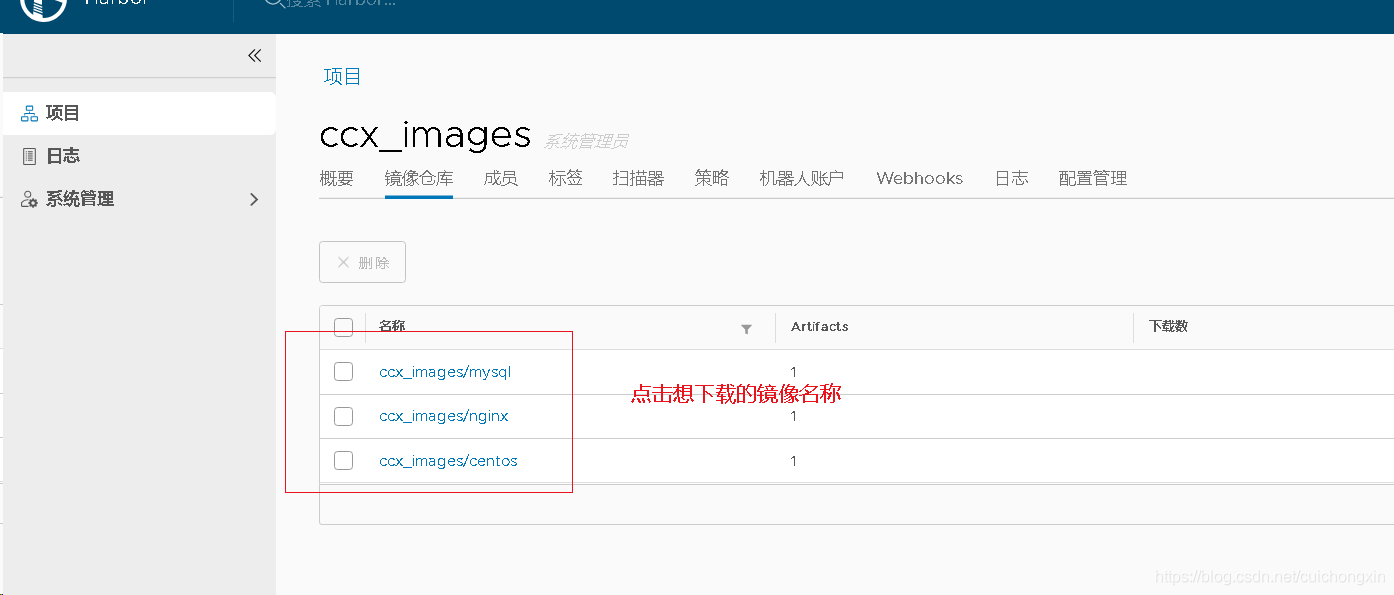
- 点进来以后有个拉取命令,点击一下就可以复制了【鼠标放上面是可以看到命令的】
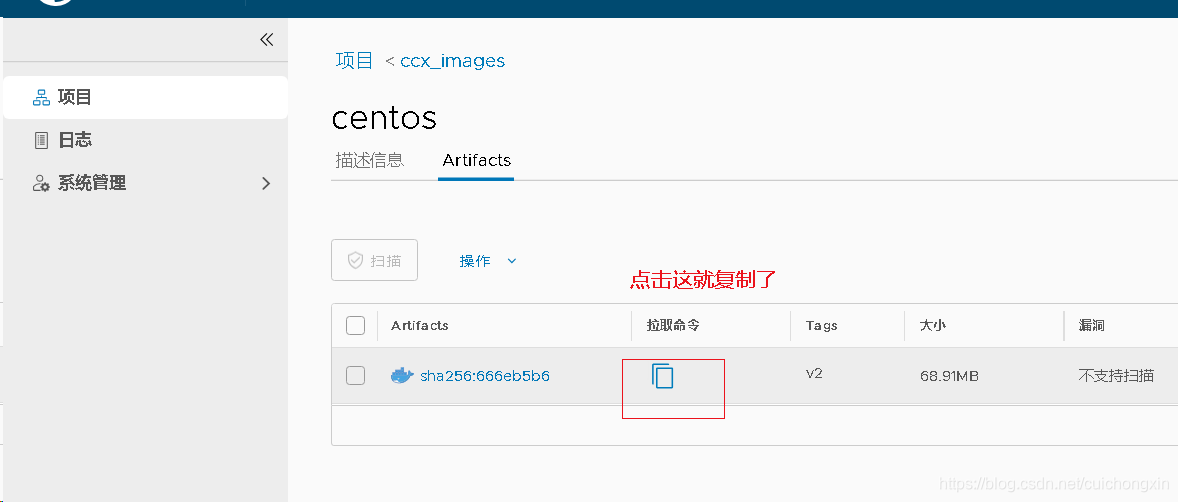
正确下载说明
- 复制好命令以后,我们去到linux主机上粘贴回车即可【需要删除@及@后面的内容,并加上
:tag名称】
注:因为我是在同一主机上操作的,并且没有删除docker文件,所以下载过程和新主机上的略有不同。
如,以mysql为例,命令为:
docker pull 192.168.159.129/ccx_images/mysql:v2【具体方式看下图】
[root@ccx harbor]#  docker pull 192.168.159.129/ccx_images/mysql:v2
v2: Pulling from ccx_images/mysql
Digest: sha256:c0806ac73235043de2a6cb4738bb2f6a74f71d9c7aa0f19c8e7530fd6c299e75
Status: Downloaded newer image for 192.168.159.129/ccx_images/mysql:v2
192.168.159.129/ccx_images/mysql:v2
[root@ccx harbor]#
[root@ccx harbor]#
[root@ccx harbor]#  docker pull 192.168.159.129/ccx_images/nginx:v2
v2: Pulling from ccx_images/nginx
Digest: sha256:61191087790c31e43eb37caa10de1135b002f10c09fdda7fa8a5989db74033aa
Status: Downloaded newer image for 192.168.159.129/ccx_images/nginx:v2
192.168.159.129/ccx_images/nginx:v2
[root@ccx harbor]#
[root@ccx harbor]#
[root@ccx harbor]# docker images | grep 129/
192.168.159.129/ccx_images/centos    v2        c85441b108da   47 hours ago   193MB
192.168.159.129/ccx_images/nginx     v2        d1a364dc548d   4 weeks ago    133MB
192.168.159.129/ccx_images/mysql     v2        9e64176cd8a2   4 years ago    407MB
[root@ccx harbor]#
- 这种下载方式结果和下面的下载方式二一样,所以创建容器测试也放在了下面的下载方式二中。
错误的下载方式说明【了解就行】
我直接使用网站复制的 拉取链接下载了,没有进行任何修改,这样的下载方式是错误的,出现的问题看后面。
[root@ccx harbor]# docker pull 192.168.159.129/ccx_images/centos@sha256:666eb5b6ea6b81a152f8ae56c1b5e221d112c2bf2736799ce2ef3fc8f881494a
192.168.159.129/ccx_images/centos@sha256:666eb5b6ea6b81a152f8ae56c1b5e221d112c2bf2736799ce2ef3fc8f881494a: Pulling from ccx_images/centos
Digest: sha256:666eb5b6ea6b81a152f8ae56c1b5e221d112c2bf2736799ce2ef3fc8f881494a
Status: Downloaded newer image for 192.168.159.129/ccx_images/centos@sha256:666eb5b6ea6b81a152f8ae56c1b5e221d112c2bf2736799ce2ef3fc8f881494a
192.168.159.129/ccx_images/centos@sha256:666eb5b6ea6b81a152f8ae56c1b5e221d112c2bf2736799ce2ef3fc8f881494a
[root@ccx harbor]# docker pull 192.168.159.129/ccx_images/nginx@sha256:61191087790c31e43eb37caa10de1135b002f10c09fdda7fa8a5989db74033aa
192.168.159.129/ccx_images/nginx@sha256:61191087790c31e43eb37caa10de1135b002f10c09fdda7fa8a5989db74033aa: Pulling from ccx_images/nginx
Digest: sha256:61191087790c31e43eb37caa10de1135b002f10c09fdda7fa8a5989db74033aa
Status: Downloaded newer image for 192.168.159.129/ccx_images/nginx@sha256:61191087790c31e43eb37caa10de1135b002f10c09fdda7fa8a5989db74033aa
192.168.159.129/ccx_images/nginx@sha256:61191087790c31e43eb37caa10de1135b002f10c09fdda7fa8a5989db74033aa
[root@ccx harbor]# docker pull 192.168.159.129/ccx_images/mysql@sha256:c0806ac73235043de2a6cb4738bb2f6a74f71d9c7aa0f19c8e7530fd6c299e75
192.168.159.129/ccx_images/mysql@sha256:c0806ac73235043de2a6cb4738bb2f6a74f71d9c7aa0f19c8e7530fd6c299e75: Pulling from ccx_images/mysql
Digest: sha256:c0806ac73235043de2a6cb4738bb2f6a74f71d9c7aa0f19c8e7530fd6c299e75
Status: Downloaded newer image for 192.168.159.129/ccx_images/mysql@sha256:c0806ac73235043de2a6cb4738bb2f6a74f71d9c7aa0f19c8e7530fd6c299e75
192.168.159.129/ccx_images/mysql@sha256:c0806ac73235043de2a6cb4738bb2f6a74f71d9c7aa0f19c8e7530fd6c299e75
[root@ccx harbor]#

# 下面查看已经下载的3个镜像
[root@ccx harbor]# docker images| grep 129/
192.168.159.129/ccx_images/centos    <none>    c85441b108da   30 hours ago   193MB
192.168.159.129/ccx_images/nginx     <none>    d1a364dc548d   3 weeks ago    133MB
192.168.159.129/ccx_images/mysql     <none>    9e64176cd8a2   4 years ago    407MB
[root@ccx harbor]#
- 通过这种方式下载的tag名称为
<none>,就离谱,不知道为啥。 - 说明,我通过这种方式下载的镜像,因为images是,所以不能创建容器,不能重命名,但可以通过指定正常的tag名称来实现创建容器,但不能做删除操作。【总结就是,通过这种方式下载的镜像,是看不到正常tag的,必须正确指定tag名称才能使用】
[root@ccx harbor]# docker images| grep 129/ccx_images/centos
192.168.159.129/ccx_images/centos    <none>    c85441b108da   31 hours ago   193MB
[root@ccx harbor]#
[root@ccx harbor]#
[root@ccx harbor]# docker run -it --rm --name=test 192.168.159.129/ccx_images/centos
Unable to find image '192.168.159.129/ccx_images/centos:latest' locally
docker: Error response from daemon: unknown: artifact ccx_images/centos:latest not found.
See 'docker run --help'.
[root@ccx harbor]# docker run -it --rm --name=test 192.168.159.129/ccx_images/centos:<none>
-bash: syntax error near unexpected token `newline'
[root@ccx harbor]#
[root@ccx harbor]#
[root@ccx harbor]# docker run -it --rm --name=test 192.168.159.129/ccx_images/centos:v2
Unable to find image '192.168.159.129/ccx_images/centos:v2' locally
v2: Pulling from ccx_images/centos
Digest: sha256:666eb5b6ea6b81a152f8ae56c1b5e221d112c2bf2736799ce2ef3fc8f881494a
Status: Downloaded newer image for 192.168.159.129/ccx_images/centos:v2
[ccx@32675ac0fd20 /]$ ls
anaconda-post.log  ccx  etc   lib    lost+found  mnt  proc  run   srv  tmp  var
bin                dev  home  lib64  media       opt  root  sbin  sys  usr
[ccx@32675ac0fd20 /]$ exit
exit

[root@ccx harbor]#
[root@ccx harbor]#
下载方式二
-
这个和上面的正确下载说明一样的,只是换了一种查看方式而已,这个方法和上面正确下载说明,想用哪种用哪种。
-
通过下面这命令下载拉取,这样有tag名称【需要知道镜像名称,这信息是需要通过网页查看的,或者从上传的主机上直接 docker images查看】
-
docker pull ip/名称:tag名称【这种稍微简单一点,不用删除啥东西,直接点击项目后,复制名称:跟上tag名称即可】
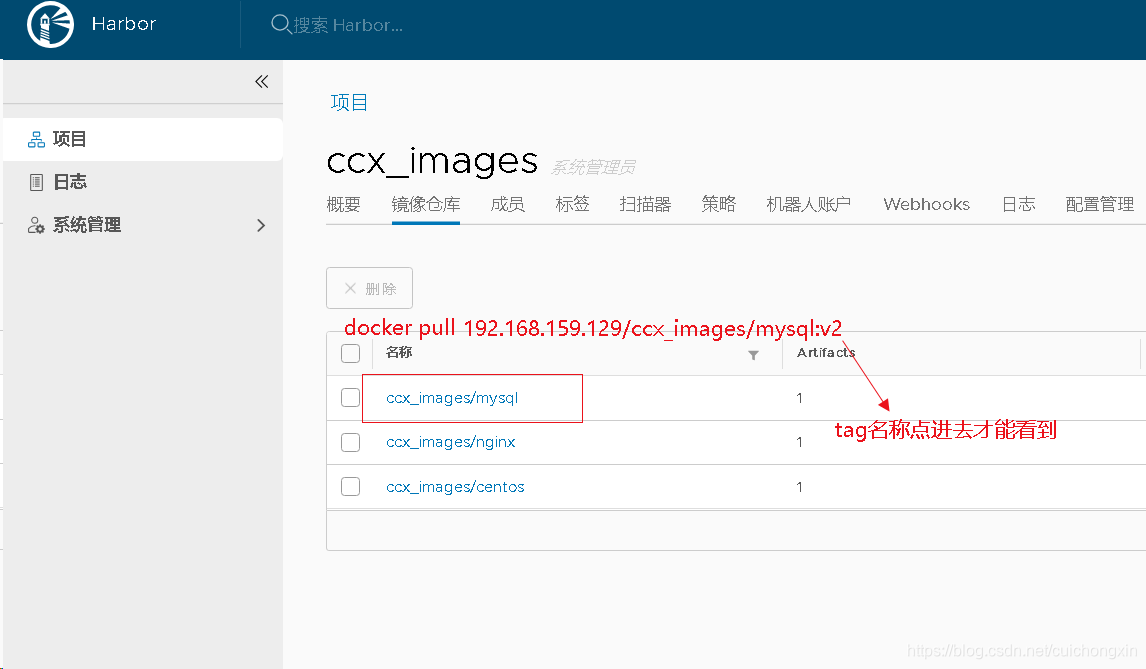
-
如,我删掉centos镜像,通过这种方式下载
因为网页上复制的下载连接没有tag信息,我发现我删不掉。。。。【因为这种镜像没有tag信息,后面可以直接下载,会自动覆盖这个没有tag的镜像】
[root@ccx harbor]# docker images| grep 129/ccx_images/centos
192.168.159.129/ccx_images/centos    <none>    c85441b108da   31 hours ago   193MB
[root@ccx harbor]# docker rmi 192.168.159.129/ccx_images/cenots
Error: No such image: 192.168.159.129/ccx_images/cenots
[root@ccx harbor]#
[root@ccx harbor]# docker rmi 192.168.159.129/ccx_images/cenots:<none>
-bash: syntax error near unexpected token `newline'
[root@ccx harbor]#
[root@ccx harbor]#

# 删不掉就不删了,直接下载后,我发现覆盖了我之前下载的,这次的有tag名称了诶。
[root@ccx harbor]# docker pull 192.168.159.129/ccx_images/centos:v2
v2: Pulling from ccx_images/centos
Digest: sha256:666eb5b6ea6b81a152f8ae56c1b5e221d112c2bf2736799ce2ef3fc8f881494a
Status: Downloaded newer image for 192.168.159.129/ccx_images/centos:v2
192.168.159.129/ccx_images/centos:v2
[root@ccx harbor]# docker images| grep 129/ccx_images/centos
192.168.159.129/ccx_images/centos    v2        c85441b108da   31 hours ago   193MB
[root@ccx harbor]#
- 通过该镜像创建一个容器测试是否正常
结果正常。
[root@ccx harbor]# docker run -it --rm --name=test 192.168.159.129/ccx_images/centos:v2
[ccx@665a9262aed1 /]$ ls
anaconda-post.log  ccx  etc   lib    lost+found  mnt  proc  run   srv  tmp  var
bin                dev  home  lib64  media       opt  root  sbin  sys  usr
[ccx@665a9262aed1 /]$ pwd
/
[ccx@665a9262aed1 /]$ exit
exit
[root@ccx harbor]#
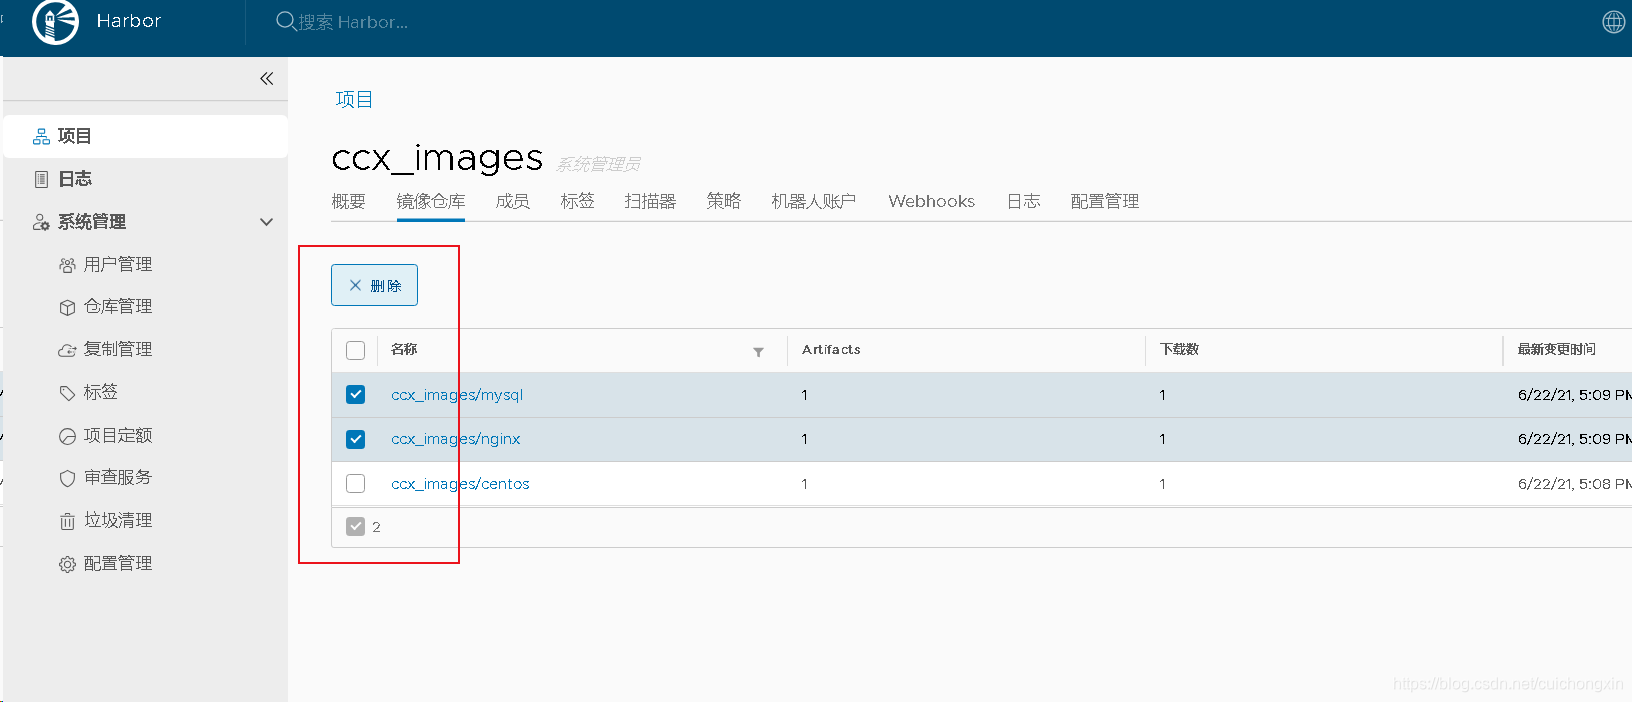
镜像删除
这个可以直接通过harbor网页操作,很方便。
harbor服务启动与停止
网页登陆报错用户或密码不正确
- 就是在登陆网页,你登陆的时候确定输入了正确的用户名和密码,但登陆依然提示用户名或密码错误,原因 是 因为 harbor服务没有启完 !!!!!【遇到这种情况不要慌,直接关闭全部服务,重新启动一次即可】
我就是这个原因,折腾了我好久。
正常服务如下
[root@ccx ~]# docker ps
CONTAINER ID   IMAGE                                COMMAND                  CREATED         STATUS                        PORTS                                   NAMES
4ce343c800db   goharbor/harbor-jobservice:v2.0.6    "/harbor/entrypoint.…"   9 minutes ago   Up About a minute (healthy)                                           harbor-jobservice
0e31e44d1135   goharbor/nginx-photon:v2.0.6         "nginx -g 'daemon of…"   9 minutes ago   Up About a minute (healthy)   0.0.0.0:80->8080/tcp, :::80->8080/tcp   nginx
9b049eb060fe   goharbor/harbor-core:v2.0.6          "/harbor/entrypoint.…"   9 minutes ago   Up About a minute (healthy)                                           harbor-core
366208a35b0c   goharbor/registry-photon:v2.0.6      "/home/harbor/entryp…"   9 minutes ago   Up About a minute (healthy)   5000/tcp                                registry
0877ac575708   goharbor/redis-photon:v2.0.6         "redis-server /etc/r…"   9 minutes ago   Up About a minute (healthy)   6379/tcp                                redis
2dae67cdaf95   goharbor/harbor-db:v2.0.6            "/docker-entrypoint.…"   9 minutes ago   Up About a minute (healthy)   5432/tcp                                harbor-db
ca31b61f1a71   goharbor/harbor-portal:v2.0.6        "nginx -g 'daemon of…"   9 minutes ago   Up About a minute (healthy)   8080/tcp                                harbor-portal
00cd85d083df   goharbor/harbor-registryctl:v2.0.6   "/home/harbor/start.…"   9 minutes ago   Up About a minute (healthy)                                           registryctl
b9261491e14b   goharbor/harbor-log:v2.0.6           "/bin/sh -c /usr/loc…"   9 minutes ago   Up About a minute (healthy)   127.0.0.1:1514->10514/tcp               harbor-log
[root@ccx ~]#
harbor服务关闭
- 必须在harbor解压目录执行下面命令,否则会报错
[root@ccx ~]# docker-compose down -v
ERROR:
        Can't find a suitable configuration file in this directory or any
        parent. Are you in the right directory?

        Supported filenames: docker-compose.yml, docker-compose.yaml

[root@ccx ~]#
- 如果你不知道harbor解压目录在哪,可以用:
find / -name harbor查找的。
正确的harbor目录中会有docker-compose.yml文件。
[root@ccx harbor]# pwd
/root/harbor
[root@ccx harbor]#
[root@ccx harbor]# ls
common     docker-compose.yml    harbor.yml       install.sh  prepare
common.sh  harbor.v2.0.6.tar.gz  harbor.yml.tmpl  LICENSE
[root@ccx harbor]#
[root@ccx harbor]# find / -name harbor
/root/harbor
服务关闭命令如下:docker-compose down -v
[root@ccx harbor]# docker-compose down -v
Stopping nginx             ... done
Stopping harbor-jobservice ... done
Stopping harbor-core       ... done
Stopping harbor-db         ... done
Stopping harbor-portal     ... done
Stopping registryctl       ... done
Stopping registry          ... done
Stopping redis             ... done
Stopping harbor-log        ... done
Removing nginx             ... done
Removing harbor-jobservice ... done
Removing harbor-core       ... done
Removing harbor-db         ... done
Removing harbor-portal     ... done
Removing registryctl       ... done
Removing registry          ... done
Removing redis             ... done
Removing harbor-log        ... done
Removing network harbor_harbor
[root@ccx harbor]# docker ps
CONTAINER ID   IMAGE     COMMAND   CREATED   STATUS    PORTS     NAMES
[root@ccx harbor]#
harbor服务启动
- 必须在harbor解压目录执行下面命令,否则会报错
[root@ccx ~]# docker-compose up -d
ERROR:
        Can't find a suitable configuration file in this directory or any
        parent. Are you in the right directory?

        Supported filenames: docker-compose.yml, docker-compose.yaml

[root@ccx ~]#
- 如果你不知道harbor解压目录在哪,可以用:
find / -name harbor查找的。
正确的harbor目录中会有docker-compose.yml文件。
[root@ccx harbor]# pwd
/root/harbor
[root@ccx harbor]#
[root@ccx harbor]# ls
common     docker-compose.yml    harbor.yml       install.sh  prepare
common.sh  harbor.v2.0.6.tar.gz  harbor.yml.tmpl  LICENSE
[root@ccx harbor]#
[root@ccx harbor]# find / -name harbor
/root/harbor
...
- 服务启动命令:
docker-compose up -d
[root@ccx harbor]# docker-compose up -d
Starting harbor-log ... done
Starting registry ...
Starting registryctl ...
Starting harbor-db ...
Starting redis ...
Starting redis ... done
Starting harbor-core ... done
Starting harbor-jobservice ...
Starting nginx ... done
[root@ccx harbor]# docker ps
CONTAINER ID   IMAGE                                COMMAND                  CREATED         STATUS                            PORTS                                   NAMES
4ce343c800db   goharbor/harbor-jobservice:v2.0.6    "/harbor/entrypoint.…"   7 minutes ago   Up 2 seconds (health: starting)                                           harbor-jobservice
0e31e44d1135   goharbor/nginx-photon:v2.0.6         "nginx -g 'daemon of…"   7 minutes ago   Up 2 seconds (health: starting)   0.0.0.0:80->8080/tcp, :::80->8080/tcp   nginx
9b049eb060fe   goharbor/harbor-core:v2.0.6          "/harbor/entrypoint.…"   7 minutes ago   Up 3 seconds (health: starting)                                           harbor-core
366208a35b0c   goharbor/registry-photon:v2.0.6      "/home/harbor/entryp…"   7 minutes ago   Up 3 seconds (health: starting)   5000/tcp                                registry
0877ac575708   goharbor/redis-photon:v2.0.6         "redis-server /etc/r…"   7 minutes ago   Up 3 seconds (health: starting)   6379/tcp                                redis
2dae67cdaf95   goharbor/harbor-db:v2.0.6            "/docker-entrypoint.…"   7 minutes ago   Up 3 seconds (health: starting)   5432/tcp                                harbor-db
ca31b61f1a71   goharbor/harbor-portal:v2.0.6        "nginx -g 'daemon of…"   7 minutes ago   Up 3 seconds (health: starting)   8080/tcp                                harbor-portal
00cd85d083df   goharbor/harbor-registryctl:v2.0.6   "/home/harbor/start.…"   7 minutes ago   Up 4 seconds (health: starting)                                           registryctl
b9261491e14b   goharbor/harbor-log:v2.0.6           "/bin/sh -c /usr/loc…"   8 minutes ago   Up 6 seconds (health: starting)   127.0.0.1:1514->10514/tcp               harbor-log
[root@ccx harbor]#
harbor网站打不开解决方法
如果配置没问题,重启主机后网站打不开或者输入正确密码登陆依然提示用户密码错误。
通过上述方法中的关闭和启动来一遍即可【必须先关闭再启动】
总结
- 因为我这是第一次搭建,有些东西需要通外网才行,所以我是在我笔记本上安装的vmware做的测试,我不想在笔记本上装太多虚拟机,所以我全部环境都在一台虚拟机上面做的实验了。
- 上面所有条件中,最优的状态是3台虚拟机
- 一台专门用来创建harbor
- 一台专门用来推送镜像
- 一台专门用来下载镜像
- 但是,只要搞懂了其中流程,其实几台也无所谓了。
- 最重要的是,因为我全都是在一台上面做的,所有环境也都有了,我们可以直接导出这个系统,放到后面任意地方的VMware中,可以直接在无网络的环境中使用了哦。


 839
839


 被折叠的 条评论
为什么被折叠?
被折叠的 条评论
为什么被折叠?
 到【灌水乐园】发言


