


fcm和firebase
塔米特CMS (Tamiat CMS)
Vuejs and Firebase based CMS.
基于Vuejs和Firebase的CMS。

入门 (Getting Started)
To get started with Tamiat CMS, you have two options:
要开始使用Tamiat CMS,您有两种选择:
Making Tamiat your starting point.
以Tamiat为起点。
Integrating Tamiat into an existing project.
将Tamiat集成到现有项目中。
让Tamiat成为您的起点 (Making Tamiat Your Starting Point)
Clone the CMS repository and install the dependencies.
克隆CMS存储库并安装依赖项。
# clone the repo
git clone https://github.com/tamiat/tamiat.git

# install the dependencies
npm install
# or
yarn
Log in to firebase console using your google account and create a new firebase project.
使用您的Google帐户登录到Firebase控制台并创建一个新的firebase项目。
In the authentication section, add a new user by providing an email and a password.
在身份验证部分,通过提供电子邮件和密码来添加新用户。
Rename
database.rules.json.tmpfile in root folder todatabase.rules.json将根文件夹中的
database.rules.json.tmp文件重命名为database.rules.json
Setup your database basic security rules by going to the
database.rules.jsonfile in your project and fill in your UID.通过转到项目中的
database.rules.json文件并填写UID来设置数据库的基本安全规则。
{
  "rules": {
    ".write": "(auth.uid === yourUID) || (auth.uid === anOtherUID)" // you can chain these together like so
yourUID and anOtherUID are the uids of users with permission to write to the database. They look something like this "Lxgqp3FmcPVU6UYO6gNdkn1i0ok1". You can obtain a user uid from the authentication section in the firebase console.
yourUID和anOtherUID是有权写入数据库的用户的uid。 它们看起来像“ Lxgqp3FmcPVU6UYO6gNdkn1i0ok1”。 您可以从firebase控制台的“身份验证”部分获取用户uid。
Navigate to
/src/admin/firebase_configand renameconfig.js.tmptoconfig.js导航到
/src/admin/firebase_config并将config.js.tmp重命名为config.js
Copy your project configurations from WEB SETUP (in Authentication section of firebase console) and paste them in
config.jsfile by replacing the existing ones.从WEB SETUP复制项目配置( 在firebase控制台的Authentication部分中 ),然后通过替换现有配置将它们粘贴到
config.js文件中。
// replace the existing config object below with your configurations
const config = {
  apiKey: 'AIzaSyCnxuLX6AgMduDMLtSJVDNJhR8xuMNvs4Y',
  authDomain: 'tamiat-demo.firebaseapp.com',
  databaseURL: 'https://tamiat-demo.firebaseio.com/',
  projectId: 'tamiat-demo',
  storageBucket: '',
  messagingSenderId: '188459960333'
}
Run the
firebase initcommand (if you haven't installed firebase yet, do so bynpm install -g firebase-tools), select your firebase project from the list, use the default database rules already presentdatabase.rules.json, choosedistas your public directory and configure the project as a single-page app.运行
firebase init命令(如果尚未安装firebase,请通过npm install -g firebase-tools),从列表中选择您的firebase项目,使用已经存在的默认数据库规则database.rules.json,选择dist作为您的公共目录,并将项目配置为单页应用程序。
Make sure
.firebasercis created in your project root directory and the file contains the project id of firebase project you created earlier确保在您的项目根目录中创建了
.firebaserc,并且该文件包含您之前创建的.firebaserc项目的项目ID
You can now use
firebase deployto deploy the security rules you just entered (to deploy the actual web app you must first usenpm run buildoryarn build).现在,您可以使用
firebase deploy部署刚刚输入的安全规则(要部署实际的Web应用程序,必须首先使用npm run build或yarn build)。
Run the local dev server with
npm run devoryarn dev.使用
npm run dev或yarn dev运行本地开发服务器。
Access the admin interface by navigating to
localhost:8080/admin.通过导航到
localhost:8080/admin来访问管理界面。
Sign in with your previous email and password.
使用您之前的电子邮件地址和密码登录。
(Optional) Navigate to Database menu from sidebar to add demo contents from
tamiat.config.json(可选)从侧边栏导航到“数据库”菜单,以从
tamiat.config.json添加演示内容
Enjoy!
请享用!
将Tamiat集成到现有项目中 (Integrating Tamiat Into an Existing Project)
Create a new vue.js project based on webpack template.
基于webpack模板创建一个新的vue.js项目。
vue init webpack my-project
# install webpack template dependencies
npm install
Install the required dependencies by Tamiat.
通过Tamiat安装所需的依赖项。
cd my-project

# install development dependencies
npm install node-sass sass-loader --save-dev

# install production dependencies
npm install moment vue-router bulma firebase vuefire font-awesome vue-quill-editor
In
main.jsfile, import the external stylesheets and the necessary plugins and activate them.在
main.js文件中,导入外部样式表和必要的插件并激活它们。
import router from './router'
import VueFire from 'vuefire'
import VueQuillEditor from 'vue-quill-editor'

// import external stylesheets
import fontAwesome from '../node_modules/font-awesome/css/font-awesome.css'
import bulma from '../node_modules/bulma/css/bulma.css'

Vue.use(VueFire) // activate vuefire plugin
Vue.use(VueQuillEditor) // activate vue-quill-editor
Remember, don't forget to add the
routerproperty to the vue instance.请记住,不要忘记将
router属性添加到vue实例。
new Vue({
  el: '#app',
  router, // this property should be added to the vue instance
  template: '<App/>',
  components: { App }
})
Clean up your
App.vuefile by deleting the extra content and making it similar to that:通过删除多余的内容并使它类似于以下内容来清理
App.vue文件:
<template>
  <div id="app">
    <router-view></router-view>
  </div>
</template>
Now, open the Tamiat CMS repo and copy the following folders and files:
现在,打开Tamiat CMS存储库并复制以下文件夹和文件:
要复制的文件夹: (Folders to be copied:)
| Source | Target | Description |
|---|---|---|
| Tamiat/src/admin | my-project/src/admin | The building blocks of the admin interface |
| Tamiat/src/app | my-project/src/app | The building blocks of the app interface |
| Tamiat/src/router | my-project/src/router | The routing logic of the CMS |
| 资源 | 目标 | 描述 |
|---|---|---|
| Tamiat / src / admin | 我的项目/ src目录/管理员 | 管理界面的组成部分 |
| Tamiat / src / app | 我的项目/ SRC /应用程序 | 应用程序界面的构建块 |
| Tamiat / src /路由器 | 我的项目/ src目录/路由器 | CMS的路由逻辑 |
-
Once this is done, you can just follow the same instructions of the first option above starting from
step 2.完成此操作后,您就可以按照从
step 2开始的上述第一个选项的相同说明进行操作。 -
Enjoy!
请享用!
特征 (Features)
Front end focused CMS
面向前端的CMS
Powered by [Vue][] 2.0 & [Firebase]
由[Vue] [] 2.0和[Firebase]驱动
路由 (Routing)
In Tamiat CMS, there are reserved routes that are built in the CMS itself as well as dynamic routes that you can create yourself.
在Tamiat CMS中 ,CMS本身内置有保留的路由以及您可以创建自己的动态路由。
它提供什么好处 (What benefit it offers)
With dynamic routes you are in complete control and have the total freedom about the presentation of your content. You can associate the content that you want with the template that you want and give them the url that you want.
使用动态路由,您可以完全控制自己,并完全自由地展示内容。 您可以将所需的内容与所需的模板相关联,并为它们提供所需的URL。
如何创建动态路线 (How to create a dynamic route)
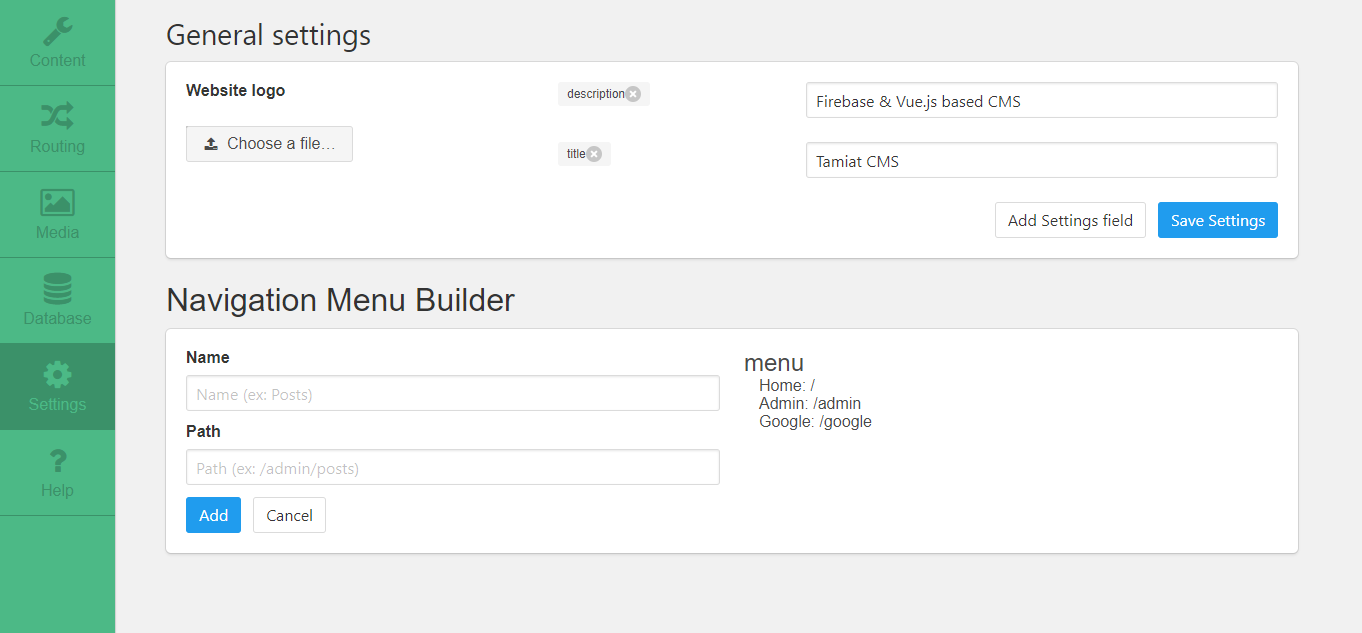
In order to create a dynamic route you have to go to the Routing section in Tamiat admin area.
为了创建动态路由,您必须转到Tamiat管理区域中的“ Routing部分。

On the right side, you can see the reserved routes in the CMS (you can not create dynamic routes with these paths).
在右侧,您可以在CMS中看到保留的路由(无法使用这些路径创建动态路由)。
On the left side you see the form that you need to fill in to create a new dynamic route. This form consists of 4 inputs:
在左侧,您需要填写表单以创建新的动态路线。 该表格包含4个输入:
The route path
路线路径
The route template
路线模板
The route content type
路线内容类型
The route content
路线内容
The only required fields in the form are path & template. The other fileds: Content type & Content are optional since some templates are static and don't accept any dynamic content to show. This type of templates shows static content instead (like the default About us template).
表单中唯一需要的字段是path & template 。 其他文件: Content type和Content是可选的,因为某些模板是静态的,并且不接受任何动态内容来显示。 这类模板显示的是静态内容(例如默认的About us模板)。
After you fill in the form and click the add button, the dynamic route will be created and added to the Dynamic routes on the right hand side. There, you can test it by clicking on the path link that will open the new route in a new browser tab.
填写表单并单击add按钮后,将创建动态路由并将其添加到右侧的动态路由 。 在此处,您可以通过单击路径链接进行测试,该链接将在新的浏览器标签中打开新路线。
After the creation of the new route, you will have options to edit all it's components (path, template, content type & content) in addition to completely deleting it. You just need to hove over the created route to see those control buttons.
创建新路线后,除了完全删除它之外,您还可以选择编辑其所有组件(路径,模板,内容类型和内容)。 您只需将鼠标悬停在创建的路径上即可查看这些控制按钮。
如何创建新模板 (What about creating new templates)
Creating new templates is very easy. All you have to do is:
创建新模板非常容易。 您要做的就是:
Create a new
MyTemplate.vuefile in/src/app/templatesfolder.在
/src/app/templates文件夹中创建一个新的MyTemplate.vue文件。
<template>
  <div class="template">
    <h1>Hello, I am a new template</h1>
  </div>
</template>
Add some info about the new template to
/src/app/templates/templates.jsonas in the following snippet of code:如以下代码片段所示,将有关新模板的一些信息添加到
/src/app/templates/templates.json:
[
  ...
  {
    "filename": "MyTemplate", // the name of the file you created without ".vue" extension
    "displayName": "My New Template" // The name you want your template to be called in the Routing page
  }
  ...
]
静态模板与动态模板 (Static vs dynamic templates)
Static templates are templates that contains only hard coded content. They can not be used to show dynamic content (ex: the AboutUs default template).
静态模板是仅包含硬编码内容的模板。 它们不能用于显示动态内容(例如:AboutUs默认模板)。
here is the minimal code for a static template:
这是静态模板的最少代码:
<template>
  <div class="template">
    <h1>Hello, I am a static template</h1>
  </div>
</template>
On the other side, dynamic templates are used to show dynamic content in a given layout defined by the template (ex: the BlogPost default template)
另一方面,动态模板用于以模板定义的给定布局显示动态内容(例如:BlogPost默认模板)
Here is the minimal code for a dynamic template:
这是动态模板的最少代码:
<template>
  <div class="template">
    <h1>{{content.title}}</h1>
  </div>
</template>

<script>
import LoadContent from './LoadContent'
export default {
  mixins: [LoadContent]
}
</script>
The vue mixin LoadContent will expose your content as a data object called content. There, you can access all the fields of the content you assigned to that route.
vue mixin LoadContent将您的内容公开为一个名为content的数据对象。 在这里,您可以访问分配给该路由的内容的所有字段。
内容类型/内容/字段 (Content types/Contents/Fields)
First, we have to understand the basic concepts and the DB structure.
首先,我们必须了解基本概念和数据库结构。
Content type - type from which we create specific contents - every content type has it's own
name,icon,path,fieldsanddata(Contents)内容类型-我们从中创建特定内容的类型-每个内容类型都有其自己的
name,icon,path,fields和data(内容)Content - actual contents created as
datain Content types内容-在内容类型中作为
data创建的实际内容Fields - used as properties for Contents and can be created as one of the available input types (
textarea,textbox,integer,boolean,url,richtextbox,tags,select,input)字段-用作内容的属性,可以创建为可用输入类型之一(
textarea,textbox,integer,boolean,url,richtextbox,tags,select,input)
我们为什么需要这个? (Why do we need this?)
This way, everything we create is custom made. We don't have any restrictions in sense of how our content should be named, what properties(inputs) should it have, on what path should our contents be, etc.
这样,我们创建的所有内容都是定制的。 在内容的命名方式,内容应具有的属性,内容的路径等方面,我们没有任何限制。
_对于使用Tamiat CMS先前版本的用户_ (_ For users who have used previous version of Tamiat CMS _)
In order for this new feature to work, you have to do the following:
为了使此新功能正常工作,您必须执行以下操作:
Delete everything from DB except
media,navandsettings删除数据库中除
media,nav和settings以外的所有内容Go to the
Databasesection in Tamiat admin area and addDemo ContentandDemo Fields转到“ Tamiat”管理区域中的“
Database部分,然后添加“Demo Content和“Demo FieldsAfter this, you have successfully added the demo data and initialized the DB. Now you can continue on working with contents and fields.
之后,您已经成功添加了演示数据并初始化了数据库。 现在,您可以继续处理内容和字段。
如何创建内容类型和字段? (How to create Content types and Fields?)
In order to create content types and fields we have to go to the Content section in Tamiat admin area.
为了创建内容类型和字段,我们必须转到Tamiat管理区域中的“ Content部分。
内容类型 (Content types)

创造 (Create)
To be able to create new content type we have to define the name and select one or more fields from available fields list. On the right side we have a list of available fields. Those are the fields that are currently available in the DB. By checking a field from that list, we decide to include it in the creation of content type. If we want some fields to be shown later in the UI, we have to check a field from Fields list (only textbox type fields are available). Also, we can reorder fields so that they are stored in the DB as we want.
为了能够创建新的内容类型,我们必须定义名称并从可用字段列表中选择一个或多个字段。 在右侧,我们提供了可用字段的列表。 这些是数据库中当前可用的字段。 通过检查该列表中的字段,我们决定将其包括在内容类型的创建中。 如果我们希望稍后在UI中显示某些字段,则必须从“ Fields列表中检查一个字段(仅textbox类型的字段可用)。 另外,我们可以对字段进行重新排序,以便将它们存储在所需的数据库中。
编辑/删除 (Edit/Delete)
Lets look at the right section. By selecting a content type from dropdown menu, section on the left is populated with data of selected content type. From that point, we can choose to edit or to delete it.
让我们看看右边的部分。 通过从下拉菜单中选择一种内容类型,将在左侧区域中填充所选内容类型的数据。 从这一点来看,我们可以选择编辑或删除它。
领域 (Fields)

创造 (Create)
By clicking on Add new field button, this block is displayed. Field name and field type are mandatory, but multi value isn't.
通过单击Add new field按钮,将显示此块。 字段名称和字段类型是必填项,但不是多值。
编辑/删除 (Edit/Delete)
Next to every fields name in the available fields list, we have two icons - delete and edit. The same block is displayed just now it's populated with selected fields data.
在可用字段列表中的每个字段名称旁边,我们都有两个图标-删除和编辑。 刚才显示的是同一个块,其中装有选定的字段数据。
我们创建了一个新的内容类型,现在怎么办? (We created a new content type, what now?)
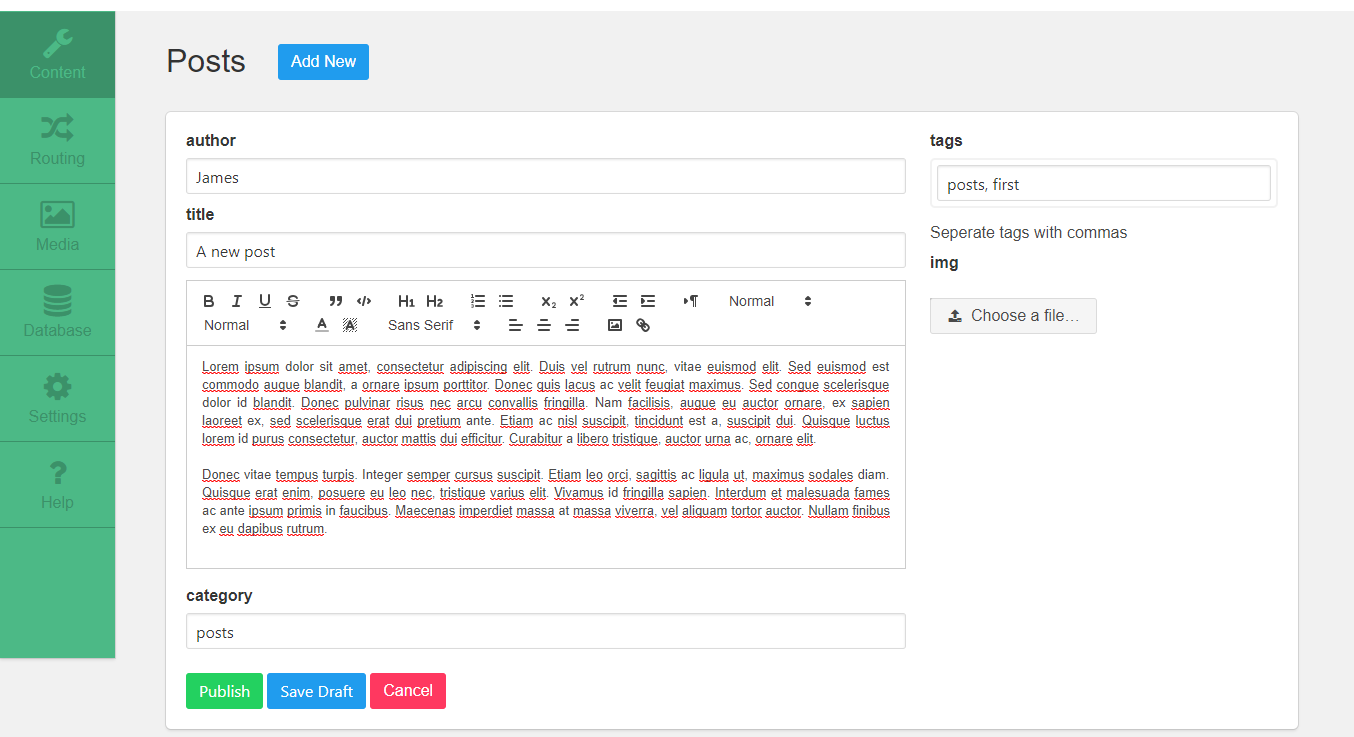
After successfull creation, content types are displayed in the dropdown menu Content in Tamiat admin area. By clicking on a specific content type, this page is displayed:
创建成功后,内容类型将显示在Tamiat管理区域中的下拉菜单Content中。 通过单击特定的内容类型,将显示此页面:

From this point, we can Create (Save/Publish), Edit, Delete, Bulk delete, Select, Filter and Sort contents. Those contents will be displayed later in the app.
至此,我们可以创建(保存/发布),编辑,删除,批量删除,选择,过滤和排序内容。 这些内容将稍后在应用程序中显示。
In the picture above we can see that we have newly created content type, ex. Posts, which has an actual data that is displayed in the table. Notice that only author and title fields are displayed - because those are the textbox fields we previously marked to be shown in content list when we were creating content type.
在上图中,我们可以看到我们新创建了内容类型,例如。 Posts ,具有表中显示的实际数据。 请注意,仅显示author和title字段-因为这些是我们先前在创建内容类型时标记为显示在内容列表中的textbox字段。
翻译自: https://vuejsexamples.com/vuejs-and-firebase-based-cms/
fcm和firebase


 1705
1705

 被折叠的 条评论
为什么被折叠?
被折叠的 条评论
为什么被折叠?
 到【灌水乐园】发言


