介绍 (Introduction)
In this article we’ll use the Docker Plugin for Visual Studio Code. Docker allows us to package our applications into images and run them as containers on any platform that has Docker installed. We’ll use this plugin with two developer stacks: Node.js and Go.
在本文中,我们将使用适用于Visual Studio Code的Docker插件 。 Docker允许我们将应用程序打包成映像,然后在安装了Docker的任何平台上将它们作为容器运行。 我们将这个插件与两个开发人员堆栈一起使用:Node.js和Go。
安装 (Installation)
You need to have docker installed on your work station. Instructions on how to install and run docker are available here, and it should be specific to the particular operation system you are running.
您需要在工作站上安装docker。 此处提供了有关如何安装和运行docker的说明,并且应特定于您正在运行的特定操作系统。
You also need to have Visual Studio Code installed.
您还需要安装Visual Studio Code 。
Once you have Visual Studio Code installed, open it click on the extensions section on the left most pane, and search for Docker.

安装Visual Studio Code后,将其打开,单击最左侧窗格的扩展部分,然后搜索Docker。
Once installed, you should notice a few new things in your Visual Studio Code instance. On the left most pane, there’s a new Docker section with the Docker logo, which when clicked opens the Docker Explorer with three sections. Images, Containers, Registries
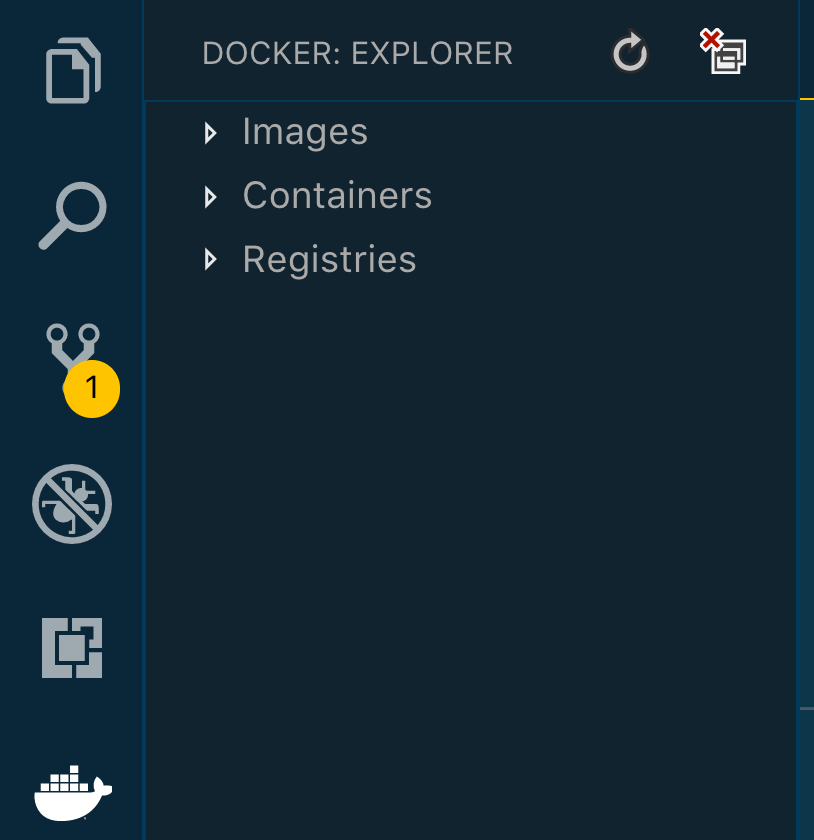
安装后,您应该在Visual Studio Code实例中注意到一些新内容。 在最左侧的窗格中,有一个带有Docker徽标的新Docker部分,单击该按钮可打开包含三个部分的Docker Explorer。 图片 , 容器 , 注册表
There are also a few commands added to the command palette, which you can view by opening the command palette and typing in docker
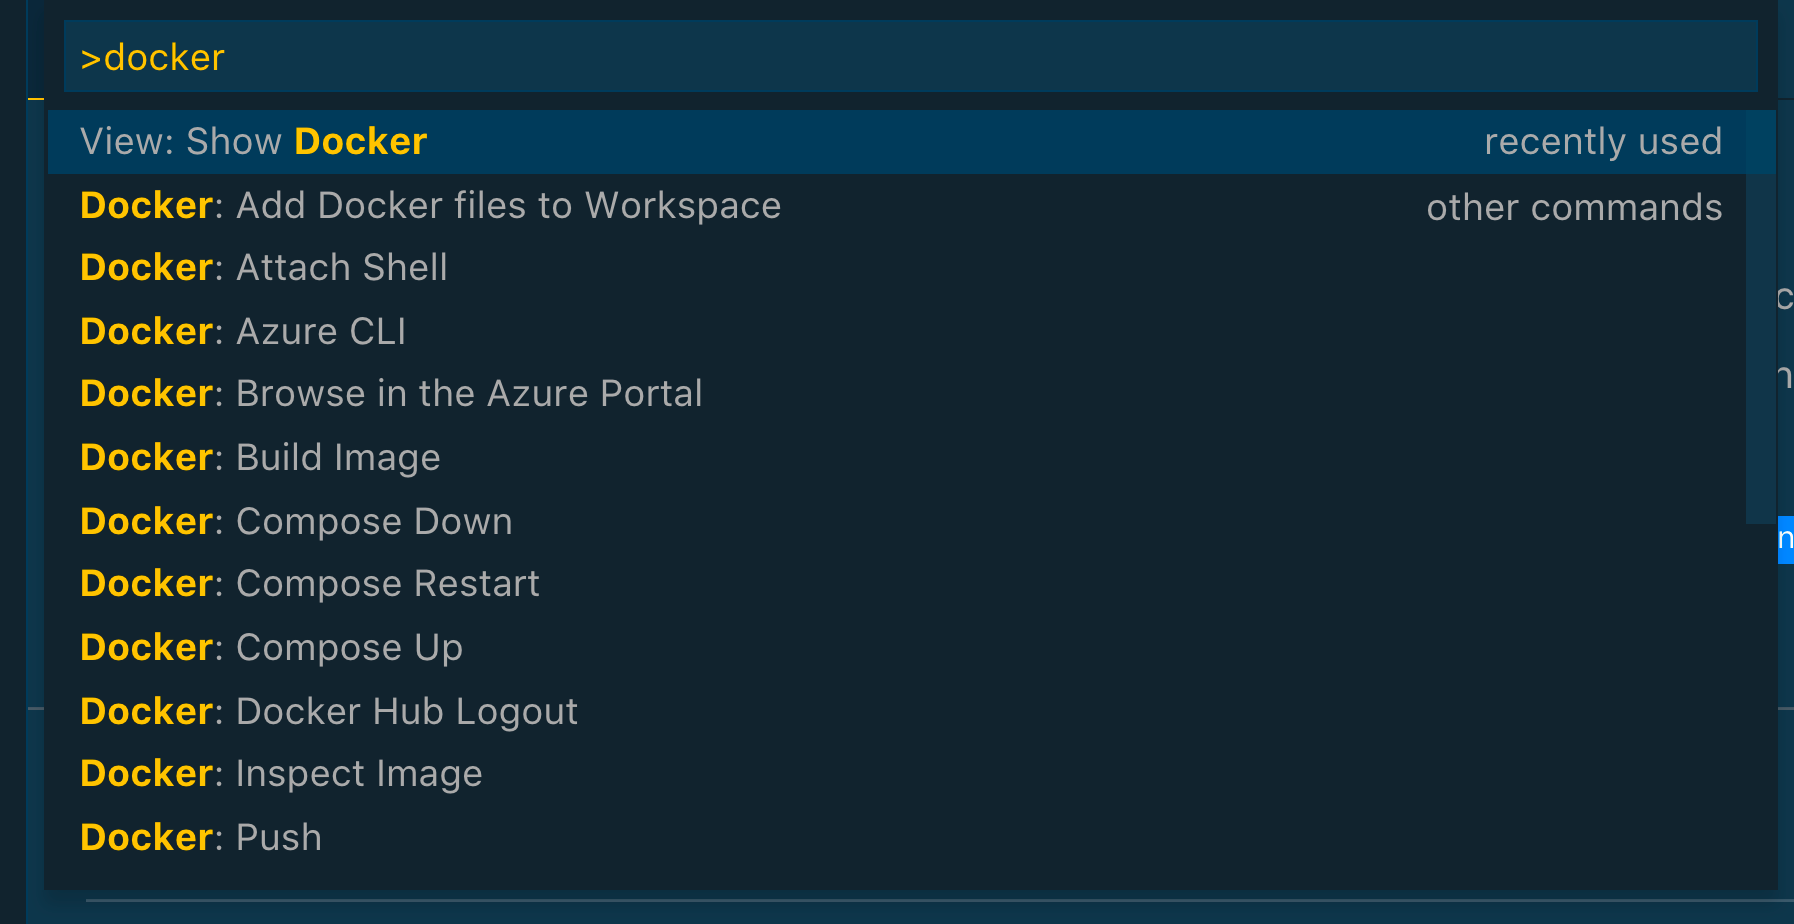 .
.
在命令面板中还添加了一些命令,您可以通过打开命令面板并键入docker来查看 。
Node.js (Node.js)
We’ll use a Node.js application to demonstrate the capabilities the Docker plugin adds to VSCode.
我们将使用Node.js应用程序来演示Docker插件添加到VSCode的功能。
Let’s create an Express server.
让我们创建一个Express服务器。
- mkdir docker-node mkdir docker节点
- cd docker-node cd docker节点
- npm init -y npm初始化-y
- npm install --save express npm install-保存快递
- touch index.js 触摸index.js
We should have a directory tree like this:
我们应该有一个像这样的目录树:
.
├── index.js
├── node_modules
├── package-lock.json
└── package.json

1 directory, 3 files
This is the content of index.js
这是index.js的内容
const express = require('express')
const app = express()

app.listen(3000)

app.get('/', (req, res) => {
  res.send('hello world')
})
Update package.json to have a start script.
更新package.json以具有启动脚本。
"scripts": {
    "start": "node index.js"
  },
Now, we can simply run this app with npm start, and go to port 3000 and see the app working.
现在,我们可以简单地使用npm start运行该应用npm start ,并转到端口3000并查看该应用程序的运行情况。
Traditionally, to add Docker, we would follow these steps.
传统上,要添加Docker,我们将遵循以下步骤。
- Create a Dockerfile (or docker-compose.yaml) 创建一个Dockerfile(或docker-compose.yaml)
- Add docker instructions to the file (FROM, WORKDIR, ADD, EXPOSE, CMD) 将docker指令添加到文件中(FROM,WORKDIR,ADD,EXPOSE,CMD)
Run
docker build...on the terminal to build the image在终端上运行
docker build...以构建映像Run
docker run...on the terminal to run the container在终端上运行
docker run...以运行容器
With the plugin however, all we need to do is the following. Open the command palette, and type in docker, then select Docker: Add Docker files to Workspace. It should be the first option. Press Enter
 You will be asked to choose the platform/stack, select Node.js and press
Enter. You will then be asked to choose a port. Write
3000 since it’s the port our app will listen to.
 The following files are added to your workspace:
.dockerignore,
docker-compose.debug.yml,
docker-compose.yml, and
Dockerfile.
但是,使用该插件,我们要做的只是以下操作。 打开命令面板,输入docker ,然后选择Docker: Add Docker files to Workspace 。 它应该是第一个选择。 按Enter
 系统将要求您选择平台/堆栈,选择Node.js并按
Enter 。 然后将要求您选择一个端口。 写
3000因为它是我们的应用程序将监听的端口。
 以下文件已添加到您的工作区:
.dockerignore ,
docker-compose.debug.yml
docker-compose.yml ,
Dockerfile
docker-compose.yml和
Dockerfile 。
The .dockerignore tells docker to ignore the files listed when adding files to the build image.
.dockerignore告诉.dockerignore在将文件添加到构建映像时忽略列出的文件。
The docker-compose.debug.yml will allow you to run docker-compose with inspect, and attach a debugger.
docker-compose.debug.yml将允许您运行带有inspect docker-compose.debug.yml docker-compose ,并附加调试器。
version: '2.1'

services:
  docker-node:
    image: docker-node
    build: .
    environment:
      NODE_ENV: development
    ports:
      - 3000:3000
      - 9229:9229
    command: node --inspect=0.0.0.0:9229 index.js
If you are debugging during development though, you may need to attach a volume so that changes you make on your local machine are persisted in the container.
但是,如果在开发过程中进行调试,则可能需要附加一个卷,以便将在本地计算机上所做的更改保存在容器中。
The docker-compose.yml file is a standard docker-compose file used to run docker-services. When you add other resources/services such as database connections and load balancers, you’ll edit this file.
docker-compose.yml文件是用于运行docker-compose.yml的标准docker-compose.yml -compose文件。 添加其他资源/服务(例如数据库连接和负载平衡器)时,将编辑此文件。
version: '2.1'

services:
  docker-node:
    image: docker-node
    build: .
    environment:
      NODE_ENV: production
    ports:
      - 3000:3000
The Dockerfile, which is the most important here, since it has to be built, contains the instructions we would have to write manually if we did not have the plugin installed.
Dockerfile在这里是最重要的,因为它必须被构建,其中包含如果我们没有安装插件,我们将必须手动编写的指令。
FROM node:8.9-alpine
ENV NODE_ENV production
WORKDIR /usr/src/app
COPY ["package.json", "package-lock.json*", "npm-shrinkwrap.json*", "./"]
RUN npm install --production --silent && mv node_modules ../
COPY . .
EXPOSE 3000
CMD npm start
Next, to build the Image, open the VS Code command palette, and type in docker then select Docker: Build Image and press Enter.
 You’ll be prompted to select the Dockerfile, choose it and press
Enter. Next you’ll be prompted to select the tag. Leave the default
docker-node selected and press
Enter.
 The Integrated Terminal will open, and the build logs will show.
接下来,要构建映像,请打开VS Code命令面板,然后键入docker然后选择Docker: Build Image并按Enter 。
 系统将提示您选择Dockerfile,选择它,然后按
Enter 。 接下来,将提示您选择标签。 保持默认的
docker-node处于选中状态,然后按
Enter 。
 集成终端将打开,并且将显示构建日志。
Finally, we need to run the container. Once again, open the command palette and type in docker run, the select Docker: Run
 A list of all containers in your system will show up, select
docker-node:latest, the one we tagged, and press
Enter. The terminal will show the logs for the run command.
 Notice it added the
-p 3000:3000 exposing the port to our host machine so that we can run the application by visiting
localhost:3000.
最后,我们需要运行容器。 再次打开命令面板,然后键入docker run ,选择Docker: Run 将显示系统中所有容器的列表,选择docker-node:latest ,我们标记的容器,然后按Enter 。
 终端将显示运行命令的日志。 注意,它添加了
-p 3000:3000将端口暴露给我们的主机,以便我们可以通过访问
localhost:3000来运行该应用程序。
We can also run the container by going to the left pane, selecting the Docker section, then under Images, choose the docker-node image, right click and click on run.
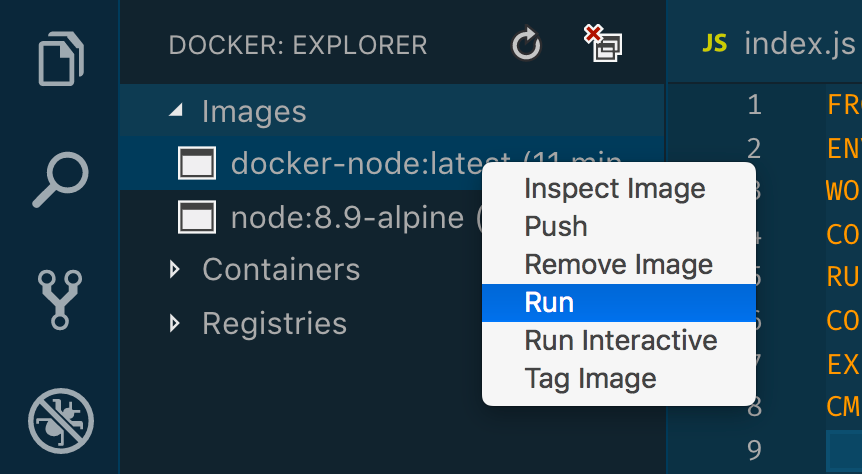 The same logs will run on the terminal.
我们还可以通过以下方法运行容器:转到左窗格,选择Docker部分,然后在Images下,选择docker-node映像,右键单击并单击run。 相同的日志将在终端上运行。
You’ll also notice that the images section above has a list of the images in your system. Once the docker-node container is running, We can check the running containers in the same section, and even stop them.
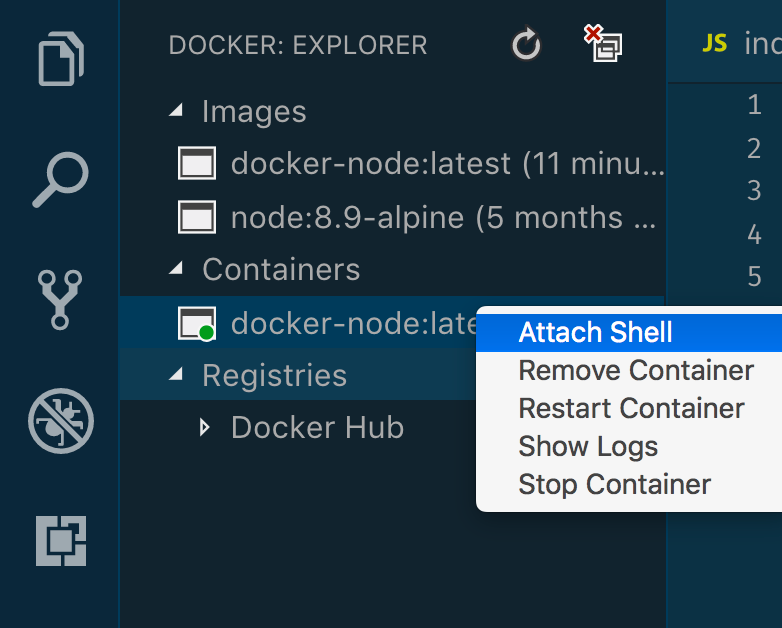 Above,
Attach Shell is selected, which is equivalent to the docker command below.
您还将注意到,上面的图像部分提供了系统中图像的列表。 docker-node容器运行后,我们可以检查同一部分中正在运行的容器,甚至停止它们。 Attach Shell ,它等效于以下docker命令。
- docker exec -it <container> sh docker exec -it <容器> sh
This shows the below terminal log output.
这显示以下终端日志输出。
You can see we’re in the container and we can list the files inside the container.
您可以看到我们在容器中,并且可以列出容器中的文件。
Stop the container, and try running the app with docker-compose. Open the command palette, find docker-compose and see the output.
停止容器,然后尝试使用docker-compose运行应用。 打开命令面板,找到docker-compose并查看输出。
走 (Go)
If you are not familiar with Golang, you can skip to the next topic.
如果您不熟悉Golang,可以跳到下一个主题。
Docker is also built with Go
Docker也是用Go构建的
Let’s create a Go App.
让我们创建一个Go App。
- mkdir docker-go mkdir docker-go
- cd docker-go cd docker-go
- touch main.go 触摸main.go
Your directory tree will have one file.
您的目录树将只有一个文件。
.
└── main.go

0 directories, 1 file
Here’s the content for the main.go file.
这是main.go文件的内容。
package main

import (
    "log"
    "net/http"
)

func helloHandler(w http.ResponseWriter, r *http.Request) {
    w.Write([]byte("Hello World"))
}

func main() {
    http.HandleFunc("/", helloHandler)

    if err := http.ListenAndServe(":9000", nil); err != nil {
        log.Fatalln("ListenAndServer Error", err)
    }
}
You can run the App with:
您可以通过以下方式运行该应用程序:
- go run main.go 去运行main.go
Let’s however use the VSCode Docker plugin to build an image and run the container.
但是,让我们使用VSCode Docker插件来构建映像并运行容器。
Create the Dockerfile by opening the command palette, typing in Docker and selecting Docker: Add Dockerfile to Workspace.
通过打开命令面板,输入Docker并选择Docker: Add Dockerfile to Workspace ,创建Dockerfile Docker: Add Dockerfile to Workspace 。
You will be prompted to select a platform, choose Go and press Enter.
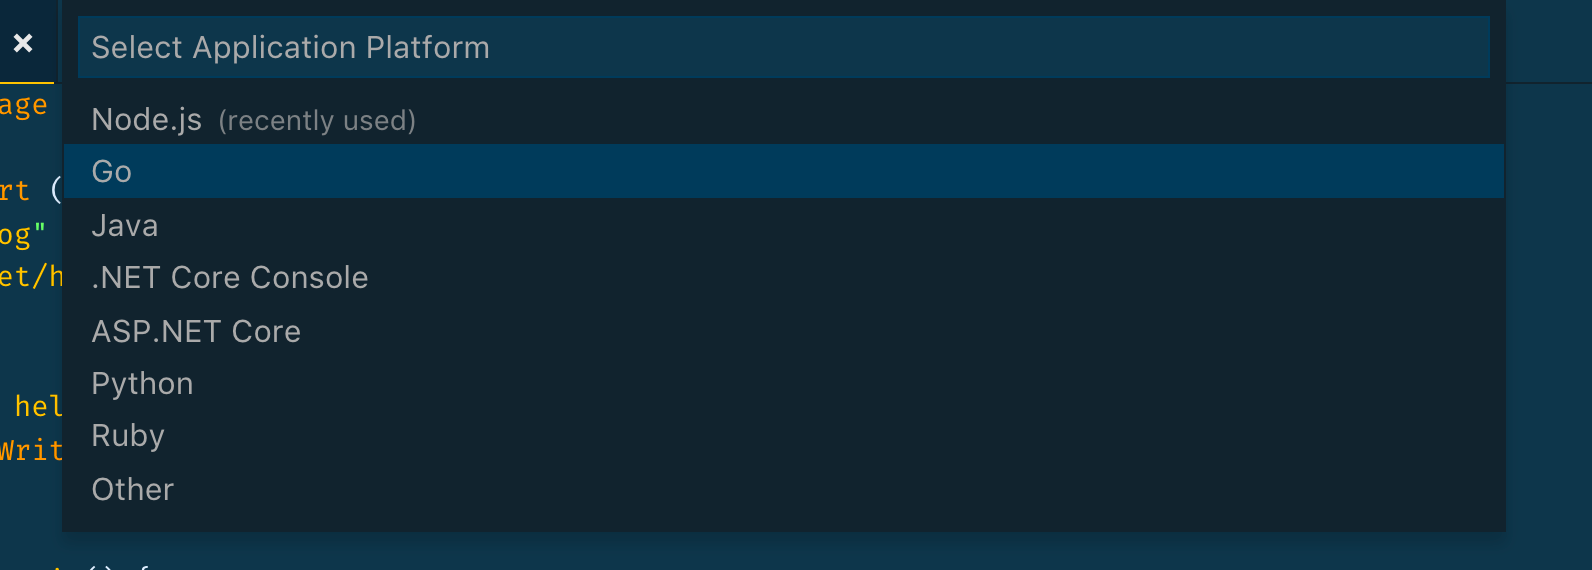
系统将提示您选择一个平台,选择Go ,然后按Enter 。
You’ll then be prompted to select a port, write in port 9000, since it’s the port we chose on our app, and press Enter.

然后,系统将提示您选择一个端口,并写入端口9000 ,因为它是我们在应用程序中选择的端口,然后按Enter 。
The following 4 files will be created. .dockerignore, docker-compose.debug.yml, docker-compose.yml, and Dockerfile.
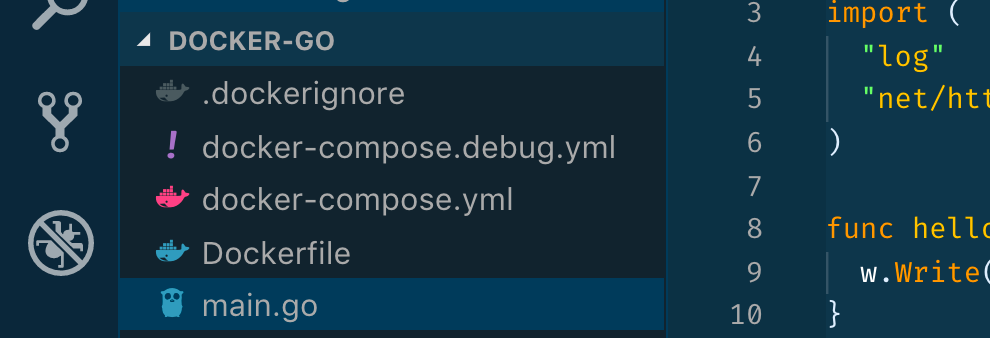
将创建以下4个文件。 .dockerignore , docker-compose.debug.yml docker-compose.yml , Dockerfile docker-compose.yml和Dockerfile 。
The .dockerignore file tells Docker to ignore some files when adding files to the image.
.dockerignore文件告诉Docker在将文件添加到映像时忽略某些文件。
The docker-compose.debug.yml and the docker-compose.yml are used by Docker Compose to run the app. They are not that much different, since the debug file requires additional input, as debugging Go is more complex.
Docker Compose使用docker-compose.yml docker-compose.debug.yml和docker-compose.debug.yml docker-compose.yml运行该应用程序。 它们并没有太大区别,因为调试文件需要额外的输入,因为调试Go更复杂。
The Dockerfile here is however the most interesting bit. The last two lines of the build stage are commented out and added RUN go install -v ./...
然而,这里的Dockerfile是最有趣的部分。 注释了build stage的最后两行,并添加了RUN go install -v ./...
# RUN go-wrapper download   # "go get -d -v ./..."
# RUN go-wrapper install    # "go install -v ./..."
RUN go install -v ./...
Here’s the final docker file.
这是最终的docker文件。
#build stage
FROM golang:alpine AS builder
WORKDIR /go/src/app
COPY . .
RUN apk add --no-cache git
# RUN go-wrapper download   # "go get -d -v ./..."
# RUN go-wrapper install    # "go install -v ./..."
RUN go install -v ./...

#final stage
FROM alpine:latest
RUN apk --no-cache add ca-certificates
COPY --from=builder /go/bin/app /app
ENTRYPOINT ./app
LABEL Name=docker-go Version=0.0.1
EXPOSE 9000
This type of Dockerfile pattern is called multi-stage build, and it’s main advantage is optimization of Docker images. It’s mostly useful for compiled languages, which in most cases doesn’t require the compilation tools to run the compiled app. Go is a good example.
这种类型的Dockerfile模式称为多阶段构建 ,它的主要优势是对Docker映像的优化。 它对于已编译的语言最为有用,在大多数情况下,这些语言不需要编译工具即可运行已编译的应用程序。 去是一个很好的例子。
In a nutshell, we use part of the Docker build to compile the app, then copy the compiled binary to a lighter Docker image, and run it from there.
简而言之,我们使用Docker构建的一部分来编译应用程序,然后将已编译的二进制文件复制到较轻的Docker映像中,然后从那里运行它。
Next we need to build the image. Open the command palette, and type in docker-build, select Docker: Build Image and press Enter.
接下来,我们需要构建图像。 打开命令面板,然后键入docker-build ,选择Docker: Build Image并按Enter 。
You’ll be prompted to select the Dockerfile, leave the default selected and press Enter.
系统将提示您选择Dockerfile,保留默认设置,然后按Enter 。
Finally, you’ll be ask to pick an image tag. Leave the default docker-go:latest and press Enter.
 You’ll see the build logs in the integrated terminal.
最后,您将被要求选择一个图像标签。 保留默认的docker-go:latest ,然后按Enter 。 您将在集成终端中看到构建日志。
Lastly, we need to run the container. Open the command palette and type in docker run. Select Docker: Run and press Enter.
 You’ll be prompted to select the image. Select
docker-go:latest. You’ll see the logs in the Integrated Terminal.
 Like before, you can also run the container by selecting the Docker section in the left pane, and under containers, select
docker-go, right click on click
Run. You’ll then see the same
docker run logs.
最后,我们需要运行容器。 打开命令面板,然后键入docker run 。 选择Docker: Run ,然后按Enter 。
 系统将提示您选择图像。 选择
docker-go:latest 。 您将在集成终端中看到日志。
 与之前一样,您还可以通过在左窗格中选择Docker部分来运行容器,然后在容器下选择
docker-go ,右键单击
Run 。 然后,您将看到相同的
docker run日志。
Since our our running Docker container only had the binary, we can attach the shell, in the containers section.
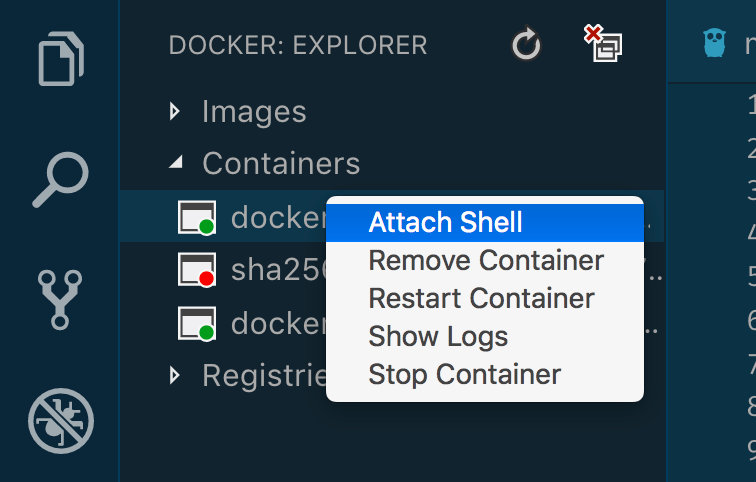 We can the type in
ls in the attached shell in the Integrated Terminal, and we’ll see a binary file called
app, which corresponds to the Dockerfile.
由于我们运行的Docker容器仅包含二进制文件,因此我们可以在容器部分中附加外壳程序。
 我们可以在Integrated Terminal的附加外壳中键入
ls ,然后将看到一个名为
app的二进制文件,该文件对应于Dockerfile。
其他特性 (Other Features)
We’ll finally look at other helpful features that come with the VSCode Docker plugin.
我们最后将看看VSCode Docker插件附带的其他有用功能。
Docker inspect images: This allows you to inspect the images built and see the details in a JSON file.
Docker检查图像:这使您可以检查构建的图像,并在JSON文件中查看详细信息。
Select the image you want and open the context menu, and select inspect image.
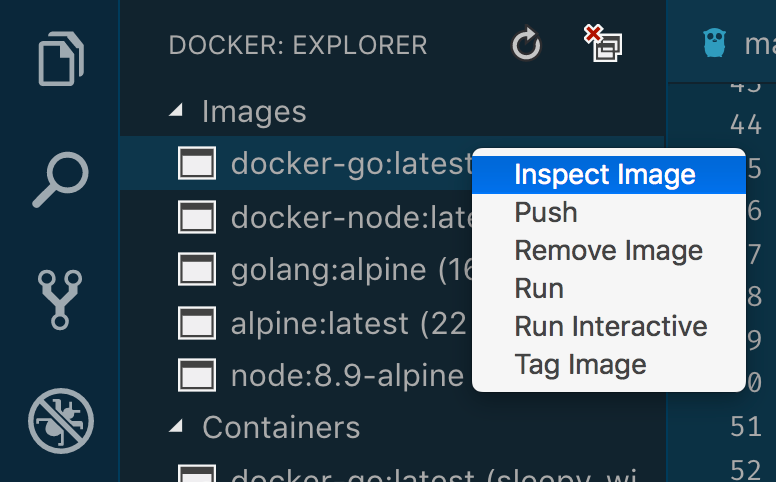 A JSON file will be opened with the details.
选择所需的图像,然后打开上下文菜单,然后选择检查图像 。
 将打开一个包含详细信息的JSON文件。
Show container logs: This is also found in the context menu for running containers. We’ll use the running Node.js container
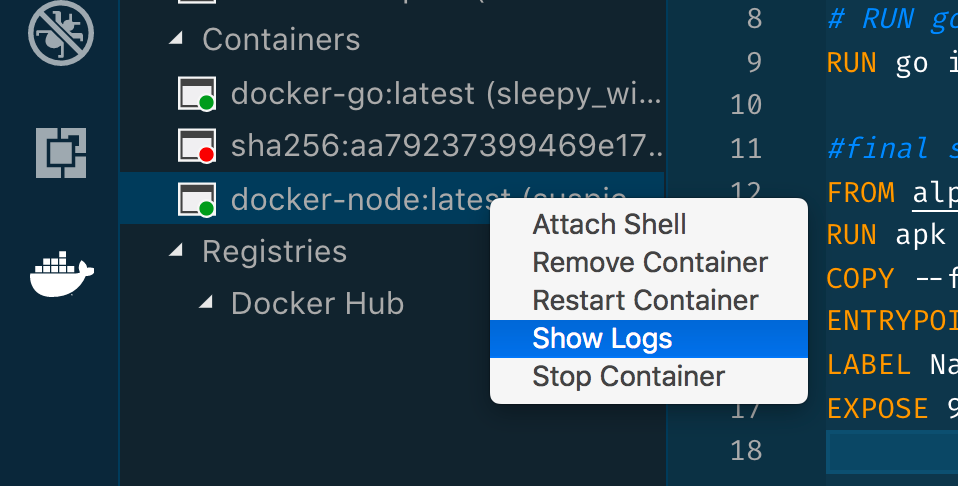 The logs will be shown in the Integrated Terminal.
显示容器日志:在运行容器的上下文菜单中也可以找到它。 我们将使用运行中的Node.js容器
 日志将显示在集成终端中。
Registries: You can log in to your Docker registry and see the images you’ve built and pushed.
注册表:您可以登录到Docker注册表并查看已构建和推送的映像。
System Prune: This option allows you to run docker system prune, which clears unused images your system. It’s available via the button with the windows and a cross in the Docker explorer.

System Prune:此选项允许您运行docker system prune ,清除系统中未使用的映像。 可以通过带窗口的按钮和Docker Explorer中的叉形按钮使用。
Intellisense: If you have to write the Docker files (Dockerfile, docker-compose.yml) yourself, you’ll get useful intellisense when typing.
 It will even give you available image tags. This is triggered by typing in the image name, then a full colon, and
CMD +
Space.
Intellisense:如果您必须自己编写Docker文件(Dockerfile,docker-compose.yml),则在键入时会获得有用的智能感知。
 它甚至会为您提供可用的图像标签。 输入图像名称,然后输入完整的冒号和
CMD +
Space触发此操作。
Dockerfile Linting: When you have an error in your Dockerfiles, a squiggly line will appear in VS Code and when you hover over it, you’ll be shown what the error is.
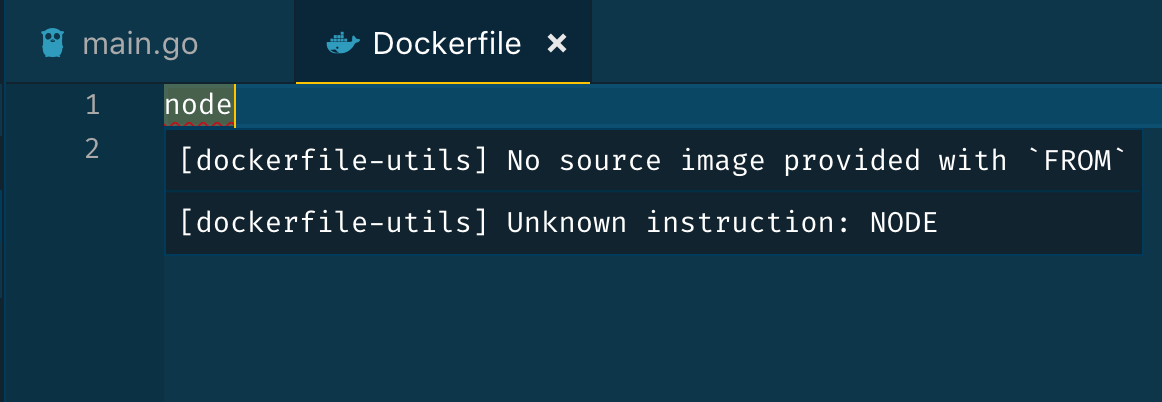
Dockerfile Linting:当Dockerfile中有错误时,VS Code中将出现弯曲的行,并将鼠标悬停在该行上时,将显示错误的原因。
The problems tab below VS Code will also show it.

VS Code下面的问题标签也将显示它。
结论 (Conclusion)
The Docker plugin for VS Code can help you quickly set up and create your Dockerfiles, build them and run them, without typing many of the commands yourself.
VS Code的Docker插件可以帮助您快速设置和创建Dockerfile,构建它们并运行它们,而无需自己键入许多命令。
翻译自: https://www.digitalocean.com/community/tutorials/how-to-use-the-docker-plugin-for-visual-studio-code


 本文介绍了如何使用Visual Studio Code的Docker插件,该插件使得在Node.js和Go开发中集成Docker变得简单。文章涵盖了插件的安装,创建Dockerfile,使用插件构建和运行容器的步骤,以及插件提供的其他功能,如Docker镜像检查、容器日志查看和系统清理等。


 1万+
1万+

 被折叠的 条评论
为什么被折叠?


