


wordpress创建
Have you tried to find functionality for a specific purpose in WordPress but failed to find a plugin or widget that does your work? This post walks through how you can create a WordPress widget, even if you have limited knowledge of coding.
您是否尝试过在WordPress中找到用于特定目的的功能,但是找不到适合您的工作的插件或小部件? 即使您对编码的知识有限,本文也会逐步介绍如何创建WordPress小部件。
WordPress Widgets are blocks of code — static, dynamic, or a combination of both — which can be added to any specific area of your WordPress site. There are many built-in widgets in WordPress — such as tag cloud and categories — but this post helps you create a widget from scratch in a short time. It will probably take you longer to finish reading this article than to create the widget after you gain the knowledge!
WordPress窗口小部件是代码块(静态,动态或二者的结合),可以将其添加到WordPress网站的任何特定区域。 WordPress中有许多内置小部件(例如标签云和类别),但是这篇文章可帮助您在短时间内从头开始创建小部件。 获得知识之后,完成阅读本文所需的时间可能比创建窗口小部件要花费更多的时间!
For illustration purposes, we’re looking at creating a widget with dynamic content in the form of real time data of cricket matches. The purpose of creating dynamic content is to familiarize you with various functions that are associated with WordPress Widgets.
出于说明目的,我们正在考虑以板球比赛的实时数据形式创建具有动态内容的小部件。 创建动态内容的目的是使您熟悉与WordPress小部件相关的各种功能。
前提条件 (Pre Requisites)
Before you start any code, please make sure you back up your WordPress code, as you may end up with a white screen of death. Alternately, you may want to explore version control for WordPress with Git.
在开始任何代码之前,请确保备份WordPress代码 ,否则可能会死机。 或者,您可能希望使用Git探索WordPress的版本控制 。
Further, it’s recommended that you have some knowledge of OOP in PHP before attempting to create a widget.
此外,建议您在尝试创建小部件之前对PHP的OOP有一定的了解。
This tutorial has been created on WordPress version 4.9.8.
本教程是在WordPress 4.9.8版上创建的。
将代码放在哪里? (Where to Put the Code?)
Before we discuss the nuances of developing a WordPress Widget, let’s consider where to keep the code. The answer to that lies in the purpose for developing the widget. In case you want the widget to appear in a specific theme only, you can put the code in the theme’s functions.php file. However, this makes the widget accessible only if the theme is active.
在讨论开发WordPress小部件的细微差别之前,让我们考虑将代码保存在何处。 答案在于开发小部件的目的。 如果您希望小部件仅出现在特定主题中,则可以将代码放在主题的functions.php文件中。 但是,这仅在主题处于活动状态时才使小部件可访问。
This tutorial focuses on creating a widget which can be accessed throughout themes on your website. Hence, we would create a new plugin, which houses the widget that shows a list of live cricket matches from an API.
本教程着重于创建一个可在您网站上的整个主题中访问的窗口小部件。 因此,我们将创建一个新插件,其中包含显示来自API的实时板球比赛列表的小部件。
小部件开发基础 (Widget Development Basics)
To create a widget in WordPress, you need to extend the WP_Widget class. Within your widget class, you can create a list of functions:
要在WordPress中创建小部件,您需要扩展WP_Widget类。 在窗口小部件类中,您可以创建函数列表:
- the constructor function 构造函数
the
widgetfunction to display the widget contentswidget功能以显示小部件内容the
formfunction if you need to define a form that takes inputform函数,如果您需要定义一个接受输入的表单the
updatefunction if you need to update the settings of the widget.如果您需要更新小部件的设置,请使用
update功能。
In the example of displaying cricket feeds, we need to define only the first two functions. Further, once we’ve created the widget class, we need to register it with the register_widget function.
在显示板球提要的示例中,我们仅需要定义前两个功能。 此外,一旦创建了窗口小部件类,就需要使用register_widget函数对其进行register_widget 。
Let’s now move on to creating a basic plugin in WordPress and then use an API to generate dynamic content.
现在,让我们继续在WordPress中创建一个基本插件,然后使用API生成动态内容。
基础:Hello World小部件 (The Basics: Hello World Widget)
Before you create the widget, an empty plugin needs to be created. Head on to the /wp-content/plugins/ and create a new directory with the slug of the name of your plugin. Within this directory, create an index.php file with the following content.
在创建窗口小部件之前,需要创建一个空插件。 转到/wp-content/plugins/并使用插件名称的标签创建一个新目录。 在此目录中,创建具有以下内容的index.php文件。
定义一个空插件 (Define an Empty Plugin)
<?php
/*
Plugin Name: Live Score Custom
Plugin URI: https://www.sitepoint.com/
Description: Get and display sports feeds
Version: 1.0
Author: Shaumik
Author URI: https://www.sitepoint.com/
License: GPL2
*/
?>
This is essentially a blank PHP file with comments, as suggested on the WordPress Codex page on creating a new plugin. These comments are read by WordPress when displaying information about the plugin on WP Admin.
本质上是一个空白PHP文件,带有注释,如创建新插件的WordPress Codex页面上所建议。 当在WP Admin上显示有关插件的信息时,WordPress将阅读这些注释。
Once you’ve created the empty plugin with comments, you can see that your plugin is active on the list of plugins on WP Admin. Activate the plugin before proceeding further.
创建带有注释的空插件后,您可以在WP Admin上的插件列表中看到该插件处于活动状态。 在继续操作之前,请激活插件。
 Plugin list on WP Admin after creating empty plugin 创建空插件后,WP Admin上的插件列表
在插件中定义窗口小部件 (Define a Widget within the Plugin)
The next step is to create a sample widget code. As discussed earlier, we would be extending the WP_Widget class. After defining the class, we’ll register the widget using the register_widget method:
下一步是创建示例窗口小部件代码。 如前所述,我们将扩展WP_Widget类。 定义了类之后,我们将使用register_widget方法注册小部件:
class My_Custom_Widget extends WP_Widget {

    public function __construct() {
    }

    public function widget( $args, $instance ) {
        // Define the widget
    }
}
// Register the widget
function my_register_custom_widget() {
    register_widget( 'My_Custom_Widget' );
}
add_action( 'widgets_init', 'my_register_custom_widget' );
Now that our skeleton code is ready, let’s fill in the constructor and widget functions:
现在我们的框架代码已经准备好,让我们填写构造函数和widget函数:
public function __construct() {
    // Define the constructor

    $options = array(
        'classname' => 'custom_livescore_widget',
        'description' => 'A live score widget',
    );

    parent::__construct(
        'live_score_widget', 'Live Score Widget', $options
    );
}
The constructor can be extended from the parent constructor. In the options, we can also provide a CSS class that’s added to the entire widget element in the HTML DOM when being displayed. Next, let’s define the widget display options:
构造函数可以从父构造函数扩展。 在选项中,我们还可以提供一个CSS class , class在显示时会添加到HTML DOM中的整个小部件元素中。 接下来,让我们定义小部件显示选项:
public function widget( $args, $instance ) {
    // Keep this line
    echo $args['before_widget'];

    echo $args['before_title'] . apply_filters( 'widget_title', 'Live Criket Matches' ) . $args['after_title'];
    echo 'Hello, World!';

    // Keep this line
    echo $args['after_widget'];
}
In the widget class, we define what needs to be displayed in the widget. First, we add a widget title, “Live Cricket Matches”, and then a simple “Hello, World!”
在widget类中,我们定义需要在小部件中显示的内容。 首先,我们添加一个小部件标题“ Live Cricket Matches”,然后添加一个简单的“ Hello,World!”。
Once the code has been saved, let’s head back to Appearance > Widgets in WP Admin and add the newly created widget to a part of the page.
保存代码后,让我们回到WP Admin中的“ 外观”>“小部件” ,然后将新创建的小部件添加到页面的一部分。
 Adding Widget in WP Admin 在WP Admin中添加小部件
Once you’ve added the widget, you can refresh your home page and check if the widget has appeared.
添加窗口小部件后,您可以刷新主页并检查窗口小部件是否已出现。
 Hello World widget in the home page 主页中的Hello World小部件
You may notice that the class in which we defined the widget has been added to the widget element. You can change the style of the widget if required. If you’re interested, check out this tutorial on how to customize the style of a WordPress theme.
您可能会注意到,我们在其中定义窗口小部件的类已添加到窗口小部件元素中。 您可以根据需要更改小部件的样式。 如果您有兴趣,请查看本教程,了解如何自定义WordPress主题的样式 。
添加实时比分选项 (Adding a Live Score Option)
So far, we’ve successfully created a widget associated with a plugin, registered it on WP Admin and displayed it on our home page. The next step is to get the live score feed from an API.
到目前为止,我们已经成功创建了一个与插件相关联的小部件,并在WP Admin上注册了该小部件,并将其显示在我们的主页上。 下一步是从API获取实时比分Feed。
As a demonstration, we’ll use the API by CricAPI. You can make 100 API requests per day under the free plan. After registering, you’re provided with an API key, which is needed when you make requests to the site. We’ll use the “New match API” option to get the data for our widget.
作为演示,我们将使用CricAPI的API。 免费计划下,您每天可以发出100个API请求。 注册后,会为您提供一个API密钥,当您向该网站提出请求时需要使用它。 我们将使用“新匹配API”选项来获取小部件的数据。
A GET request needs to be sent to the Match API with the apikey parameter to get a list of matches. Once you have your API key you can verify that the API is working properly by going to the following URL on your browser:
需要使用apikey参数将GET请求发送到Match API以获取匹配项列表。 拥有API密钥后,您可以转到浏览器上的以下URL,以验证API是否正常运行:
http://cricapi.com/api/matches?apikey=api_keyThe response is a JSON string, with the list of matches and some metadata. We can emulate the request and extract the data in PHP by modifying our widget function:
响应是一个JSON字符串,其中包含匹配项列表和一些元数据。 我们可以通过修改widget函数来模拟请求并提取PHP中的数据:
public function widget( $args, $instance ) {

// before and after widget arguments are defined by themes
echo $args['before_widget'];

echo $args['before_title'] . apply_filters( 'widget_title', 'Live Criket Matches' ) . $args['after_title'];

// This is where you run the code and display the output
$api_key = 'ONkuR4grRDFyUzOEYoSzeUQolbx2'
$api_url  = "http://cricapi.com/api/matches?apikey=" . $api_key;

//  Initiate curl
$ch = curl_init();
curl_setopt($ch, CURLOPT_SSL_VERIFYPEER, false);

// Will return the response, if false it print the response
curl_setopt($ch, CURLOPT_RETURNTRANSFER, true);
// Set the url
curl_setopt($ch, CURLOPT_URL, $api_url);
// Execute
$result = curl_exec($ch);
// Closing
curl_close($ch);

// Will dump a json - you can save in variable and use the json
$cricketMatches = json_decode($result);

foreach($cricketMatches->matches as $item) {
    if ($item->matchStarted == true) {
        echo $item->{'team-1'}, ' vs ', $item->{'team-2'}, '<br />';
    }
}

echo $args['after_widget'];

}
Here are the steps we follow in the code:
这是我们在代码中遵循的步骤:
we send a request to the URL through cURL, disabling the secure option (notice that the cricAPI URL is
http)我们通过cURL发送请求到URL,禁用安全选项(注意cricAPI URL是
http)we save the JSON response after decoding in the variable
$cricketMatches我们将解码后的JSON响应保存在变量
$cricketMatches- we get a list of matches and display those which have started already. 我们会得到一个匹配列表,并显示已经开始的匹配。
Let’s now have a look at the home page to see whether the desired data is shown.
现在让我们看一下主页,看看是否显示了所需的数据。
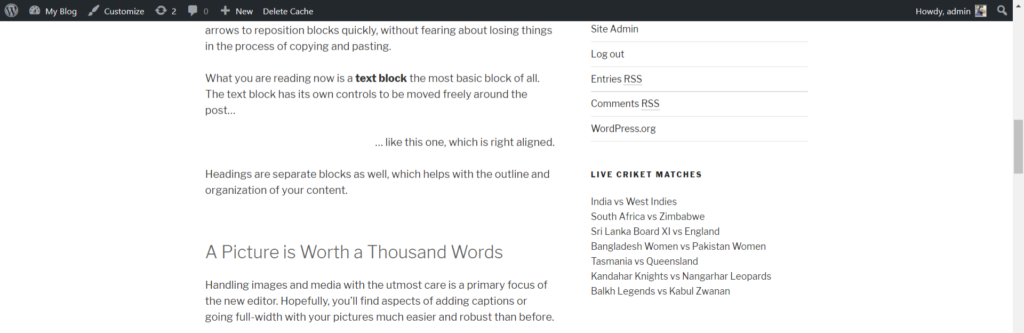 Widget displaying list of cricket matches in home page 显示主页上板球比赛列表的小部件
The data can be explored further to display specific options. For instance, you can get the score by sending a request to the cricket score API with your API key and match ID.
可以进一步探索数据以显示特定选项。 例如,您可以通过使用API密钥和匹配ID向板球比分API发送请求来获得比分 。
打包和共享插件 (Packaging and Sharing the Plugin)
There you go. You’ve successfully created the widget that lists live cricket matches! You can pack the plugin by creating a zip file of the live-score-custom-plugin directory, and uploading the zip file to Plugins > Add New > Upload Plugin.
妳去 您已经成功创建了列出实时板球比赛的小部件! 您可以通过创建live-score-custom-plugin目录的zip文件并将该zip文件上传到Plugins> Add New> Upload Plugin来打包插件 。
最后的想法 (Final Thoughts)
In this tutorial, we went through the basics of creating a widget in WordPress through a plugin and extracted live sports feeds to display data.
在本教程中,我们介绍了通过插件在WordPress中创建窗口小部件的基础知识,并提取了实时体育供稿以显示数据。
wordpress创建


 1636
1636

 被折叠的 条评论
为什么被折叠?
被折叠的 条评论
为什么被折叠?
 到【灌水乐园】发言


