


symfony 控制器
This popular article was updated on May 24th, 2017 to provide a more comprehensive introduction into an essential, modern tool.
这篇热门文章于2017年5月24日进行了更新,以对基本的现代工具进行更全面的介绍。
“The console component eases the creation of beautiful and testable command line interfaces.”
“控制台组件使创建漂亮且可测试的命令行界面变得容易。”
This is how we are welcomed when we visit the Symfony Console component tool page.
当我们访问Symfony Console组件工具页面时,这就是我们的欢迎方式。
As software developers, we often feel the need to resort to command line tools. These kinds of tools are helpful when we need to do a sort of recurring task like migrating data, performing imports, or creating cron jobs.
作为软件开发人员,我们经常感到有必要诉诸命令行工具。 当我们需要执行某种重复性任务(例如迁移数据,执行导入或创建cron作业)时,这些工具非常有用。

The Symfony Console component tool provides us with a simple framework to create our own command line tools.
Symfony控制台组件工具为我们提供了一个简单的框架来创建我们自己的命令行工具。
Unlike many components in Symfony, this is a standalone package and is used by the likes of Laravel‘s Artisan and many other famous PHP packages.
与Symfony中的许多组件不同,这是一个独立的程序包,并由Laravel的Artisan和许多其他著名PHP程序包使用。
To read up on alternatives to Symfony Console, see our comparison post: PHP Console Wars!
要阅读Symfony Console的替代方案,请参阅我们的比较文章:PHP Console Wars!
安装 (Installation)
composer require symfony/consoleEssential information about Composer here.
关于作曲家基本信息在这里 。
创建一个新命令 (Creating a New Command)
To create a new command, we need to make sure our file will be executable. In order to do that, let’s create a console file in the root of our project. This file will be our command manager.
要创建新命令,我们需要确保文件是可执行的。 为此,让我们在项目的根目录中创建一个console文件。 该文件将成为我们的命令管理器。
touch consoleNow, let’s make sure the file is executable.
现在,让我们确保文件是可执行的。
chmod 755 consoleThen, let’s make sure our file has the shebang at the beginning. The shebang is a character sequence (a number sign followed by an exclamation mark) that appears at the beginning of a script. When the shebang is present, exec() will instead run the executable specified after the shebang. In our case, it will run as a PHP script.
然后,让我们确保文件的开头是shebang 。 shebang是出现在脚本开头的一个字符序列(一个数字符号,后跟一个感叹号)。 如果存在shebang,则exec()会运行shebang之后指定的可执行文件。 在我们的例子中,它将作为PHP脚本运行。
After this, let’s define our console application. The first iteration of our command manager will look like this:
之后,让我们定义控制台应用程序。 我们的命令管理器的第一个迭代将如下所示:
#!/usr/bin/env php

<?php

require_once __DIR__ . '/vendor/autoload.php';

use Symfony\Component\Console\Application;

$app = new Application();
$app->run();
`
`
Let’s take a closer look at things. First, we are autoloading all our dependencies, then importing the Application package from the Console component. After that, we are creating a new instance of the Application and running it.
让我们仔细看看。 首先,我们将自动加载所有依赖项,然后从控制台组件导入Application包。 之后,我们将创建该应用程序的新实例并运行它。
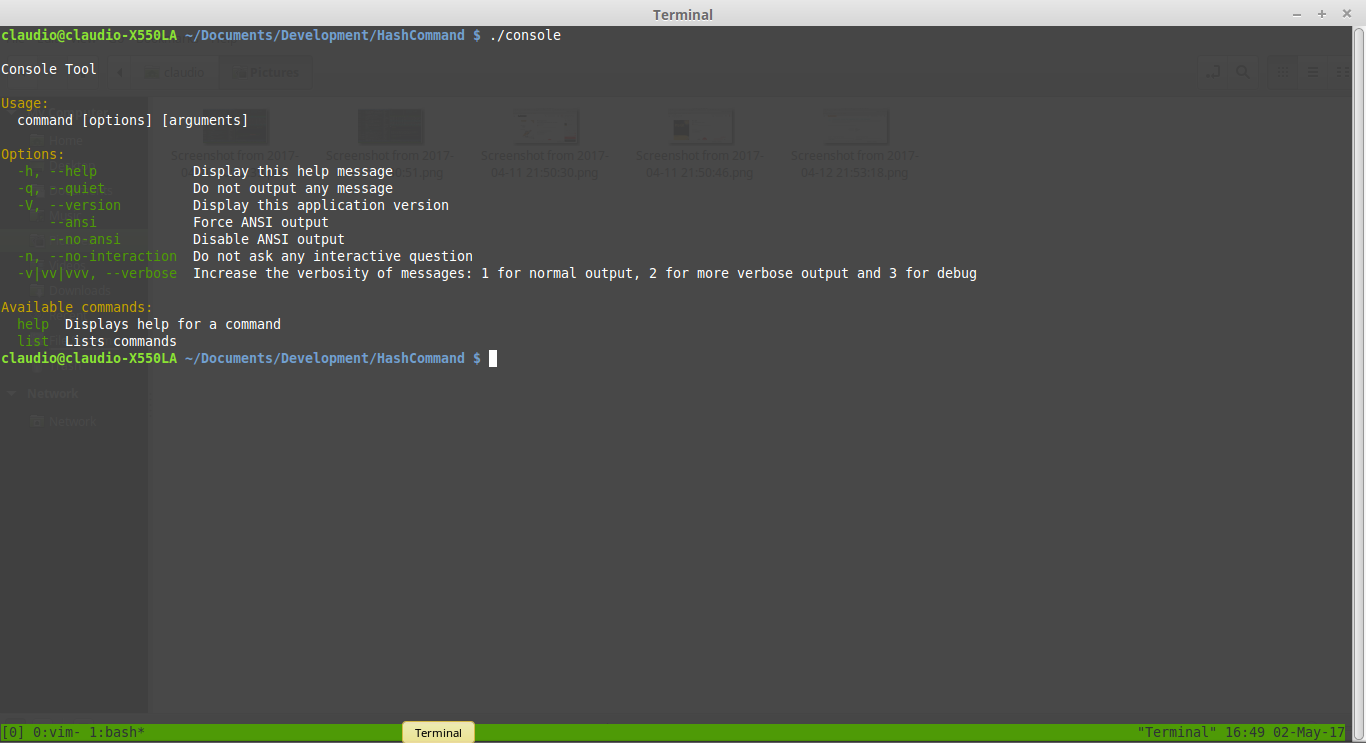
If we execute our script with ./console, we should get the following help message:
如果使用./console执行脚本,则应获得以下帮助消息:
This is because we haven’t registered any commands yet, we only built the basic framework for them.
这是因为我们尚未注册任何命令,我们仅为它们构建了基本框架。
Let’s create our script and register it in our newly created command manager.
让我们创建脚本并将其注册到我们新创建的命令管理器中。
For this particular example, we will implement two simple commands: one for hashing strings, and another one for confirming a hash belongs to a given string.
对于此特定示例,我们将实现两个简单的命令:一个用于对字符串进行哈希处理,另一个用于确认哈希属于给定字符串。
We’ll create a /src folder in which we will put our Hash.php class with the contents:
我们将创建一个/src文件夹,其中将包含以下内容的Hash.php类:
<?php

namespace Hash;

class Hash{

    /**
     * Receives a string password and hashes it.
     *
     * @param string $password
     * @return string $hash
     */
    public static function hash($password){
        return password_hash($password, PASSWORD_DEFAULT);
    }

    /**
     * Verifies if an hash corresponds to the given password
     *
     * @param string $password
     * @param string $hash
     * @return boolean If the hash was generated from the password
     */
    public static function checkHash($string, $hash){
        if( password_verify( $string, $hash ) ){
            return true;
        }
        return false;
    }

}
It’s time to create our command. Let’s create a new PHP file called HashCommand.php.
现在该创建命令了。 让我们创建一个名为HashCommand.php的新PHP文件。
This class will extend from Symfony’s Command class and implement the configure and execute methods. These methods are essential for our command as they tell it how to look and behave.
该类将从Symfony的Command类扩展,并实现configure和execute方法。 这些方法对于我们的命令至关重要,因为它们告诉了它外观和行为。
This is what the finished command looks like:
这是完成的命令,如下所示:
<?php

namespace Hash;

use Symfony\Component\Console\Command\Command;
use Symfony\Component\Console\Input\InputInterface;
use Symfony\Component\Console\Output\OutputInterface;
use Symfony\Component\Console\Input\InputArgument;
use Symfony\Component\Console\Input\InputOption;
use Symfony\Component\Console\Formatter\OutputFormatterStyle;

use Hash\Hash;

class HashCommand extends Command{

    protected function configure(){
        $this->setName("Hash:Hash")
                ->setDescription("Hashes a given string using Bcrypt.")
                ->addArgument('Password', InputArgument::REQUIRED, 'What do you wish to hash)');
    }

    protected function execute(InputInterface $input, OutputInterface $output){

        $hash = new Hash();
        $input = $input->getArgument('Password');

        $result = $hash->hash($input);

        $output->writeln('Your password hashed: ' . $result);

    }

}
In the configure portion, the setName method is how we will be calling our command, setDescription is a description of our command, and addArgument is where we are saying that our command will take one argument called Password, and that it is required.
在configure部分中, setName方法是我们调用命令的方式, setDescription是命令的描述, addArgument是我们的命令将使用一个名为Password参数的地方,它是必需的。
In the execute portion, we are accessing the argument through the getArgument function, and then using our Hash class to hash it. Finally, we use the OutputInterface‘s writeln method to print our result to the screen.
在execute部分,我们通过getArgument函数访问参数,然后使用我们的Hash类对其进行哈希处理。 最后,我们使用OutputInterface的writeln方法将结果打印到屏幕上。
If we run our command like this, we will see that nothing happens. That’s because we are still missing one very important step. We still need to register our command in the console.
如果我们这样运行命令,我们将看不到任何React。 那是因为我们仍然缺少一个非常重要的步骤。 我们仍然需要在console注册命令。
#!/usr/bin/env php

<?php

require_once __DIR__ . '/vendor/autoload.php';

use Symfony\Component\Console\Application;
use Hash\HashCommand;

$app = new Application();

$app->add(new HashCommand());

$app->run();
With the command registered in our console, let’s run it.
使用在console注册的命令,让我们运行它。
If we run the ./console command once again, we can see that we now have a new command registered.
如果再次运行./console命令,可以看到现在已经注册了一个新命令。
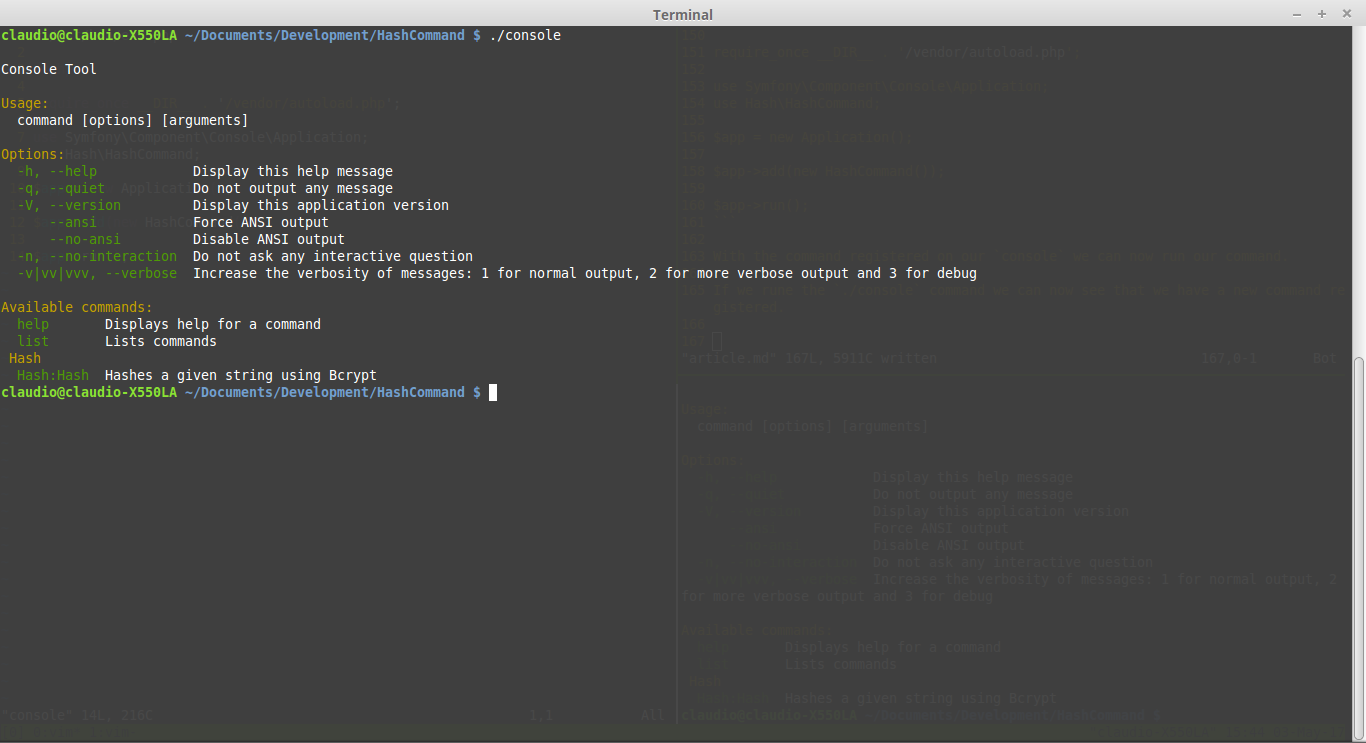
Let’s run it:
让我们运行它:
./console Hash:Hash SitepointAnd we see the final result:
我们看到了最终结果:
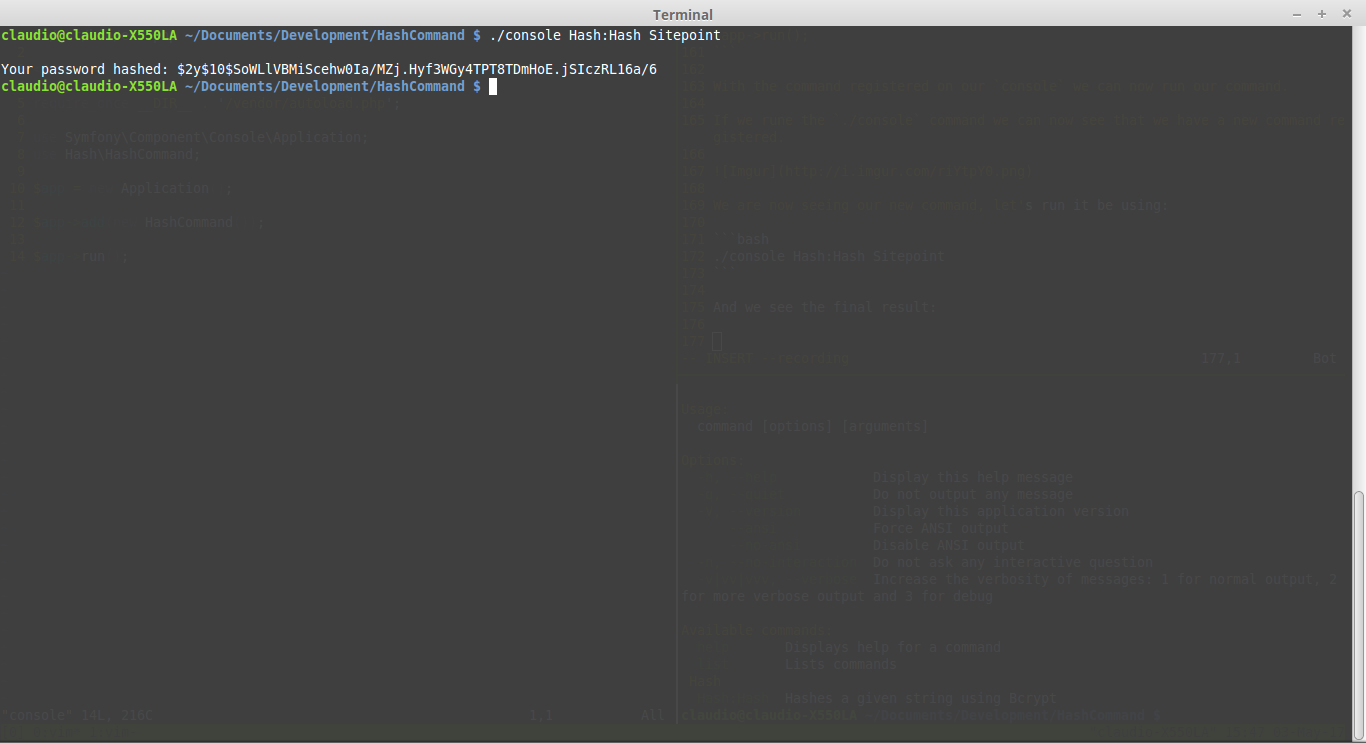
The hash is the result of running the PHP hash() method on the Sitepoint string.
哈希是在Sitepoint字符串上运行PHP hash()方法的结果。
For the hash-confirming functionality, we will use the same method, but instead of one, we will have two arguments. One will be the string to confirm, and the other the hash we want to validate.
对于哈希确认功能,我们将使用相同的方法,但是将使用两个方法代替一个方法。 一个是要确认的字符串,另一个是我们要验证的哈希。
We will be creating a new command file, right next to the HashCommand file. Let’s call it ConfirmCommand.
我们将在HashCommand文件旁边创建一个新的命令文件。 我们称它为ConfirmCommand 。
<?php

namespace Hash;

use Symfony\Component\Console\Command\Command;
use Symfony\Component\Console\Input\InputInterface;
use Symfony\Component\Console\Output\OutputInterface;
use Symfony\Component\Console\Input\InputArgument;
use Symfony\Component\Console\Input\InputOption;
use Symfony\Component\Console\Formatter\OutputFormatterStyle;

use Hash\Hash;

class ConfirmCommand extends Command{

    protected function configure(){
        $this->setName("Hash:Confirm")
                ->setDescription("Confirms an Hash given the string.")
                ->addArgument('Password', InputArgument::REQUIRED, 'What password do you wish to confirm?)')
                ->addArgument('Hash', InputArgument::REQUIRED, 'What is the hashyou want to confirm?');
    }

    protected function execute(InputInterface $input, OutputInterface $output){

        $hash = new Hash();
        $inputPassword = $input->getArgument('Password');
        $inputHash = $input->getArgument('Hash');

        $result = $hash->checkHash($inputPassword, $inputHash);

        if($result){
            $output->writeln('The hash belongs to the password!');
            return true;
        }

        $output->writeln('The hash does not belong to the password!');

    }

}
Then, register the command in the console.
然后,在console注册命令。
#!/usr/bin/env php

<?php

require_once __DIR__ . '/vendor/autoload.php';

use Symfony\Component\Console\Application;
use Hash\HashCommand;
use Hash\ConfirmCommand;

$app = new Application();

$app->add(new HashCommand());
$app->add(new ConfirmCommand());

$app->run();
测试中 (Testing)
When it comes to testing, Symfony provides us with some handy tools. The most useful of them is the CommandTester class, as it provides special input and output classes to test our commands without the need of a command line.
在测试方面,Symfony为我们提供了一些方便的工具。 其中最有用的是CommandTester类,因为它提供了特殊的输入和输出类,无需命令行即可测试我们的命令。
Let’s use the CommandTester class to implement a test for our Hash:Hash command.
让我们使用CommandTester类为Hash:Hash命令实现一个测试。
First, let’s create a /tests folder at the same level as our /src folder.
首先,让我们在与/src文件夹相同级别上创建一个/tests文件夹。
Then, let’s create our test class inside of it and call it HashCommandTest.php:
然后,让我们在其中创建测试类,并将其称为HashCommandTest.php :
<?php

use Hash\HashCommand;
use Symfony\Component\Console\Application;
use Symfony\Component\Console\Tester\CommandTester;

require_once  './vendor/autoload.php';

class HashCommandTest extends \PHPUnit_Framework_TestCase{

    public function testHashIsCorrect(){

        $application = new Application();
        $application->add(new HashCommand());

        $command = $application->find('Hash:Hash');
        $commandTester = new CommandTester($command);
        $commandTester->execute(array(
            'command'      => $command->getName(),
            'Password'         => 'Sitepoint'
        ));

        $this->assertRegExp('/Your password hashed:/', $commandTester->getDisplay());

    }

}
We begin our test by loading our command using the Application class. Then, we instantiate a new CommandTester. With the CommandTester, we can configure how we want to call our command. The last step is just comparing the results of the execution with the result we are expecting using the getDisplay() method.
我们通过使用Application类加载命令来开始测试。 然后,我们实例化一个新的CommandTester 。 借助CommandTester,我们可以配置如何调用命令。 最后一步只是使用getDisplay()方法将执行结果与我们期望的结果进行比较。
The getDisplay() method holds the result of our command’s execution, just as we would see it on the command line.
getDisplay()方法保存命令执行的结果,就像我们在命令行上看到的一样。
结论 (Conclusion)
We just created two different commands using the Symfony Console Component. We also saw a good way of testing those commands. I recommend you take a look at the component’s various options and features, and give us some feedback on your experiments in the comments section below.
我们只是使用Symfony控制台组件创建了两个不同的命令。 我们还看到了测试这些命令的好方法。 我建议您看一下该组件的各种选项和功能,并在下面的评论部分中为我们的实验提供一些反馈。
Would you like to see some more advanced tutorials about Symfony Console on SitePoint? Let us know!
您想在SitePoint上查看有关Symfony Console的更多高级教程吗? 让我们知道!
All the code we wrote in this article is available on Github.
我们在本文中编写的所有代码都可以在Github上找到 。
翻译自: https://www.sitepoint.com/re-introducing-symfony-console-cli-php-uninitiated/
symfony 控制器


 1678
1678

 被折叠的 条评论
为什么被折叠?
被折叠的 条评论
为什么被折叠?
 到【灌水乐园】发言


