


octobercms
October CMS is the new star in the sky of CMSes. Built on top of Laravel, it promises joyful coding and a back to basics approach. Read our introduction here and find out how to build plugins for it here. In this article, we’re going to see how we can build a theme.
十月CMS是CMSes的新星。 构建在Laravel之上,它保证了令人愉快的编码和返璞归真的方法。 请阅读我们的介绍在这里 ,并找出如何构建插件它在这里 。 在本文中,我们将了解如何构建主题。

我们将要建立的 (What We Are Going to Build)
We are going to build a blogging theme. The theme will depend on the rainlab blog plugin, and will contain:
我们将建立一个博客主题。 主题将取决于rainlab Blog插件 ,并将包含:
- Default page layout 默认页面布局
- About page 关于页面
- Home page 主页
- Posts page 帖子页面
- Categories page 分类页面
- Single post page 单个帖子页
These are the main parts of a blogging website. At the end of this article, you’ll be able to create your own pages and extend the theme with new functionality.
这些是博客网站的主要部分。 在本文的结尾,您将能够创建自己的页面并使用新功能扩展主题。
The entire source code mentioned in this post is available on Github, so you’d do best if you open the repo in another tab and follow along as we explain each file in detail.
这篇文章中提到的整个源代码都可以在Github上找到 ,因此,如果您在另一个选项卡中打开仓库,并按照我们对每个文件的详细说明进行操作,则将是最好的选择。
建立主题 (Building The Theme)
OctoberCMS stores themes inside the themes directory, and they get automatically loaded when visiting the backend theme interface.
OctoberCMS将主题存储在themes目录中,并且在访问后端主题界面时会自动加载它们。
To speed up the process, I will use a free theme from startbootstrap.com.
为了加快此过程,我将使用startbootstrap.com中的免费主题。
OctoberCMS主题文件夹结构 (OctoberCMS Theme Folders Structure)
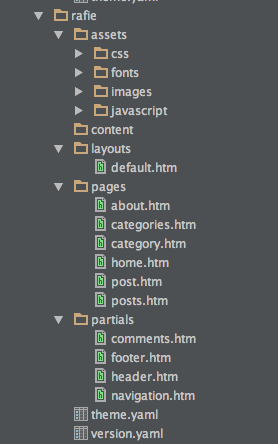
The screenshot shows the final structure of our theme. The folder structure is not too complicated – read the docs for more info.
屏幕截图显示了我们主题的最终结构。 文件夹结构不是太复杂-请阅读文档以获取更多信息。
安装必要的插件 (Installing Necessary Plugins)
Because we’re going to build a blogging theme, we will install the rainlab blog plugin which provides a handful of components we can use. If you are not familiar with components, be sure to check my previous article about building OctoberCMS plugins.
因为我们要构建博客主题,所以我们将安装rainlab博客插件 ,该插件提供了一些可以使用的组件。 如果您不熟悉组件,请确保查看我之前有关构建OctoberCMS插件的文章。
脚手架我们的主题 (Scaffolding Our Theme)
To begin building our theme, we only need to create a folder with our unique name. I will call mine rafietheme. If you visit /backend/cms/themes, you’ll see that the new theme has been added to the list.
要开始构建主题,我们只需要创建一个具有唯一名称的文件夹。 我称我为rafietheme 。 如果您访问/backend/cms/themes ,则会看到新主题已添加到列表中。
For now, the theme doesn’t have a description or a name, and October is only using our folder name.
目前,该主题没有描述或名称,并且October仅使用我们的文件夹名称。
The theme.yaml file inside our root theme directory will contain information about our theme.
我们的根主题目录中的theme.yaml文件将包含有关我们主题的信息。
// rafietheme/theme.yaml

name: RAFIETHEME
author: RAFIE Younes
authorUrl: http://younesrafie.com
description: Simple blogging theme
If you visit the theme management interface, you’ll see our theme with a new description and author info. Now we will add a placeholder screenshot. OctoberCMS will look for the screenshot in rafietheme/assets/images/theme-preview.png by default.
如果您访问主题管理界面,则会看到带有新描述和作者信息的主题。 现在,我们将添加一个占位符屏幕截图。 默认情况下,OctchCMS将在rafietheme/assets/images/theme-preview.png查找屏幕截图。
The version.yaml file tells your theme’s versioning story, and because this is just our first version we can add:
version.yaml文件讲述了主题的版本控制故事,由于这只是我们的第一个版本,我们可以添加:
1.0.1: First version模板结构 (Template Structure)
October template pages are split into three parts. Each section is separated from the others with ==.
十月的模板页面分为三个部分。 每个部分之间用==隔开。
配置部分 (Configuration Section)
This section is where we describe our template to the CMS. We can specify the page url, title, etc.
这部分是我们向CMS描述模板的地方。 我们可以指定页面的网址,标题等。
url = "/posts"
title = "Latest Posts"
description = "Just another posts page"
layout = "default"
We can use also initialize components, and configure them. More about that in the docs.
我们还可以使用初始化组件并进行配置。 有关更多信息,请参阅文档 。
PHP部分 (PHP Section)
This section is going to be wrapped inside a cached class, so we are only allowed to use functions or the use keyword if you want.
本节将包装在一个缓存的类中,因此仅在需要时才允许使用函数或use关键字。
You’ll frequently see the onStart method used here. This method is automatically run because it’s part of the page life cycle. Check the list of available functions, as well as some global variables (layout, page, component).
您会经常看到这里使用的onStart方法。 此方法是页面生命周期的一部分,因此会自动运行。 检查可用功能列表以及一些全局变量( layout , page , component )。
标记部分 (Markup Section)
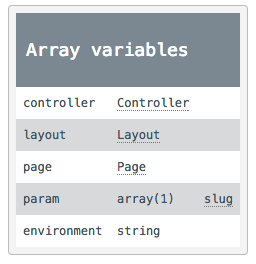
October is using Symfony’s Twig template engine, and inherits all the core features. The variables passed from the PHP section are available in the view. The this variable contains information about our page, controller, layout, environment, and params.
October使用Symfony的Twig模板引擎,并继承了所有核心功能。 从PHP部分传递的变量在视图中可用。 this变量包含有关page , controller , layout , environment和params 。
使用占位符 (Using Placeholders)
Placeholders are a way to inject content into the page. They can be used as one of the ways to inject your scripts, for example.
占位符是一种将内容注入页面的方法。 例如,它们可以用作注入脚本的方法之一。
// defining the placeholder
...
	{% placeholder scripts %}
	</body>
</html>
Here we defined a placeholder. Before closing the body tag, we give the user the opportunity to inject some scripts, like so:
在这里,我们定义了一个占位符。 在关闭body标签之前,我们为用户提供了注入一些脚本的机会,如下所示:
{% put scripts %}
	<script src="js/slider.min.js"></script>
{% endput %}
Placeholders have other features like injecting default content, or testing if a placeholder exists. Be sure to check the docs for more examples.
占位符还具有其他功能,例如注入默认内容或测试是否存在占位符。 请务必检查文档以获取更多示例。
使用局部 (Using Partials)
Partials are very useful for separating our page parts, header, footer, etc. As we said before, they are stored inside the partials directory and can be nested using sub-directories.
局部变量对于分隔页面的各个部分, header , footer等非常有用。如前所述,它们存储在partials目录中,可以使用子目录嵌套。
|---- partials/
|-- header.htm
|-- footer.htm
|-- navigation.htm
|-- comments.htm
|-- ajax/
|- posts.htmheader.htm: contains the doctype and header definition, also some assets links.header.htm:包含doctype和标头定义,还包含一些资产链接。footer.htm: will contain some copyright text and close the document, also some JavaScript assets.footer.htm:将包含一些版权文本并关闭文档,还包含一些JavaScript资产。navigation.htm: will only contain our navigation menu.navigation.htm:仅包含我们的导航菜单。comments.htm: Because we’re only going to use Disqus, let’s put it in its own partial.comments.htm:因为我们只打算使用Disqus ,所以将其放在自己的部分中。
// partials/header.htm

<!DOCTYPE html>
<html lang="en">
<head>
    <title>{{ this.page.title }}</title>
	{% styles %}
    <link href="{{ [
            'assets/css/bootstrap.min.css',
            'assets/css/clean-blog.min.css'
        ]|theme }}" rel="stylesheet">

</head>
<body>
Inside every partial or page we can access the this variable which contains the page, layout, controller, param and environment variables, as stated in the docs.
在每个局部或页面内,我们都可以访问this变量, this变量包含page , layout , controller , param和environment变量,如docs中所述。
When loading assets, we pass an array of links to the theme filter that combines the files and generates a cached link.
加载资产时,我们将一系列链接传递到theme过滤器,该theme过滤器组合文件并生成缓存的链接。
The {% styles %} tag allows the plugin developers to inject their assets to the page, and the same thing applies to {% scripts %}.
{% styles %}标签允许插件开发人员将其资产注入到页面中,同样的情况也适用于{% scripts %} 。
To inject your assets to the pages, you have two ways:
要将资产注入页面,您有两种方法:
Using the
onStartfunction in your PHP code part of the page:在页面PHP代码部分中使用
onStart函数:function onStart(){ $this->addCss('assets/css/main.css'); $this->addJs('assets/js/app.js'); }Using component placeholders:
使用组件占位符:
{% put scripts %}
	    <script type="text/javascript" src="{{ ['assets/js/app.js']|theme }}"></script>
	{% endput %}
// partials/footer.htm

<script src="{{ [
    '@jquery'
    'assets/javascript/bootstrap.min.js',
    'assets/javascript/clean-blog.min.js']|theme }}"></script>
{% scripts %}
</body>
</html>
You’ve noticed that we added @jquery instead of a file path! This simply means that we want to use the jQuery file available in the back end. These notations are called aliases.
您已经注意到我们添加了@jquery而不是文件路径! 这只是意味着我们要使用后端提供的jQuery文件。 这些符号称为别名 。
<ul class="nav navbar-nav navbar-right">
	<li class="{% if( this.page.id == 'home') %}active {% endif %}">
	    <a href="{{ 'home'|page }}">Home</a>
	</li>
	<li class="{% if( this.page.id == 'about') %}active {% endif %}">
	    <a href="{{ 'about'|page }}">About</a>
	</li>
	<li class="{% if( this.page.id == 'posts') %}active {% endif %}">
	    <a href="{{ 'posts'|page }}">Posts</a>
	</li>
</ul>
We said before that the page object is available for use inside any page or partial. We use the page.id to set the active menu item, and for the links’ href attribute, we pass the page ID to the page filter that will generate a full URL. Note that the page id is the template filename.
我们之前说过, page对象可在任何页面或部分页面内使用。 我们使用page.id设置活动菜单项,对于链接的href属性,我们将页面ID传递给page过滤器,该过滤器将生成完整的URL。 请注意,页面ID是模板文件名。
使用布局 (Using Layouts)
October has a layouts folder where we can register our layouts. We will start with one default layout that we’ll be using for our pages.
十月有一个布局文件夹,我们可以在其中注册布局。 我们将从一个将用于页面的default布局开始。
description = "Default Layout"
==
{% partial 'header' %}
{% partial 'navigation' %}
{% page %}
{% partial 'footer' %}
In the configuration part, we can specify a description for our layout. Inside the twig markup part we include the necessary partials. The page tag will output the page content using this layout.
在配置部分,我们可以为布局指定描述。 在树枝标记部分中,我们包括必要的部分。 page标签将使用此布局输出页面内容。
We can use most of the partial and page features, and also include HTML markup, assets, etc.
我们可以使用大部分的部分和页面功能,还包括HTML标记,资产等。
创建页面 (Creating Pages)
OctoberCMS stores user defined pages insides the pages folder. Let’s start by creating our about page first, and we will explore the different possibilities along the way.
OctoberCMS将用户定义的页面存储在pages文件夹中。 让我们首先创建关于页面开始,然后我们将探索各种可能性。
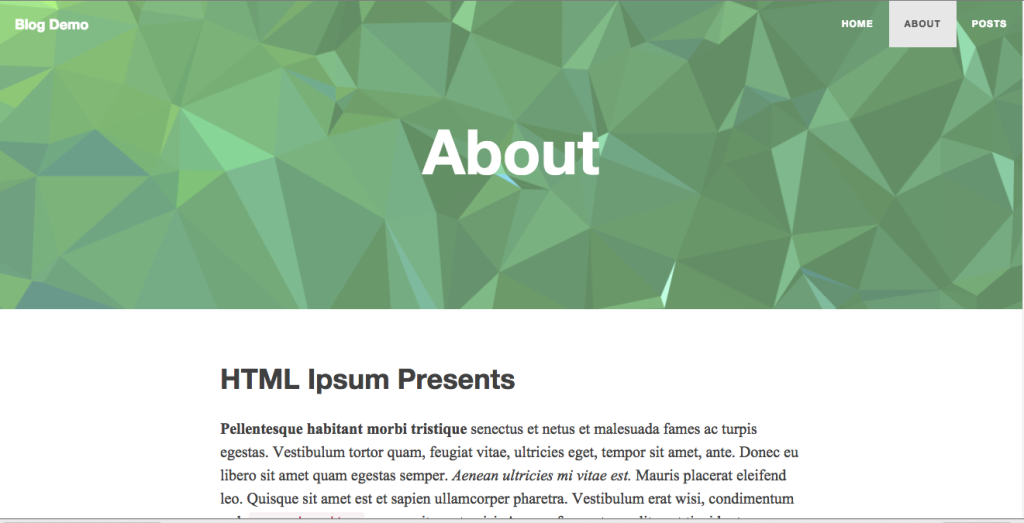
关于页面 (About Page)
Because this is our first page, we’re going to make it as simple as possible, and the first part is to use the configuration section.
因为这是我们的第一页,所以我们将使其变得尽可能简单,并且第一部分是使用配置部分。
title = "About"
url = "/about"
layout = "default"
description = "Just another about page"
The template section will contain only some Lorem ipsum HTML content inside a container.
模板部分将只在容器内包含一些Lorem ipsum HTML内容。
<div class="container">
	Lorem ipsum.....
</div>
That’s it! you can visit the new page by hitting the /about URL of your blog’s front end.
而已! 您可以通过点击博客前端的/about URL来访问新页面。
主页 (Home Page)
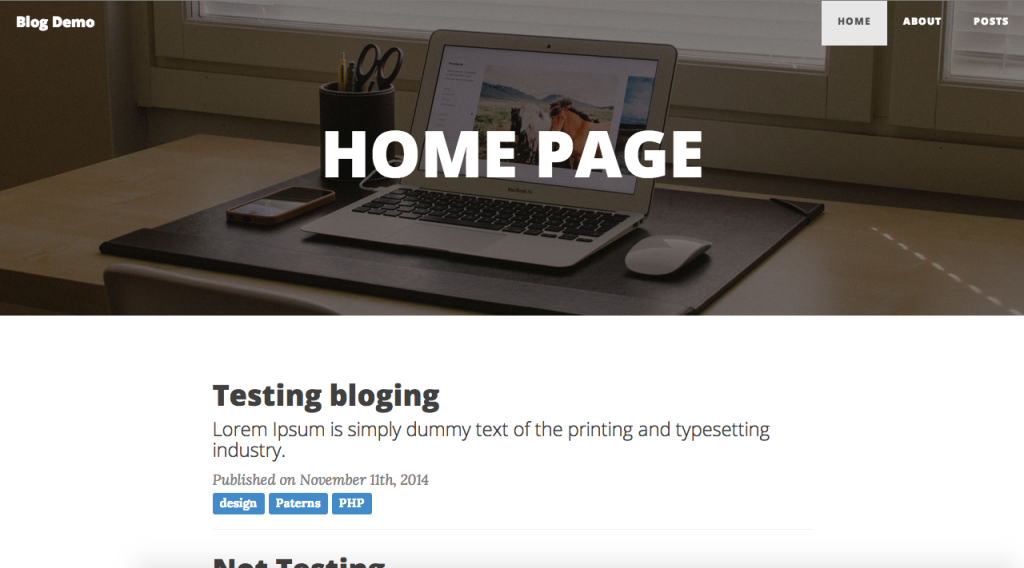
Inside our configuration part, we map our page to a URL and use a specific layout, along with a title and description.
在我们的配置部分中,我们将页面映射到URL并使用特定的布局以及标题和描述。
title = "HOME PAGE"
url = "/"
layout = "default"
description = "Blog Home Page"
Inside our PHP section, we use the onStart method to set ready our page variables. This method is executed after all components are initialized.
在我们PHP部分中,我们使用onStart方法来准备页面变量。 初始化所有组件后,将执行此方法。
<?php
use RainLab\Blog\Models\Post;

function onStart(){
    $this['posts'] = Post::isPublished()
					    ->orderBy('published_at', 'desc')
					    ->take(5)
					    ->with('categories')
					    ->get();
}
?>
The rainlab plugin provides a set of models that we can use to query the database. We take only the five latest published posts from our database and we set it as a global variable.
rainlab插件提供了一组可用于查询数据库的模型。 我们仅从数据库中获取五个最新发布的帖子,并将其设置为全局变量。
<div class="col-lg-8 col-lg-offset-2 col-md-10 col-md-offset-1">
{% for post in posts %}
<div class="post-preview">
<a href="{{ 'post'|page({slug: post.slug}) }}">
<h2 class="post-title">
{{ post.title }}
</h2>
<h3 class="post-subtitle">
{{ post.excerpt }}
</h3>
</a>
<span class="post-meta">Published on {{ post.published_at|date("F jS, Y") }}</span> <br/>
{% for category in post.categories %}
<a href="{{ 'category'|page({slug: category.slug }) }}">
<span class="label label-primary">{{ category.name }}</span>
</a>
{% endfor %}
</div>
<hr>
{% else %}
<h2>No posts found.</h2>
{% endfor %}
<ul class="pager">
<li class="next">
<a href="{{ 'posts'|page }}">Older Posts →</a>
</li>
</ul>
</div>Getting to the view part, we loop through the list of posts, we loop through the list of attached categories also, and when the user clicks on a post, we should redirect him to the single post page.
进入视图部分,我们循环浏览帖子列表,还循环浏览附加类别列表,并且当用户单击帖子时,我们应该将他重定向到单个帖子页面。
The page filter generates a URL to a given page, but you can also pass some URL parameters to be included. Check the docs for more info.
page过滤器会生成指向给定页面的URL,但是您也可以传递一些URL参数以将其包括在内。 检查文档以获取更多信息。
单个帖子页 (Single Post Page)
title = "Blog Post"
url = "/post/:slug"
layout = "default"
description = "Single post page"
The only difference from the home page is the URL part. The slug parameter is the slug in the database. If we want to be more explicit we can use regular expressions to match our rules.
与主页的唯一区别是URL部分。 slug参数是数据库中的slug。 如果我们想更加明确,可以使用正则表达式来匹配我们的规则。
url = "/post/:slug|^[a-zA-Z0-9]$"You can check the documentation for more info about the URL syntax and the use of regular expressions.
您可以查看文档以获取有关URL语法和正则表达式使用的更多信息。
<?php
use RainLab\Blog\Models\Post;

function onStart(){
    $slug = $this->param('slug');
    $this['post'] = Post::where('slug', '=', $slug)
                            ->isPublished()
                            ->with('categories')
                            ->first();
    if( !$this['post'] )
        return Redirect::to('/404');
}
?>
Inside our PHP section, we look at the database for a post using the slug parameter. If the post doesn’t exist, we redirect to our 404 page.
在我们PHP部分中,我们使用slug参数查看数据库中的帖子。 如果该帖子不存在,我们将重定向到404页面。
<header class="intro-header" style="
            {% if post.featured_images.isEmpty() %}
                background-image: url('{{ "/assets/images/post-sample-image.jpg"|theme }}')
            {% else %}
                background-image: url('{{ post.featured_images.first().getPath() }}')
            {% endif %}">
    <div class="container">
        <div class="row">
            <div class="col-lg-8 col-lg-offset-2 col-md-10 col-md-offset-1">
                <div class="post-heading">
                    <h1>{{ post.title }}</h1>
                    <span class="meta">Published on {{ post.published_at|date("F jS, Y") }}</span><br/>
                    {% for category in post.categories %}
                    <a href="{{ 'category'|page({slug: category.slug }) }}">
                        <span class="label label-primary">{{ category.name }}</span>
                    </a>
                    {% endfor %}
                </div>
            </div>
        </div>
    </div>
</header>

<article>
    <div class="container">
        <div class="row">
            <div class="col-lg-8 col-lg-offset-2 col-md-10 col-md-offset-1">
                {{ post.content|raw }}
            </div>
        </div>
        <div class="row">
            <hr/>
            <div class="col-lg-8 col-lg-offset-2 col-md-10 col-md-offset-1">
                {% partial 'comments' %}
            </div>
        </div>
    </div>
</article>
We test if the blog has any featured posts. If so, we grab the first one, else we show a default featured image. After that, we print the title, date, categories, and we escape the content before outputting it.
我们测试博客中是否有特色文章。 如果是这样,我们将抓取第一个图像,否则将显示默认的特色图像。 之后,我们打印标题,日期,类别,并在输出内容之前对其进行转义。
The partial tag will load our comments. For now, it just outputs <h2>Comments</h2>, but you can use Disqus if you want.
partial标记将加载我们的评论。 目前,它仅输出<h2>Comments</h2> ,但是您可以根据需要使用Disqus。
分类帖子页面 (Category Posts Page)

The configuration section of our page is basically the same.
我们页面的配置部分基本相同。
title = "Category"
url = "/category/:slug"
layout = "default"
description = "Filter posts by category"
use RainLab\Blog\Models\Post;
use RainLab\Blog\Models\Category;
function onStart(){
$slug = $this->param('slug');
$this['category'] = Category::where('slug', '=', $slug)->first();
if( $this['category'] ){
$post = new Post;
$query = $post->isPublished()
->orderBy('published_at', 'desc')
->with('categories');
$this['posts'] = $post->scopeFilterCategories($query, [ $this['category']->id ])->get();
}
}In the PHP section part, we test to see if the category exists. If so, we query the database for the matching posts.
在PHP部分中,我们测试以查看类别是否存在。 如果是这样,我们将在数据库中查询匹配的职位。
I was going to use a join on the pivot table between posts and categories, but the rainlab blog plugin provides a RainLab\Blog\Models@scopeFilterCategories method to filter through posts using an array of category IDs: it accepts an Illuminate\Query\Builder as the first parameter and an array of category IDs.
我打算在枢纽分析表上使用posts和categories之间的联接,但是rainlab博客插件提供了RainLab\Blog\Models@scopeFilterCategories方法,以使用类别ID数组过滤帖子:它接受Illuminate\Query\Builder作为第一个参数和类别ID的数组。
The HTML part is the same as the home page, we only changed the header title to put the category name.
HTML部分与主页相同,我们只更改了标题以放入类别名称。
帖子页面 (Posts Page)
The posts page will print the five latest posts, and at the bottom of the page we have a load more button that will use OctoberCMS’ ajax framework functionality to load more.
帖子页面将打印五个最新的帖子,并且在页面底部,我们有一个load more按钮,它将使用OctoberCMS的ajax框架功能load more按钮。
To be able to use the ajax framework you need to include the {% framework %} tag. This will output a link to the framework.js file from the modules directory.
为了能够使用ajax框架,您需要包含{% framework %}标签。 这将从模块目录输出到framework.js文件的链接。
The tag also supports a {% framework extra %} parameter. This will add some styles, like the loading indicator when using ajax.
标记还支持{% framework extra %}参数。 这将添加一些样式,例如使用ajax时的加载指示器。
AJAX框架 (AJAX Framework)
October has a nice way of handling some of the most common usage of loading content via ajax requests. To enable the ajax framework on an element, you simply add the HTML5 data-request="onMethodName" attribute. The method that will be executed must start with on followed by your method name.
October具有处理Ajax请求加载内容的一些最常见用法的好方法。 要在元素上启用ajax框架,只需添加HTML5 data-request="onMethodName"属性。 将要执行的方法必须以on开头,后跟您的方法名称。
There are two ways to define your ajax handler method:
定义ajax处理程序方法有两种方法:
Inside the php section:
在php部分中:
function onMethodName(){
		//handle it here
	}
Inside a component:
在组件内部:
You can define your handler inside a component class. Be sure to include the component inside the configuration section of your page (see example below). If you want to learn more about how to create components, be sure to check my previous article.
您可以在组件类中定义处理程序。 确保将组件包括在页面的配置部分中(请参见下面的示例)。 如果您想了解有关如何创建组件的更多信息,请务必查看我的上一篇文章 。
title = "My page"
	url = "/"

	[componentName]
	==
Before sending the request, we can show a confirmation message, or redirect after the response is back. You can check the list of supported attributes here.
在发送请求之前,我们可以显示确认消息,或者在响应返回后重定向。 您可以在此处检查支持的属性列表。
<div class="col-md-2 col-md-offset-5">
            <a id="load_more"
               href="#"
               class="btn btn-primary"
               data-request="onLoadMorePosts"
               data-request-update="'ajax/posts': '@#posts'"
               data-request-data='"postsCount": 1'
               data-request-success="incrementPostsCounter($el);">
                Load more
            </a>
</div>data-request: bind ouronLoadMorePostshandler that we defined inside our PHP section.data-request:绑定我们在PHP部分中定义的onLoadMorePosts处理程序。data-request-update: is where we specify the partial that will be loaded on the server, and also an ID or class of the target element. If you’ve noticed the@symbol before the ID, this simply means that we want to append to the element and not replace its content.data-request-update:在这里我们指定将要在服务器上加载的部分,以及目标元素的ID或类。 如果您在ID之前注意到@符号,则仅表示我们要附加到元素而不是替换其内容。data-request-data: we can add more parameters to the request, in this case we send a posts count variable.data-request-data:我们可以在请求中添加更多参数,在这种情况下,我们发送一个posts count变量。data-request-success: JS code to be executed after every successful request, in this case, theincrementPostsCounterfunction will update ourdata-request-dataattribute.data-request-success:在每次成功请求后执行的JS代码,在这种情况下,incrementPostsCounter函数将更新我们的data-request-data属性。
function onLoadMorePosts(){
	$postsCount = (int) post('postsCount');

	$this['posts'] = Post::isPublished()
	    ->orderBy('published_at', 'desc')
	    ->skip( $postsCount * 5 )
	    ->take(5)
	    ->with('categories')
	    ->get();
}
The post method retrieves the postsCount from the page, then we skip the specified count and select the next five posts.
post方法从页面中检索postsCount ,然后我们跳过指定的计数并选择接下来的五个帖子。
The partials/ajax/posts.htm page gets called automatically, and the list of posts remains available to loop through.
会自动调用partials/ajax/posts.htm页面,并且帖子列表仍然可以循环浏览。
// partials/ajax/posts.htm
{% for post in posts %}
    <div class="post-preview">
        <a href="{{ 'post'|page({slug: post.slug}) }}">
            <h2 class="post-title">
                {{ post.title }}
            </h2>
            <h3 class="post-subtitle">
                {{ post.excerpt }}
            </h3>
        </a>
        <span class="post-meta">Published on {{ post.published_at|date("F jS, Y") }}</span> <br/>
        {% for category in post.categories %}
            <a href="{{ 'category'|page({slug: category.slug }) }}">
                <span class="label label-primary">{{ category.name }}</span>
            </a>
        {% endfor %}
    </div>
    <hr>
{% endfor %}
Really that’s all it takes to load more posts – the animation and insertion is automatically handled by the framework.
加载更多帖子实际上就是所有这些–动画和插入由框架自动处理。
If you have caching troubles with ajax loading, try php artisan cache:clear from the command line to clear the cache and make sure the JS refreshes.
如果您在使用Ajax加载时遇到缓存问题,请从命令行尝试php artisan cache:clear来清除缓存并确保JS刷新。
结论 (Conclusion)
In this article, we saw how to create a basic theme for October CMS. We didn’t cover every feature, but this should help you consider taking a look, or even assist you in exploring some new possibilities. You can take a look at the final result on Github, and if you have any question or opinions let me know in the comments!
在本文中,我们了解了如何为October CMS创建基本主题。 我们并未涵盖所有功能,但这应该可以帮助您考虑一下,甚至可以帮助您探索一些新的可能性。 您可以在Github上查看最终结果,如果有任何疑问或意见,请在评论中告诉我!
octobercms


 228
228

 被折叠的 条评论
为什么被折叠?
被折叠的 条评论
为什么被折叠?
 到【灌水乐园】发言


