


android mvp示例
In this tutorial you will get android button example.
在本教程中,您将获得android按钮示例。
Button is a very basic and commonly used UI widget of Android. It can be pressed or clicked and we can perform some action on its click event.
Button是Android的一个非常基本且常用的UI小部件。 可以按下或单击它,我们可以对其单击事件执行一些操作。
We can define a button in XML layout by using <Button> tag. In this tutorial I have given an example in which if the user presses the button then a message is displayed in Toast.
我们可以使用<Button>标签在XML布局中定义一个按钮。 在本教程中,我给出了一个示例,其中如果用户按下按钮,则会在Toast中显示一条消息。
We can handle the click event on button in two ways.
我们可以通过两种方式处理按钮上的click事件。
Using OnClickListener
使用OnClickListener
Using android:onClick
使用android:onClick
Android按钮示例 (Android Button Example)
OnClickListener (OnClickListener)
We can handle button click event by using OnClickListener in following way.
我们可以通过以下方式使用OnClickListener处理按钮单击事件。
Create a new project with package name thecrazyprogrammer.androidexample and add following code in respective files.
使用包名称thecrazyprogrammer.androidexample创建一个新项目,并在相应文件中添加以下代码。
activity_main.xml
activity_main.xml
<?xml version="1.0" encoding="utf-8"?>
<LinearLayout xmlns:android="http://schemas.android.com/apk/res/android"
    android:layout_width="match_parent" android:layout_height="match_parent"
    android:orientation="vertical"
    android:gravity="center">

    <Button
        android:layout_width="match_parent"
        android:layout_height="wrap_content"
        android:id="@+id/btn"
        android:text="Click Here"/>
</LinearLayout>
MainActivity.java
MainActivity.java
package thecrazyprogrammer.androidexample;
import android.app.Activity;
import android.os.Bundle;
import android.view.View;
import android.widget.Button;
import android.widget.Toast;
public class MainActivity extends Activity {
Button btn;
@Override
protected void onCreate(Bundle savedInstanceState) {
super.onCreate(savedInstanceState);
setContentView(R.layout.activity_main);
btn = (Button)findViewById(R.id.btn);
btn.setOnClickListener(new View.OnClickListener() {
@Override
public void onClick(View v) {
Toast.makeText(MainActivity.this,"You Clicked Me :)",Toast.LENGTH_LONG).show();
}
});
}
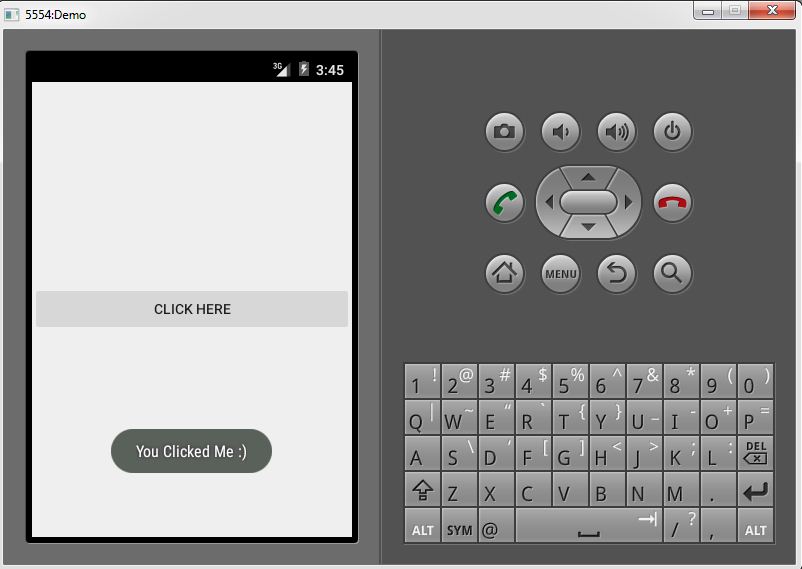
}Screenshot
屏幕截图
In case you use more than one button in Activity then you have to apply OnClickListener separately on each button as shown below.
如果在“活动”中使用多个按钮,则必须分别对每个按钮应用OnClickListener,如下所示。
button1.setOnClickListener(new View.OnClickListener() {
	@Override
	public void onClick(View v) {
		//code for work to perform on button1 click comes here
	}
});

button2.setOnClickListener(new View.OnClickListener() {
	@Override
	public void onClick(View v) {
		//code for work to perform on button2 click comes here
	}
});
android:onClick (android:onClick)
We can also handle click event by assigning a method to button in XML layout by using android:onClick attribute. When button is clicked, the associated method is called. Make sure the method is public void and accept View as a parameter. See below example to learn how to implement this.
我们还可以通过使用android:onClick属性为XML布局中的按钮分配一个方法来处理click事件。 单击按钮时,将调用关联的方法。 确保该方法是public void并接受View作为参数。 请参见以下示例,以了解如何实现此目的。
Create a new project with package name thecrazyprogrammer.androidexample and add following code in respective files.
使用包名称thecrazyprogrammer.androidexample创建一个新项目,并在相应文件中添加以下代码。
activity_main.xml
activity_main.xml
<?xml version="1.0" encoding="utf-8"?>
<LinearLayout xmlns:android="http://schemas.android.com/apk/res/android"
    android:layout_width="match_parent" android:layout_height="match_parent"
    android:orientation="vertical"
    android:gravity="center">

    <Button
        android:layout_width="match_parent"
        android:layout_height="wrap_content"
        android:id="@+id/btn"
        android:text="Click Here"
        android:onClick="btnAction"/>
</LinearLayout>
MainActivity.java
MainActivity.java
package thecrazyprogrammer.androidexample;

import android.app.Activity;
import android.os.Bundle;
import android.view.View;
import android.widget.Button;
import android.widget.Toast;

public class MainActivity extends Activity {
    Button btn;

    @Override
    protected void onCreate(Bundle savedInstanceState) {
        super.onCreate(savedInstanceState);
        setContentView(R.layout.activity_main);

        btn = (Button)findViewById(R.id.btn);
    }

    public void btnAction(View view){
        Toast.makeText(MainActivity.this,"You Clicked Me :)",Toast.LENGTH_LONG).show();
    }
}
In above example I have used method name as btnAction. You can give its name according to you.
在上面的示例中,我将方法名称用作btnAction 。 您可以根据自己的名字命名。
In case you use more than one button in Activity then click event for each button can be handled in following way.
如果您在“活动”中使用多个按钮,则可以通过以下方式处理每个按钮的单击事件。
public void btnAction(View view){
        if(view.getId()==R.id.button1){
            //code for work to perform on button1 click comes here
        }

        if(view.getId()==R.id.button2){
            //code for work to perform on button2 click comes here
        }
}
Comment below if you have any queries related to above android button example.
如果您有与上述android按钮示例相关的任何查询,请在下面评论。
翻译自: https://www.thecrazyprogrammer.com/2016/08/android-button-example.html
android mvp示例


 903
903


 被折叠的 条评论
为什么被折叠?
被折叠的 条评论
为什么被折叠?
 到【灌水乐园】发言


