


python 构建简单窗口
Building quality digital products is a requirement toward acquiring long-term customers, but inefficient communication is an efficient way to lose them just as quickly as you gain them. The internet is currently the world’s largest marketplace and everyone is building something for an online audience to consume, however, it would be a shame if there isn’t a way to receive feedback or interact with customers in realtime.
建立高质量的数字产品是获取长期客户的要求,但是低效的沟通是一种与获得客户一样快的失去他们的有效方法。 互联网目前是世界上最大的市场,每个人都在为在线受众构建某种东西来消费,但是,如果没有一种实时接收反馈或与客户互动的方法,那将是一种耻辱。
In this tutorial, we will look at how we can create a realtime chat widget using Pusher, Python, and JavaScript. When we are done building, the final application will look and work like this:
在本教程中,我们将研究如何使用Pusher,Python和JavaScript创建实时聊天小部件。 完成构建后,最终的应用程序将如下所示运行:
In the image above, we can see a digital product called “SPIN” and it has a chat widget option for visiting customers to interact with. On the left browser window, a customer visits this website and fills in his/her details before submitting the form.
在上图中,我们可以看到一个名为“ SPIN”的数字产品,它具有一个聊天小部件选项,用于拜访客户以进行交互。 客户在左侧的浏览器窗口中访问该网站并填写其详细信息,然后再提交表单。
There is an admin on the right browser window who can see all connected customers and respond to all their messages accordingly, providing effective and realtime support.
在右侧浏览器窗口中,有一个管理员可以查看所有已连接的客户并相应地答复他们的所有消息,从而提供有效和实时的支持。
先决条件 ( Prerequisites )
To follow along with this tutorial, a basic knowledge of Python, Flask, JavaScript (ES6 syntax) and jQuery is required. You will also need the following installed:
为了跟随本教程,需要具备Python,Flask,JavaScript(ES6语法)和jQuery的基本知识。 您还需要安装以下软件:
Virtualenv is great for creating isolated Python environments, so we can install dependencies in an isolated environment, and not pollute our global packages directory.
Virtualenv非常适合创建隔离的Python环境,因此我们可以在隔离的环境中安装依赖项,而不会污染我们的全局包目录。
Let’s install virtualenv with this command:
让我们使用以下命令安装virtualenv :
$ pip install virtualenv⚠️ Virtualenv comes preinstalled with Python 3 so you may not need to install it if you are on this version.
Virtual️Virtualenv预先安装了Python 3,因此如果您使用的是此版本,则可能不需要安装它。
设置应用程序环境 ( Setting up the app environment )
Let’s create our project folder, and activate a virtual environment within it:
让我们创建项目文件夹,并在其中激活一个虚拟环境:
$ mkdir python-pusher-chat-widget
    $ cd python-pusher-chat-widget
    $ virtualenv .venv
    $ source .venv/bin/activate # Linux based systems
    $ \path\to\env\Scripts\activate # Windows users
Now that we have the virtual environment setup, we can install Flask and the remaining dependencies with this command:
现在我们有了虚拟环境设置,我们可以使用以下命令安装Flask和其余依赖项:
$ pip install flask flask-cors simplejsonWe need to install the Pusher library as we will need that for realtime updates.
我们需要安装Pusher库,因为我们需要它来进行实时更新。
设置推送器 ( Setting up Pusher )
The first step here will be to get a Pusher Channels application. We need the application credentials for our realtime messaging to work.
第一步是获取Pusher Channels应用程序。 我们需要应用程序凭据才能使实时消息正常工作。
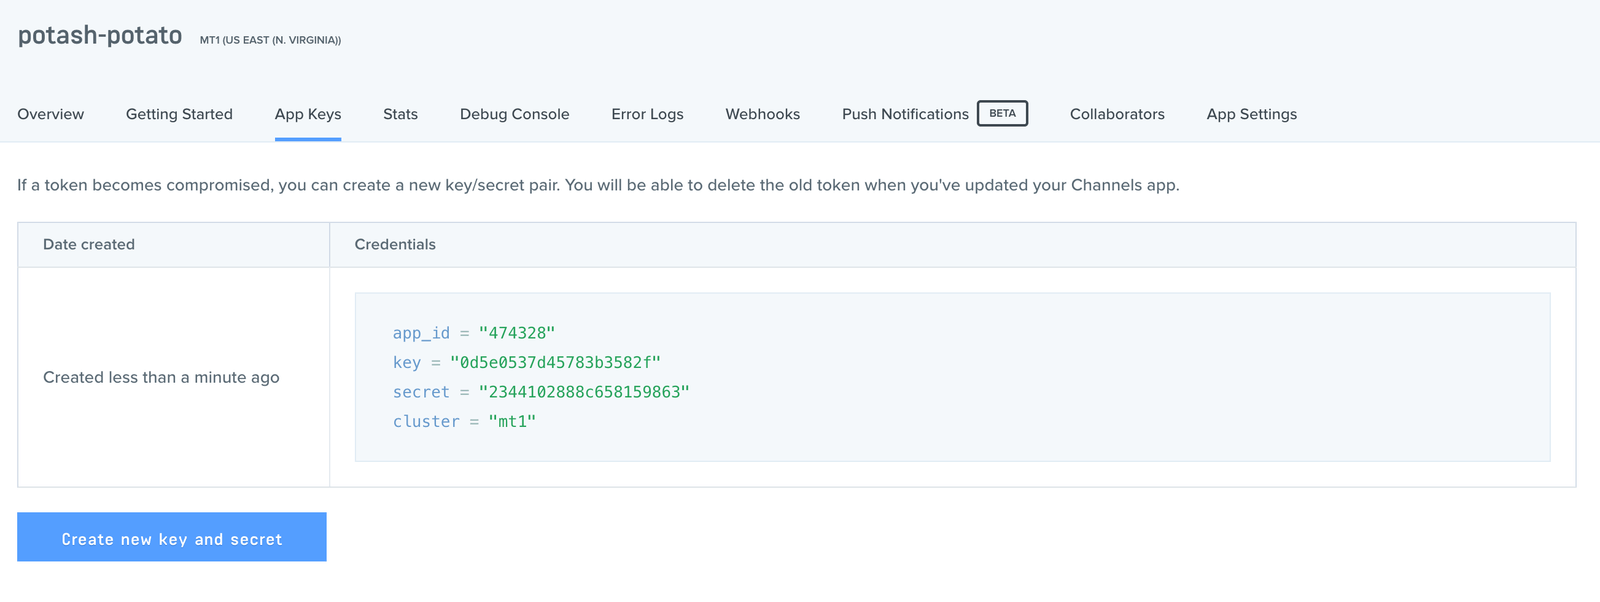
Go to the Pusher website and create an account. After creating an account, you should create a new application. Follow the application creation wizard and then you should be given your application credentials, we will use this later in the article:
转到Pusher网站并创建一个帐户。 创建帐户后,您应该创建一个新的应用程序。 遵循应用程序创建向导,然后应为您提供应用程序凭据,我们将在本文的后面部分中使用它:
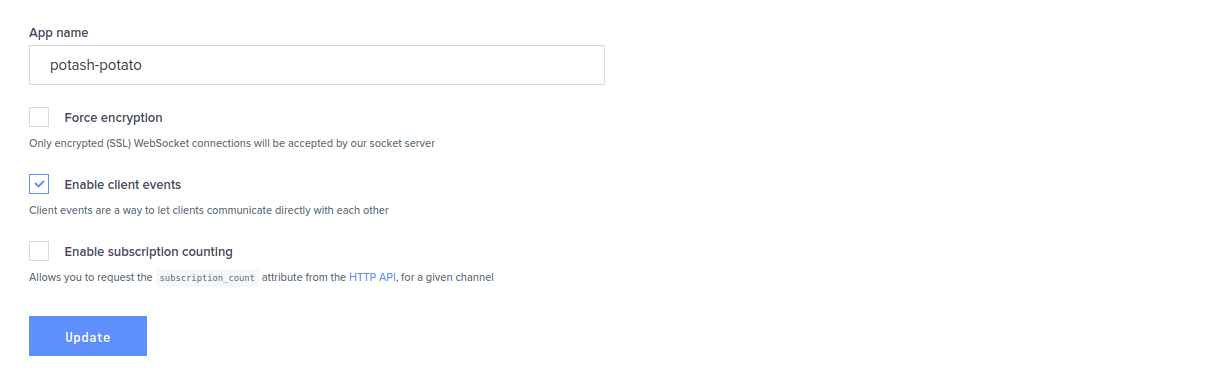
There’s one more thing we need to do here on this dashboard; because we will directly be triggering the message events on the client side of the application, we need to turn on a special feature that is turned off by default for security reasons. To learn more about triggering events on the client side, you can read the documentation here.
在此信息中心上,我们还需要做一件事。 因为我们将直接在应用程序的客户端上触发消息事件,所以我们需要启用一项特殊功能,出于安全原因,该功能默认情况下处于关闭状态。 要了解有关在客户端触发事件的更多信息,您可以在此处阅读文档。
On the dashboard, click on App settings and scroll to the bottom of the page then select the option that says Enable client events:
在信息中心上,点击“ 应用程序设置”,然后滚动到页面底部,然后选择“ 启用客户端事件 ”选项:
Great, now let’s install the Pusher Python library, so that we can use Pusher in the application:
太好了,现在我们安装Pusher Python库,以便我们可以在应用程序中使用Pusher:
$ pip install pusher文件和文件夹结构 ( File and folder structure )
Here’s a representation of the file/folder structure for this app:
这是此应用程序的文件/文件夹结构的表示形式:
├── python-pusher-chat-widget
           ├── app.py
           ├── static
           └── templates
The static folder will contain the static files to be used as is defined by Flask standards. The templates folder will hold the HTML templates. In our application, app.py is the main entry point and will contain our server-side code.
static文件夹将包含Flask标准定义的要使用的静态文件。 templates文件夹将保存HTML模板。 在我们的应用程序中, app.py是主要入口点,将包含我们的服务器端代码。
Let’s create the app.py file and then the static and templates folders.
让我们创建app.py文件,然后创建static和templates文件夹。
建立后端 ( Building the backend )
Before we start writing code to determine how the frontend of our application will be rendered, let’s fully develop the backend and all of its endpoints so that the frontend has something to communicate with when we build it.
在开始编写代码以确定如何呈现应用程序的前端之前,让我们充分开发后端及其所有端点,以便在构建前端时可以与之通信。
Let’s open the app.py file and paste the following code:
让我们打开app.py文件并粘贴以下代码:
// File: ./app.py

    from flask import Flask, render_template, request, jsonify, makeresponse, json
    from flaskcors import CORS
    from pusher import pusher
    import simplejson

    app = Flask(_**name**_)
    cors = CORS(app)
    app.config_[_'CORSHEADERS'] = 'Content-Type'

    # configure pusher object
    pusher = pusher.Pusher(
    app_id='PUSHER_APP_ID',
    key='PUSHER_APP_KEY',
    secret='PUSHER_APP_SECRET',
    cluster='PUSHER_APP_CLUSTER',
    ssl=True)

    @app.route('/')
    def index():
        return render_template('index.html')

    @app.route('/admin')
    def admin():
        return render_template('admin.html')

    @app.route('/new/guest', methods=_[_'POST'])
    def guestUser():
        data = request.json
        pusher.trigger(u'general-channel', u'new-guest-details', {
            'name' : data_[_'name'],
            'email' : data_[_'email']
            })
        return json.dumps(data)

    @app.route("/pusher/auth", methods=_[_'POST'])
    def pusher_authentication():
        auth = pusher.authenticate(channel=request.form_[_'channel_name'],socket_id=request.form_[_'socket_id'])
        return json.dumps(auth)

    if _**name == '**_main_':
        app.run(host='0.0.0.0', port=5000, debug=True)
Replace the
PUSHER_APP_*keys with the values on your Pusher dashboard.将
PUSHER_APP_*键替换为Pusher仪表板上的值。
The logic for this application is simple, we will require a Pusher public channel so that whenever a new customer connects with the chat widget, their details are sent over to the admin (using that public channel) and the admin can subscribe to a private channel (the customer will have to subscribe to this private channel too) using the customer’s email as a unique ID. The admin and that customer can further engage in one to one messaging over that private channel.
此应用程序的逻辑很简单,我们需要一个Pusher公共频道,以便每当新客户与聊天小部件连接时,他们的详细信息就会发送到管理员(使用该公共频道),并且管理员可以订阅私人频道(客户也必须订阅此私人频道),并使用客户的电子邮件作为唯一ID。 管理员和该客户还可以通过该专用渠道进行一对一消息传递。
Let’s go over the code in the app.py file to see how it satisfies the logic we just discussed. We first imported all the required packages, then registered a new Pusher instance. Next, we declared four endpoints:
让我们看一下app.py文件中的代码,看看它如何满足我们刚刚讨论的逻辑。 我们首先导入了所有必需的软件包,然后注册了一个新的Pusher实例。 接下来,我们声明了四个端点:
/- This endpoint returns the static HTML template that defines the homepage of this app./-此端点返回定义此应用程序主页的静态HTML模板。/admin- This endpoint returns the static HTML template that defines the admin dashboard./admin此端点返回定义管理仪表板的静态HTML模板。/new/guest/- This endpoint receives a POST request containing the details of a new customer and pushes it to the public channel — general-channel — in a “new-guest-details” event. The admin on the other side responds to this event by subscribing to a private channel using the user’s email as the unique ID./new/guest/-此端点接收包含新客户详细信息的POST请求,并在“ new-guest-details”事件中将其推送到公共渠道(即一般渠道)。 另一方的管理员通过使用用户的电子邮件作为唯一ID订阅私人频道来响应此事件。
We used the trigger method on the Pusher instance here, the trigger method has the following syntax: pusher.trigger("a_channel", "an_event", {key: "data"}). You can find the docs for the Pusher Python library here to get more information on configuring and using Pusher in Python.
我们在这里在Pusher实例上使用了触发方法,该触发方法具有以下语法: pusher.trigger("a_channel", "an_event", {key: "data"}) 。 您可以在此处找到Pusher Python库的文档,以获取有关在Python中配置和使用Pusher的更多信息。
/pusher/auth- This endpoint is responsible for enabling our applications to connect to private channels. Without thisauthendpoint, we will not be authorized to send client events over private channels. You can learn more about private channels here and about how to authorize users here./pusher/auth此终结点负责使我们的应用程序连接到专用通道。 没有此auth端点,我们将无权通过专用渠道发送客户端事件。 您可以在此处了解更多有关私人频道以及如何授权用户的信息。
建立前端 ( Building the frontend )
In this section, we are going to do the following things:
在本节中,我们将做以下事情:
- Create two new files,
index.htmlandadmin.htmlin thetemplatesdirectory. 在templates目录中创建两个新文件index.html和admin.html。 - Create an
imgdirectory in thestaticdirectory and add a background image calledbg.jpginside it. You can find and download free images here. 在static目录中创建一个img目录,并在其中添加名为bg.jpg的背景图像。 您可以在此处找到并下载免费图像。 - Create a
cssandjsdirectory within thestaticdirectory. In thecssdirectory, create a newadmin.cssandapp.cssfile. In thejsdirectory, create a newadmin.jsandapp.jsfile. 在static目录中创建一个css和js目录。 在css目录中,创建一个新的admin.css和app.css文件。 在js目录中,创建一个新的admin.js和app.js文件。
We will be using Bootstrap as a base style for the application. We will also be using other third-party libraries so let’s fetch the source and place them in the appropriate directory inside the static directory.
我们将使用Bootstrap作为应用程序的基本样式。 我们还将使用其他第三方库,因此让我们获取源代码并将其放置在static目录内的相应目录中。
Add these files in the static/js directory:
将这些文件添加到static/js目录中:
axios.js- download the source code here.axios.js在此处下载源代码。bootstrap.js- download the source code here.bootstrap.js在此处下载源代码。jquery.js- download the source code here.jquery.js在此处下载源代码。popper.js- download the source code here.popper.js在此处下载源代码。
Add this file in the static/css directory:
将此文件添加到static/css目录中:
The new folder structure should be:
新的文件夹结构应为:
├── python-pusher-chat-widget
      ├── app.py
      ├── static
        ├── css
          ├── admin.css
          ├── app.css
          ├── bootstrap.css
        ├── img
          ├── bg.jpg
        ├── js
          ├── admin.js
          ├── app.js
          ├── axios.js
          ├── bootstrap.js
          ├── jquery.js
          ├── popper.js
      ├── templates
        ├── admin.html
        ├── index.html
If you currently have this folder structure then you are good to go!
如果您当前具有此文件夹结构,那么就很好了!
设置主页视图 (Setting up the homepage view)
In the templates/index.html file, paste the following code:
在templates/index.html文件中,粘贴以下代码:
<!-- File: ./templates/index.html -->
    <!doctype html>
    <html lang="en">
      <head>
        <meta charset="utf-8">
        <meta name="viewport" content="width=device-width, initial-scale=1, shrink-to-fit=no">
        <title>Spin Spinner Spinnest!</title>
        <link rel="stylesheet" href="{{ url_for('static', filename='css/bootstrap.css') }}">
        <link rel="stylesheet" href="{{ url_for('static', filename='css/app.css') }}">
      </head>
      <body>
        <div class="site-wrapper">
          <div class="site-wrapper-inner">
            <div class="cover-container">

              <header class="masthead clearfix">
                <div class="inner">
                  <h3 class="masthead-brand">SPIN</h3>
                  <nav class="nav nav-masthead">
                    <a class="nav-link active" href="#">Home</a>
                    <a class="nav-link" href="#">Features</a>
                    <a class="nav-link" href="#">Contact</a>
                  </nav>
                </div>
              </header>

              <main role="main" class="inner cover">
                <h1 class="cover-heading">SPIN</h1>
                <p class="lead">SPIN is a simple realtime chat widget powered by Pusher.</p>
                <p class="lead">
                  <a href="#" class="btn btn-lg btn-secondary">GO for a SPIN?</a>
                </p>
              </main>

              <footer class="mastfoot">
              </footer>

            </div>
          </div>
        </div>

        <div class="chatbubble">
            <div class="unexpanded">
                <div class="title">Chat with Support</div>
            </div>
            <div class="expanded chat-window">
              <div class="login-screen container">
                <form id="loginScreenForm">
                  <div class="form-group">
                    <input type="text" class="form-control" id="fullname" placeholder="Name_" required>
                  </div>
                  <div class="form-group">
                    <input type="email" class="form-control" id="email" placeholder="Email Address_" required>
                  </div>
                  <button type="submit" class="btn btn-block btn-primary">Start Chat</button>
                </form>
              </div>
              <div class="chats">
                <div class="loader-wrapper">
                  <div class="loader">
                    <span>{</span><span>}</span>
                  </div>
                </div>
                <ul class="messages clearfix">
                </ul>
                <div class="input">
                  <form class="form-inline" id="messageSupport">
                    <div class="form-group">
                      <input type="text" autocomplete="off" class="form-control" id="newMessage" placeholder="Enter Message">
                    </div>
                    <button type="submit" class="btn btn-primary">Send</button>
                  </form>
                </div>
              </div>
            </div>
        </div>
        <script src="https://js.pusher.com/4.0/pusher.min.js"></script>
        <script src="{{ url_for('static', filename='js/jquery.js') }}"></script>
        <script src="{{ url_for('static', filename='js/popper.js') }}"></script>
        <script src="{{ url_for('static', filename='js/bootstrap.js') }}"></script>
        <script src="{{ url_for('static', filename='js/axios.js') }}"></script>
        <script src="{{ url_for('static', filename='js/app.js') }}"></script>
      </body>
    </html>
In this file, we have the HTML for the homepage. We also used Flask’s url_for function to dynamically link to all the local scripts and styles that we created.
在此文件中,我们具有主页HTML。 我们还使用了Flask的url_for函数来动态链接到我们创建的所有本地脚本和样式。
Because we require our application to send and receive messages in realtime, we imported the official Pusher JavaScript library with this line of code:
因为我们要求应用程序实时发送和接收消息,所以我们使用以下代码行导入了官方的Pusher JavaScript库:
<script src="https://js.pusher.com/4.0/pusher.min.js"></script>We included some custom classes within the HTML elements, however, these classes will be useless if we do not define them in the matching CSS file, open the static/css/app.css file and paste the following code:
我们在HTML元素中包含了一些自定义类,但是,如果我们没有在匹配CSS文件中定义它们,请打开static/css/app.css文件并粘贴以下代码,这些类将无用:
/_ File: static/css/app.css _/
    a,
    a:focus,
    a:hover {
      color: #fff;
    }

    .btn-secondary,
    .btn-secondary:hover,
    .btn-secondary:focus {
      color: #333;
      text-shadow: none;
      background-color: #fff;
      border: .05rem solid #fff;
    }

    html,
    body {
      height: 100%;
      background-color: #333;
    }

    body {
      color: #fff;
      text-align: center;
      text-shadow: 0 .05rem .1rem rgba(0,0,0,.5);
    }

    .site-wrapper {
      display: table;
      width: 100%;
      height: 100%; /_ For at least Firefox _/
      min-height: 100%;
      box-shadow: inset 0 0 5rem rgba(0,0,0,.5);
      background: url(../img/bg.jpg);
      background-size: cover;
      background-repeat: no-repeat;
      background-position: center;
    }

    .site-wrapper-inner {
      display: table-cell;
      vertical-align: top;
    }

    .cover-container {
      margin-right: auto;
      margin-left: auto;
    }

    .inner {
      padding: 2rem;
    }

    .masthead {
      margin-bottom: 2rem;
    }

    .masthead-brand {
      margin-bottom: 0;
    }

    .nav-masthead .nav-link {
      padding: .25rem 0;
      font-weight: 700;
      color: rgba(255,255,255,.5);
      background-color: transparent;
      border-bottom: .25rem solid transparent;
    }

    .nav-masthead .nav-link:hover,
    .nav-masthead .nav-link:focus {
      border-bottom-color: rgba(255,255,255,.25);
    }

    .nav-masthead .nav-link + .nav-link {
      margin-left: 1rem;
    }

    .nav-masthead .active {
      color: #fff;
      border-bottom-color: #fff;
    }

    @media (min-width: 48em) {
      .masthead-brand {
        float: left;
      }

      .nav-masthead {
        float: right;
      }
    }

    .cover {
      padding: 0 1.5rem;
    }

    .cover .btn-lg {
      padding: .75rem 1.25rem;
      font-weight: 700;
    }

    .mastfoot {
      color: rgba(255,255,255,.5);
    }

    @media (min-width: 40em) {
      .masthead {
        position: fixed;
        top: 0;
      }

      .mastfoot {
        position: fixed;
        bottom: 0;
      }

      .site-wrapper-inner {
        vertical-align: middle;
      }

      .masthead,
      .mastfoot,
      .cover-container {
        width: 100%;
      }
    }

    @media (min-width: 62em) {
      .masthead,
      .mastfoot,
      .cover-container {
        width: 42rem;
      }
    }

    .chatbubble {
        position: fixed;
        bottom: 0;
        right: 30px;
        transform: translateY(300px);
        transition: transform .3s ease-in-out;
    }

    .chatbubble.opened {
        transform: translateY(0)
    }

    .chatbubble .unexpanded {
        display: block;
        background-color: #e23e3e;
        padding: 10px 15px 10px;
        position: relative;
        cursor: pointer;
        width: 350px;
        border-radius: 10px 10px 0 0;
    }

    .chatbubble .expanded {
        height: 300px;
        width: 350px;
        background-color: #fff;
        text-align: left;
        padding: 10px;
        color: #333;
        text-shadow: none;
        font-size: 14px;
    }

    .chatbubble .chat-window {
      overflow: auto;
    }

    .chatbubble .loader-wrapper {
        margin-top: 50px;
        text-align: center;
    }

    .chatbubble .messages {
        display: none;
        list-style: none;
        margin: 0 0 50px;
        padding: 0;
    }

    .chatbubble .messages li {
        width: 85%;
        float: left;
        padding: 10px;
        border-radius: 5px 5px 5px 0;
        font-size: 14px;
        background: #c9f1e6;
        margin-bottom: 10px;
    }

    .chatbubble .messages li .sender {
        font-weight: 600;
    }

    .chatbubble .messages li.support {
        float: right;
        text-align: right;
        color: #fff;
        background-color: #e33d3d;
        border-radius: 5px 5px 0 5px;
    }

    .chatbubble .chats .input {
        position: absolute;
        bottom: 0;
        padding: 10px;
        left: 0;
        width: 100%;
        background: #f0f0f0;
        display: none;
    }

    .chatbubble .chats .input .form-group {
        width: 80%;
    }

    .chatbubble .chats .input input {
        width: 100%;
    }

    .chatbubble .chats .input button {
        width: 20%;
    }

    .chatbubble .chats {
      display: none;
    }

    .chatbubble .login-screen {
      margin-top: 20px;
      display: none;
    }

    .chatbubble .chats.active,
    .chatbubble .login-screen.active {
      display: block;
    }

    /_ Loader Credit: https://codepen.io/ashmind/pen/zqaqpB _/
    .chatbubble .loader {
      color: #e23e3e;
      font-family: Consolas, Menlo, Monaco, monospace;
      font-weight: bold;
      font-size: 10vh;
      opacity: 0.8;
    }

    .chatbubble .loader span {
      display: inline-block;
      -webkit-animation: pulse 0.4s alternate infinite ease-in-out;
              animation: pulse 0.4s alternate infinite ease-in-out;
    }

    .chatbubble .loader span:nth-child(odd) {
      -webkit-animation-delay: 0.4s;
              animation-delay: 0.4s;
    }

    @-webkit-keyframes pulse {
      to {
        -webkit-transform: scale(0.8);
                transform: scale(0.8);
        opacity: 0.5;
      }
    }

    @keyframes pulse {
      to {
        -webkit-transform: scale(0.8);
                transform: scale(0.8);
        opacity: 0.5;
      }
    }
设置管理仪表板视图 (Setting up the admin dashboard view)
In the templates/admin.html file, paste the following code:
在templates/admin.html文件中,粘贴以下代码:
<!-- File: templates/admin.html -->
<!doctype html>
<html lang="en">
<head>
<meta charset="utf-8">
<meta name="viewport" content="width=device-width, initial-scale=1, shrink-to-fit=no">
<title>Admin</title>
<link href="{{ url_for('static', filename='css/bootstrap.css') }}" rel="stylesheet">
<link href="{{ url_for('static', filename='css/admin.css') }}" rel="stylesheet">
</head>
<body>
<header>
<nav class="navbar navbar-expand-md navbar-dark fixed-top bg-dark">
<a class="navbar-brand" href="#">Dashboard</a>
</nav>
</header>
<div class="container-fluid">
<div class="row" id="mainrow">
<nav class="col-sm-3 col-md-2 d-none d-sm-block bg-light sidebar">
<ul class="nav nav-pills flex-column" id="rooms">
</ul>
</nav>
<main role="main" class="col-sm-9 ml-sm-auto col-md-10 pt-3" id="main">
<h1>Chats</h1>
<p>? Select a chat to load the messages</p>
<p> </p>
<div class="chat" style="margin-bottom:150px">
<h5 id="room-title"></h5>
<p> </p>
<div class="response">
<form id="replyMessage">
<div class="form-group">
<input type="text" placeholder="Enter Message" class="form-control" name="message" />
</div>
</form>
</div>
<div class="table-responsive">
<table class="table table-striped">
<tbody id="chat-msgs">
</tbody>
</table>
</div>
</main>
</div>
</div>
<script src="https://js.pusher.com/4.0/pusher.min.js"></script>
<script src="{{ url_for('static', filename='js/jquery.js') }}"></script>
<script src="{{ url_for('static', filename='js/popper.js') }}"></script>
<script src="{{ url_for('static', filename='js/bootstrap.js') }}"></script>
<script src="{{ url_for('static', filename='js/axios.js') }}"></script>
<script src="{{ url_for('static', filename='js/admin.js') }}"></script>
</body>
</html>Open the static/css/admin.css file and paste the following code:
打开static/css/admin.css文件并粘贴以下代码:
/_ File: static/css/admin.css _/
    body {
        padding-top: 3.5rem;
    }

    h1 {
        padding-bottom: 9px;
        margin-bottom: 20px;
        border-bottom: 1px solid #eee;
    }

    .sidebar {
        position: fixed;
        top: 51px;
        bottom: 0;
        left: 0;
        z-index: 1000;
        padding: 20px 0;
        overflow-x: hidden;
        overflow-y: auto;
        border-right: 1px solid #eee;
    }

    .sidebar .nav {
        margin-bottom: 20px;
    }

    .sidebar .nav-item {
        width: 100%;
    }

    .sidebar .nav-item + .nav-item {
        margin-left: 0;
    }

    .sidebar .nav-link {
        border-radius: 0;
    }

    .placeholders {
        padding-bottom: 3rem;
    }

    .placeholder img {
        padding-top: 1.5rem;
        padding-bottom: 1.5rem;
    }

    tr .sender {
        font-size: 12px;
        font-weight: 600;
    }

    tr .sender span {
        color: #676767;
    }

    .response {
        display: none;
    }
编写app.js脚本 (Writing the app.js script)
In this section, we will write the script that works with the homepage and supports the customers’ functions. This script will define the logic that will enable a customer to submit the form after filling in his/her details and everything else.
在本部分中,我们将编写与主页配合使用并支持客户功能的脚本。 该脚本将定义使客户能够在填写其详细信息及其他所有内容后提交表单的逻辑。
We will define some helper functions within an IIFE and these functions will run on the occurrence of several DOM events and possibly pass on the execution to other helper functions.
我们将在IIFE中定义一些辅助函数,这些函数将在多个DOM事件发生时运行,并有可能将执行传递给其他辅助函数。
Open the app.js file and paste the following:
打开app.js文件并粘贴以下内容:
// File: static/js/app.js
    (function() {
        'use strict';

        var pusher = new Pusher('PUSHER_APP_KEY', {
            authEndpoint: '/pusher/auth',
            cluster: 'PUSHER_APP_CLUSTER',
            encrypted: true
        });

        // ----------------------------------------------------
        // Chat Details
        // ----------------------------------------------------

        let chat = {
            name:  undefined,
            email: undefined,
            myChannel: undefined,
        }


        // ----------------------------------------------------
        // Targeted Elements
        // ----------------------------------------------------

        const chatPage   = $(document)
        const chatWindow = $('.chatbubble')
        const chatHeader = chatWindow.find('.unexpanded')
        const chatBody   = chatWindow.find('.chat-window')


        // ----------------------------------------------------
        // Register helpers
        // ----------------------------------------------------

        let helpers = {

            // ----------------------------------------------------
            // Toggles the display of the chat window.
            // ----------------------------------------------------

            ToggleChatWindow: function () {
                chatWindow.toggleClass('opened')
                chatHeader.find('.title').text(
                    chatWindow.hasClass('opened') ? 'Minimize Chat Window' : 'Chat with Support'
                )
            },

            // --------------------------------------------------------------------
            // Show the appropriate display screen. Login screen or Chat screen.
            // --------------------------------------------------------------------

            ShowAppropriateChatDisplay: function () {
                (chat.name) ? helpers.ShowChatRoomDisplay() : helpers.ShowChatInitiationDisplay()
            },

            // ----------------------------------------------------
            // Show the enter details form.
            // ----------------------------------------------------

            ShowChatInitiationDisplay: function () {
                chatBody.find('.chats').removeClass('active')
                chatBody.find('.login-screen').addClass('active')
            },

            // ----------------------------------------------------
            // Show the chat room messages display.
            // ----------------------------------------------------

            ShowChatRoomDisplay: function () {
                chatBody.find('.chats').addClass('active')
                chatBody.find('.login-screen').removeClass('active')

                setTimeout(function(){
                    chatBody.find('.loader-wrapper').hide()
                    chatBody.find('.input, .messages').show()
                }, 2000)
            },

            // ----------------------------------------------------
            // Append a message to the chat messages UI.
            // ----------------------------------------------------

            NewChatMessage: function (message) {
                if (message !== undefined) {
                    const messageClass = message.sender !== chat.email ? 'support' : 'user'

                    chatBody.find('ul.messages').append(
                        `<li class="clearfix message ${messageClass}">
                            <div class="sender">${message.name}</div>
                            <div class="message">${message.text}</div>
                        </li>`
                    )


                    chatBody.scrollTop(chatBody[0].scrollHeight)
                }
            },

            // ----------------------------------------------------
            // Send a message to the chat channel.
            // ----------------------------------------------------

            SendMessageToSupport: function (evt) {

                evt.preventDefault()

                let createdAt = new Date()
                createdAt = createdAt.toLocaleString()

                const message = $('#newMessage').val().trim()

                chat.myChannel.trigger('client-guest-new-message', {
                    'sender': chat.name,
                    'email': chat.email,
                    'text': message,
                    'createdAt': createdAt
                });

                helpers.NewChatMessage({
                    'text': message,
                    'name': chat.name,
                    'sender': chat.email
                })

                console.log("Message added!")

                $('#newMessage').val('')
            },

            // ----------------------------------------------------
            // Logs user into a chat session.
            // ----------------------------------------------------

            LogIntoChatSession: function (evt) {
                const name  = $('#fullname').val().trim()
                const email = $('#email').val().trim().toLowerCase()

                // Disable the form
                chatBody.find('#loginScreenForm input, #loginScreenForm button').attr('disabled', true)

                if ((name !== '' && name.length >= 3) && (email !== '' && email.length >= 5)) {
                    axios.post('/new/guest', {name, email}).then(response => {
                        chat.name = name
                        chat.email = email
                        chat.myChannel = pusher.subscribe('private-' + response.data.email);
                        helpers.ShowAppropriateChatDisplay()
                    })
                } else {
                    alert('Enter a valid name and email.')
                }

                evt.preventDefault()
            }
        }

        // ------------------------------------------------------------------
        // Listen for a new message event from the admin
        // ------------------------------------------------------------------

        pusher.bind('client-support-new-message', function(data){
            helpers.NewChatMessage(data)
        })


        // ----------------------------------------------------
        // Register page event listeners
        // ----------------------------------------------------

        chatPage.ready(helpers.ShowAppropriateChatDisplay)
        chatHeader.on('click', helpers.ToggleChatWindow)
        chatBody.find('#loginScreenForm').on('submit', helpers.LogIntoChatSession)
        chatBody.find('#messageSupport').on('submit', helpers.SendMessageToSupport)
    }())
Above we have the JavaScript that powers the clients chat widget. In the code, we start by instantiating Pusher (remember to replace the PUSHER_* keys with the keys in your Pusher dashboard).
上面有支持客户端聊天小部件JavaScript。 在代码中,我们首先实例化Pusher(请记住将PUSHER_*键替换为Pusher仪表板中的键)。
We have a helpers property that has a few functions attached to it. Each function has a comment explaining what it does right before it is defined. At the bottom of the script is where we register all the events and listeners that make the widget function as expected.
我们有一个helpers属性,其中附加了一些功能。 每个函数都有一个注释,解释其在定义之前所做的事情。 在脚本的底部是我们注册使小部件按预期功能运行的所有事件和侦听器的位置。
Writing the admin.js script The code in the admin.js is similar to the app.js and functions in a similat manner. Open the admin.js add paste the following code:
编写管理员 。 js脚本 admin.js的代码类似于app.js并且以相似的方式起作用。 打开admin.js添加粘贴以下代码:
// File: static/js/admin.js
    (function () {
        'use strict';

        // ----------------------------------------------------
        // Configure Pusher instance
        // ----------------------------------------------------

        var pusher = new Pusher('PUSHER_APP_KEY', {
            authEndpoint: '/pusher/auth',
            cluster: 'PUSHER_APP_CLUSTER',
            encrypted: true
          });

        // ----------------------------------------------------
        // Chat Details
        // ----------------------------------------------------

        let chat = {
            messages: [],
            currentRoom: '',
            currentChannel: '',
            subscribedChannels: [],
            subscribedUsers: []
        }

        // ----------------------------------------------------
        // Subscribe to the generalChannel
        // ----------------------------------------------------

        var generalChannel = pusher.subscribe('general-channel');

        // ----------------------------------------------------
        // Targeted Elements
        // ----------------------------------------------------

        const chatBody = $(document)
        const chatRoomsList = $('#rooms')
        const chatReplyMessage = $('#replyMessage')

        // ----------------------------------------------------
        // Register helpers
        // ----------------------------------------------------

        const helpers = {

            // ------------------------------------------------------------------
            // Clear the chat messages UI
            // ------------------------------------------------------------------

            clearChatMessages: () => $('#chat-msgs').html(''),

            // ------------------------------------------------------------------
            // Add a new chat message to the chat window.
            // ------------------------------------------------------------------

            displayChatMessage: (message) => {
                if (message.email === chat.currentRoom) {

                    $('#chat-msgs').prepend(
                        `<tr>
                            <td>
                                <div class="sender">${message.sender} @ <span class="date">${message.createdAt}</span></div>
                                <div class="message">${message.text}</div>
                            </td>
                        </tr>`
                    )
                }
            },

            // ------------------------------------------------------------------
            // Select a new guest chatroom
            // ------------------------------------------------------------------

            loadChatRoom: evt => {
                chat.currentRoom = evt.target.dataset.roomId
                chat.currentChannel = evt.target.dataset.channelId

                if (chat.currentRoom !== undefined) {
                    $('.response').show()
                    $('#room-title').text(evt.target.dataset.roomId)
                }

                evt.preventDefault()
                helpers.clearChatMessages()
            },

            // ------------------------------------------------------------------
            // Reply a message
            // ------------------------------------------------------------------
            replyMessage: evt => {
                evt.preventDefault()

                let createdAt = new Date()
                createdAt = createdAt.toLocaleString()

                const message = $('#replyMessage input').val().trim()

                chat.subscribedChannels[chat.currentChannel].trigger('client-support-new-message', {
                    'name': 'Admin',
                    'email': chat.currentRoom,
                    'text': message,
                    'createdAt': createdAt
                });

                helpers.displayChatMessage({
                    'email': chat.currentRoom,
                    'sender': 'Support',
                    'text': message,
                    'createdAt': createdAt
                })


                $('#replyMessage input').val('')
            },
        }


          // ------------------------------------------------------------------
          // Listen to the event that returns the details of a new guest user
          // ------------------------------------------------------------------

          generalChannel.bind('new-guest-details', function(data) {

            chat.subscribedChannels.push(pusher.subscribe('private-' + data.email));

            chat.subscribedUsers.push(data);

            // render the new list of subscribed users and clear the former
            $('#rooms').html("");
            chat.subscribedUsers.forEach(function (user, index) {

                    $('#rooms').append(
                        `<li class="nav-item"><a data-room-id="${user.email}" data-channel-id="${index}" class="nav-link" href="#">${user.name}</a></li>`
                    )
            })

          })


          // ------------------------------------------------------------------
          // Listen for a new message event from a guest
          // ------------------------------------------------------------------

          pusher.bind('client-guest-new-message', function(data){
              helpers.displayChatMessage(data)
          })


        // ----------------------------------------------------
        // Register page event listeners
        // ----------------------------------------------------

        chatReplyMessage.on('submit', helpers.replyMessage)
        chatRoomsList.on('click', 'li', helpers.loadChatRoom)
    }())
Just like in the app.js we have the helpers object that holds the meat of the script and towards the bottom, the listeners and events are called and registered.
就像在app.js一样,我们有helpers对象,该对象保存脚本的内容,并指向底部,将调用并注册侦听器和事件。
Replace the
PUSHER_APP_*keys with the keys on your Pusher dashboard.将
PUSHER_APP_*键替换为Pusher仪表板上的键。
运行应用程序 ( Running the application )
We can test the application using this command:
我们可以使用以下命令测试应用程序:
$ flask runNow if we visit 127.0.0.1:5000 and 127.0.0.1:5000/admin we should test the application:
现在,如果我们访问127.0.0.1:5000和127.0.0.1:5000/admin,我们应该测试该应用程序:
结论 ( Conclusion )
In this article, we have learned how we can leverage the power of Pusher in creating a chat widget powered by a Python backend. The entire code for this tutorial is available on GitHub.
在本文中,我们学习了如何利用Pusher的功能来创建由Python后端提供支持的聊天小部件。 本教程的完整代码可在GitHub上找到。
翻译自: https://scotch.io/tutorials/build-a-chat-widget-with-python
python 构建简单窗口


 被折叠的 条评论
为什么被折叠?
被折叠的 条评论
为什么被折叠?
 到【灌水乐园】发言


