


jest测试react组件
Enzyme is an open source JavaScript testing utility by Airbnb that makes it fun and easy to write tests for React. In this article, we will be going through writing tests for React using Enzyme and Jest.
Enzyme是Airbnb的开源JavaScript测试实用程序,它使为React编写测试变得有趣而容易。 在本文中,我们将使用Enzyme和Jest编写针对React的测试。
To get started, you will need to familiarize yourself with the following:
首先,您需要熟悉以下内容:
- React - A JavaScript library for building delightful UI by Facebook React-一个用于通过Facebook构建令人愉悦的UIJavaScript库
- Jest - A JavaScript testing framework by Facebook. Jest -FacebookJavaScript测试框架。
为什么开玩笑? ( Why Jest? )
Jest is a fast JavaScript testing utility by Facebook that enables you to get started with testing your JavaScript code with zero configuration.
Jest是Facebook的一种快速JavaScript测试实用程序,可让您开始使用零配置测试JavaScript代码。
This means that you can easily perform tasks like code-coverage by simply passing --coverage option when running your tests.
这意味着您可以通过在运行测试时简单地传递--coverage选项来轻松执行代码覆盖之类的任务。
设置我们的React应用 ( Setting Up Our React App )
First things first, create a react application using create-react-app.
首先,使用create-react-app创建一个react应用程序 。
create-react-app enzyme-testscd enzyme-tests
yarn start
Setting Up Enzyme
设置酶
To get started with Enzyme, go ahead and install the library via yarn or npm as a dev dependency.
要开始使用Enzyme,请继续通过yarn或npm作为开发依赖项安装该库。
yarn add --dev enzyme enzyme-adapter-react-16Notice that we also installed an adapter alongside enzyme that matches the React version installed by create-react-app.
请注意,我们还在酶旁边安装了一个适配器,该适配器与create-react-app安装的React版本匹配。
If you are not using the latest version of React, Enzyme has adapters for all versions of react from ^0.13.0 to ^16.0.0. You can read more about it in the Enzyme installation guide.
如果您使用的不是最新版本的React,则Enzyme拥有适用于所有版本的从^0.13.0到^16.0.0 。 您可以在《 酶安装指南》中阅读有关它的更多信息。
src/enzyme.js
src / enzyme.js
import Enzyme, { configure, shallow, mount, render } from 'enzyme';
import Adapter from 'enzyme-adapter-react-16';

configure({ adapter: new Adapter() });
export { shallow, mount, render };
export default Enzyme;
Don't worry about the named exports from enzyme here. We will get to play with them later.
在这里不必担心酶的命名出口。 我们稍后会和他们一起玩。
Finally, create a components and components/__tests__ folder inside src where our components and tests will live in respectively.
最后,在src内创建一个components and components/__tests__文件夹,我们的组件和测试将分别保存在其中。
浅层渲染 ( Shallow Rendering )
Shallow rendering is the most basic version of testing with Enzyme. As the name suggests, shallow rendering limits it's scope to the component to be tested and not it's children.
浅渲染是使用Enzyme进行测试的最基本版本。 顾名思义,浅层渲染将其范围限制为要测试的组件,而不是子组件。
This comes in handy in various scenarios:
这在各种情况下都很方便:
- For presentational/dummy components that simply render props, there is no need to try and render any other children. 对于仅渲染道具的外观/虚拟组件,无需尝试渲染任何其他子代。
- For components with deeply nested children components, a change in behavior of the children should not affect the behavior of the parent component to be tested. 对于具有深嵌套子组件的组件,子组件行为的变化不应影响要测试的父组件的行为。
For this section, we will demonstrate testing a presentational component with shallow render.
在本节中,我们将演示使用浅层渲染测试演示组件。
Take a look at the List component below that expects an items prop and displays them in an unordered list.
看一看的List低于预期的部分items在一个无序列表支撑并显示它们。
src/components/List.js
src / components / List.js
import React from 'react';
import PropTypes from 'prop-types';

/_*
 _ Render a list of items
 _
 _ @param {Object} props - List of items
 */
function List(props) {
  const { items } = props;
  if (!items.length) {
    // No Items on the list, render an empty message
    return <span className="empty-message">No items in list</span>;
  }

  return (
    <ul className="list-items">
      {items.map(item => <li key={item} className="item">{item}</li>)}
    </ul>
  );
}

List.propTypes = {
  items: PropTypes.array,
};

List.defaultProps = {
  items: [],
};

export default List;
Let's add a few tests for the component.
让我们为该组件添加一些测试。
/src/components/tests/List.test.js
/src/components/tests/List.test.js
import React from 'react';
import { shallow } from '../enzyme';

import List from './List';

describe('List tests', () => {

  it('renders list-items', () => {
    const items = ['one', 'two', 'three'];
    const wrapper = shallow(<List items={items} />);

    // Expect the wrapper object to be defined
    expect(wrapper.find('.list-items')).toBeDefined();
    expect(wrapper.find('.item')).toHaveLength(items.length);
  });

  it('renders a list item', () => {
    const items = ['Thor', 'Loki'];
    const wrapper = shallow(<List items={items} />);

    // Check if an element in the Component exists
    expect(wrapper.contains(<li key='Thor' className="item">Thor</li >)).toBeTruthy();
  });

  it('renders correct text in item', () => {
    const items = ['John', 'James', 'Luke'];
    const wrapper = shallow(<List items={items} />);

    //Expect the child of the first item to be an array
    expect(wrapper.find('.item').get(0).props.children).toEqual('John');
  });
});
The test suite imports a shallow enzyme method from the configuration we created in the previous section, wraps the List component and returns an instance of the rendered component.
该测试套件从我们在上一节中创建的配置中导入一个shallow酶方法,包装List组件并返回渲染组件的实例。
We then make a series of assertions against the instance to check if the component renders the content correctly. While the tests are not optimal, we take advantage of a few methods exposed by the shallow API.
然后,我们对实例进行一系列断言,以检查组件是否正确呈现了内容。 虽然测试不是最佳的,但我们利用了浅层API公开的一些方法。
完整的DOM呈现 ( Full DOM rendering )
in the last section, we were able to shallow render the List component and write tests to assert the actual text in the li tags. Sweet, right? In this section, we will look at full DOM rendering by making a few modifications to the component by breaking out the li element into a component of it's own called ListItem.
在上一节中,我们能够浅化呈现List组件并编写测试以声明li标记中的实际文本。 亲爱的,对吗? 在本节中,我们将通过将li元素分解为自己的组件ListItem来对组件进行一些修改,以查看完整的DOM呈现。
src/compoents/ListItem.js
src / compoents / ListItem.js
import React from 'react';
import PropTypes from 'prop-types';

/_*
 _ Render a single item
 _
 _ @param {Object} props
 */
function ListItem(props) {
  const { item } = props;
  return <li className="item">{item}</li>;
}

ListItem.propTypes = {
  item: PropTypes.string,
};

export default ListItem;
With the new component, replace the li tag with our shiny new component.
对于新组件,请用我们闪亮的新组件替换li标签。
src/components/List.js
src / components / List.js
...
import ListItem from './ListItem';
...

return (
    <ul className="list-items">
      {items.map(item => <ListItem key={item} item={item} />)}
    </ul>
  );
Let's now run the tests we wrote in the previous section and see what happens. If you did this right, your tests should be failing as terribly as mine are.
现在,让我们运行在上一节中编写的测试,看看会发生什么。 如果您做对了,您的测试应该会像我的一样严重失败。

Why would this happen? I mean the UI did not change at all. All we did was move things a littlte. Let's debug this further. The enzyme wrapper exposes a debug method that allows use to peek into the wrapped instance of our component and see what went wrong.
为什么会这样? 我的意思是用户界面根本没有改变。 我们所做的只是移动东西。 让我们进一步调试一下。 酶包装器公开了一种debug方法,该方法可用于窥视组件的包装实例并查看出了什么问题。
Let's add a log in our tests to see what went wrong.
让我们在测试中添加日志,看看出了什么问题。
/src/components/tests/List.test.js
/src/components/tests/List.test.js
...

it('renders list-items', () => {
    const items = ['one', 'two', 'three'];
    const wrapper = shallow(<List items={items} />);

    // Let's check what wrong in our instance
    console.log(wrapper.debug());

    // Expect the wrapper object to be defined
    expect(wrapper.find('.list-items')).toBeDefined();
    expect(wrapper.find('.item')).toHaveLength(items.length);
  });

...
Run the tests again and look through the terminal output, you should see our component instance log.
再次运行测试并查看终端输出,您应该看到我们的组件实例日志。
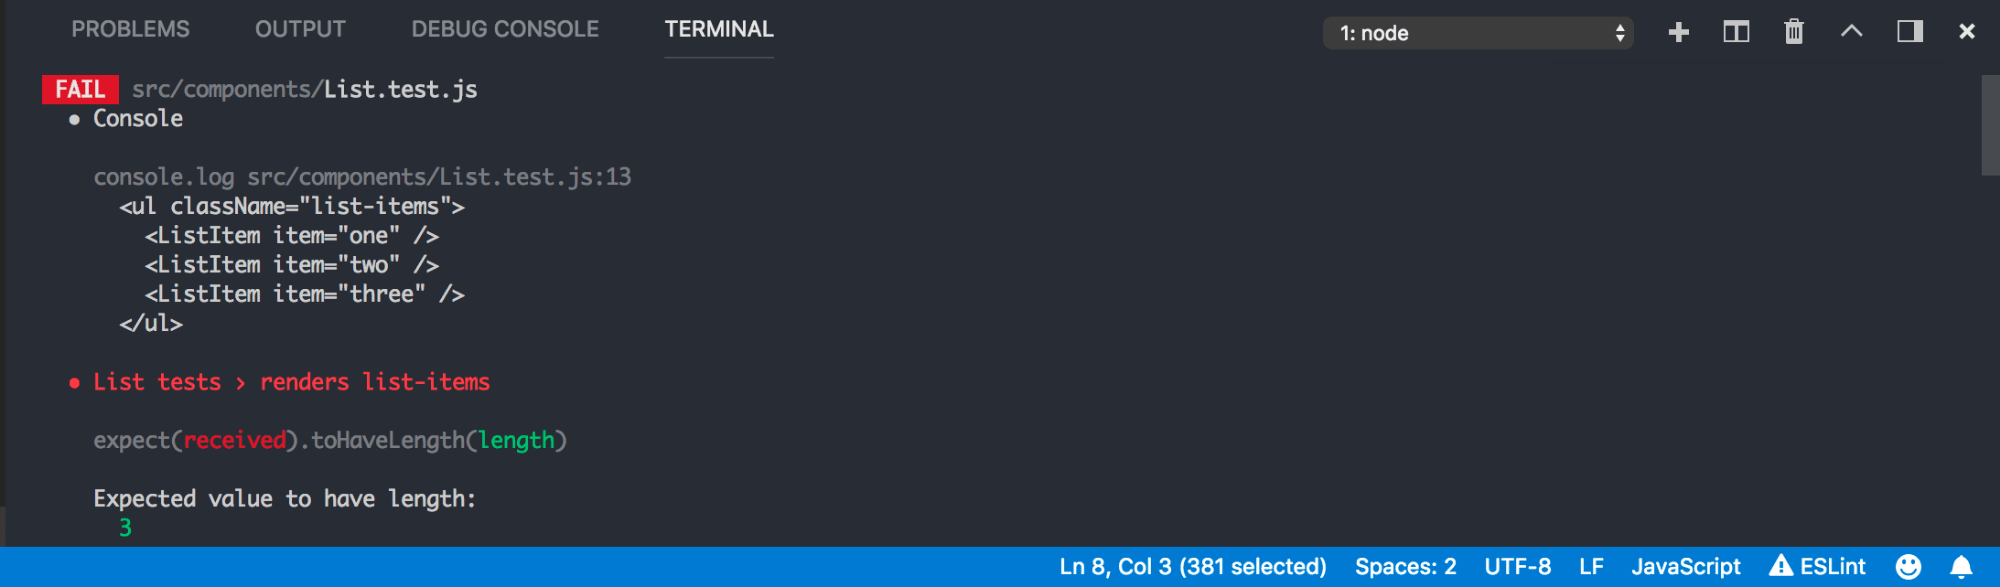
As you can see, the wrapper method does not render the ListItem Children as we would have expected. Therefore, our tests that checked for a class or li element failed.
如您所见,wrapper方法不会像我们期望的那样呈现ListItem Children。 因此,我们检查类或li元素的测试失败。
It may not seem necessary to shallow render such a simple component where the child is a presentational component but it comes in handy when you are writting tests for components that are wrapped by libraries such as react-redux's connect or reduxForm.
在子组件是表示性组件的情况下,似乎不必浅化这样一个简单的组件,但是当您编写对由库包装的组件(例如react-redux的connect或reduxForm进行测试时,它会派上用场。
The idea here is that we do not want to test the inner workings of such high order components, therefore, no need to concern ourselves with their rendering.
这里的想法是,我们不想测试这种高阶组件的内部工作原理,因此,无需担心它们的渲染。
Okay enough chatter. Let's fix the failling tests. We could stop checking for the li elements in our tests and check for the ListItem tag as shown below
好吧,chat不休。 让我们修复故障测试。 我们可以停止在测试中检查li元素,并检查ListItem标记,如下所示
/src/components/tests/List.test.js
/src/components/tests/List.test.js
...

it('renders list-items', () => {
    const items = ['one', 'two', 'three'];
    const wrapper = shallow(<List items={items} />);

    // Expect the wrapper object to be defined
    expect(wrapper.find('ListItem')).toBeDefined();
    expect(wrapper.find('ListItem')).toHaveLength(items.length);
  });

...
In this case, we actually want to test the entire tree of children in the List component. so instead, we will replace the shallow component with mount. Mount enables us to perform a full render. Here is a snippet of the updated code and a log of the debug instance.
在这种情况下,我们实际上要在List组件中测试整个子树。 因此,我们将用mount替换shallow组件。 使用Mount可以执行完整渲染。 这是更新代码的片段和调试实例的日志。
/src/components/tests/List.test.js
/src/components/tests/List.test.js
import React from 'react';
import { mount } from '../enzyme';

import List from './List';

describe('List tests', () => {

  it('renders list-items', () => {
    const items = ['one', 'two', 'three'];

    // Replace shallow iwth mount
    const wrapper = mount(<List items={items} />);

    // Let's check what wrong in our instance
    console.log(wrapper.debug());

    // Expect the wrapper object to be defined
    expect(wrapper.find('.list-items')).toBeDefined();
    expect(wrapper.find('.item')).toHaveLength(items.length);
  });

  ...
});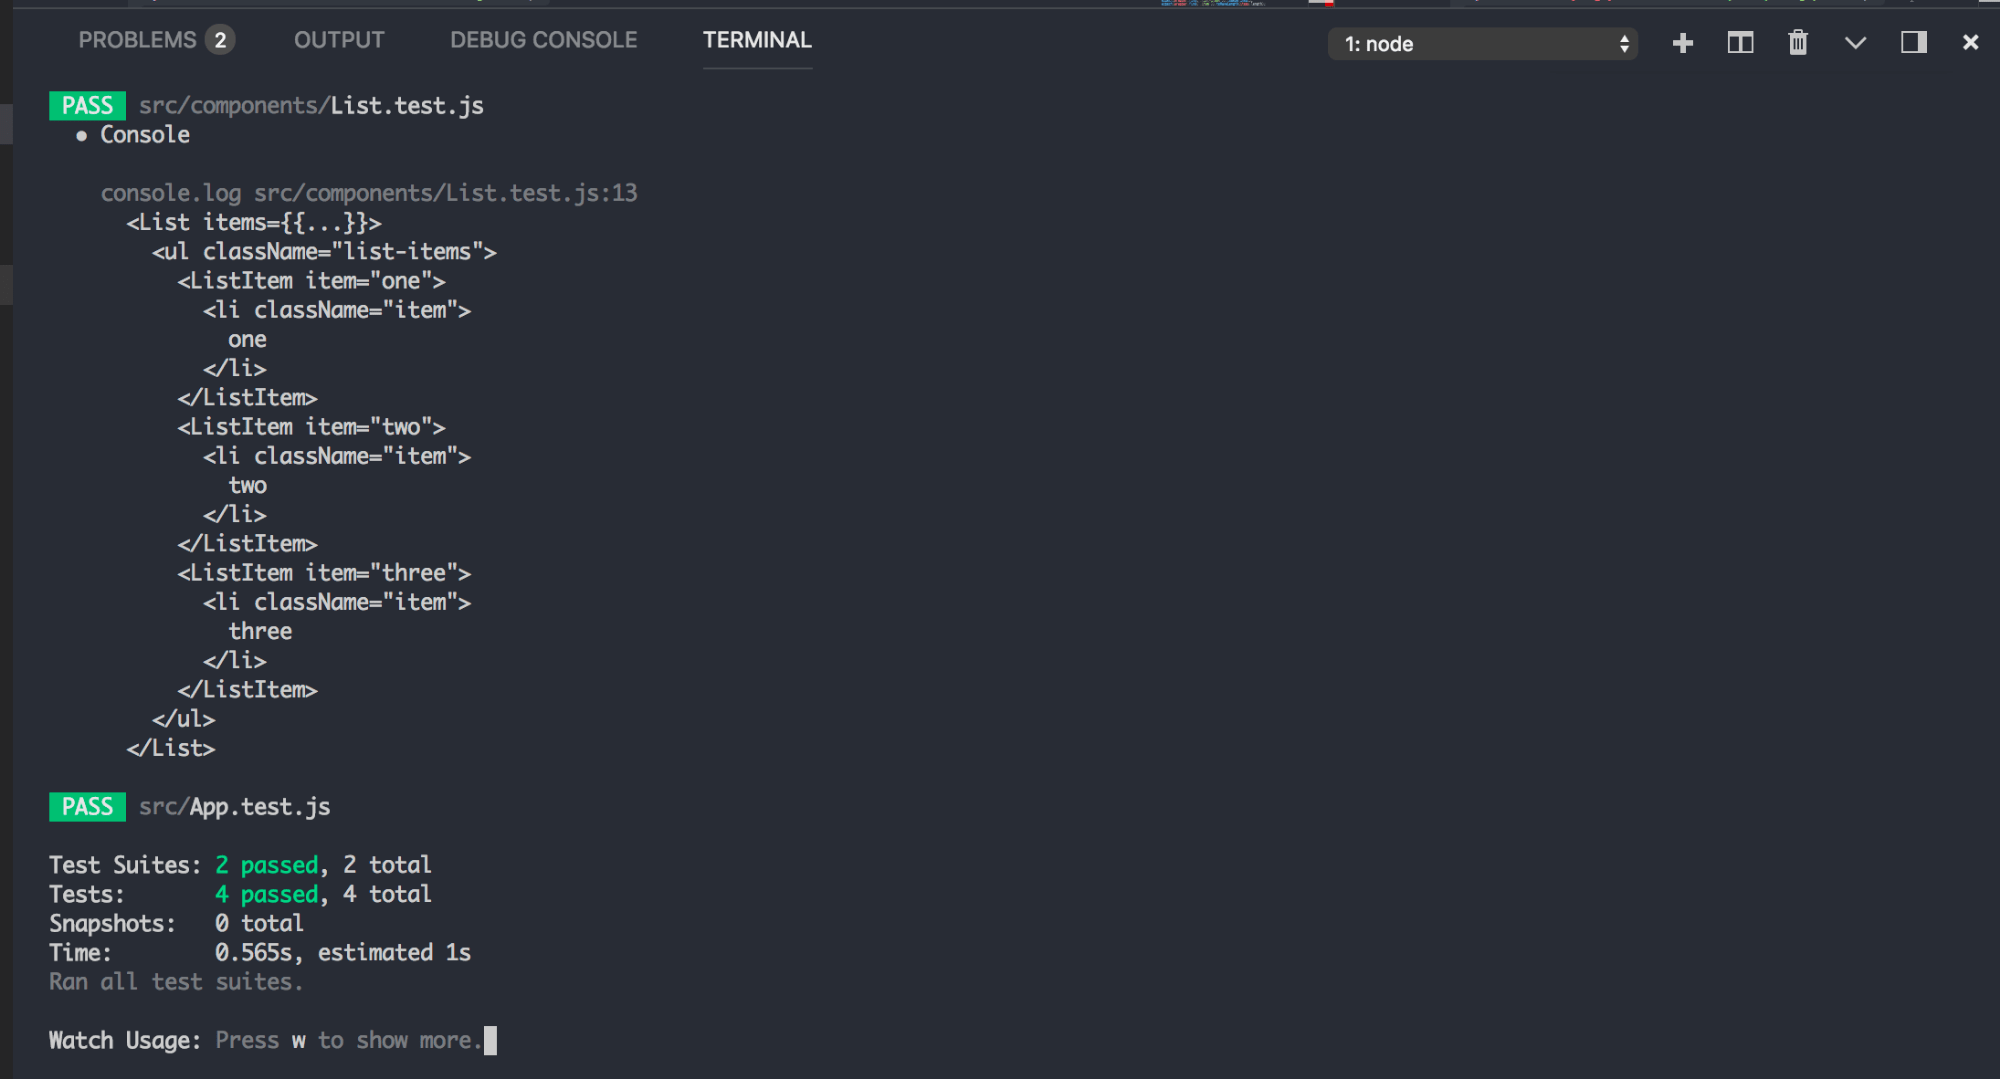
As you can see, mount's full rendering API renders the entire DOM, including that of the children. And our tests are fixed!
如您所见, mount的完整呈现API呈现了整个DOM,包括子代的DOM。 我们的测试是固定的!
Note: unlike shallow or static rendering, full rendering actually mounts the component in the DOM, which means that tests can affect each other if they are all using the same DOM. Keep that in mind while writing your tests and, if necessary, use .unmount() or something similar as cleanup.
注意:与浅表或静态渲染不同,完全渲染实际上将组件安装在DOM中,这意味着如果测试都使用相同的DOM,则它们可能会相互影响。 在编写测试时,请记住这一点,并在必要时使用.unmount()或类似清理的内容。
Enzyme Documentation
酶文献
静态渲染 ( Static Rendering )
Statics rendering works in the same way as shallow and mount but instead of returning an instance of the rendered output, it returns the rendered HMTL. It is built on top of Cheerio, a DOM manipulation and traversal API that borrows the magic of jQuery and strips out everything that we hate about it.
静态渲染的工作方式与shallow和mount相同,但它不返回渲染输出的实例,而是返回渲染的HMTL。 它建立在Cheerio之上, Cheerio是DOM操纵和遍历API,它借用了jQuery的魔力并去除了我们讨厌它的所有内容。
For static rendering, you do not have access to Enzyme API methods such as contains and debug. You however have access to the full arsenal of Cheerios manipulation and traversal methods such as addClass and find respectively.
对于静态渲染,您无权访问Enzyme API方法,例如contains和debug 。 但是,您可以访问完整的Cheerios操作和遍历方法库,例如addClass和find 。
To statically render a React component, import the render method as shown in the snippet below.
要静态渲染React组件,请导入渲染方法,如下面的代码片段所示。
/src/components/tests/List.test.js
/src/components/tests/List.test.js
import React from 'react';
import { render } from '../enzyme';

import List from './List';
import { wrap } from 'module';

describe('List tests', () => {

  it('renders list-items', () => {
    const items = ['one', 'two', 'three'];
    const wrapper = render(<List items={items} />);
    wrapper.addClass('foo');
    // Expect the wrapper object to be defined
    expect(wrapper.find('.list-items')).toBeDefined();
    expect(wrapper.find('.item')).toHaveLength(items.length);
  });

  ...
});
结论 ( Conclusion )
In this article, we have been able to go through the different ways of using Jest and Enzyme to test React components. While we did not dive into the specific methods exposed by the different renders, we were able to appreciate Enzyme's offerings.
在本文中,我们已经能够使用Jest和Enzyme来测试React组件的不同方式。 尽管我们没有深入探讨不同渲染器所提供的特定方法,但我们能够欣赏到Enzyme的产品。
The Enzyme documentation is very well done and should be easy for you to take advantage of the different methods. Next we will take a look at testing events, props and state in React. Get testing!
酶文档做得很好,您应该可以轻松利用各种方法。 接下来,我们将看看测试React中的事件,道具和状态。 得到测试!
翻译自: https://scotch.io/tutorials/testing-react-components-with-enzyme-and-jest
jest测试react组件


 980
980

 被折叠的 条评论
为什么被折叠?
被折叠的 条评论
为什么被折叠?
 到【灌水乐园】发言


