


gatsby
Even though a picture is worth a thousand words, as the English adage goes, it costs a pretty penny to store and deliver images online. Hence the common goal of many modern web-development tools to minimize the impact of images and other media assets on site performance.
即使一张图片价值一千个单词,按照英语谚语所说,在线存储和传送图像也要花费一分钱。 因此,许多现代Web开发工具的共同目标是最大程度地减少图像和其他媒体资产对站点性能的影响。
This post, part 1 of a three-part series, shows you how to build an optimized webpage by leveraging gatsby-transformer-cloudinary plugin and gatsby-image, ultimately sourcing and transforming responsive remote images in a GatsbyJS project.
这篇文章(由三部分组成的系列文章的第1部分)将向您展示如何利用gatsby-transformer-cloudinary插件和gatsby-image来构建优化的网页,最终在GatsbyJS项目中寻找和转换响应式远程图像。
Here are the steps:
步骤如下:
- Install GatsbyJS and its dependencies. 安装GatsbyJS及其依赖项。
- Set up the project configuration and layout. 设置项目配置和布局。
- Handle single- or multiple-image queries from Cloudinary through gatsby-transformer-cloudinary. 通过gatsby-transformer-cloudinary处理来自Cloudinary的单图像或多图像查询。
- Optimize the sourced images with Cloudinary and lazy-load them with gatsby-image. 使用Cloudinary优化源图像,并使用gatsby-image延迟加载它们。
- Transform the images with Cloudinary. 使用Cloudinary转换图像。
- Design a responsive layout and typography with Chakra UI. 使用Chakra UI设计响应式布局和版式。
Normally with gatsby-image, images are stored locally in the project and to utilize external images it has to come from a source, hence we use gatsby-transformer-cloudinary to fetch remote images.
通常,对于gatsby图像,图像存储在项目本地,并且要利用它必须来自某个来源的外部图像,因此我们使用gatsby-transformer-cloudinary来获取远程图像。
At the end of this project, you will be able to:
在该项目结束时,您将能够:
- Source and lazy-load remote images with gatsby-image 使用gatsby-image源和延迟加载远程映像
- Transform images using gatsby-transformer-cloudinary 使用gatsby-transformer-cloudinary转换图像
- Design a responsive app with Chakra UI 使用Chakra UI设计响应式应用
- Add progressive web app (PWA) and offline support for the webpages 为网页添加渐进式Web应用程序(PWA)和离线支持
- Add Dark mode to your site with Chakra UI 使用Chakra UI将深色模式添加到您的网站
The final app looks like this:
最终的应用程序如下所示:

先决条件 ( Prerequisites )
This project requires knowledge of JavaScript, React, and basics of GatsbyJS. You install GatsbyJS and other packages with Node.js and its package manager npm, a viable alternative for which is Yarn.
这个项目需要JavaScript,React和GatsbyJS基础知识。 您可以使用Node.js及其软件包管理器npm安装GatsbyJS和其他软件包,Yarn是可行的替代选择。
安装 ( Installation )
Follow these steps:
跟着这些步骤:
- Verify that Node.js and npm have been installed in your system by typing this command:```bashnode -v && npm -v``` 通过键入以下命令来验证系统中是否已安装Node.js和npm:``bashnode -v && npm -v''
The output prints the version numbers of Node.js and npm. Otherwise, download and install both at [nodejs.org](https://nodejs.org/).Install GatsbyJS globally with npm. Type:```bashnpm install -g gatsby-cli```
使用npm全局安装GatsbyJS。 类型:```bashnpm install -g gatsby-cli```
Create a Gatsby project in a directory of your choice. Type:```bashgatsby new gtc-demo```The default GatsbyJS starter then creates the project.
在您选择的目录中创建一个Gatsby项目。 类型:```bashgatsby new gtc-demo```然后默认的GatsbyJS启动器创建项目。
Note: To give you a jump-start, Gatsby scaffolds new projects with a starter, which comprises several pages and modules, which Gatsby then removes as the building process proceeds.
注意 :为了让您快速入门,Gatsby用一个启动器来搭建新项目,该启动器包括几个页面和模块,然后Gatsby会在构建过程中将其删除。
Install these required packages:
安装以下必需的软件包:
gatsby-transformer-cloudinary, a plugin that enables Cloudinary’s superb optimization and transformation capabilities in gatsby-image.
gatsby-transformer-cloudinary ,一个插件,可在gatsby-image中启用Cloudinary的出色优化和转换功能。
dotenv, a module that handles environment variables.
dotenv ,一个处理环境变量的模块。
chakra-ui, a UI library that efficiently builds React.js interfaces. Install gatsby-plugin-chakra-ui and its peer dependencies.
chakra-ui ,一个可有效构建React.js接口的UI库。 安装gatsby-plugin-chakra-ui及其对等项依赖项。
Gatsby-plugin-chakra-ui, a plugin that leverages Chakra UI in Gatsby projects.
Gatsby-plugin-chakra-ui ,一个在Gatsby项目中利用Chakra UI的插件。
Type the following npm command line in the project directory:
在项目目录中键入以下npm命令行:
cd gtc-demo && npm i --save gatsby-transformer-cloudinary dotenv gatsby-plugin-chakra-ui @chakra-ui/core @emotion/core @emotion/styled emotion-theming设置项目配置 ( Setup of Project Configurations )
Perform the three steps below to configure the project.
执行以下三个步骤来配置项目。
1.创建一个Cloudinary帐户 (1. Create a Cloudinary account)
Sign up for a Cloudinary account. Cloudinary offers a free tier, which is more than adequate for small to medium projects.
注册一个Cloudinary帐户 。 Cloudinary提供了免费套餐,对于中小型项目来说已经足够了。
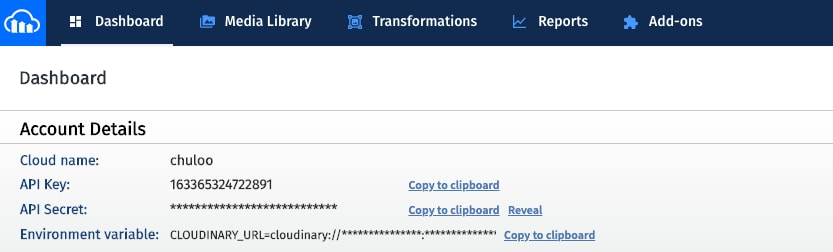
Afterwards, jot down your cloud name, API key, and API secret for later use. They are displayed on your Cloudinary dashboard, as in this example.
然后,记下您的云名称,API密钥和API机密以备后用。 如本例所示,它们显示在您的Cloudinary仪表板上。
2.设置gatsby-config.js (2. Set up gatsby-config.js)
Gatsby touts two types of plugins:
Gatsby吹捧两种类型的插件:
Source plugins, which fetch data from many sources into Gatsby projects.
源代码插件,可以从许多源中获取数据到Gatsby项目中。
Transformer plugins, which convert sourced data to usable formats.
变压器插件,可将源数据转换为可用格式。
As a start, gatsby-transformer-cloudinary uploads images from a local directory to Cloudinary, transforms them to a format usable by gatsby-image, and then returns them. Cloudinary serves as a drop-in replacement for gatsby-plugin-sharp for harnessing gatsby-image’s native image-processing capabilities.
首先,gatsby-transformer-cloudinary将图像从本地目录上载到Cloudinary,将其转换为gatsby-image可用的格式,然后返回它们。 Cloudinary可以替代gatsby-plugin-sharp,从而利用gatsby-image的本机图像处理功能。
Ultimately, Gatsby ships with a configuration file named gatsby-config.js in the root of the project, after which you can configure the installed plugins in that file.
最终,Gatsby在项目的根目录中附带了一个名为gatsby-config.js的配置文件,之后您可以在该文件中配置已安装的插件。
To set up gatsby-transformer-cloudinary and gatsby-plugin-chakra-ui, update the array of plugins in gatsby-config.js, as follows:
要设置gatsby-transformer-cloudinary和gatsby-plugin-chakra-ui,请更新gatsby-config.js的插件数组,如下所示:
require('dotenv').config();

module.exports = {
  siteMetadata: {...},
  plugins: [
    `gatsby-plugin-react-helmet`,
    {
      resolve: `gatsby-source-filesystem`,
      options: {
        name: `cloudinary-images`,
        path: `${__dirname}/src/cloudinary-images`,
      }
    },
    {
      resolve: 'gatsby-transformer-cloudinary',
      options: {
        cloudName: process.env.CLOUDINARY_CLOUD_NAME,
        apiKey: process.env.CLOUDINARY_API_KEY,
        apiSecret: process.env.CLOUDINARY_API_SECRET,
        uploadFolder: 'gtc-art-gallery',
      },
    },
    {
      resolve:`gatsby-plugin-chakra-ui`,
      options: {
        isUsingColorMode: true,
      }
    },
    [...]
  ],
}
In the configuration file, gatsby-source-filesystem, a source plugin, sources file nodes into the Gatsby data layer. Here, you’ve sourced in a folder all the images, which are uploaded once to Cloudinary on build.
在配置文件gatsby-source-filesystem(一个源插件)中,将文件节点源到Gatsby数据层。 在这里,您已经在所有文件夹中找到了所有图像,这些图像在构建时就被上传到Cloudinary。
To start, create a folder in the src directory of the project with this command:
首先,使用以下命令在项目的src目录中创建一个文件夹:
mkdir cloudinary-imagesAfterwards, upload all your media assets to that folder.
然后,将所有媒体资产上传到该文件夹。
gatsby-plugin-chakra-ui contains the configuration option for color mode with two choices: true and false.
gatsby-plugin-chakra-ui包含彩色模式的配置选项,有两个选择: true和false 。
3.添加环境变量 (3. Add environment variables)
In the gatsby-config.js file, gatsby-transformer-cloudinary contains options for adding your Cloudinary credentials as environment variables along with an upload folder. That folder could be an existing one on Cloudinary and, in case it doesn’t exist, the plugin creates it on Cloudinary during the app build.
在gatsby-config.js文件中,gatsby-transformer-cloudinary包含用于将您的Cloudinary凭据作为环境变量以及上载文件夹添加的选项。 该文件夹可能是Cloudinary上的现有文件夹,如果不存在,则插件会在应用构建期间在Cloudinary上创建该文件夹。
To add environment variables:
要添加环境变量:
Create an environment file called
.envin the root of your project for storing all the environment variables for security purposes. Since.envis specified in the.gitignorefile, it’s not pushed to a remote repository using git.在项目的根目录中创建一个名为
.env的环境文件,用于存储所有环境变量,以确保安全。 由于.env是在.gitignore文件中指定的,因此不会使用git将其推送到远程存储库。Add your Cloudinary credentials to
.env:将您的Cloudinary凭证添加到
.env:
# Find this at https://cloudinary.com/console/settings/account
CLOUDINARY_CLOUD_NAME=xxxxx

# Generate an API key pair at https://cloudinary.com/console/settings/security
CLOUDINARY_API_KEY=xxxxxxxxxxxxxx
CLOUDINARY_API_SECRET=xxxxxxxxxxxxxxxxxxx
For the other options for gatsby-transformer-cloudinary, see its readme.
有关gatsby-transformer-cloudinary的其他选项,请参见其自述文件 。
gatsby-plugin-chakra-ui is included with the config option to use color mode. This config option is either true or false.
gatsby-plugin-chakra-ui包含在config选项中,以使用彩色模式。 此配置选项为true或false 。
Next, create a development environment for leveraging Gatsby's development tools, including hot reloading and the GraphQL query builder, and for viewing the project in the browser at runtime. Type this command:
接下来,创建一个开发环境,以利用Gatsby的开发工具,包括热重载和GraphQL查询生成器,以及在运行时在浏览器中查看项目。 输入以下命令:
gatsby developOnce created, the development server runs on http://localhost:8000/.
创建完成后,开发服务器将在http:// localhost:8000 /上运行 。
Here's what the project looks like for now:
这是该项目目前的样子:

页面布局设计 ( Design of Page Layout )
The layout.js file in the src/components directory specifies the design of the pages, which persists across the site and can contain headers and footers.
src/components目录中的layout.js文件指定页面的设计,该页面在整个网站上都可以保留,并且可以包含页眉和页脚。
Currently, the layout contains a GatsbyJS useStaticQuery hook, which makes GraphQL queries in Gatsby components. You’ll fetch the site title from siteMetadata defined in gatsby-config.js with useStaticQuery.
当前,该布局包含一个GatsbyJS useStaticQuery挂钩,该挂钩在Gatsby组件中进行GraphQL查询。 从你会获取网站的标题siteMetadata在盖茨比-config.js与useStaticQuery定义。
Edit the layout to add a header, which is the navigation bar and body of the website, as follows:
编辑布局以添加标题,即网站的导航栏和正文,如下所示:
import React from "react"
import PropTypes from "prop-types"
import {graphql, useStaticQuery} from "gatsby"
import Header from "./header"
import {Box, Text, Link} from "@chakra-ui/core/dist";

const Layout = ({children}) => {

    const data = useStaticQuery(graphql` `query SiteTitleQuery {
      site {
        siteMetadata {
          title
        }
      }
    }``);

    return (
        <Box>
            <Header siteTitle={data.site.siteMetadata.title}/>
            <Box width={['90%', '90%', '80%']} mx={'auto'}>
                <main>{children}</main>
                <Text mt={10}>For this demo, the amazing images here by great artists were all sourced from <Link href={"https://unsplash.com/"} target={"_blank"} color="teal.500">Unsplash</Link></Text>
            </Box>
        </Box>
    )
};

Layout.propTypes = {
    children: PropTypes.node.isRequired,
};

export default Layout
In the above code:
在上面的代码中:
The
<Header/>custom component represents the navigation bar. Chakra UI styles the layout with different responsive widths and multiple breakpoints: 90 percent, 90 percent, and 80 percent for mobile, tablet, and desktop devices, respectively. Most properties of Chakra UI’s components follow that pattern in assigning values for various screen sizes.<Header/>自定义组件代表导航栏。 Chakra UI使用不同的响应宽度和多个断点来设置布局样式:移动设备,平板电脑和台式设备分别为90%,90%和80%。 Chakra UI组件的大多数属性在为各种屏幕尺寸分配值时都遵循该模式。The
mxproperty sets the horizontal-margin property of the page toauto, centering the page content regardless of the width.mx属性将页面的水平边距属性设置为auto,而不考虑宽度如何将页面内容居中。
Next, add the site title and the navigation bar’s dimensions by updating the Header functional component in src/components/header.js, as follows:
接下来,通过更新src/components/header.js的Header功能组件,添加网站标题和导航栏的尺寸,如下所示:
import {Box, Flex, Heading} from "@chakra-ui/core/dist";

const Header = ({siteTitle}) => {
    return (
        <Flex
            as="nav"
            align="center"
            justify="space-between"
            wrap="wrap"
            px={["0.5em", "0.5em", "1.5em"]}
            py={["1em", "1em", "1.5em"]}
            bg="blue.900"
            color="white"
        >
            <Flex align="flex-start">
                <Heading as="h1">
                    <GatsbyLink to="/">
                        <Box color={'white.800'}>
                            <Text fontSize={["md", "md", "lg"]}>{siteTitle}</Text>
                        </Box>
                    </GatsbyLink>
                </Heading>
            </Flex>
            <Flex align="flex-end">
                <Button variantColor={'blue'} mr={2} size={"xs"}>
                    <GatsbyLink to="/">Home</GatsbyLink>
                </Button>
            </Flex>
        </Flex>
    )
};
As demonstrated above, Chakra UI components and styles are handy for building a simple navigation bar, accompanied by the site title and a button to return to the homepage on a click.
如上所述,Chakra UI组件和样式很容易构建一个简单的导航栏,并带有网站标题和一个单击即可返回首页的按钮。
页面创建 ( Creation of Pages )
Now create two pages, one to display a responsive banner image; and the other, multiple images in a responsive grid.
现在创建两个页面,一个页面显示一个响应式横幅图像;另一个页面显示一个页面。 另一个是响应式网格中的多个图像。
响应式横幅图像 (Responsive Banner Image)
Build the first page, which is the homepage, with these two steps:
通过以下两个步骤构建首页,即主页。
- Query a single fluid banner image and apply a Cloudinary transformation. 查询单个流畅的横幅图像并应用Cloudinary转换。
- Render the banner. 渲染横幅。
Do the following:
请执行下列操作:
1. Edit the file src/pages/index.js with the code below to import the required modules:
1.使用以下代码编辑文件src/pages/index.js以导入所需的模块:
import React from "react"
import {graphql, Link, useStaticQuery} from "gatsby";
import Layout from "../components/layout"
import SEO from "../components/seo"
import Image from "gatsby-image"
import {Box, Button, Heading, Text} from "@chakra-ui/core/dist";
The useStaticQuery hook is for querying the images in this component. Alternatively, since this is a page component, you can use a page query to allow access to variables passed in pageContext. None of that is required, however; StaticQuery is much more straightforward.
useStaticQuery挂钩用于查询此组件中的图像。 另外,由于这是页面组件,因此可以使用页面查询来允许访问pageContext传递的变量。 但是,这些都不是必需的。 StaticQuery更直接。
2. Create and export a functional component called IndexPage. In that component, query the banner image with the query below and assign it to a variable called data.
2.创建并导出一个称为IndexPage的功能组件。 在该组件中,使用下面的查询查询横幅图像,并将其分配给名为data的变量。
const IndexPage = () => {
    // fetch images
    const data = useStaticQuery(graphqlquery BannerImage {
      bannerImage: file(name: { eq: "7" }) {
        cloudinary: childCloudinaryAsset {
          fluid(transformations:["e_grayscale"] maxWidth: 1500) {
            ...CloudinaryAssetFluid
          }
        }
      }
    });
    return (
        <Layout>
            [...]
        </Layout>
    )
};

export default IndexPage
3. Assign the returned image from the query into a variable in the component with this code:
3.使用以下代码将查询返回的图像分配给组件中的变量:
const IndexPage = () => {
    // fetch images
    const data = useStaticQuery([...]);

    // Assign the returned images to variables.
    const bannerImage = data.bannerImage.cloudinary.fluid;

    return (
    [...]
    )
};
Returned is a fluid image that fits the entire width of its parent container.
返回的是适合其父容器整个宽度的流体图像。
With gatsby-transformer-cloudinary, Cloudinary transformations are passed to the queries and applied to the resulting image. Here, you want an image with a grayscale effect.
使用gatsby-transformer-cloudinary,Cloudinary转换将传递到查询并应用于结果图像。 在这里,您需要具有灰度效果的图像。
Note that you can pass multiple transformations, including chained ones, to the query. For more details, see Cloudinary’s reference documentation on image transformations.
请注意,您可以将多个转换(包括链接的转换)传递给查询。 有关更多详细信息,请参阅Cloudinary的有关图像转换的参考文档 。
The ...CloudinaryAssetFluid fragment contains aspectRatio, the base64 image, src, sizes, and srcSet of the returned image. Where those data fields must be specified in a query, fragments take the place of the GraphQL queries.
...CloudinaryAssetFluid片段包含返回的图像的AspectRatio,base64图像,src,大小和srcSet。 在查询中必须指定这些数据字段的地方,片段代替了GraphQL查询。
Here’s the original image on Cloudinary:
这是Cloudinary上的原始图像:
 Here's the transformed grayscale image:
这是转换后的灰度图像:
Here's the transformed grayscale image:
这是转换后的灰度图像:
By default, gatsyby-transformer-cloudinary optimizes the image quality and format
默认情况下,gatsyby-transformer-cloudinary优化图像质量和格式
All the images for this project render using gatsby-image. This method provides all the native image processing and optimization capabilities of GatsbyJS including image responsiveness and lazy-loading.
该项目的所有图像均使用gatsby-image渲染。 此方法提供了GatsbyJS的所有本机图像处理和优化功能,包括图像响应能力和延迟加载。
Chakra UI builds minimalistic interfaces with no need for CSS. Box, Button, Heading, and Text are the required Chakra UI components for building the page.
Chakra UI无需CSS即可构建简约界面。 Box , Button , Heading和Text是构建页面所需的Chakra UI组件。
The SEO component, which is shipped with the default starter, adds SEO properties to the page.
默认启动程序随附的SEO组件将SEO属性添加到页面。
Once you’ve completed the queries, render the banner image in the component with this code:
完成查询后,使用以下代码在组件中渲染横幅图像:
const IndexPage = () => {
    [...]
    return (
        <Layout>
            <SEO title="Home"/>
            <Box mb={[10, 20, 100]}>
                <Heading size={'xl'} m={3} textAlign={"center"}>Responsive Banner Image</Heading>
                <Box>
                    <Image fluid={bannerImage}/>
                </Box>
            </Box>
            <Text my={5}>Click any of the buttons below to see the gallery or single Image with the <i>getFluidImageObject</i> API</Text>

            <Box>
                <Button variantColor={'teal'} mr={10} mb={[2, 0, 0]}>
                    <Link to="/gallery"> Gallery Images</Link>
                </Button>
            </Box>
        </Layout>
    )
};
By way of explanation:
通过解释的方式:
As a supercharged div element, the
Boxcomponent functions like a normal div and accepts properties, including their responsive breakpoints, for extended functionality.作为增强的div元素,
Box组件的功能类似于普通的div,并接受属性(包括其响应断点)以扩展功能。With the Chakra UI, you create responsive sizes by passing an array value to component properties. That array has sizes that represent mobile, desktop, and tablet, in that order.
使用Chakra UI,您可以通过将数组值传递到组件属性来创建响应大小。 该阵列的大小分别代表移动设备,台式机和平板电脑。
The
TextandHeadingcomponents implement responsive typography.Text和Heading组件实现了响应式排版。gatsby-image's
<Image/>component accepts a property to render either a defined fixed-width image or a responsive fluid image. This project displays a lazy-loaded fluid image with generated responsive versions.gatsby-image的
<Image/>组件接受一个属性以渲染定义的固定宽度图像或响应性流体图像。 该项目显示具有生成的响应版本的延迟加载的流体图像。The
Buttoncomponent navigates to the gallery page through Gatsby'sLinkcomponent.Button组件通过Gatsby的Link组件导航到图库页面。
Finally, restart the development server to view the homepage with the banner Image and drag the browser width to test the responsiveness. Also test the page in various mobile widths.
最后,重新启动开发服务器以查看带有横幅Image的主页,并拖动浏览器宽度以测试响应性。 还要测试各种移动宽度的页面。
To see the lazy loading in action, refresh the page or look in the browser’s network tab. Since subsequent refreshes returned cached image versions, you might have to do a hard refresh of the page to spot the lazy loading.
要查看正在执行的延迟加载,请刷新页面或查看浏览器的“网络”标签。 由于后续刷新返回了缓存的图像版本,因此您可能必须对页面进行硬刷新以发现延迟加载。
画廊图片 (Gallery Images)
Just as you did with the single-banner image, make a query for fluid images and then load them into the gallery.
就像处理单横幅图像一样,查询流体图像,然后将其加载到图库中。
1. Create a file called gallery.js in the pages directory. Import the required dependencies into the file and then make a graphQL query for the first nine images with the ...CloudinaryAssetFluid fragment. Here’s the code:
1.在pages目录中创建一个名为gallery.js的文件。 将所需的依赖项导入文件,然后使用...CloudinaryAssetFluid片段对前九个图像进行graphQL查询。 这是代码:
import Image from "gatsby-image"
import {Box, Heading, SimpleGrid} from "@chakra-ui/core/dist";
import {graphql, useStaticQuery} from "gatsby";


const SinglePage = () => {
    const data = useStaticQuery(graphql`query GalleryImages{
      listImages: allCloudinaryAsset(limit: 9) {
        images: edges {
          node {
            fluid {
              ...CloudinaryAssetFluid
            }
          }
        }
      }
    }`);

    const galleryImages = data.listImages.images;

    return (
        [...]
    )
};

export default SinglePage
2. Render the gallery in the component with the Chakra UI SimpleGrid component, as follows:
2.使用Chakra UI SimpleGrid组件在组件中渲染图库,如下所示:
const SinglePage = () => {
    const data = useStaticQuery([...]);

    const galleryImages = data.listImages.images;

    return (
        <Layout>
            <SEO title={"single"}/>
            <Box mx={'auto'} my={10}>
                <Heading textAlign={"center"} size={"xl"} mb={10}>Optimized Gallery Images</Heading>
                <SimpleGrid columns={[1, 2, 3]} spacing={2}>
                    {galleryImages.map((val, index) => (
                        <Box key={index} p={3} m={2} my={"auto"} shadow="md" borderWidth="1px" rounded={'lg'}>
                            <Image fluid={val.node.fluid}/>
                        </Box>
                    ))}
                </SimpleGrid>
            </Box>
        </Layout>
    )
};

export default SinglePage
You map through the array of returned images in the render function in a spaced grid with the gatsby-image <Image/> component.
您可以使用gatsby-image <Image/>组件在render函数中的间隔网格中映射返回的图像数组。
Here's what the final grid gallery looks like:
最终的网格图库如下所示:

Have a look at the project deployed on Netlify. For the complete code, see the GitHub repository.
看一下Netlify上部署的项目 。 有关完整的代码,请参见GitHub 存储库 。
摘要 ( Summary )
You’ve now learned how to fetch optimized Images from Cloudinary, render them as fluid images with gatsby-image, which offers all of GatsbyJS's native image-optimization and Cloudinary’s transformation capabilities.
您现在已经了解了如何从Cloudinary获取优化的图像,如何使用gatsby-image将其渲染为流畅的图像,该图像提供了GatsbyJS的所有本机图像优化和Cloudinary的转换功能。
Part 2 will describe how to fetch a single fluid image with the gatsby-transformer-cloudinary API with no need for graphQL queries for passing Cloudinary images into gatsby-image. It’s fun! Do stay tuned.
第2部分将描述如何使用gatsby-transformer-cloudinary API获取单个流体图像,而无需通过graphQL查询将Cloudinary图像传递到gatsby-image。 好有趣! 敬请期待。
翻译自: https://scotch.io/tutorials/serving-remote-optimized-images-w-gatsby-image
gatsby


 387
387


 被折叠的 条评论
为什么被折叠?
被折叠的 条评论
为什么被折叠?
 到【灌水乐园】发言


