


 BuilderX是一款屏幕设计工具,能自动生成React Native代码。它简化了设计师和开发者之间的沟通,提供无缝的设计到代码转换。本文介绍了如何安装BuilderX,使用其界面创建和编辑应用,添加业务逻辑,并在设备上运行React Native应用。
builderx
BuilderX is a screen design tool that codes React Native* for you. It generates beautiful, readable and editable code for the designs. Just design the components in your app, or import your Sketch file and it generates the corresponding code. You can hop between design and code with just a click owing to the amazing bi-directional flow in BuilderX.
BuilderX是一个屏幕设计工具,可为您编写React Native *。 它为设计生成美观,可读和可编辑的代码。 只需在您的应用程序中设计组件,或导入您的Sketch文件,它就会生成相应的代码。 由于BuilderX中惊人的双向流程,您只需单击即可在设计和代码之间进行切换。
问题 (The Problem)
It’s 2018, and Designers and Developers still don’t speak the same language. There is still a huge gap between the Design and Development phase. Designers and Developers work on different workspaces, tools, and most importantly, file formats. BuilderX is a revolutionary tool that seamlessly bridges this gap.
现在是2018年, 设计师和开发人员仍然不会讲相同的语言。 在设计和开发阶段之间仍然存在巨大差距。 设计人员和开发人员在不同的工作空间,工具,最重要的是文件格式上工作。 BuilderX是一种革命性的工具,可以无缝地弥补这一差距。
First, you will need to install BuilderX. Just go to builderx.io and install BuilderX.
首先,您将需要安装BuilderX。 只需转到builderx.io并安装BuilderX。
BuilderX界面 (BuilderX Interface)
BuilderX workspace is majorly divided in five sections:
BuilderX工作空间主要分为五个部分:
- Artboard - Artboard corresponds to a screen in your app. This is where you design awesome stuff. 画板 -画板对应于您应用中的屏幕。 这是您设计很棒的东西的地方。
- Toolbar - The toolbar on the top contains some basic tools for your design like Shapes, Text, Images, etc. and also some useful actions like create group and create symbol. 工具栏 -顶部的工具栏包含一些用于设计的基本工具,例如“形状”,“文本”,“图像”等,以及一些有用的操作,例如“创建组”和“创建符号”。
- Properties Panel - Properties panel on the right lets you adjust the properties of the selected layers and artboard. “属性”面板 -右侧的“属性”面板可让您调整所选图层和画板的属性。
- Left Panel - The left panel contains Layers and Symbols list. The layer list shows all the layers in your current Artboard. Symbols panel contains pre-built components as well as your project’s symbols that you can drag and use. 左面板 -左面板包含“层和符号”列表。 图层列表显示当前Artboard中的所有图层。 “符号”面板包含预构建的组件以及您可以拖动和使用的项目符号。
- Code Editor - Code editor is useful for developers as it lets you make changes in your code directly and changes will be reflected in real-time. 代码编辑器 -代码编辑器对开发人员很有用,因为它使您可以直接在代码中进行更改,并且更改将实时反映出来。
创建应用 (Creating the App)
In this tutorial, we will be creating a Hacker News App clone using BuilderX to design our components and then integrate the API calls with code generated to fetch the data in real-time and run the app on the device. First, we will create a new project from the BuilderX launch screen.

在本教程中,我们将使用BuilderX创建一个Hacker News App克隆,以设计我们的组件,然后将API调用与所生成的代码集成在一起,以实时获取数据并在设备上运行该应用程序。 首先,我们将在BuilderX启动屏幕上创建一个新项目。
On creating a new project, you see the project screen where the Artboard is shown in the centre as described in the previous section.
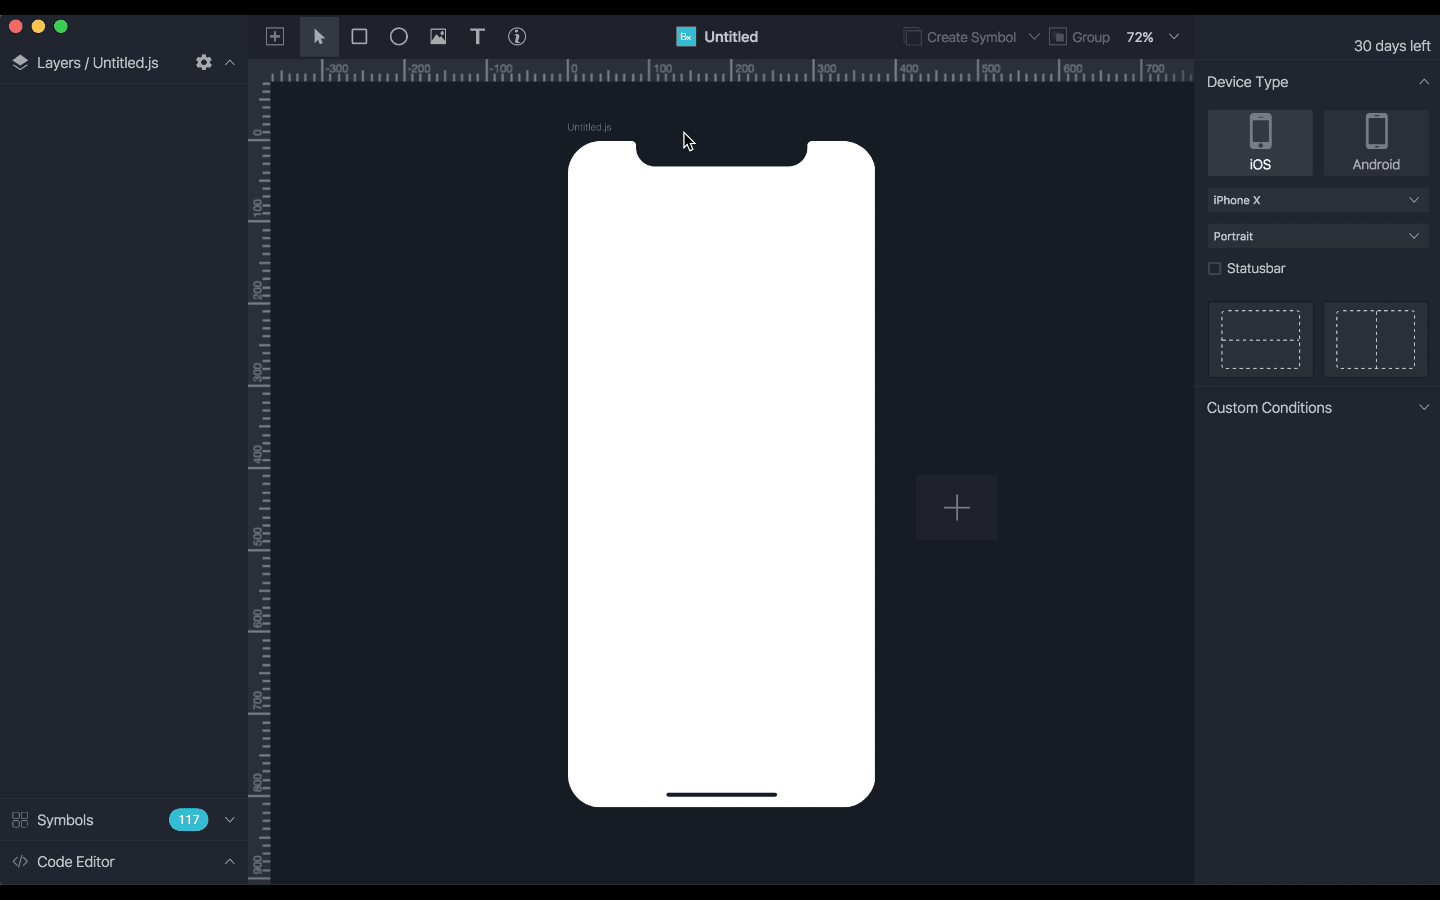
创建新项目时,您会看到项目屏幕,如上一节所述,画板显示在中间。
This is where we create our components. We will be saving the project as HackerNews-BuilderX.
这是我们创建组件的地方。 我们将项目另存为HackerNews-BuilderX。
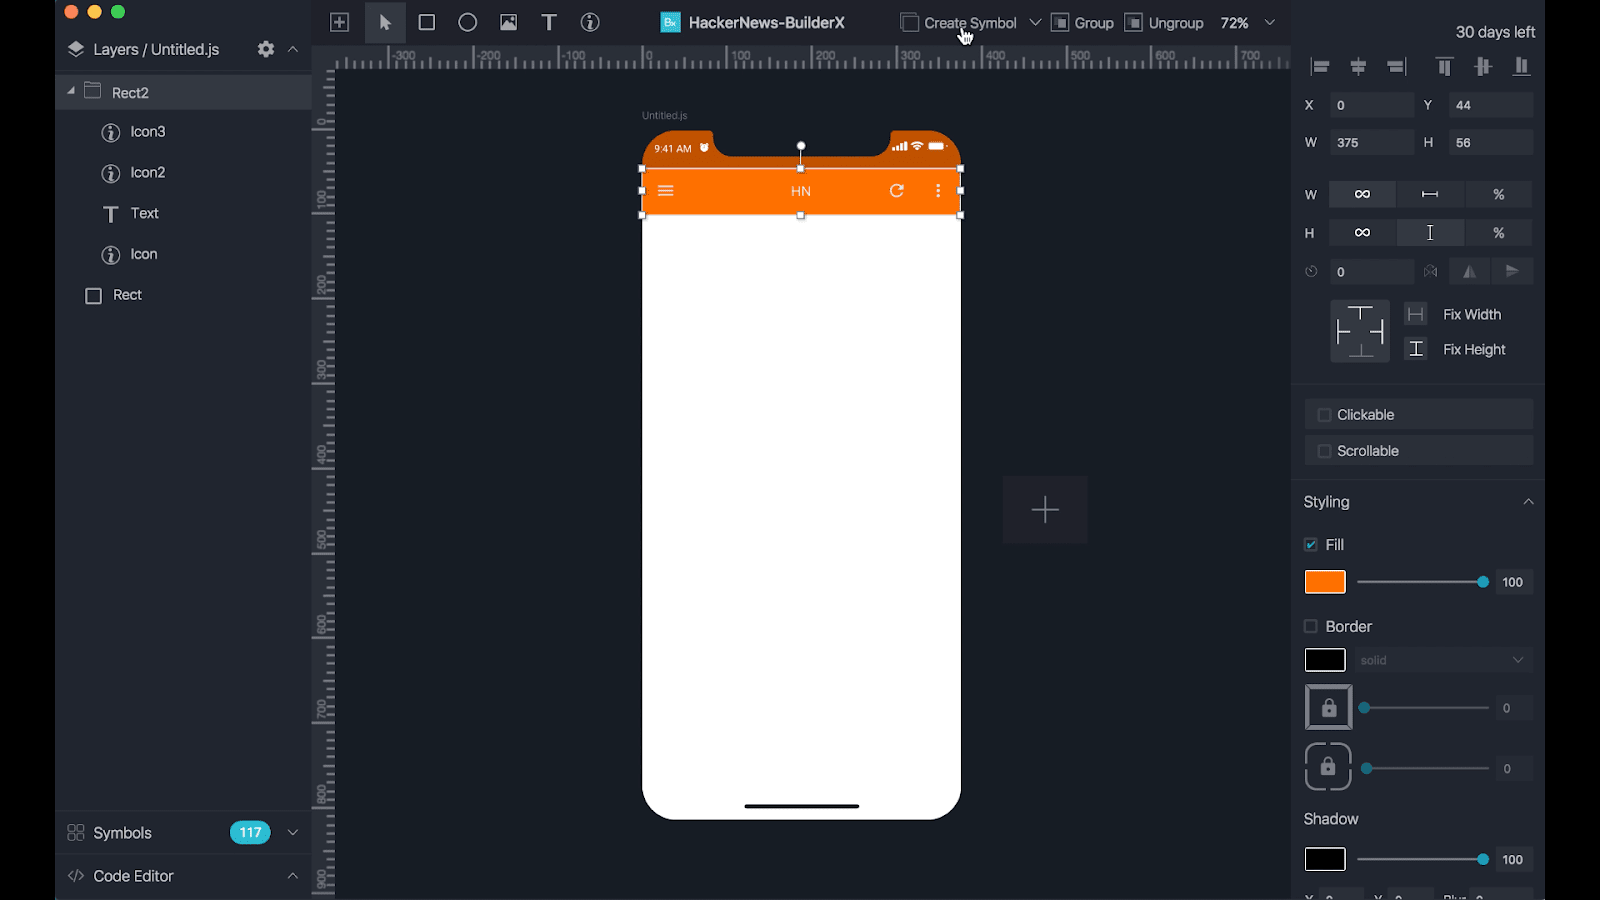
First, let’s create a rect and give it a color, which in code would correspond to <View /> component in React Native.

首先,让我们创建一个rect并为其指定颜色,该颜色在代码中将与React Native中的<View />组件相对应。
Then, to create a header, we will insert some icons by using icon menu in top toolbar. After inserting the icon, we change it to menu icon. Similarly, we can design the whole header. By using flex or different alignments, we can adjust the icons in the header.
然后,要创建标题,我们将使用顶部工具栏中的图标菜单插入一些图标。 插入图标后,我们将其更改为菜单图标。 同样,我们可以设计整个标题。 通过使用flex或不同的对齐方式,我们可以调整标题中的图标。
After designing the header, we can convert it to symbol so that we can use it on other screens as well without having to re-create it.
设计标题后,我们可以将其转换为符号,以便我们也可以在其他屏幕上使用它,而无需重新创建它。
Next, we will create a list item component that we will be using to show a single news-item. It would contain three text components inside a rect on the left and a rect on the right that would show number of comments and score. Clicking on it would navigate to <Comments /> screen.

接下来,我们将创建一个列表项组件,用于显示单个新闻项。 它将在左侧的rect和右侧的rect内包含三个文本组件,其中将显示评论数和得分。 单击它会导航到<Comments />屏幕。
After creating the list-item, we can directly create a list of that component that would correspond to the <FlatList /> in React Native.

创建列表项之后,我们可以直接创建该组件的列表,该列表将与React Native中的<FlatList />相对应。
After this, we will add Footer in our screen. For this,we will use predefined Material Footer symbol from BuilderX symbol library.

之后,我们将在屏幕上添加页脚。 为此,我们将使用BuilderX符号库中预定义的“材料页脚”符号。
Notice that we can also customise the symbol as needed and override the icons and texts. Now, we will create a new Screen for comments page. Also, if we have similar design for the new page then we can just duplicate the previously created screen or we can re-use the symbols. Here, we will use the Card component from BuilderX symbol library and modify it to fit our requirements.

注意,我们还可以根据需要自定义符号,并覆盖图标和文本。 现在,我们将创建一个新的“评论屏幕”页面。 另外,如果我们对新页面有类似的设计,则可以复制以前创建的屏幕,也可以重复使用符号。 在这里,我们将使用BuilderX符号库中的Card组件并对其进行修改以符合我们的要求。
We can can also always change the design from the code and changes will be reflected in real-time.

我们还可以随时从代码中更改设计,更改将实时反映出来。
After designing the comment component, we will create a list like in previous screen and make it a FlatList. Currently, our design will work for almost all mobile screens with few exceptions like iPhoneX or other phones with notch. BuilderX conditionals takes care of that for us. You can change the screen specific design by recording conditions for that screen.

设计了注释组件之后,我们将像上一个屏幕一样创建一个列表,并将其设置为FlatList。 目前,我们的设计将适用于几乎所有手机屏幕,只有少数例外,例如iPhoneX或其他带有缺口的手机。 BuilderX条件语句会为我们解决这一问题。 您可以通过记录该屏幕的条件来更改特定于屏幕的设计。
After we have designed the app, it looks like this.

设计完应用程序后,它看起来像这样。
Now, we will move to the next phase of adding business logic to our code.
现在,我们将进入将业务逻辑添加到代码中的下一阶段。
向应用程序添加业务逻辑 (Adding business logic to the App)
In this phase, we open the component files in an editor and add the functions to fetch the data from the API. We will add this code snippet to our LandingPage.js inside class.
在此阶段,我们在编辑器中打开组件文件,并添加函数以从API提取数据。 我们将这个代码片段添加到类内部的LandingPage.js 。
constructor() {
    super();
    this.state = {
      newsList: []
    };
    this.fetchData = this.fetchData.bind(this);
  }
  componentDidMount() {
    this.fetchData();
  }
  async fetchData() {
    const response = await fetch(
      "https://hacker-news.firebaseio.com/v0/topstories.json"
    );
    const data = await response.json();
    this.setState({ newsList: data });
  }
After adding code and mapping the state to the components, we get these screens.

添加代码并将状态映射到组件后,我们得到了这些屏幕。
Similarly, we will add these functions and mappings with respective API end-point in all screens. We also need to pass props while navigating between screens. The ListItem component now looks something like this in code.
同样,我们将在所有屏幕中将这些功能和映射与各自的API端点一起添加。 在屏幕之间导航时,我们还需要传递道具。 现在,ListItem组件在代码中看起来像这样。
async fetchData() {
    let url =
      "https://hacker-news.firebaseio.com/v0/item/" + this.props.id + ".json";
    const response = await fetch(url);
    const data = await response.json();
    this.setState({ news: data });
  }
  render() {
    return (
      <View style={[this.props.style]}>
        <View style={styles.itemContainer}>
          <Text style={styles.itemName} numberOfLines={2} ellipsizeMode="tail">
            {this.state.news.title ? this.state.news.title : "Title"}
          </Text>
          <Text style={styles.itemAuthor}>
            {this.state.news.by ? this.state.news.by : "User"}
          </Text>
          <Text style={styles.itemUrl} numberOfLines={2} ellipsizeMode="tail">
            {this.state.news.url ? this.state.news.url : "Text Added"}
          </Text>
        </View>
        <TouchableOpacity
          style={styles.button}
          onPress={() => {
            this.props.navigation.push("CommentsPage", {
              commentsList:
                this.state.news && this.state.news.kids
                  ? this.state.news.kids
                  : [],
              title:
                this.state.news && this.state.news.title
                  ? this.state.news.title
                  : "",
              url:
                this.state.news && this.state.news.url
                  ? this.state.news.url
                  : ""
            });
          }}
        >
          <View style={styles.commentsContainer}>
            <Svg style={styles.ellipse} viewBox="0 0 100 100">
              <Ellipse
                rx={50}
                ry={50}
                cx={50}
                cy={50}
                fill="rgba(249,205,175,1)"
              />
            </Svg>
            <Text style={styles.commentNumbers}>
              {this.state.news.kids ? this.state.news.kids.length : "106"}
            </Text>
          </View>
          <View style={styles.upvotesContainer}>
            <Text style={styles.upvotes}>
              {this.state.news.score ? this.state.news.score : "151"}
            </Text>
          </View>
        </TouchableOpacity>
      </View>
    );
  }
在设备上运行代码 (Running code on device)
After integrating the code and the business logic, we will run the app on our device.
集成代码和业务逻辑后,我们将在设备上运行该应用程序。
结论 (Conclusion)
This was just a simple app. But you can design and code fairly complex apps using BuilderX. Using BuilderX, developers can be sure to save at least 50% of their time, and iterate faster on ideas. Another amazing thing to note here is that design changes in the app can be made even after the app is shipped without having to reiterate the development phase.
这只是一个简单的应用程序。 但是您可以使用BuilderX设计和编写相当复杂的应用程序。 使用BuilderX,开发人员可以确保节省至少50%的时间,并且可以更快地迭代想法。 这里要注意的另一个令人惊奇的事情是,即使在交付应用程序之后也可以在应用程序中进行设计更改,而无需重复开发阶段。
You can check the complete code here on the github repo.
您可以查看完整的代码在这里对GitHub库。
快速链接 (Quick Links)
- Website 网站
- Documentation 文献资料
- Sketch To React Native 素描以React本机
- Spectrum 光谱
- Youtube 优酷
- Github Repo for App Github Repo for App
You can also follow BuilderX on Facebook and Twitter to stay updated with the latest news.
您还可以在Facebook和Twitter上关注BuilderX,以了解最新消息。
* more tech to follow
*更多技术
翻译自: https://scotch.io/tutorials/building-a-react-native-app-as-a-designer-using-builderx
builderx


 1025
1025

 被折叠的 条评论
为什么被折叠?
被折叠的 条评论
为什么被折叠?
 到【灌水乐园】发言


