


rails通过ip地址访问
Caching is a very important, yet often overlooked technique that can boost the website's performace quite significantly. To put a long story short, caching means storing the results of a complex (or not so complex) computation in some storage and later returning them right away without the need to re-compute everything. Also, "cache" is a French word that means "to hide" and "cache-cache" is a hide-and-seek game.
缓存是一项非常重要的但经常被忽视的技术,可以显着提高网站的性能。 简而言之,缓存意味着将复杂(或不太复杂)计算的结果存储在某个存储中,然后立即将其返回,而无需重新计算所有内容。 另外,“缓存”是法语单词,表示“隐藏”,“缓存-缓存”是捉迷藏游戏。
In this article we are going to discuss various types of caching in Ruby on Rails and see them in action:
在本文中,我们将讨论Ruby on Rails中的各种缓存类型,并看看它们的作用:
- Model caching 模型缓存
- Fragment caching 片段缓存
- Action caching 动作缓存
- Page caching 页面缓存
- HTTP caching HTTP缓存
The source code for the article can be found on GitHub. So, shall we start?
文章的源代码可以在GitHub上找到 。 那么,我们开始吧?
奠定基础 ( Laying Foundations )
I usually prefer to demonstrate all the concepts in practice, so go ahead and create a new Rails application without a testing suite:
我通常更喜欢在实践中演示所有概念,因此继续创建没有测试套件的新Rails应用程序:
rails new Booster -TI will be using Rails 5.1 for this demo but most of the core concepts can be applied to earlier versions as well.
我将在这个演示中使用Rails 5.1,但是大多数核心概念也可以应用于早期版本。
一些配置 (Some Configuration)
Before proceeding to the main part we need to do some ground work. First and foremost lets take a look at config/environments/development.rb file which has all the configuration for the development environment. We are interested in the following code piece:
在开始主体之前,我们需要做一些基础工作。 首先,让我们看一下config / environments / development.rb文件,其中包含开发环境的所有配置。 我们对以下代码段感兴趣:
# config/environments/development.rb
# ...
  if Rails.root.join('tmp/caching-dev.txt').exist?
    config.action_controller.perform_caching = true

    config.cache_store = :memory_store
    config.public_file_server.headers = {
      'Cache-Control' => "public, max-age=#{2.days.seconds.to_i}"
    }
  else
    config.action_controller.perform_caching = false

    config.cache_store = :null_store
  end
You can see that if the tmp/caching-dev.txt file exists then caching is enabled (this does not apply to low-level caching though). By default, this file does not exist so we need to create it either manually or by running the following command:
您可以看到,如果tmp / caching-dev.txt文件存在,则启用缓存(尽管这不适用于低级缓存)。 默认情况下,此文件不存在,因此我们需要手动或通过运行以下命令来创建它:
rails dev:cache Also note that
cache_store is set to
:memory_store which is totally okay for small websites, but is not suitable for large applications. Of course, there are other cache store options that you may utilize, like file storage or MemCache. A bit more detailed information can be found in the
official Rails guide.
cache_store设置为:memory_store ,这对于小型网站来说完全可以,但不适用于大型应用程序。 当然,您还可以使用其他缓存存储选项,例如文件存储或MemCache。 可以在Rails官方指南中找到更多详细信息。
Now that we have tackled the configuration, let's also prepare the ground for our experiments by creating a new controller, view, model and a route.
现在我们已经解决了配置问题,让我们通过创建新的控制器,视图,模型和路线来为实验做准备。
准备申请 (Preparing the Application)
Suppose we are creating an application keep track of the employees. So, go ahead and create a new model called Employee with the following fields:
假设我们正在创建一个应用程序来跟踪员工。 因此,继续使用以下字段创建一个名为Employee的新模型:
full_name(string)full_name(string)email(string) — indexed fieldemail(string)-索引字段gender(string)gender(string)salary(integer)salary(integer)
rails g model Employee full_name email:string:index gender salary:integer
rails db:migrate
I don't want to populate all sample database records by hand, so let's take advantage of the Faker gem and the seeds.rb file. This will greatly simplify things for us, because Faker can generate sample data of different kinds: names, emails, numbers, addresses and even Star Wars-related stuff. First, add the new gem to the Gemfile:
我不想手工填充所有示例数据库记录,因此让我们利用Faker gem和seed.rb文件。 这将大大简化我们的工作,因为Faker可以生成不同类型的样本数据:名称,电子邮件,数字,地址,甚至与《星球大战》有关的东西。 首先,将新的gem添加到Gemfile中 :
# Gemfile
# ...
group :development, :test do
  gem 'faker'
end
Run:
跑:
bundleinstallAnd then modify db/seeds.rb file to create 100 employees:
然后修改db / seeds.rb文件以创建100名员工:
# db/seeds.rb
100.times do
  Employee.create full_name: Faker::StarWars.character,
                  email: Faker::Internet.unique.email,
                  gender: (rand > 0.5 ? 'male' : 'female'),
                  salary: Faker::Number.between(1, 5000)
end
Here we are using:
在这里我们使用:
- StarWars module to generate random names for our employees (which means that even Darth Vader himself may work for us!). StarWars模块可为我们的员工生成随机名称(这意味着Darth Vader本人也可能为我们工作!)。
- Internet module to generate emails. Note the
uniquemethod which should guarantee that the returned values do not repeat. Internet模块,用于生成电子邮件。 请注意unique方法,该方法应保证返回的值不会重复。 - Number module to generate an intereger between
1and5000. 编号模块以生成1到5000之间的整数。 - As for the gender, we have only two options so
randis used to pick one of them. 至于性别,我们只有两种选择,因此rand被用来选择其中一种。
Now let's populate the database:
现在让我们填充数据库:
rails db:seedWhat I'd like to do next is create an EmployeesController with a sole index action that is going to fetch employees from the database based on some criteria:
我接下来要做的是创建一个带有唯一index操作的EmployeesController ,该操作将根据一些条件从数据库中获取员工:
# controllers/employees_controller.rb
class EmployeesController < ApplicationController
  def index
      def index
        @employees = Employee.by_gender params[:gender]
      end
  end
end
We are using by_gender class method to request all employees based on the value of the gender GET param. Let's code the method itself now (which is going to be presented as a scope):
我们使用by_gender类方法根据gender GET参数的值请求所有员工。 现在让我们编写方法本身的代码(将作为范围显示):
# models/employee.rb
class Employee < ApplicationRecord
# ...
  VALID_GENDER = %w(male female)

  scope :by_gender, ->(gender) do
    if VALID_GENDER.include?(gender)
      where gender: gender
    else
      all
    end
  end
end
The idea is simple: if the requested gender is valid, then get all male or female employees. Otherwise simply load all the people from the database.
这个想法很简单:如果所请求的性别有效,则请所有男性或女性雇员。 否则,只需从数据库中加载所有人员。
Now create a view and a partial:
现在创建一个视图和一个局部视图:
<!-- views/employees/index.html.erb -->
<h1>Our brilliant employees</h1>

<ul>
  <%= render @employees %>
</ul>
<!-- views/employees/_employee.html.erb -->
<li>
<%= employee.full_name %> (<%= employee.gender %>)<br>
<%= mail_to employee.email %><br>
<b>Salary</b>: <%= employee.salary %>
</li>Lastly, add the route:
最后,添加路线:
# config/routes.rb
Rails.application.routes.draw do
  resources :employees, only: [:index]
end
Now you may boot the server
现在您可以启动服务器
rails sand navigate to http://localhost:3000/employees to make sure everything is working fine.
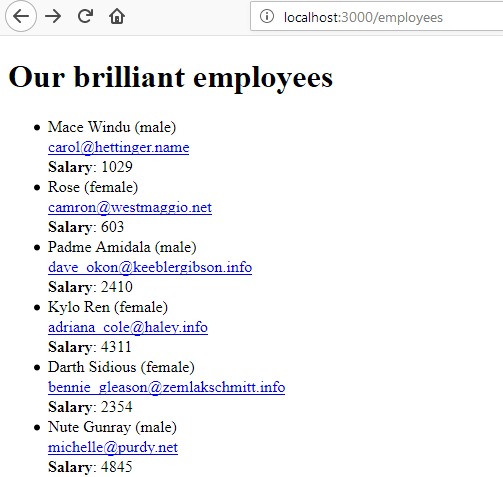 Setting the
?employees GET param to either
male or
female should limit the scope of the query.
并导航到http://localhost:3000/employees以确保一切正常。 ?employees GET参数设置为male还是female应该限制查询的范围。
低级缓存 ( Low Level Caching )
The first type of caching I'd like to discuss is called low level or model caching. In my opinion, this is the simplest type of caching that still can (when used properly) boost the performance of some particular page quite significantly. The idea is that we cache the results of a complex query and return them without re-running the same query over and over again.
我想讨论的第一类缓存称为低级 缓存或模型缓存 。 我认为,这是最简单的缓存类型,当正确使用时,它仍然可以显着提高某些特定页面的性能。 这个想法是我们缓存一个复杂查询的结果并返回它们,而不必一遍又一遍地重新运行相同的查询。
To some extent, Rails automatically uses this type of caching but only for the same queries performed in the same controller action. After the action finishes its job, the cached data are no longer available. So, in our case we need a more long-term storage. Luckily, Rails' core already has all the necessary methods to read and write cached data. There are three main methods to do that:
在某种程度上,Rails自动使用这种类型的缓存,但仅用于在同一控制器action中执行的相同查询。 操作完成其工作后,缓存的数据将不再可用。 因此,在我们的情况下,我们需要更长的存储时间。 幸运的是,Rails的核心已经拥有读取和写入缓存数据的所有必要方法。 有三种主要方法可以做到这一点:
Rails.cache.write 'some_key', 5 # => true
Rails.cache.read 'some_key' # => 5
Rails.cache.fetch('some_other_key') { 50 + 50 } #=> 100 (saved to cache)
Rails.cache.fetch('some_other_key') { 50 + 50 } #=> 100 (fetched from cache)
read and write methods are pretty self-explanatory. write accepts a key and a value, wheread read accepts a key and returns the corresponding value (if any). fetch method is a bit more complex:
read和write方法非常不言自明。 write接受键和值,而read接受键并返回相应的值(如果有)。 fetch方法稍微复杂一些:
- It tries to find a value under the given key. 它尝试在给定键下找到一个值。
- If it exists, the corresponding value is returned right away. 如果存在,则立即返回相应的值。
- If it does not exist, the given block is evaluated. The returned value is then stored under the key and is also returned as a result of the method call. 如果不存在,则评估给定的块。 然后,将返回的值存储在键下,并且也作为方法调用的结果返回。
This behaviour is illustrated above. On the first call of the fetch method the some_other_key does not exist, therefore the 50 + 50 expression is being evaluated and 100 is being saved to the cache. On subsequent method call some_other_key is already present and 100 is returned right away, without evaluating the block. We are going to use this approach to cache the queries.
上面说明了此行为。 在首次调用fetch方法时, some_other_key不存在,因此将评估50 + 50表达式并将100保存到高速缓存中。 在随后的方法调用中, some_other_key已经存在,并立即返回100 ,而不评估该块。 我们将使用这种方法来缓存查询。
Tweak the model like this:
像这样调整模型:
# models/employee.rb
class Employee < ApplicationRecord
# ...
  scope :by_gender, ->(gender) do
    if VALID_GENDER.include?(gender)
      Rails.cache.fetch("employees_#{gender}") { puts 'evaluating...' ; where gender: gender }
    else
      Rails.cache.fetch('all_employees') { puts 'evaluating...' ; all }
    end
  end
  end
If the requested gender is valid, we need to generate the cache key on the fly — it is going to be either employees_male or employees_female. For all employees, the cache name is static.
如果所请求的性别有效,则我们需要即时生成缓存密钥-该密钥将为employees_male或employees_female 。 对于所有员工,缓存名称都是静态的。
Try to reload the http://localhost:3000/employees a couple of times and open the console. You will note that on the first request the evaluating... string is printed out, whereas on the second request it is not there which means the cached result was utilized.
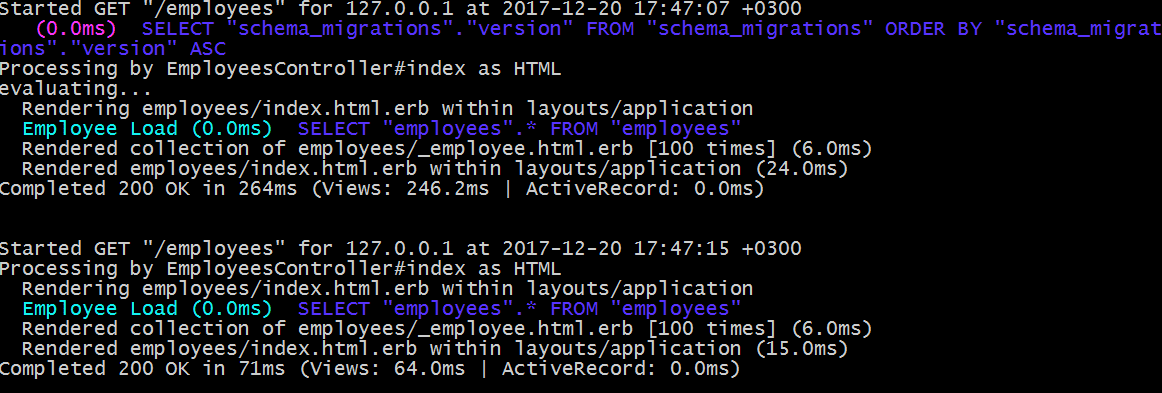 Nice! Of course, you will not see any major performance boost as you are working locally and don't have any complex queries. But when the same technique is applied in the real world the benefits can be really significant.
尝试重新加载http://localhost:3000/employees几次,然后打开控制台。 您会注意到,在第一个请求上,将打印出evaluating...字符串,而在第二个请求上,该字符串不存在,这意味着已利用了缓存的结果。
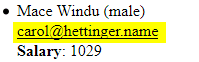
But what if one of the records is modified later? Let's try doing that by opening the console and changing an email for the first employee (which happens to be Mace Windu in my case):
但是,如果其中一条记录后来被修改怎么办? 让我们尝试通过打开控制台并更改第一位员工的电子邮件(在我的情况下恰好是Mace Windu )来做到这一点:
rails c
mace= Employee.first
mace.email = 'mace@windu.jedi'
mace.save
Now reload the page... and the email is incorrect.
 Well, this is explainable as we are not invalidating the cache anywhere. Let's take care of that by using the
after_commit callback. It is going be run whenever we are commiting something to the table:
现在重新加载页面...,电子邮件不正确。 after_commit回调来解决这个after_commit 。 每当我们向表中提交一些东西时,它将运行:
# models/employee.rb
class Employee < ApplicationRecord
# ...
  after_commit :flush_cache!

  private

  def flush_cache!
    puts 'flushing the cache...'
    Rails.cache.delete 'all_employees'
    Rails.cache.delete "employees_#{gender}"
  end
end
So, we are always deleting the all_employees cache as well as the data under the employees_male or employees_female key.
因此,我们总是删除all_employees缓存以及employees_male或employees_female键下的数据。
Now let's try changing the e-mail for Mace Windu again:
现在,让我们尝试再次更改Mace Windu的电子邮件:
rails c
mace= Employee.first
mace.email = 'mace@windu.cool_jedi'
mace.save
You are going to see an output similar to this:
 It means that the cache was flushed. After reloading the server and the page the e-mail should have a proper value:
您将看到类似于以下的输出:
这意味着缓存已刷新。 重新加载服务器和页面后,电子邮件应具有适当的值:
关于缓存键的注意事项 (Note About Cache Keys)
Under some circumstances we can simplify the process of invalidating the cache by employing special cache keys. Let's add a new instance method that applies some random tax to the employee's salary and returns the result. In this example I'm going to introduce a new method cache_key:
在某些情况下,我们可以通过使用特殊的缓存键来简化使缓存无效的过程。 让我们添加一个新的实例方法,该方法将一些随机税应用于员工的薪水并返回结果。 在此示例中,我将介绍一个新方法cache_key :
# models/employee.rb
class Employee < ApplicationRecord
# ...
  def final_salary
    Rails.cache.fetch("#{cache_key}/tax") { puts 'calculating tax...' ; salary - salary * 0.13 }
  end

  private
  # ... private methods here
end
This method is going to generate a unique key based on the record's id and update_at attributes (though you may specify other attributes as well):
此方法将基于记录的id和update_at属性生成唯一键(尽管您也可以指定其他属性):
Employee.first.cache_key #=> employees/1-20171220151513642857It means that whenever the record is updated, the updated_at column changes and so the cache is invalidated automatically.
这意味着无论何时更新记录, updated_at列都会更改,因此缓存将自动失效。
片段缓存 ( Fragment Caching )
The next type of caching we are going to discuss is called fragment which means that only part of the page is being cached. That's a pretty popular type of caching that may come in really handy. Using it can be as simple as wrapping your code with the cache method:
我们将要讨论的下一类缓存称为片段 ,这意味着仅部分页面被缓存。 这是一种非常流行的缓存类型,可能会派上用场。 使用它就像使用cache方法包装代码一样简单:
<!-- views/employees/_employee.html.erb -->
<% cache employee do %>
  <li>
    <%= employee.full_name %> (<%= employee.gender %>)<br>
    <%= mail_to employee.email %><br>
    <b>Salary</b>: <%= employee.salary %><br>
    <b>Final salary</b>: <%= employee.final_salary %>
  </li>
<% end %>
This is going to cache all the data given to the block. As for the key, it will be generated using the cache_key method called on the employee object. What's interesting, the cache will be invalidated when the record changes or when the markup itself changes. This is possible because the resulting cache key also contains the markup's digest. Note that you may clear the cache manually with the help of expire_fragment method.
这将缓存提供给该块的所有数据。 至于密钥,将使用对employee对象调用的cache_key方法生成。 有趣的是,当记录更改或标记本身更改时,缓存将失效。 这是可能的,因为生成的缓存键还包含标记的摘要。 请注意,您可以借助expire_fragment方法手动清除缓存。
If, for some reason, you'd like to customize the key's name, simply pass it as the first argument:
如果出于某种原因想要自定义键的名称,只需将其作为第一个参数传递即可:
<!-- views/employees/_employee.html.erb -->
<% cache "employee_#{employee.email}" do %>
<!-- ... other content here -->
<% end %>
Also, you may take advantage of the cache_if and cache_unless methods that accept condition as the first argument. They may come in handy if the caching should occur only under specific circumstances.
同样,您可以利用将条件作为第一个参数的cache_if和cache_unless方法。 如果仅在特定情况下才进行缓存,它们可能会派上用场。
Also, the above code can be simplified even more by setting the cached option to true when rendering the collection:
同样,可以通过在呈现集合时将cached选项设置为true来进一步简化上述代码:
<!-- views/employees/index.html.erb -->
<ul>
  <%= render @employees, cached: true %>
</ul>
Having this in place, the cache method can be removed from the partial.
将其放置到位后,可以从局部对象中删除cache方法。
What's interesting, fragment caching can become nested (which is called Russian doll caching). It means that the following code is totally valid:
有趣的是,片段缓存可能会嵌套(这称为俄罗斯玩偶缓存 )。 这意味着以下代码完全有效:
<% cache @employees do %>
  <ul>
    <%= render @employees, cached: true %>
  </ul>
<% end %>
动作缓存 ( Action Caching )
If the fragment caching works with individual parts of the page, action caching is used to cache the page as a whole. This may offer a really nice performance boost, because the HTML markup is sent to the client nearly right away, without the need to interpret all the embedded Ruby code. Why nearly? Well, because prior to that all before_action blocks are being run as usual. This is really convenient in situations when you firstly need to perform authentication or authorization.
如果片段缓存适用于页面的各个部分,则使用动作缓存来缓存整个页面。 这可能会带来非常不错的性能提升,因为HTML标记几乎立即发送到了客户端,而无需解释所有嵌入式Ruby代码。 为什么要近? 好吧,因为在此之前,所有before_action块都照常运行。 在您首先需要执行身份验证或授权的情况下,这确实非常方便。
Let's see action caching in action (duh!). Since Rails 4 this functionality was striped out from the framework's core and extracted as a separate gem, so add it now:
让我们看看操作中的操作缓存(duh!)。 从Rails 4开始,此功能已从框架的核心中剥离出来并提取为单独的gem ,因此,请立即添加:
# Gemfile
# ...
gem 'actionpack-action_caching'
Then install it:
然后安装它:
bundleinstallNow suppose we have a ridiculously simple authentication system that simply checks whether the admin GET param is set or not. This stunt was performed by a professional so never try doing it yourself at home (that is, for real world apps):
现在,假设我们有一个非常简单的身份验证系统,该系统仅检查是否设置了admin GET参数。 该特技是由专业人士执行的,因此切勿在家中自行尝试(即,对于现实应用而言):
# controllers/employees_controller.rb
class EmployeesController < ApplicationController
before_action :stupid_authentication!, only: [:index]

  # your actions here...

  private

  def stupid_authentication!
    redirect_to '/404' and return unless params[:admin].present?
  end
 end
Next let's do some caching which is as simple as adding the caches_action method:
接下来,让我们做一些缓存,就像添加caches_action方法一样简单:
# controllers/employees_controller.rb
class EmployeesController < ApplicationController
  caches_action :index

  def index
    @employees = Employee.by_gender params[:gender]
  end

  # ... private methods here
end
Now simply try navigating to http://localhost:3000/employees with and without the admin GET param. You will note that on every request the before_action runs and only after that the cached version of the page is fetched. This is possible because under the hoods the gem utilizes around filters and fragment caching with the requested path set as a cache key.
现在,简单地尝试使用和不使用admin GET参数导航到http://localhost:3000/employees 。 您会注意到,在每个请求上, before_action将运行,并且仅在该页面的缓存版本被获取之后before_action运行。 这是可能的,因为在幕后,gem围绕过滤器和片段缓存进行利用,并将请求的路径设置为缓存键。
caches_action accepts a bunch of options including :if, :unless, :expires_in and :cache_path (to rename the cache key. You may find examples you using these options at the official gem's page.
caches_action接受许多选项,包括:if , :unless , :expires_in和:cache_path (重命名缓存密钥。您可以在官方gem页面上找到使用这些选项的示例。
The cached actions can be flushed by utilizing the expire_action method:
可以通过使用expire_action方法刷新缓存的操作:
expire_action controller: "employees", action: "index"页面缓存 ( Page Caching )
Page caching is very similar to action caching, but it does not run any before action and rather fully caches the page. Subsequent requests are not processed by the Rails stack and a static page is served instead. This type of caching can be rocket-fast, but of course it has a somewhat limited usage. In many modern applications visitors should be treated differently and so page caching is not really suitable. Still, it shines on wiki resources and blogs.
页面缓存与动作缓存非常相似,但是它不会在动作之前运行,而是完全缓存页面。 Rails堆栈不处理后续请求,而是提供一个静态页面。 这种类型的缓存可以达到快速的速度,但是当然它的用法有所限制。 在许多现代应用程序中,应该区别对待访问者,因此页面缓存并不是真正适合的。 尽管如此,它仍然在Wiki资源和博客上大放异彩。
Page caching was also extracted as a separate gem so let's add it now:
页面缓存也被提取为单独的gem,所以现在就添加它:
# Gemfile
# ...
gem "actionpack-page_caching"
Install it:
安装它:
bundleinstallNow we need to do some configuration:
现在我们需要做一些配置:
# config/environment/development.rb
# ...
config.action_controller.page_cache_directory = "#{Rails.root}/public/cached_pages"
The pages will be cached as static HTML so the public directory is the best place to store it. This setting can be overridden for individual controllers:
这些页面将作为静态HTML进行缓存,因此公共目录是存储它的最佳位置。 可以为单个控制器覆盖此设置:
class SomeController < ApplicationController
  self.page_cache_directory = -> { Rails.root.join("public", request.domain) }
end
Now let's add a non-standart action that will render an informational page with some statistics (you may use model caching here as well):
现在,让我们添加一个非标准动作,该动作将呈现具有一些统计信息的信息页(您也可以在此处使用模型缓存):
# controllers/employees_controller.rb
class EmployeesController < ApplicationController
  # ... other actions here
  def info
    @employees = Employee.all
  end

  private

  # ... private methods here
end
Add a route:
添加路线:
# config/routes.rb
Rails.application.routes.draw do
  resources :employees, only: [:index] do
    collection do
      get 'info'
    end
  end
end
Create a view:
创建一个视图:
<!-- views/employees/info.html.erb -->

<h1>Some info</h1>

<p>Greetings! We have the best team in the world.</p>

<p>There are <strong><%= @employees.count %></strong> employees in total.</p>

<p>There are <strong><%= @employees.where(gender: 'male').count %></strong> male employees.</p>

<p>There are <strong><%= @employees.where(gender: 'female').count %></strong> female employees which is cool!</p>
I've added some queries right to the view for simplicity though of course that's not the best practice.
为了简单起见,我在视图中添加了一些查询,尽管这当然不是最佳实践。
Now let's cache this page by adding the following code:
现在,通过添加以下代码来缓存此页面:
# controllers/employees_controller.rb
class EmployeesController < ApplicationController
  caches_page :info
  # actions here...
end
This is pretty much it! Now the public/cached_pages/employees directory should have an info.html file with the static HTML markup. You may find some sample configuration for Apache and Nginx to serve the caches page at the docs. Of course, it is also important to have a fast and reliable hosting provider, because it plays the main role of serving responses to your users.
差不多了! 现在, public / cached_pages / employees目录应该具有一个带有静态HTML标记的info.html文件。 您可以在docs中找到一些用于Apache和Nginx的示例配置,以服务于缓存页面。 当然,拥有一个快速可靠的托管服务提供商也很重要,因为它起着为用户提供响应的主要作用。
In order to expire the cache, utilize the expire_page method:
为了使缓存过期,请使用expire_page方法:
expire_page controller: 'employees', action: 'info'You may also utilize rails-observers gem to set up a cache sweeper.
您还可以利用rails-observers gem设置缓存清除程序 。
HTTP缓存 ( HTTP Caching )
HTTP caching is yet another common type of caching that relies on HTTP headers, specifically HTTP_IF_NONE_MATCH and HTTP_IF_MODIFIED_SINCE. By using these headers the client's browser can check when the page was lastly modified and what is the value of its unique id (called ETag).
HTTP缓存是依赖HTTP标头(尤其是HTTP_IF_NONE_MATCH和HTTP_IF_MODIFIED_SINCE另一种常见缓存类型。 通过使用这些标头,客户端的浏览器可以检查页面的最后修改时间以及其唯一ID(称为ETag )的值是什么。
The idea is not that complex. On the first request the browser records the ETag of the page and caches it to the disk. On subsequent requests the browser sends the recorded ETag to the server. If the tag returned by the server and the one sent by the client do not match, it means that the page was modified and, obviously, should be requested again. If the ETags are the same, a 304 status code ("Not modified") is returned and the browser can display the page from the cache.
这个想法并不复杂。 在第一个请求上,浏览器记录页面的ETag并将其缓存到磁盘。 在随后的请求中,浏览器将记录的ETag发送到服务器。 如果服务器返回的标记与客户端发送的标记不匹配,则表明页面已被修改,显然应该再次请求该页面。 如果ETag相同,则返回304状态代码(“未修改”),浏览器可以显示来自缓存的页面。
One thing to note is that there are two types of ETags: strong and weak. Weak tags are prefixed with the W/ part and they allow the page to have some minor changes. Strong tags require the response to be completely identical, otherwise the page is downloaded again.
要注意的一件事是,ETag有两种类型:强和弱。 弱标签以W/部分作为前缀,它们使页面有一些细微的变化。 强标签要求响应必须完全相同,否则页面将再次下载。
To enable support for HTTP caching in Rails, you may utilize one of two methods: stale? and fresh_when. stale? is a bit more complex method that accepts a block (useful in conjunction with respond_to). fresh_when is simpler and can be utilized when you don't need to respond with various formats.
为了在Rails中启用对HTTP缓存的支持,您可以使用以下两种方法之一: stale? 和fresh_when 。 stale? 是一个接受块的更复杂的方法(与respond_to结合使用)。 fresh_when比较简单,不需要使用各种格式进行响应时可以使用。
So, let's now set the information about the last page's update and provide its ETag:
因此,现在让我们设置有关最后一页更新的信息并提供其ETag:
# controllers/employees_controller.rb
class EmployeesController < ApplicationController
# ...
  def index
    @employees = Employee.by_gender params[:gender]
    fresh_when etag: @employees, last_modified: @employees.first.updated_at
  end
 # other actions here...
end
Also tweak our scope by introducing a custom ordering so that the newly edited records appear first:
还通过引入自定义顺序来调整我们的范围,以便首先显示新编辑的记录:
# models/employee.rb
class Employee < ApplicationRecord
  scope :by_gender, ->(gender) do
    if VALID_GENDER.include?(gender)
      Rails.cache.fetch("employees_#{gender}") { where(gender: gender).order(updated_at: :desc) }
    else
      Rails.cache.fetch('all_employees') { all.order(updated_at: :desc) }
    end
  end
 end
Now disable action caching for the index, reload the page and open the Network tab in your developer's tools (which usually can be opened by pressing F12). You will see something like this:
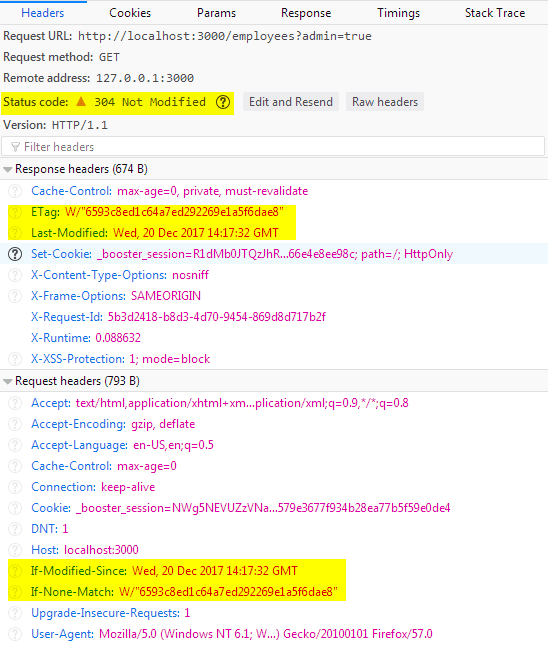 In the console you will note that the status code is 304, not 200 as usual:
Last-Modified header are sent properly. Note that by default Rails generates a weak ETag. You may set strong one instead by specifying the
:strong_etag option.
现在,禁用index操作缓存,重新加载页面并在开发人员的工具中打开“网络”选项卡(通常可以通过按F12来打开)。 您将看到如下内容:
在控制台中,您会注意到状态代码是304,而不是通常的200:
Last-Modified标头均已正确发送。 请注意,默认情况下,Rails会生成一个弱ETag。 您可以通过指定
:strong_etag选项设置强项。
Both stale? and fresh_when may also accept an ActiveRecord object. In this case all the necessary options will be set automatically:
都stale? 和fresh_when也可以接受ActiveRecord对象。 在这种情况下,所有必要的选项都会自动设置:
fresh_when@employee结论 ( Conclusion )
In this article we have discussed ways to boost our web application's performance by implemented various types of caches:
在本文中,我们讨论了通过实现各种类型的缓存来提高Web应用程序性能的方法:
- Low-level (model) to cache complex queries 低级(模型)以缓存复杂的查询
- Fragment to cache parts of the page 片段以缓存页面的一部分
- Action to cache the whole page still allowing before filters to be executed as usual 缓存整个页面的操作仍然允许照常执行过滤器之前的操作
- Page caching to directly respond with static HTML 页面缓存以静态HTML直接响应
- HTTP caching to allow browser cache the response based on
Last-Modifiedand ETag headers HTTP缓存,允许浏览器基于Last-Modified和ETag头缓存响应
Hopefully, now you are ready to implement these techniques into practice! Having a fast web site is really important as users, as you probably know, don't like to wait so its our job to please them. On the other hand, preliminary optimization is often evil so introducing all caching types for each page is generally a bad idea. Try assessing the site's performance, detect the bottlenecks and only then decide which type of caching may solve the problem.
希望您现在准备将这些技术付诸实践! 拥有一个快速的网站非常重要,因为您可能不希望用户等待,因此我们的工作就是取悦他们。 另一方面,初步优化通常是有害的,因此为每个页面引入所有缓存类型通常不是一个好主意。 尝试评估站点的性能,检测瓶颈,然后再决定哪种缓存类型可以解决问题。
I wish you good luck and see you soon!
祝你好运,早日见!
翻译自: https://scotch.io/tutorials/how-to-improve-website-performance-with-caching-in-rails
rails通过ip地址访问


 3500
3500

 被折叠的 条评论
为什么被折叠?
被折叠的 条评论
为什么被折叠?
 到【灌水乐园】发言


