


node 中进行命令行交互
JavaScript has evolved over the last five years with the introduction of Node.js. Basically, It serves as a language that can be used for Front end application, server side application, desktop application, mobile application, etc.
在过去的五年中,随着Node.js的推出,JavaScript得到了发展。 基本上,它是一种可用于前端应用程序,服务器端应用程序,桌面应用程序,移动应用程序等的语言。
The ecosystem is growing really fast with different innovation and technologies springing out from it. StackOverflow's recent survey shows that Javascript is by far the most commonly used programming language on earth.
随着各种创新和技术的涌现,生态系统正在Swift发展。 StackOverflow的最新调查表明,Java语言是迄今为止世界上最常用的编程语言。
That said, over the past 5 years, Node.js has allowed developers to write command-line tools that are interactive and very easy to use.
也就是说,在过去的5年中,Node.js允许开发人员编写交互式且易于使用的命令行工具。
If you have used git, heroku, gulp, grunt or any other package that allows you to bootstrap your project like create-react-app, angular-cli, yeoman, etc, you've used the power of Node.js in writing command-line tools. I think it's easy and simple to start writing your own command-line tools today with Node.js and its libraries for increased productivity.
如果您使用过git , heroku , gulp , grunt或其他任何可以引导您的项目的包,例如create-react-app , angular-cli , yeoman等,那么您已经在编写命令时使用了Node.js的强大功能线工具。 我认为现在开始使用Node.js及其库来编写自己的命令行工具既容易又容易,以提高生产率。
项目介绍 ( Project description )
We will be building an interactive command-line contact management system that allows users to create, read, and manage their contacts from the shell(command prompt). This will allow users to perform basic CRUD operation from the shell with ease.
我们将构建一个交互式的命令行联系人管理系统,该系统允许用户从shell(命令提示符)创建,读取和管理其联系人。 这将使用户可以轻松地从Shell执行基本的CRUD操作。
Here is a demo of the application we're going to build

这是我们将要构建的应用程序的演示
We will use Node.js as the core framework, commander.js for command-line interfaces, inquirer.js for gathering user input from the command-line, and MongoDB for data persistence.
我们将使用Node.js的为核心框架, commander.js的命令行界面, inquirer.js从命令行收集用户输入和MongoDB的数据持久性。
技术领域 ( Technologies )
1) Node.js - A server-side platform wrapped around the JavaScript language with the largest package(npm) ecosystem in the world.
1) Node.js-围绕JavaScript语言的服务器端平台,拥有世界上最大的package(npm)生态系统。
2) Commander.js - An elegant and light-weight command-line library for Node.js.
2) Commander.js-一个优雅轻巧的Node.js命令行库。
3) Inquirer.js - A collection of powerful interactive command-line interfaces.
3) Inquirer.js-强大的交互式命令行界面的集合。
4) MongoDB - A free and opensource NoSQL document-oriented database.
4) MongoDB-一个免费的开源NoSQL面向文档的数据库。
Here is a picture of what the application workflow looks like.
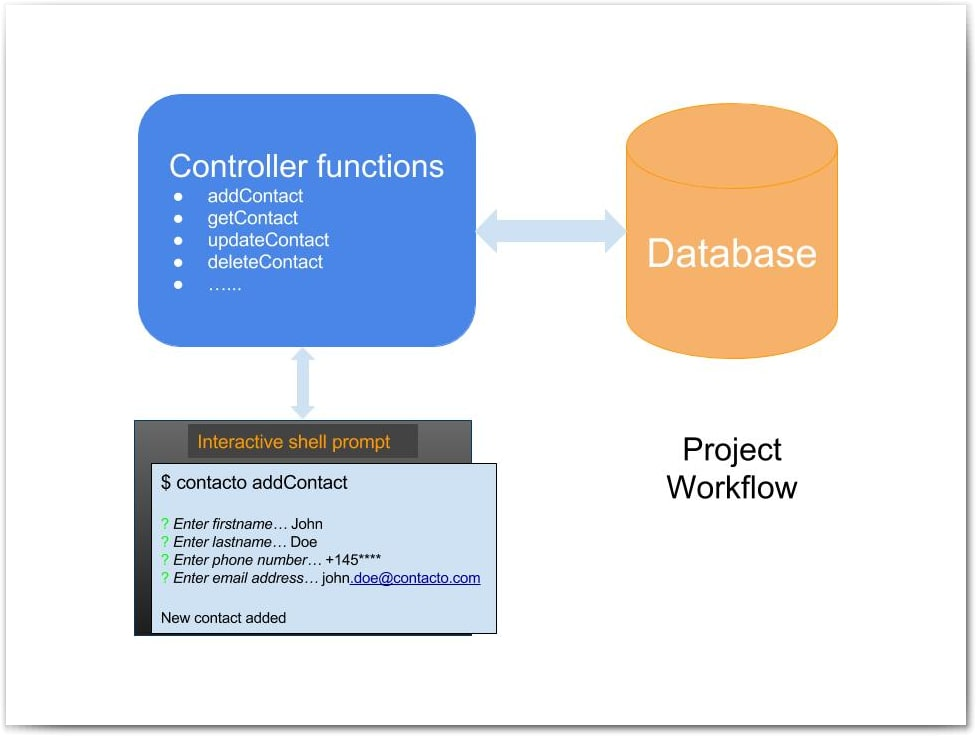 Fig: Project workflow
这是应用程序工作流的外观图。
使用Node.js构建交互式命令行应用程序的步骤 ( Steps to building an interactive command-line application with Node.js )
1) Project setup
1)项目设置
2) Define application logic
2)定义应用逻辑
3) Handle command-line arguments
3)处理命令行参数
4) Interactive run time user inputs
4)交互式运行时用户输入
5) Convert application to a shell command
5)将应用程序转换为Shell命令
6) More application logic
6)更多的应用逻辑
第1步(共5步):项目设置 (Step 1 of 5: Project setup)
Ensure the version of your installed Node.js is >=6. Run node --version on your terminal to verify. We will use yarn, a package manager for Javascript developed by Facebook to manage our project dependencies. If you don't have it installed, run
确保已安装的Node.js的版本为> = 6。 在终端上运行node --version以进行验证。 我们将使用yarn ,这是Facebook开发的Java包管理器,用于管理我们的项目依赖项。 如果没有安装,请运行
$ npm install -g yarn
$ npm install -g yarn
You can also use npm to run your application as yarn is just a personal preference though with some advantages.
您还可以使用npm来运行您的应用程序,因为yarn只是个人喜好,尽管有一些优点。
Let's create a project directory and initialize it as a Node.js application.
让我们创建一个项目目录,并将其初始化为Node.js应用程序。
$mkdir contact-manager # Create project directory
$ cd contact-manager && yarn init # Initialize the directory as a Node.jS application and follow the prompt
$ yarn add mongoose inquirer commander # Add the dependencies we need for the project
Now that we have our Node.js application initialized, you will see package.json in your project's root directory with updated dependencies to get started.
现在,我们已经初始化了Node.js应用程序,您将在项目的根目录中看到具有更新的dependencies package.json以开始使用。
{
  "name": "contacto",
  "version": "1.0.0",
  "description": "A command-line contact management system",
  ............
 "dependencies": {
    "commander": "^2.9.0",
    "inquirer": "^3.0.6",
    "mongoose": "^4.9.2"
  }
}
第2步,共5步:定义应用程序逻辑 (Step 2 of 5: Define application logic)
In this section, we will define our schema, model, and the controller functions that handles user input and persist them to the database.
在本节中,我们将定义用于处理用户输入并将其持久化到数据库的架构,模型和控制器功能。
This step requires that your MongoDB server is running.
此步骤要求您的MongoDB服务器正在运行。
Let's create logic.js in the project directory
让我们在项目目录中创建logic.js
const mongoose = require('mongoose'); // An Object-Document Mapper for Node.js
const assert = require('assert'); // N.B: Assert module comes bundled with Node.js.
mongoose.Promise = global.Promise; // Allows us to use Native promises without throwing error.

// Connect to a single MongoDB instance. The connection string could be that of a remote server
// We assign the connection instance to a constant to be used later in closing the connection
const db = mongoose.connect('mongodb://localhost:27017/contact-manager');

// Converts value to lowercase
function toLower(v) {
  return v.toLowerCase();
}

// Define a contact Schema
const contactSchema = mongoose.Schema({
  firstname: { type: String, set: toLower },
  lastname: { type: String, set: toLower },
  phone: { type: String, set: toLower },
  email: { type: String, set: toLower }
});

// Define model as an interface with the database
const Contact = mongoose.model('Contact', contactSchema);

/**
 * @function  [addContact]
 * @returns {String} Status
 */
const addContact = (contact) => {
  Contact.create(contact, (err) => {
    assert.equal(null, err);
    console.info('New contact added');
    db.disconnect();
  });
};

/**
 * @function  [getContact]
 * @returns {Json} contacts
 */
const getContact = (name) => {
  // Define search criteria. The search here is case-insensitive and inexact.
  const search = new RegExp(name, 'i');
  Contact.find({$or: [{firstname: search }, {lastname: search }]})
  .exec((err, contact) => {
    assert.equal(null, err);
    console.info(contact);
    console.info(`${contact.length} matches`);
    db.disconnect();
  });
};

// Export all methods
module.exports = {     addContact, getContact };
Basically, we define our schema and interact with the database via our model. We then define controller functions( addContact, getContact, etc) that would be called depending on the user's interaction with the application.
基本上,我们定义架构并通过模型与数据库进行交互。 然后,我们定义控制器函数( addContact , getContact等),这些函数将根据用户与应用程序的交互进行调用。
You will notice we're using toLower function to convert the values to lowercase before saving to the database. Also, like in any other contact management system we want to allow users to make case-insensitive inexact matches. However, if you want to make case-insensitive exact matches, see below for options.
您会注意到我们在保存到数据库之前使用toLower函数将值转换为小写。 同样,与其他任何联系人管理系统一样,我们希望允许用户进行不区分大小写的不精确匹配 。 但是,如果您要进行不区分大小写的精确匹配 ,请参阅以下选项。
// case-insensitive inexact matches
const search = new RegExp(name, 'i');
// case-insensitive exact match
const search = new RegExp(`^${name}$`, 'i');
For the purpose of this demo, we're only searching by firstname and lastname fields.
就本演示而言,我们仅按firstname和lastname字段进行搜索。
第3步,共5步:处理命令行参数 (Step 3 of 5: Handle command-line arguments)
To test our progress so far, we need a mechanism for accepting users' input and passing it to our controller functions defined in the step above.
为了测试到目前为止的进展,我们需要一种机制来接受用户的输入并将其传递给上面步骤中定义的控制器功能。
Commander.js is our friend for reading command-line inputs and saves us the stress of managing different options and parsing values. It comes with Git-like sub-commands which makes it interactive and easy to use. It allows us to define option, alias, command, version, action, description, etc. We will see them in action in a bit.
Commander.js是我们阅读命令行输入的朋友,并减轻了管理不同选项和解析值的压力。 它带有类似Git的子命令,使其具有交互性且易于使用。 它允许我们定义option , alias , command , version , action , description等。稍后我们将看到它们的作用。
Let's create contact.js in the project directory
让我们在项目目录中创建contact.js
const program = require('commander');
// Require logic.js file and extract controller functions using JS destructuring assignment
const { addContact, getContact } = require('./logic');

program
  .version('0.0.1')
  .description('Contact management system');

program
  .command('addContact <firstame> <lastname> <phone> <email>')
  .alias('a')
  .description('Add a contact')
  .action((firstname, lastname, phone, email) => {
    addContact({firstname, lastname, phone, email});
  });

program
  .command('getContact <name>')
  .alias('r')
  .description('Get contact')
  .action(name => getContact(name));

program.parse(process.argv);
Whoop! We're all set up. Before we test the application let's understand the key idea here. commander.js' API exposes some functions which are chainable.
op! 我们都准备好了。 在测试应用程序之前,让我们在这里了解关键思想。 commander.js的API公开了一些可链接的功能。
.command() allows you to specify the command name with optional parameters. In our own case, they're not optional because we specified them using <>. To make any parameter optional, use [the parameter goes in here] instead.
.command()允许您使用可选参数指定命令名称。 就我们自己而言,它们不是可选的,因为我们使用<>指定了它们。 要使任何参数可选,请改用[the parameter goes in here] 。
.action() takes a callback and runs it each time the command name is specified.
.action()接受回调,并在每次指定命令名称时运行它。
Let's test it out in the terminal.
让我们在终端中对其进行测试。
$ node contact.js --help# Shows you program description, usage, commands, actions, and aliases
$ node contact.js --version # Shows the version number specified
Now that we've gotten a hang of the program, let's try adding a contact to our database from the terminal Usage: contact [options] [command]
现在,我们已经了解了该程序的全部内容,让我们尝试从终端Usage: contact [options] [command]添加到数据库中。 Usage: contact [options] [command]
$ node contact.js addContact John Doe 013-452-3134 john.doe@contacto.comThe parameters to addContact are space separated and since each of the parameters is marked as required using <>, you must provide all the parameters.
addContact的参数以空格分隔,并且由于每个参数都使用<>标记为必需,因此必须提供所有参数。
We can also use alias instead of the full command name. Now, let's retrieve the contact we just added
我们也可以使用alias代替完整的命令名。 现在,让我们检索刚刚添加的联系人
$ node contact.js r john# Notice we used r which is an alias for getContact.####** Step 4 of 5: Interactive runtime user inputs** We can accept and parse command-line arguments, thanks to commander.js. However, we can enhance the user experience by allowing a user respond to questions in a more interactive way. Let's use inquirer.js for user interface and inquiry session flow.
#### **第5步,共4步:交互式运行时用户输入**感谢commander.js,我们可以接受和解析命令行参数。 但是,我们可以通过允许用户以更具交互性的方式回答问题来增强用户体验。 让我们将inquirer.js用于用户界面和查询会话流。
First we define the questions to be presented to the user and based on the answer, we save the contact.
首先,我们定义要呈现给用户的问题,并根据答案保存联系人。
Let's update contact.js
让我们更新contact.js
.........
const { prompt } = require('inquirer'); // require inquirerjs library

// Craft questions to present to users
const questions = [
  {
    type : 'input',
    name : 'firstname',
    message : 'Enter firstname ...'
  },
  {
    type : 'input',
    name : 'lastname',
    message : 'Enter lastname ...'
  },
  {
    type : 'input',
    name : 'phone',
    message : 'Enter phone number ...'
  },
  {
    type : 'input',
    name : 'email',
    message : 'Enter email address ...'
  }
];
.........

program
  .command('addContact') // No need of specifying arguments here
  .alias('a')
  .description('Add a contact')
  .action(() => {
    prompt(questions).then(answers =>
      addContact(answers));
  });
..........
This looks a lot cleaner with some interactive flow. We can now do away with the parameters. prompt launches an inquiry session by presenting the questions to the user. It returns a promise, answers which is passed to our controller function, addContact.
通过一些交互流程,这看起来更加干净。 现在,我们可以取消参数。 prompt通过向用户呈现questions来启动查询会话。 它返回一个promise, answers将传递给我们的控制器函数addContact 。
Let's test our program again and respond to the prompt
让我们再次测试我们的程序并响应提示
$ node contact.js a# The Above command lauches a prompt
? Enter firstname .. John
? Enter lastname .. Doe
? Enter phone number .. +145****
? Enter email address .. john.doe@contacto.com
New contact added
第5步,共6步:将应用程序转换为Shell命令 (Step 5 of 6: Convert application to a shell command)
We are able to accept command-line arguments in an interactive way but what about we make our tool a regular shell command? The good news is, it's easy to achieve.
我们能够以交互方式接受命令行参数,但是如何使我们的工具成为常规的shell命令呢? 好消息是,这很容易实现。
First, we add #!/usr/bin/env node at the top of contact.js, which tells the shell how to execute our script, otherwise the script is started without the node executable.
首先,我们在contact.js的顶部添加#!/usr/bin/env node ,它告诉shell如何执行脚本,否则,脚本将在没有节点可执行文件的情况下启动。
#!/usr/bin/env node

const program = require('commander');
..............
Next, we configure the file to be executable. Let's update our package.json file with the necessary properties
接下来,我们将文件配置为可执行文件。 让我们使用必要的属性更新package.json文件
"name": "contacto",
...........
"preferGlobal": true,
  "bin": "./contact.js",
..........
First, we set preferGlobal to true because our application is primarily a command-line application that should be installed globally. And then we add bin property which is a map of command name to local file name. Since, we have just one executable the name should be the name of the package.
首先,我们将preferGlobal设置为true因为我们的应用程序主要是应该全局安装的命令行应用程序。 然后,我们添加bin属性,该属性是命令名到本地文件名的映射。 由于我们只有一个可执行文件,因此名称应为程序包的名称。
Finally, we create a symlink from contact.js script to /usr/local/bin/contact by running
最后,我们通过运行以下命令创建从contact.js脚本到/usr/local/bin/contact的符号链接
$ yarnlink # creates a symbolic link between project directory and executable command.Let's test that our tool now works globally. Open a new terminal and ensure you're not in your project directory.
让我们测试一下我们的工具现在可以在全球范围内工作了。 打开一个新终端,并确保您不在项目目录中。
$ contacto --help# Returns usage instructions.
$ contacto r john # Returns user detail.
Yes, our tool is ready to be shipped to the world. What a user needs to do is simply install it on their system and everything would be fine.
是的,我们的工具已准备好交付世界。 用户需要做的就是简单地将其安装在他们的系统上,一切都会好起来的。
第6步(共6步):更多应用程序逻辑 (Step 6 of 6: More application logic)
Now, we are able to add and get contact(s). Let's add the functionality to list, update, and delete contacts in the application. We have a problem though. How do we get a specific contact to update/delete since we don't have unique contraints? The only unique key is the _id. For this demo, let's use the _id from the database. This requires we first search for a contact and then select the _id of the contact we want to delete/update.
现在,我们可以添加并获取联系人。 让我们将功能添加到列表 , 更新和删除应用程序中的联系人。 我们有一个问题。 由于我们没有独特的约束,我们如何获得特定的联系人以进行更新/删除? 唯一的唯一键是_id 。 对于此演示,让我们使用数据库中的_id 。 这要求我们首先搜索联系人,然后选择要删除/更新的联系人的_id 。
Let's update logic.js.
让我们更新logic.js。
const mongoose = require('mongoose'); // An Object-Document Mapper for Node.js
const assert = require('assert'); // N.B: Assert module comes bundled with NodeJS.
mongoose.Promise = global.Promise; // Allows us to use Native promises without throwing error.

// Connect to a single MongoDB instance. The connection string could be that of remote server
// We assign the connection instance to a constant to be used later in closing the connection
const db = mongoose.connect('mongodb://localhost:27017/contact-manager');

// Convert value to to lowercase
function toLower(v) {
  return v.toLowerCase();
}

// Define a contact Schema
const contactSchema = mongoose.Schema({
  firstname: { type: String, set: toLower },
  lastname: { type: String, set: toLower },
  phone: { type: String, set: toLower },
  email: { type: String, set: toLower }
});

// Define model as an interface with the database
const Contact = mongoose.model('Contact', contactSchema);

/**
 * @function  [addContact]
 * @returns {String} Status
 */
const addContact = (contact) => {
  Contact.create(contact, (err) => {
    assert.equal(null, err);
    console.info('New contact added');
    db.disconnect();
  });
};

/**
 * @function  [getContact]
 * @returns {Json} contacts
 */
const getContact = (name) => {
  // Define search criteria
  const search = new RegExp(name, 'i');

  Contact.find({$or: [{firstname: search }, {lastname: search }]})
  .exec((err, contact) => {
    assert.equal(null, err);
    console.info(contact);
    console.info(`${contact.length} matches`);
    db.disconnect();
  });
};

/**
 * @function  [getContactList]
 * @returns {Sting} status
 */
const updateContact = (_id, contact) => {
  Contact.update({ _id }, contact)
  .exec((err, status) => {
    assert.equal(null, err);
    console.info('Updated successfully');
    db.disconnect();
  });
};

/**
 * @function  [deleteContact]
 * @returns {String} status
 */
const deleteContact = (_id) => {
  Contact.remove({ _id })
  .exec((err, status) => {
    assert.equal(null, err);
    console.info('Deleted successfully');
    db.disconnect();
  })
}

/**
 * @function  [getContactList]
 * @returns [contactlist] contacts
 */
const getContactList = () => {
  Contact.find()
  .exec((err, contacts) => {
    assert.equal(null, err);
    console.info(contacts);
    console.info(`${contacts.length} matches`);
    db.disconnect();
  })
}

// Export all methods
module.exports = {
  addContact,
  getContact,
  getContactList,
  updateContact,
  deleteContact
};
Also, update contact.js.
另外,更新contact.js。
#!/usr/bin/env node

const program = require('commander');
const { prompt } = require('inquirer');

const {
  addContact,
  getContact,
  getContactList,
  updateContact,
  deleteContact
} = require('./logic');

const questions = [
  {
    type : 'input',
    name : 'firstname',
    message : 'Enter firstname ..'
  },
  {
    type : 'input',
    name : 'lastname',
    message : 'Enter lastname ..'
  },
  {
    type : 'input',
    name : 'phone',
    message : 'Enter phone number ..'
  },
  {
    type : 'input',
    name : 'email',
    message : 'Enter email address ..'
  }
];

program
  .version('0.0.1')
  .description('contact management system')

program
  .command('addContact')
  .alias('a')
  .description('Add a contact')
  .action(() => {
    prompt(questions).then((answers) =>
      addContact(answers));
  });

program
  .command('getContact <name>')
  .alias('r')
  .description('Get contact')
  .action(name => getContact(name));

program
  .command('updateContact <_id>')
  .alias('u')
  .description('Update contact')
  .action(_id => {
    prompt(questions).then((answers) =>
      updateContact(_id, answers));
  });

program
  .command('deleteContact <_id>')
  .alias('d')
  .description('Delete contact')
  .action(_id => deleteContact(_id));

program
  .command('getContactList')
  .alias('l')
  .description('List contacts')
  .action(() => getContactList());

// Assert that a VALID command is provided
if (!process.argv.slice(2).length || !/[arudl]/.test(process.argv.slice(2))) {
  program.outputHelp();
  process.exit();
}
program.parse(process.argv)
It's time to test things out in the terminal
是时候在终端上进行测试了
$ contacto l# Lists all the contact in the app
$ contacto u <id of the contact to update> # Lauches inquiry session to get the new data to update with.
$ contacto d <id of the contact to delete> # Deletes a contact.
If you fail to provide any of the values, it's set to '"".
如果您未能提供任何值,则将其设置为'"" 。
Good news! You have built a command-line tool with Node.js.
好消息! 您已经使用Node.js构建了一个命令行工具。
结语 ( Wrap up )
Now, we know it's easy to build command-line tools with Node.js. The libraries used in this tutorial are not compulsory for building command-line application. We only used them to avoid being distracted with some tiny details. You can use Child process module from Node.js to achieve the same result natively.
现在,我们知道使用Node.js构建命令行工具非常容易。 本教程中使用的库对于构建命令行应用程序不是必需的。 我们仅使用它们来避免分散一些小细节。 您可以使用Node.js中的子进程模块来自然地获得相同的结果。
Yes, think of the tool we built and its use; think about its flaws and improve it.
是的,请考虑我们构建的工具及其使用; 考虑它的缺陷并加以改进。
翻译自: https://scotch.io/tutorials/build-an-interactive-command-line-application-with-nodejs
node 中进行命令行交互


 4万+
4万+

 被折叠的 条评论
为什么被折叠?
被折叠的 条评论
为什么被折叠?
 到【灌水乐园】发言


