


The precondition to freedom is security – Rand Beers
自由的前提是安全–兰德·比尔斯(Rand Beers)
Authentication is a pivotal part of the security of an API.
身份验证是API安全性的关键部分。
But first, some recap.
但首先,要回顾一下。
In part 1 of this series, we learnt about how to create a bucketlist API using the TDD approach. We covered writing tests in Django and also learnt a lot about the Django Rest Framework.
在本系列的第1部分中,我们学习了如何使用TDD方法创建存储桶API。 我们介绍了用Django编写测试的内容,还了解了有关Django Rest Framework的很多知识。
We'll be covering complementary topics in part 2 of our series. For the most part, we'll delve deeper into authenticating and authorizing users in the Django-driven bucketlist API. If you haven't checked part 1 yet, now is the chance to do so before we start crushing it.
我们将在本系列的第2部分中介绍补充主题。 在大多数情况下,我们将更深入地研究Django驱动的bucketlist API中的身份验证和授权。 如果您尚未检查第1部分 ,那么现在有机会在我们开始压碎它之前进行检查。
Ok... back to business!
好吧...回去营业!
身份验证与授权 (Authentication vs Authorization)
Authentication is usually confused with authorization. They are not the same thing.
身份验证通常与授权相混淆。 它们不是同一件事。
You can think of authentication as a way to verify someone's identify. (username, password, tokens, keys et cetera) and authorization as a method that determines the level of access a verified user should be granted.
您可以将身份验证视为验证某人身份的一种方法。 (用户名,密码,令牌,密钥等)和授权作为确定经过验证的用户的访问级别的一种方法应被授予。
When we look at our bucketlist API, it works for the most part. It however lacks capabilities such as knowing who created a bucketlist, whether a given user is authenticated in the first place or even whether the they have the right to effect changes onto a bucketlist.
当我们查看bucketlist API时,它大部分都可以工作。 但是,它缺乏诸如了解谁创建了存储桶列表,首先是否对给定用户进行身份验证,甚至他们是否有权对存储桶列表进行更改的权限等功能。
We need to fix that.
我们需要解决这个问题。
We'll implement authentication first and later drop in some authorization features.
我们将首先实现身份验证,然后再添加一些授权功能。
实施它 ( Implementing it )
Implementing authentication in a DRF API can be done. And the starting point is easy – You start by keeping track of the user.
可以在DRF API中实现身份验证。 起点很容易–您首先要跟踪用户。
So how do we achieve this? Django provides a default User model that we can play around with.
那么我们如何实现这一目标呢? Django提供了一个默认的User模型,我们可以使用它。
Ok. Let's get it done.
好。 让我们完成它。
We're going to create an owner field on the Bucketlist model. Here's why: A user can create a bucketlist – which means that a bucketlist has an owner. Therefore, we'll simply add a field definition of a user inside our bucketlist model.
我们将在Bucketlist模型上创建一个owner字段 。 原因如下:用户可以创建一个存储区列表-这意味着该存储区列表具有所有者。 因此,我们只需要在存储桶模型中添加用户的字段定义即可。
# rest_api/models.py

from django.db import models


class Bucketlist(models.Model):
    """This class represents the bucketlist model."""
    name = models.CharField(max_length=255, blank=False, unique=True)
    owner = models.ForeignKey('auth.User',  # ADD THIS FIELD
    related_name='bucketlists',
    on_delete=models.CASCADE)
    date_created = models.DateTimeField(auto_now_add=True)
    date_modified = models.DateTimeField(auto_now=True)

    def __str__(self):
        """Return a human readable representation of the model instance."""
        return "{}".format(self.name)
The owner fieild uses a ForeignKey class that accepts a number of arguments. The first one auth.User simply points to the model class we wish to create a relationship with.
所有者fieild使用一个ForeignKey类,该类接受许多参数。 第一个auth.User只是指向我们希望与其建立关系的模型类。
The foreign key will come from the model class auth.User to enable the relationship between the User and the Bucketlist models.
外键将来自模型类auth.User以启用 User和Bucketlist模型之间的关系。
After this is done, we'll have to run our migrations to reflect the model changes in our database.
完成此操作后,我们将必须运行迁移以在数据库中反映模型更改。
We'll run
我们会跑
python3 manage.py makemigrations rest_apiA point to note: When writing new fields on existing tables, you might encouter this:

需要注意的一点:在现有表上编写新字段时,您可能会对此感到困惑:
The database complains that we are trying to add a non-nullable field which should not be null or lacking a value. We need a value for it since we have pre-existing data on the database. A simple hack when under a development environment would be to delete the migrations folder inside your app and the db.sqlite3 file. This will get rid of the bucketlist we created last. We can always create a new one. However, you should never do this on a production environment because you'll lose all your DB data. A cleaner way to fix it is to provide a one-off default value. But if you have no records on your db, feel free to go with the deletion fix.
数据库抱怨我们试图添加一个不可为空的字段 ,该字段不能为null或缺少值。 因为我们在数据库中已有数据,所以我们需要一个值。 在开发环境下的一个简单技巧是删除应用程序内的migrations文件夹和db.sqlite3文件。 这将摆脱我们上次创建的存储桶列表。 我们总是可以创建一个新的。 但是,绝对不要在生产环境中执行此操作,因为这样会丢失所有数据库数据。 解决该问题的一种更干净的方法是提供一个一次性的默认值。 但是,如果您的数据库上没有记录,请随时使用删除修复程序。
After doing this, we'll commit the changes to our DB using the migrate command:
完成此操作后,我们将使用migration命令将更改提交到数据库:
python3 manage.py migrate重构测试 ( Refactoring Our Tests )
So far, we haven't written any tests that work with the new user authentication. We'll therefore have to refactor the existing test cases.
到目前为止,我们尚未编写任何适用于新用户身份验证的测试。 因此,我们将不得不重构现有的测试用例。
But first, we've got to know what to write.
但是首先,我们必须知道该写些什么。
Let's do some analysis. The changes we need to factor in are:
让我们做一些分析。 我们需要考虑的变化是:
- Bucketlist ownership by users – which points to integrating the default Django User model 用户的遗愿清单所有权–指向集成默认Django用户模型
- Ensure requests made are made by authenticated users – which means we'll enforce authentication before sending HTTP requests 确保发出的请求是由经过身份验证的用户发出的-这意味着我们将在发送HTTP请求之前执行身份验证
- Restrict bucketlist(s) creation to only authenticated users 将存储桶列表的创建限制为仅通过身份验证的用户
- Restrict existing bucketlist(s) to be accessed only by their owner 限制现有的存储桶列表只能由其所有者访问
These points will go a long way in guiding us to refactor our tests.
这些观点将在指导我们重构测试方面大有帮助。
重构ModelTestCase (Refactoring the ModelTestCase)
We'll import the default User model(django.contrib.auth.User) into our test module to create a user.
我们将默认的User模型(django.contrib.auth.User)导入我们的测试模块以创建一个用户。
# rest_api/tests.py
from django.contrib.auth.models import User
The user will help us test for the owner of the bucketlist. We'll create the User in our setUp method so that we don't have to create it every time we want to use it.
用户将帮助我们测试存储区列表的所有者。 我们将在setUp方法中创建User,这样我们就不必每次都要使用它时都创建它。
class ModelTestCase(TestCase):
    """This class defines the test suite for the bucketlist model."""

    def setUp(self):
        """Define the test client and other test variables."""
        user = User.objects.create(username="nerd") # ADD THIS LINE
     self.name = "Write world class code"
        # specify owner of a bucketlist
        self.bucketlist = Bucketlist(name=self.name, owner=user) # EDIT THIS TOO
Inside the setup method, we've just defined a test user by creating a user with a username. Then, we've added the instance of the user into the bucketlist class. The user is now the owner of that bucketlist.
在设置方法内部,我们只是通过创建具有用户名的用户来定义测试用户。 然后,我们将用户实例添加到了bucketlist类中。 用户现在是该存储桶列表的所有者。
重构ViewsTestCase (Refactoring the ViewsTestCase)
Since views deals with mainly making requests, we'll ensure only authenticated and authorized users have access to the bucketlist API.
由于视图主要处理发出的请求,因此我们将确保只有经过身份验证和授权的用户才能访问存储区API。
Let's write some code for it
让我们为它写一些代码
# rest_api/tests.py
# import fall here

# Model Test Case is here


class ViewTestCase(TestCase):
    """Test suite for the api views."""

    def setUp(self):
        """Define the test client and other test variables."""
        user = User.objects.create(username="nerd")

        # Initialize client and force it to use authentication
        self.client = APIClient()
        self.client.force_authenticate(user=user)

        # Since user model instance is not serializable, use its Id/PK
        self.bucketlist_data = {'name': 'Go to Ibiza', 'owner': user.id}
        self.response = self.client.post(
            reverse('create'),
            self.bucketlist_data,
            format="json")

    def test_api_can_create_a_bucketlist(self):
        """Test the api has bucket creation capability."""
        self.assertEqual(self.response.status_code, status.HTTP_201_CREATED)

    def test_authorization_is_enforced(self):
        """Test that the api has user authorization."""
        new_client = APIClient()
        res = new_client.get('/bucketlists/', kwargs={'pk': 3}, format="json")
        self.assertEqual(res.status_code, status.HTTP_401_UNAUTHORIZED)

    def test_api_can_get_a_bucketlist(self):
        """Test the api can get a given bucketlist."""
        bucketlist = Bucketlist.objects.get(id=1)
        response = self.client.get(
            '/bucketlists/',
            kwargs={'pk': bucketlist.id}, format="json")

        self.assertEqual(response.status_code, status.HTTP_200_OK)
        self.assertContains(response, bucketlist)

    def test_api_can_update_bucketlist(self):
        """Test the api can update a given bucketlist."""
        bucketlist = Bucketlist.objects.get()
        change_bucketlist = {'name': 'Something new'}
        res = self.client.put(
            reverse('details', kwargs={'pk': bucketlist.id}),
            change_bucketlist, format='json'
        )
        self.assertEqual(res.status_code, status.HTTP_200_OK)

    def test_api_can_delete_bucketlist(self):
        """Test the api can delete a bucketlist."""
        bucketlist = Bucketlist.objects.get()
        response = self.client.delete(
            reverse('details', kwargs={'pk': bucketlist.id}),
            format='json',
            follow=True)
        self.assertEquals(response.status_code, status.HTTP_204_NO_CONTENT)
We initialized the ApiClient and forced it to use authentication. This enforces the API's security. The bucketlist ownership has been factored in as well. Also, notice how we consistently use self.client in each test method instead of creating new ones? This is to ensure that we reuse the authenticated client. Reusability is good practice. :-) Great!
我们初始化了ApiClient并强制其使用身份验证。 这加强了API的安全性。 桶清单所有权也已考虑在内。 另外,请注意我们如何在每种测试方法中始终使用self.client而不是创建新方法? 这是为了确保我们重新使用经过身份验证的客户端。 可重用性是一种好习惯。 :-)太好了!
Run the tests. They should fail for now.
运行测试。 他们现在应该失败了 。
python3 manage.pytest rest_apiThe next step is to refactor our code to make these failing tests pass.
下一步是重构我们的代码,以使这些失败的测试通过。
如何通过那些测试! ( How To Pass Those Tests! )
首先,整合用户 (First, Integrate the User)
For the most part, any changes you make in your model should be reflected in your serializers too. This is because serializers interface directly with the model which aids in changing weird-looking query sets to json and vice versa.
在大多数情况下,您对模型所做的任何更改也应反映在序列化器中。 这是因为序列化程序直接与模型交互,这有助于将看起来很奇怪的查询集更改为json,反之亦然。
Let's edit our bucketlist serializer. We'll simply jump into the serializers.py file and write a custom field that we'll preferably call owner. This is the owner of a bucketlist.
让我们编辑存储桶序列化程序。 我们将简单地跳入serializers.py文件,并编写一个自定义字段,我们最好将其称为owner 。 这是时段清单的拥有者。
# rest_api/serializers.py

class BucketlistSerializer(serializers.ModelSerializer):
    """Serializer to map the model instance into json format."""

    owner = serializers.ReadOnlyField(source='owner.username') # ADD THIS LINE

    class Meta:
        """Map this serializer to a model and their fields."""
        model = Bucketlist
        fields = ('id', 'name', 'owner', 'date_created', 'date_modified') # ADD 'owner'
        read_only_fields = ('date_created', 'date_modified')
The owner field is read-only so that a user using our api cannot alter the owner of a bucketlist. Don't forget to add the owner into the fields as directed above.
owner字段是只读的,因此使用我们api的用户无法更改存储桶列表的所有者。 不要忘记按照上述指示将所有者添加到字段中。
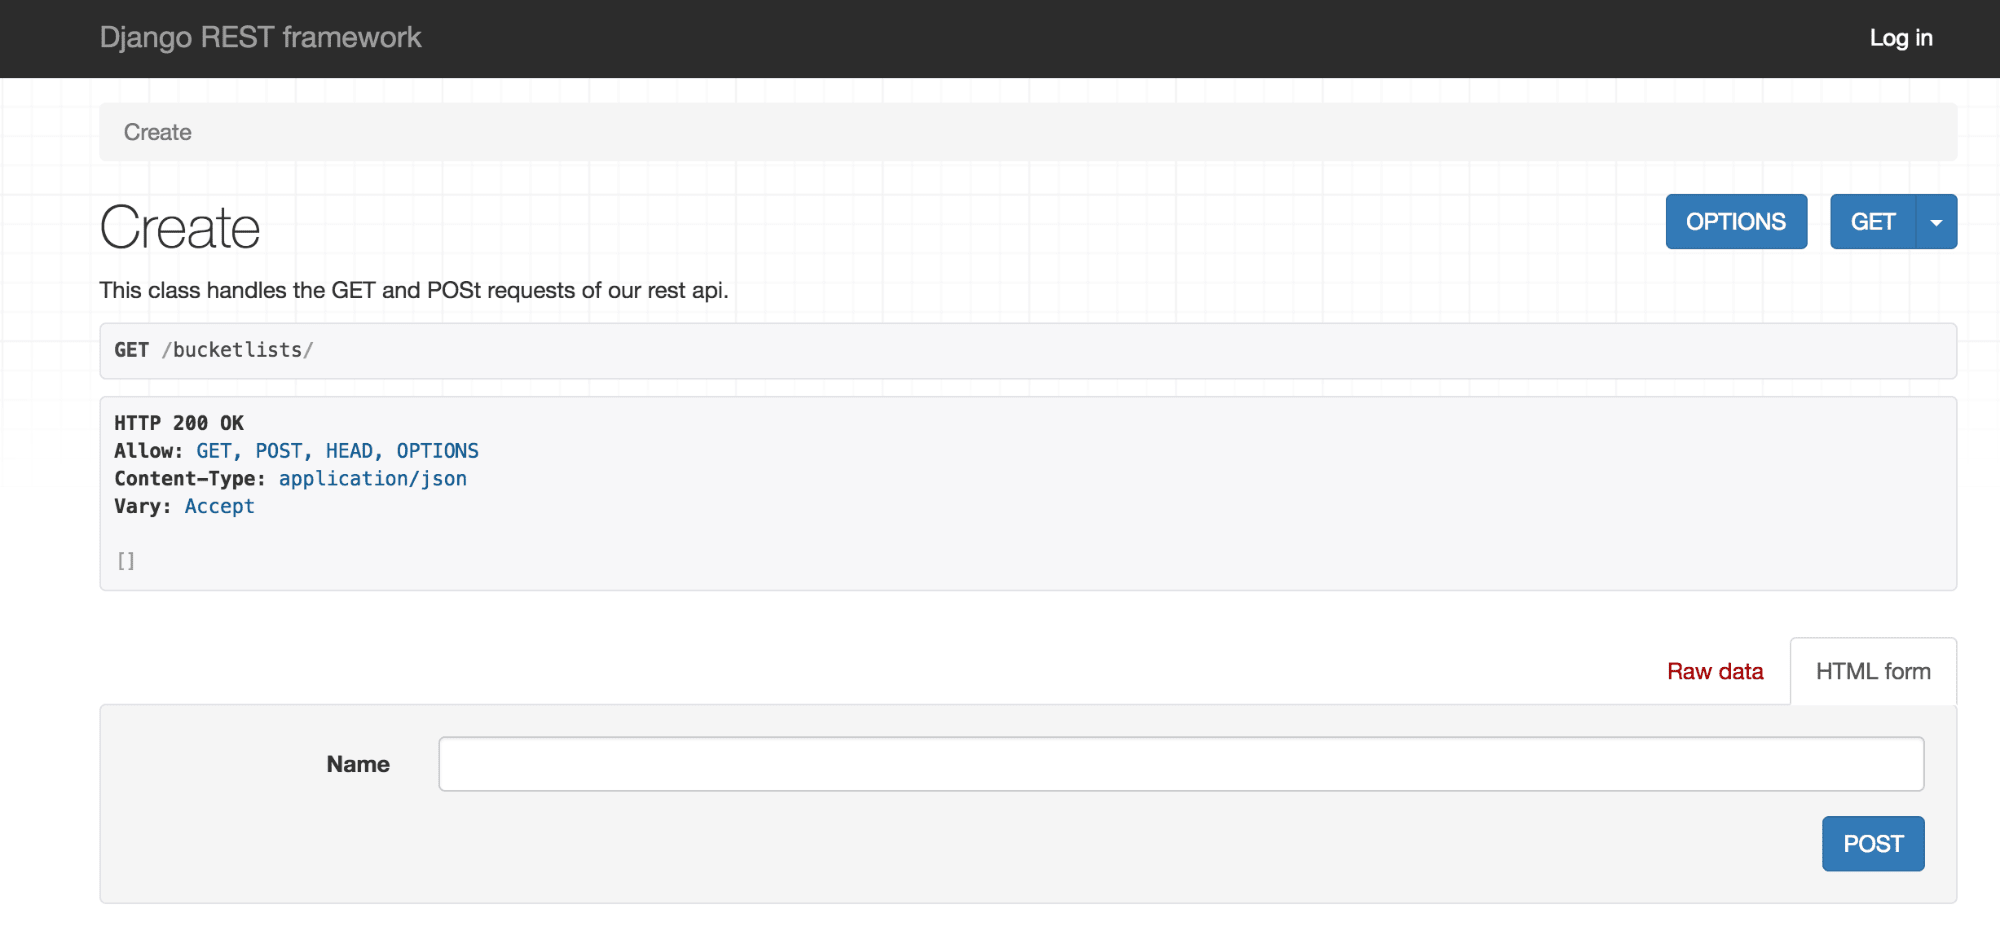
Let's run this and see if it works: Start the server python3 manage.py runserver
让我们运行它,看看它是否有效:启动服务器python3 manage.py runserver
When we access it from localhost, we should see something like this:
当我们从本地主机访问它时,我们应该看到如下所示:
Now, we need to make a way to save the owner when a new bucketlist is created. Saving a bucketlist is done in a class called CreateView that we defined in views.py. We'll edit our CreateView class by adding a perform_create(self, serializer) method. This method gives us control on how to save our serializer.
现在,我们需要一种在创建新的存储桶列表时保存所有者的方法。 保存存储桶列表是在我们在views.py定义的名为CreateView的类中完成的。 我们将通过添加perform_create(self, serializer)方法来编辑CreateView类。 这种方法使我们可以控制如何保存序列化程序。
# rest_api/views.py

# We are inside the CreateView class
...

    def perform_create(self, serializer):
            """Save the post data when creating a new bucketlist."""
            serializer.save(owner=self.request.user) # Add owner=self.request.user
The serializer.save() accepts field arguments. Here, we specified the owner argument. Why? Because our serializer has it as a field – which means that we can specify the owner in a serializer's save method that will then save the bucketlist with a user as its owner.
serializer.save()接受字段参数。 在这里,我们指定了owner参数。 为什么? 因为我们的序列化器将其作为字段–这意味着我们可以在序列化器的save方法中指定所有者,该方法然后将用户作为所有者的存储桶列表保存下来。
We should now get an error that looks like this when we try to create a bucketlist
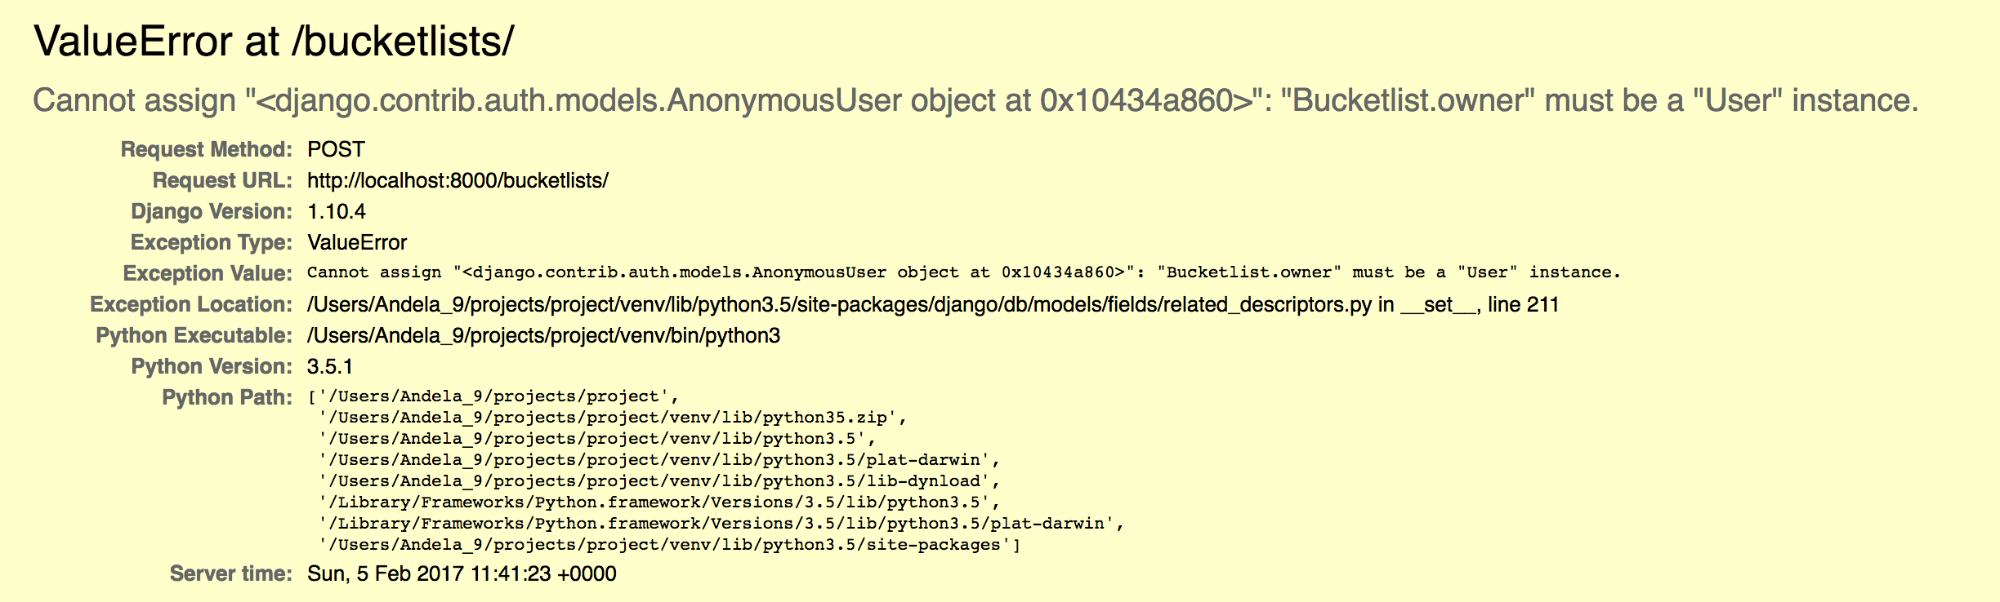 The DB complains. Why a Value Error? Good question – It's simply because we are trying to save a bucketlist from the browser
现在,当我们尝试创建存储桶列表时,我们应该会收到类似以下的错误 而不指定所有者 !
Our new non-nullable owner field needs a value before the serializer can validate and save a bucketlist.
在序列化程序可以验证并保存存储区列表之前,我们新的非空所有者字段需要一个值。
Let's fix that right away.
让我们立即修复它。
In our urls.py, we'll add a route for helping the user to log in to our api before creating a bucketlist. We do this to allow a bucketlist to have an owner, that is if the logged in user decides to create one.
在urls.py ,我们将添加一条路径,以帮助用户在创建存储区列表之前登录到我们的api。 我们这样做是为了使存储桶列表具有所有者,也就是说,如果登录用户决定创建一个所有者。
# rest_api/urls.py
# imports fall here

urlpatterns = {
    url(r'^auth/', include('rest_framework.urls', # ADD THIS URL
                               namespace='rest_framework')),
    url(r'^bucketlists/$', CreateView.as_view(), name="create"),
    url(r'^bucketlists/(?P<pk>[0-9]+)/$',
        DetailsView.as_view(), name="details"),
}

urlpatterns = format_suffix_patterns(urlpatterns)
This new line includes the DRF routes that provides a default login template to authenticate a user. You can call the route anything you want apart from auth.
此新行包括DRF路由,该路由提供了用于验证用户身份的默认登录模板。 除了auth之外,您还可以将路由命名为任何其他名称。
Save the file. It will automatically refresh the running server instance.
保存文件。 它将自动刷新正在运行的服务器实例。
You should now see a login button on the top right of the screen when you access http://localhost/bucketlists/
现在,当您访问http:// localhost / bucketlists /时,应该会在屏幕右上方看到一个登录按钮 。
Clicking the button will redirect to a login template.
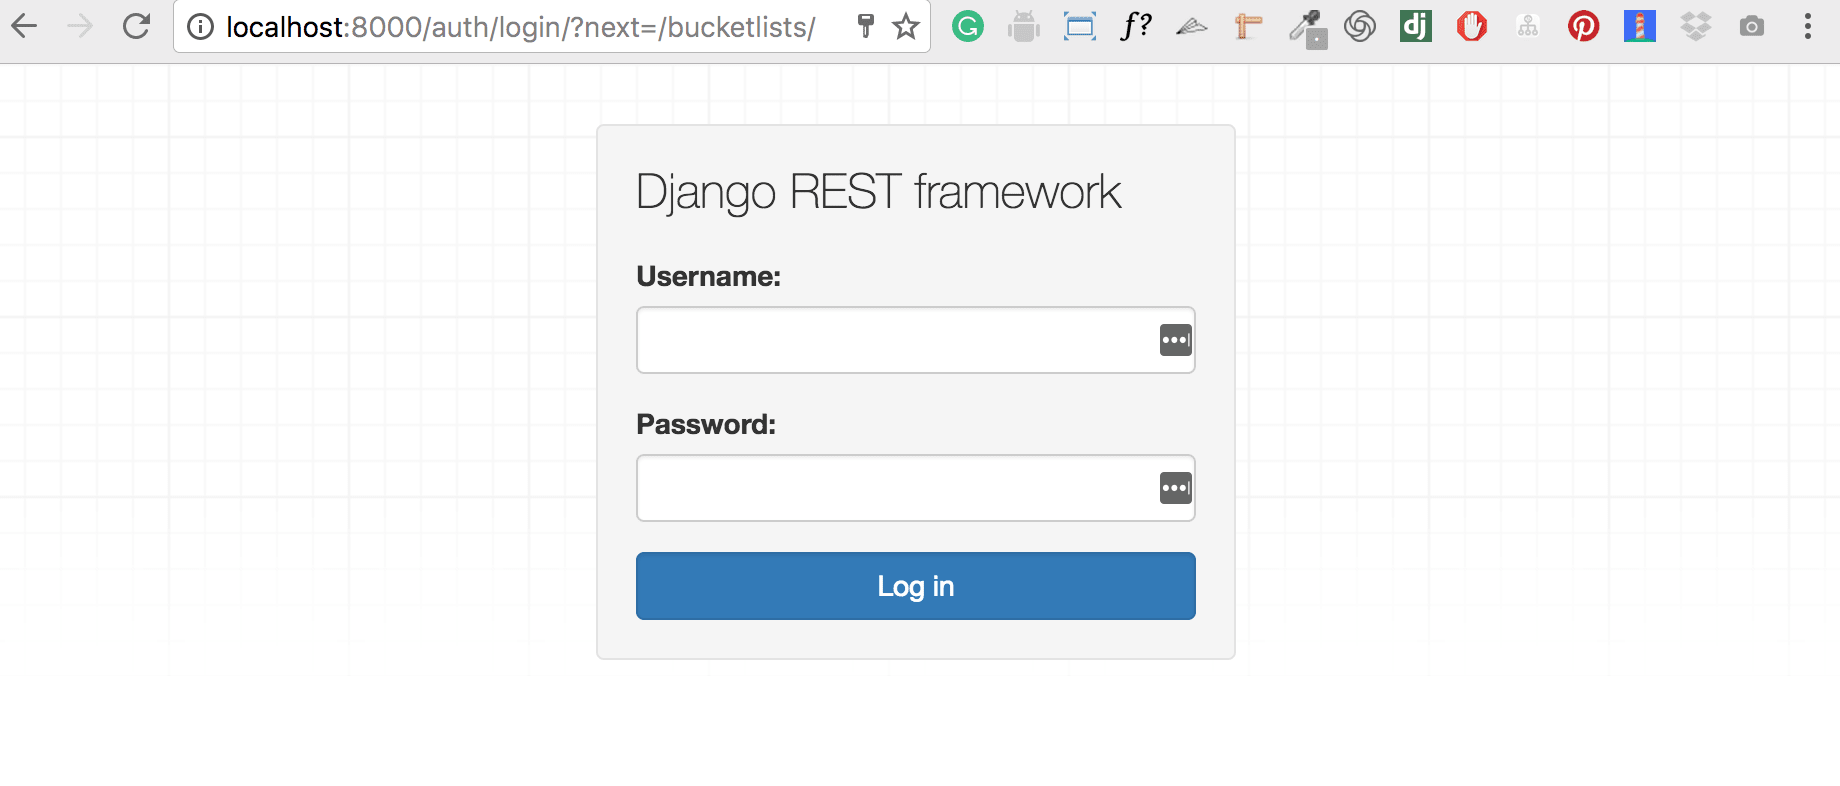
单击该按钮将重定向到登录模板。
Let's create a super-user for which to log in with.
让我们创建一个用于登录的超级用户 。
python3 manage.py createsuperuserLogging in should be a breeze with the username and password we just specified.
使用我们刚刚指定的用户名和密码登录,应该很容易。
授权:添加权限 (Authorization: Adding permissions)
Right now, any user can view and edit any bucketlist. We'd want to tie the user to their bucketlist so that only the owner can effect changes like editing and deletion to it.
现在,任何用户都可以查看和编辑任何存储区列表。 我们希望将用户绑定到他们的存储桶列表,以便只有所有者才能进行更改,例如对其进行编辑和删除。
默认权限检查 (A default permission check)
We can use the default permission package to restrict bucketlist access to authenticated users only.
我们可以使用默认权限包将存储桶列表访问限制为仅通过身份验证的用户。
In views.py we'll import the permission classes
在views.py中,我们将导入权限类
from rest_framework import permissionsThen inside our CreateView class we'll add the permission class IsAuthenticated.
然后在我们的CreateView类中,将添加权限类IsAuthenticated 。
# rest_api/views.py

class CreateView(generics.ListCreateAPIView):
    """This class handles the GET and POSt requests of our rest api."""
    queryset = Bucketlist.objects.all()
    serializer_class = BucketlistSerializer
    permission_classes = (permissions.IsAuthenticated,) # ADD THIS LINE
The permission class IsAuthenticated will deny permission to any unauthenticated user, and allow permission otherwise. We could have used IsAuthenticatedOrReadOnly which permits unauthenticated users if the request is one of the "safe" methods (GET, HEAD and OPTIONS). But we want full security – we'll stick to IsAuthenticated.
权限类IsAuthenticated将拒绝任何未经身份验证的用户的权限,否则允许该权限。 如果请求是“安全”方法( GET , HEAD和OPTIONS )之一,我们可以使用IsAuthenticatedOrReadOnly允许未经IsAuthenticatedOrReadOnly验证的用户。 但是我们需要全面的安全性-我们将坚持使用IsAuthenticated 。
自定义权限 (Custom Permission)
Right now, any authenticated user can see the other user's bucketlists. To implement the full concept of ownership, we'll have to create a custom permission.
现在,任何经过身份验证的用户都可以看到其他用户的存储桶列表。 要实现所有权的完整概念,我们必须创建一个自定义权限。
Let's create a file called permissions.py inside the rest_api directory. Inside this file, we write the following code:
让我们在rest_api目录中创建一个名为permissions.py的文件。 在此文件中,我们编写以下代码:
from rest_framework.permissions import BasePermission
from .models import Bucketlist


class IsOwner(BasePermission):
    """Custom permission class to allow only bucketlist owners to edit them."""

    def has_object_permission(self, request, view, obj):
        """Return True if permission is granted to the bucketlist owner."""
        if isinstance(obj, Bucketlist):
            return obj.owner == request.user
        return obj.owner == request.user
The class above implements a permission which holds by this truth – The user has to be the owner to have that object's permission. If they are indeed the owner of that bucketlist, it returns True, else False.
上面的类实现了一个拥有此真理的权限-用户必须是所有者才能拥有该对象的权限。 如果他们确实是该存储区列表的所有者,则返回True,否则返回False。
We just have to add it inside our permission_classes tuple and we are set. For clarity, the updated view.py should now look like this:
我们只需要将其添加到我们的permission_classes元组中就可以了。 为了清楚起见,更新后的view.py现在应如下所示:
# rest_api/views.py

from rest_framework import generics, permissions
from .permissions import IsOwner
from .serializers import BucketlistSerializer
from .models import Bucketlist


class CreateView(generics.ListCreateAPIView):
    """This class handles the GET and POSt requests of our rest api."""
    queryset = Bucketlist.objects.all()
    serializer_class = BucketlistSerializer
    permission_classes = (
        permissions.IsAuthenticated, IsOwner)

    def perform_create(self, serializer):
        """Save the post data when creating a new bucketlist."""
        serializer.save(owner=self.request.user)


class DetailsView(generics.RetrieveUpdateDestroyAPIView):
    """This class handles GET, PUT, PATCH and DELETE requests."""

    queryset = Bucketlist.objects.all()
    serializer_class = BucketlistSerializer
    permission_classes = (
        permissions.IsAuthenticated,
        IsOwner)
If we log out and try to get the bucketlists, we'll be hit by a HTTP 403 Forbidden response. This means that our authentication and authorization is actually working!
如果我们注销并尝试获取存储桶列表,则会被HTTP 403 Forbidden响应打中。 这意味着我们的身份验证和授权实际上是有效的!
Awesome!
太棒了!

Finally, we run our tests and see whether they'll pass:
最后,我们运行测试,看看它们是否可以通过:
python3 manage.pytest
Moving on swiftly.
快速前进。
基于令牌的身份验证呢? ( What about Token-based Authentication? )
Token authentication is appropriate for client–server setups especially when the consumption clients are native desktop or native mobile.
令牌认证适用于客户端-服务器设置,尤其是在使用消费客户端为本机桌面或本机移动设备时。
This is how it works – A user requests a security token from the server. The server generates the token and associates it with that user. After sending the token, the server waits for the user to request for resources using that specific token. The user can then use the token to authenticate and prove to the server that he/she is indeed a valid user.
这是这样的-用户从服务器请求安全令牌。 服务器生成令牌并将其与该用户关联。 发送令牌后,服务器将等待用户使用该特定令牌请求资源。 然后,用户可以使用令牌来验证身份并向服务器证明他/她确实是有效用户。
For us to use token authentication in our API, we'll have to set up some configurations on the settings.py file.
为了让我们在API中使用令牌身份验证,我们必须在settings.py文件上settings.py一些配置。
Let's add rest_framework.authtoken in our list of installed apps – like this:
让我们在已安装的应用程序列表中添加rest_framework.authtoken ,如下所示:
# project/settings.py

INSTALLED_APPS = (
    'django.contrib.admin',
    'django.contrib.auth',
    'django.contrib.contenttypes',
    'django.contrib.sessions',
    'django.contrib.messages',
    'django.contrib.staticfiles',
    'rest_framework',
    'rest_api', # note the comma (if you lack it, errors! the horror!)
    'rest_framework.authtoken' # ADD THIS LINE
)
Every time we create a user, we'd like to also create a security token for them. But how do we ensure that a user creation will also trigger a token creation?
每次创建用户时,我们都希望为其创建一个安全令牌。 但是,我们如何确保用户创建也会触发令牌创建?
Enter signals.
输入信号。
Django comes packed with a signal dispatcher. A dispatcher is like a messanger sent forth to notify others about an event that just happened. When a user is created, a post_save signal will be emitted by the User model. A receiver(which is simply a function) will then help us catch this post_save signal and immediately create the token.
Django配备了信号分配器 。 调度员就像发出通知的人一样,将刚刚发生的事件通知其他人。 创建用户时,User模型将发出post_save信号。 然后, 接收器 (仅是一个函数)将帮助我们捕获此post_save信号并立即创建令牌。
Our receiver will live in our models.py file. A couple of imports to add: the post_save signal, the default User model, the Token model and the receiver:
我们的接收器将存在于我们的models.py文件中。 要添加几个导入: the post_save signal , the default User model , the Token model和the receiver :
from django.db.models.signals import post_save
from django.contrib.auth.models import User
from rest_framework.authtoken.models import Token
from django.dispatch import receiver
Then write the receiver at the bottom of the file like this:
然后像下面这样将接收器写入文件的底部:
# rest_api/models.py
from django.db.models.signals import post_save
from django.contrib.auth.models import User
from rest_framework.authtoken.models import Token
from django.dispatch import receiver

class Bucketlist(models.Model):
    """This class represents the bucketlist model."""
    name = models.CharField(max_length=255, blank=False, unique=True)
    owner = models.ForeignKey(
        'auth.User',
        related_name='bucketlists',
        on_delete=models.CASCADE)
    date_created = models.DateTimeField(auto_now_add=True)
    date_modified = models.DateTimeField(auto_now=True)

    def __str__(self):
        """Return a human readable representation of the model instance."""
        return "{}".format(self.name)

# This receiver handles token creation immediately a new user is created.
@receiver(post_save, sender=User)
def create_auth_token(sender, instance=None, created=False, **kwargs):
    if created:
        Token.objects.create(user=instance)
Note that the receiver is NOT indented inside the Bucketlist model class. It's a common mistake to indent it inside the class.
请注意, Bucketlist模型类中的接收方不是缩进的 。 在类中缩进是一个常见的错误。
We also need to provide a way for the user to obtain the token. A url will serve the purpose. Write the following lines of code on the urls.py:
我们还需要为用户提供一种获取令牌的方法。 网址将达到目的。 在urls.py上编写以下代码行:
# rest_api/urls.py
from rest_framework.authtoken.views import obtain_auth_token # add this import

urlpatterns = {
    url(r'^bucketlists/$', CreateView.as_view(), name="create"),
    url(r'^bucketlists/(?P<pk>[0-9]+)/$',
        DetailsView.as_view(), name="details"),
    url(r'^auth/', include('rest_framework.urls',
                           namespace='rest_framework')),
    url(r'^users/$', UserView.as_view(), name="users"),
    url(r'users/(?P<pk>[0-9]+)/$',
        UserDetailsView.as_view(), name="user_details"),
    url(r'^get-token/', obtain_auth_token), # Add this line
}

urlpatterns = format_suffix_patterns(urlpatterns)
The rest framework is so powerful that it provides a built-in view which handles obtaining the token when a user posts their username and password.
rest框架是如此强大,它提供了一个内置视图,该视图可在用户发布用户名和密码时处理获取令牌的过程。
We'll go ahead with making migrations and migrate the changes to the database so that our app can tap the power of this built-in view.
我们将继续进行迁移并将更改迁移到数据库,以便我们的应用程序可以利用此内置视图的强大功能。
python3 manage.py makemigrations&& python3 manage.py migrateFinally, we add some configs to the settings so that our app can authenticate with both BasicAuthentication and TokenAuthentication.
最后,我们在设置中添加一些配置,以便我们的应用程序可以同时使用BasicAuthentication和TokenAuthentication进行身份验证。
# project/settings.py

REST_FRAMEWORK = {
    'DEFAULT_PERMISSION_CLASSES': (
        'rest_framework.permissions.IsAuthenticated',
    ),
    'DEFAULT_AUTHENTICATION_CLASSES': (
        'rest_framework.authentication.BasicAuthentication',
        'rest_framework.authentication.TokenAuthentication',
    )
}
The DEFAULT_AUTHENTICATION_CLASSES config tells the app that we wish to configure more than one ways of authenticating the user. We specify the ways by referencing the built-in authentication classes inside this tuple.
DEFAULT_AUTHENTICATION_CLASSES配置告诉应用程序我们希望配置多种验证用户身份的方法。 我们通过引用该元组中的内置身份验证类来指定方法。
运行 ( Run it )
Once saved, the server will automagically restart with the added changes if it's already running. However, it's good to just rerun the server with python3 manage.py runserver
保存后,如果服务器已经在运行,它将自动以添加的更改重启。 但是,最好使用python3 manage.py runserver重新运行服务器
To visually test whether our api still stands, we'll make the HTTP requests on Postman
为了直观地测试我们的api是否仍然站立,我们将在Postman上发出HTTP请求
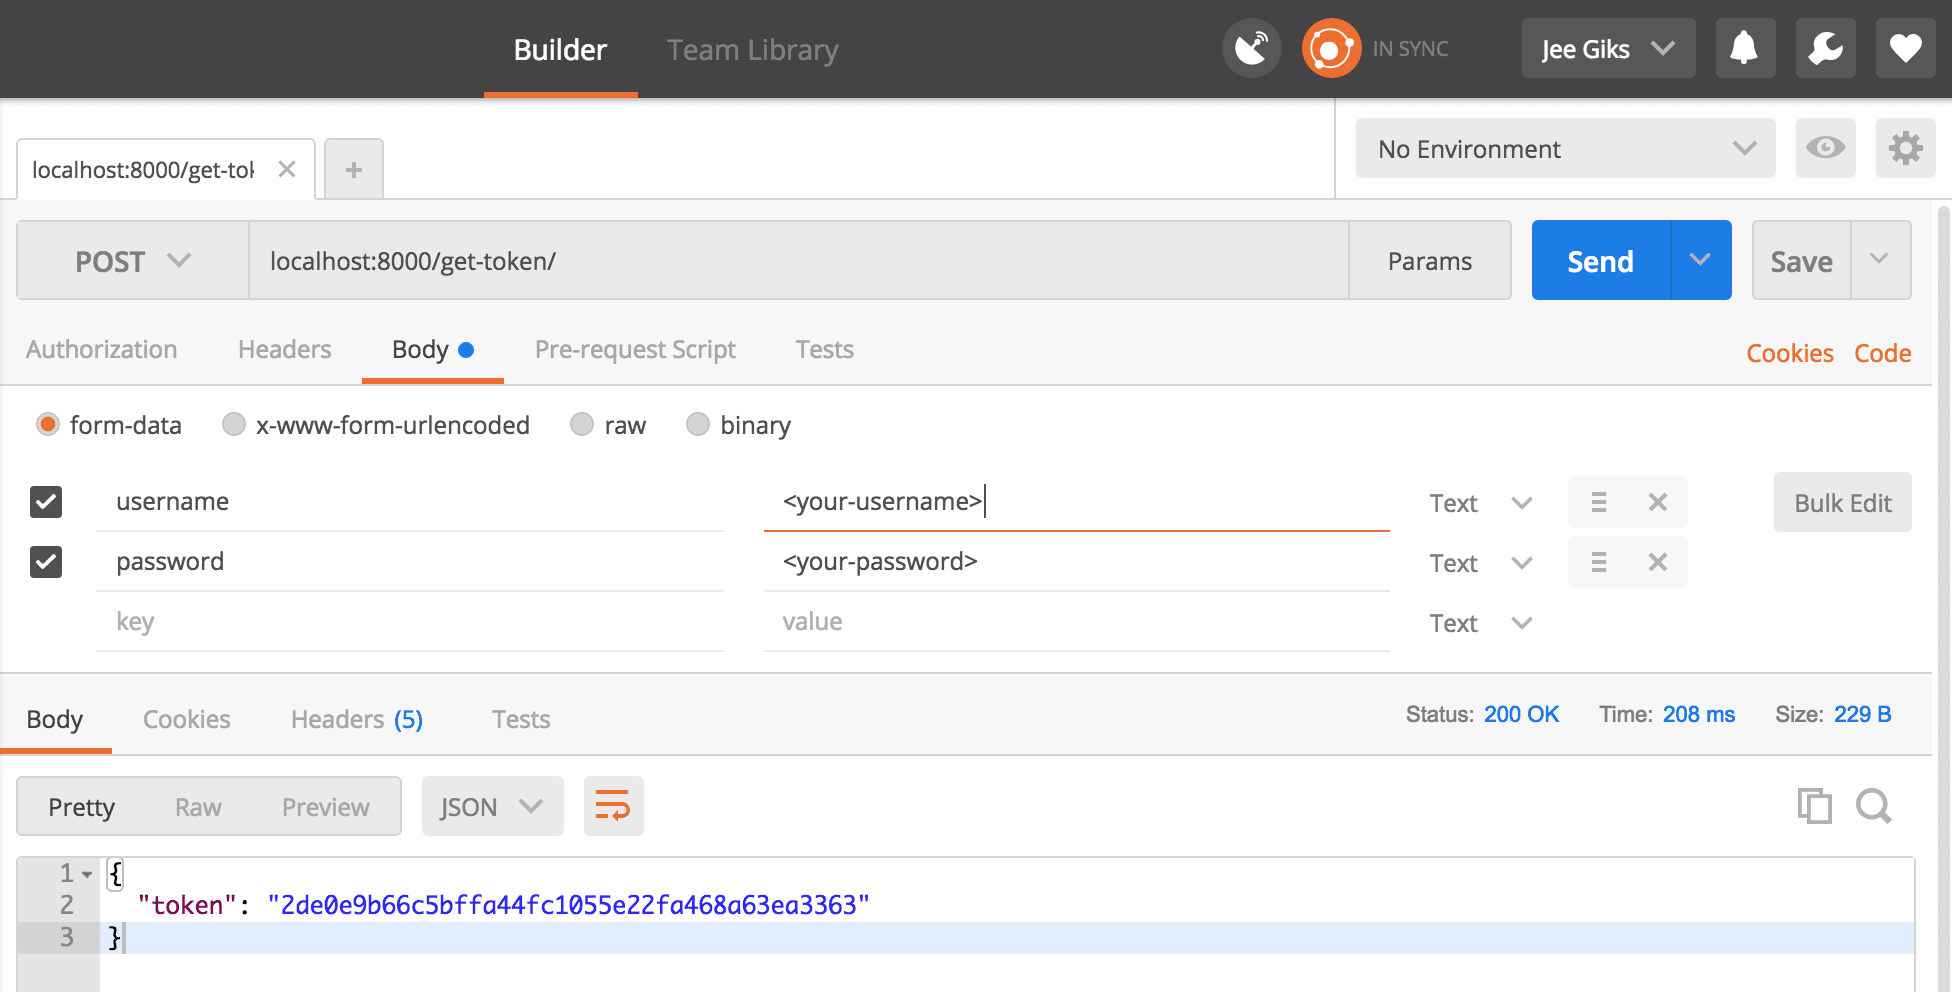
邮递员步骤1:获取该令牌 (Postman Step 1: Obtain that token)
For clients to authenticate, the token obtained should be included in the Authorization HTTP header. We prepend the word Token followed by a space character. The header should look like this:
为了使客户端进行身份验证,获得的令牌应包含在Authorization HTTP标头中。 我们在单词Token前面加上一个空格字符。 标头应如下所示:
Authorization: Token 2777b09199c62bcf9418ad846dd0e4bbdfc6ee4b
Authorization: Token 2777b09199c62bcf9418ad846dd0e4bbdfc6ee4b
Don't forget to put the space in between.
别忘了在两者之间放置空格。
We'll make a post request to http://localhost:8000/get-token/, specifying the username and password in the process.
我们将向http://localhost:8000/get-token/发出发布请求,并在此过程中指定用户名和密码。
邮递员步骤2:在授权标头中使用获得的令牌 (Postman Step 2: Use obtained token in Authorization header)
For the subsequent requests, we'll have to include the Authorization header if we ever want to access the API resources.
对于后续请求,如果我们想访问API资源,则必须包含Authorization标头。
A common mistake that might cause errors here is inputing an incorrect format for the Authorization header. Here's a common error message from the server:
一个可能导致错误的常见错误是为Authorization标头输入了错误的格式。 这是来自服务器的常见错误消息:
{
  "detail": "Authentication credentials were not provided."
}
Ensure you input this format instead– Token <your-new-token-is-here>. If you want to have a different keyword in the header, such as Bearer, simply subclass TokenAuthentication and set the keyword class variable.
请确保您输入的是此格式- Token <your-new-token-is-here> 。 如果要在标头中使用其他关键字(例如Bearer ,则只需将TokenAuthentication子类化,然后设置关键字class变量即可。
Let's try sending a GET request. It should yield something like this:
 Feel free to play around with your now well secured API.
让我们尝试发送GET请求。 它应该产生如下内容:
结论 ( Conclusion )
If you've read this to the end, you are awesome!
如果您读完这本书,那就太棒了!
We've covered quite a lot! From implementing user authentication to creating custom permissions for implementing authorization, we've covered most of securing a Django API.
我们已经介绍了很多内容! 从实施用户身份验证到创建用于实施授权的自定义权限,我们涵盖了保护Django API的大部分内容。
We also conveniently defined a token-based authentication layer so that mobile and desktop clients can securely consume our API. But the most important thing is that we refactored our tests to accomodate the changes. This is paramount to anything else and remains the heart of Test Driven Development.
我们还方便地定义了基于令牌的身份验证层,以便移动和桌面客户端可以安全地使用我们的API。 但是最重要的是我们重构了测试以适应变化。 这对其他任何事情都至关重要,并且仍然是测试驱动开发的核心。
If you get to that point where you ask yourself, "what is going on here?", I highly recommend you take a look at Part 1 of this series which aptly provides a detailed tutorial on building a bucketlist API the TDD way.
如果您问自己“ 这是怎么回事? ”,那么我强烈建议您看一下本系列的第1部分 ,该部分适当地提供了有关以TDD方式构建桶列表API的详细教程。
Happy coding!
编码愉快!
翻译自: https://scotch.io/tutorials/build-a-rest-api-with-django-a-test-driven-approach-part-2


 451
451

 被折叠的 条评论
为什么被折叠?
被折叠的 条评论
为什么被折叠?
 到【灌水乐园】发言


